
GLS ShopDelivery
GLS is a logistics company operating in 42 European countries – and worldwide though partnership networks. It is currently the 3rd largest parcel provider in Europe.
The most commonly used GLS delivery service is the GLS ShopDelivery, where a parcel is delivered to a shop near the delivery address.
In order to integrate GLS delivery in your Dynamicweb Ecommerce solution:
- Your products must have weights in kg in their product details – read more about weight here – which is required by GLS for planning purposes
- Orders must be created with a delivery zip, city and address specified – used both for regular deliveries and for looking up ShopDelivery shops close to the delivery address
The GLS shipping provider is only implemented for Danish addresses – i.e. international shipping is not part of the integration.
Delivery time estimation and freight and tracking services are not implemented either.
Creating a GLS account
Before setting up deliveries with GLS ShopDelivery, you need to contact GLS and set up an account.
They will provide you with an account number, which you will use when going live. For testing purposes, however, any number will do.
Configuring the shipping provider
In order to set up deliveries with GLS, you must configure the GLS Shipping provider.
To do so:
- Create or edit a shipping method in the Management Center > Ecommerce > Orders > Shipping following the regular procedure
- Select the GLS shipping provider from the dropdown menu
- Fill in the necessary parameters (Figure 3.1)
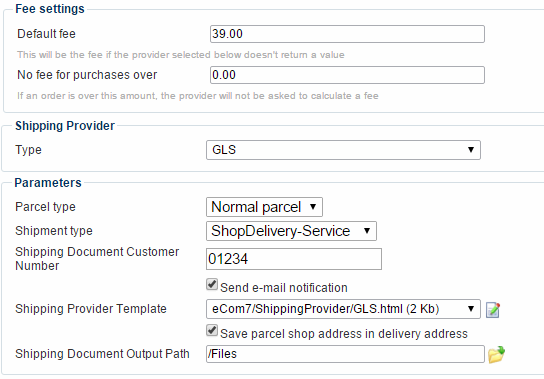
You must:
- Select a parcel type – normal, pallet or small parcel
- Select a shipment type – usually ShopDelivery Service
- Enter your customer number – use 01234 for testing, and replace with your real GLS customer number when going live
- Check Send email notifications if you want GLS to notify customers that their order has shipped. If used, please ensure that you always submit a customer email along with the regular customer details, or no notification will be sent.
- Select, edit or create a template for rendering a list of parcel shops close to the customer address – and check the save parcel shop address in delivery address checkbox if you want to automatically save the parcel shop address as the delivery address in your order details.
- You may also specify a custom Shipping Document Output Path – this is the folder where the .csv files generated when creating shipping documents can be found
GLS fees and prices
Please note, that the GLS shipping provider does not fetch fees or rates – rather, the way to set it up is to create a shipping method per parcel or shipment type, and manually enter a fixed fee in the fee settings, as in the screenshot above. The GLS shipping provider merely fetches nearby ShopDelivery locations.
For other types of GLS delivery, we recommend you use the Fee Rules shipping provider.
Modifying your templates to render parcel shops
Once your shipping method has been created, you will need to modify your order flow templates to list ShopDelivery locations (ParcelShops) close to the user’s address.
To do so, use the <!--@Ecom:ShippingProvider.Content--> tag within the Shippingmethods loop.
Once set up, a customer going through the order flow entering valid address detail (address, zip and city) will be presented with a list of parcel shops nearby.
The customer selects one, and – if you use the Save parcel shop address setting – the parcel shop address is saved as the delivery address in the order details once the order is completed.
You can then go to the order details and create shipping documents for the order, and then manually upload these to GLS Interline 7.0 Service – read more here.