FedEx Address Validation Service
The FedEx Address Validation Service supports validating Canadian, US and Puerto Rican addresses only.
If you use the FedEx shipping provider, you can use the FedEx Address Validation Service to validate or complete recipient addresses.
This is a service provided by FedEx – and supported by Dynamicweb.
Please note, however, that we are not responsible for any changes made by FedEx.
The process for setting up address validation with FedEx is as follows:
- Register a FedEx test account
- Configure Dynamicweb to work with the test credentials
- Modify your templates to use address validation
- Test your setup
- Exchange test credentials with actual credentials
- Go live
Here’s how!
Registering a FedEx test account
To get started with FedEx, you need to register a FedEx test account:
To do so:
- Sign up at the FedEx Developer Resource Center and request a developer test key.
- Once you have filled out the required form, the following will be mailed to you:
- A test Key
- A test Account
- A test Meter Number
- A test Password
You can use these, along with the Production service URL for testing - https://wsbeta.fedex.com:443/web-services/rate - to test your setup before going live.
Read more in the FedEx Get started documentation.
Configuring a Dynamicweb address validator
To test your setup you must create and configure an address validation provider in your Dynamicweb backend administration.
To do so:
- Go to Management Center > Ecommerce > Orders > Address validation and click new in the toolbar (Figure 3.1)

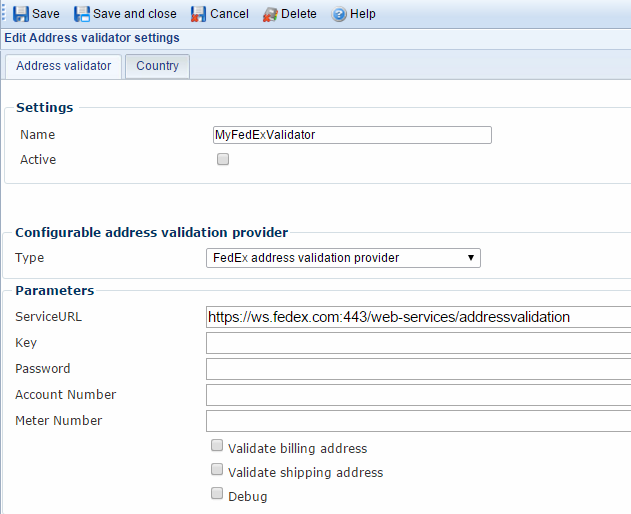
This opens the address validator window (Figure 3.2).

You must:
- Name the address validator
- Check the Active checkbox to activate it
- Select the FedEx address validation provider from the dropdown menu
- Write your test service URL in the Service URL field, and your test account credentials in the other appropriate fields
- Select what you want to validate – the billing address or shipping address or both
- Go to the Country tab and select the countries you want the validator to be active for
- Save the validator
Once you have completed your steps, you are ready to test your setup.
The debug checkbox
The debug checkbox activates a log of requests and responses from FedEx when enabled. The log is created in:
System\Log\eCom\AddressValidatorProvider\Dynamicweb.eCommerce.Cart.ShippingProviders.AddressValidation.FedexAddressValidationProvider
Modifying your templates
To implement the address validation service in your order flow, you can use the AddressValidators loop and its associated tags. From this loop, you have access to the Ecom:Order.AddressValidator.ErrorMessage loop, which renders address validation errors if the validation fails.
You can find an example of address validation in the default Shopping Cart template InformationAddressValidation.html template, which is located in Files/Templates/eCom7/CartV2/Step.
The FedEx Address Validation Service requires you to always supply the following: Delivery zip, city, state/province and address.
Going live
Once your tests are complete, you must replace the test credentials used above with a new set of actual credentials (Meter number, authentication key, password).
You need to request these credentials from the FedEx Developer Resource Center using a valid FedEx account number– read more about the process in the FedEx Get started documentation.
A production meter number is required for each location you ship from, but your key and password can be used with multiple locations.
If you already have the required production credentials, you can get a production key here - you need to login with your credentials.

