
Beanstream
Beanstream provides merchant account services in the United States and Canada. The Beanstream merchant gateway helps businesses easily process payments through any method (order forms, shopping cart, or manual orders).
Beanstream processes payments in the back end, so when a customer submits payment through the Beanstream gateway, they never leave your company website.
Limitations
- The Beanstream Checkout Handler only supports USA and Canada
- The checkout handler only supports Canadian and US dollar processing for VISA, MasterCard, American Express, Diners, Discover, JCB, and Sears. While the Beanstream system can handle all of these cards, merchants must acquire merchant accounts for each card type they wish to accept on their website
It is possible to process other credit cards than the default ones (Visa and MasterCard) through their gateway, but in order to use other cards you need to contact Beanstream sales. Read more here: http://www.beanstream.com/e-commerce/#credit-cards
Creating a test account
To start with, you must create a test account here http://developer.beanstream.com/quick-start/.
Afterwards, you must setup your Beanstream account.
- Login to the Beanstream administration: https://www.beanstream.com/admin/sDefault.asp with the credentials from the registration form
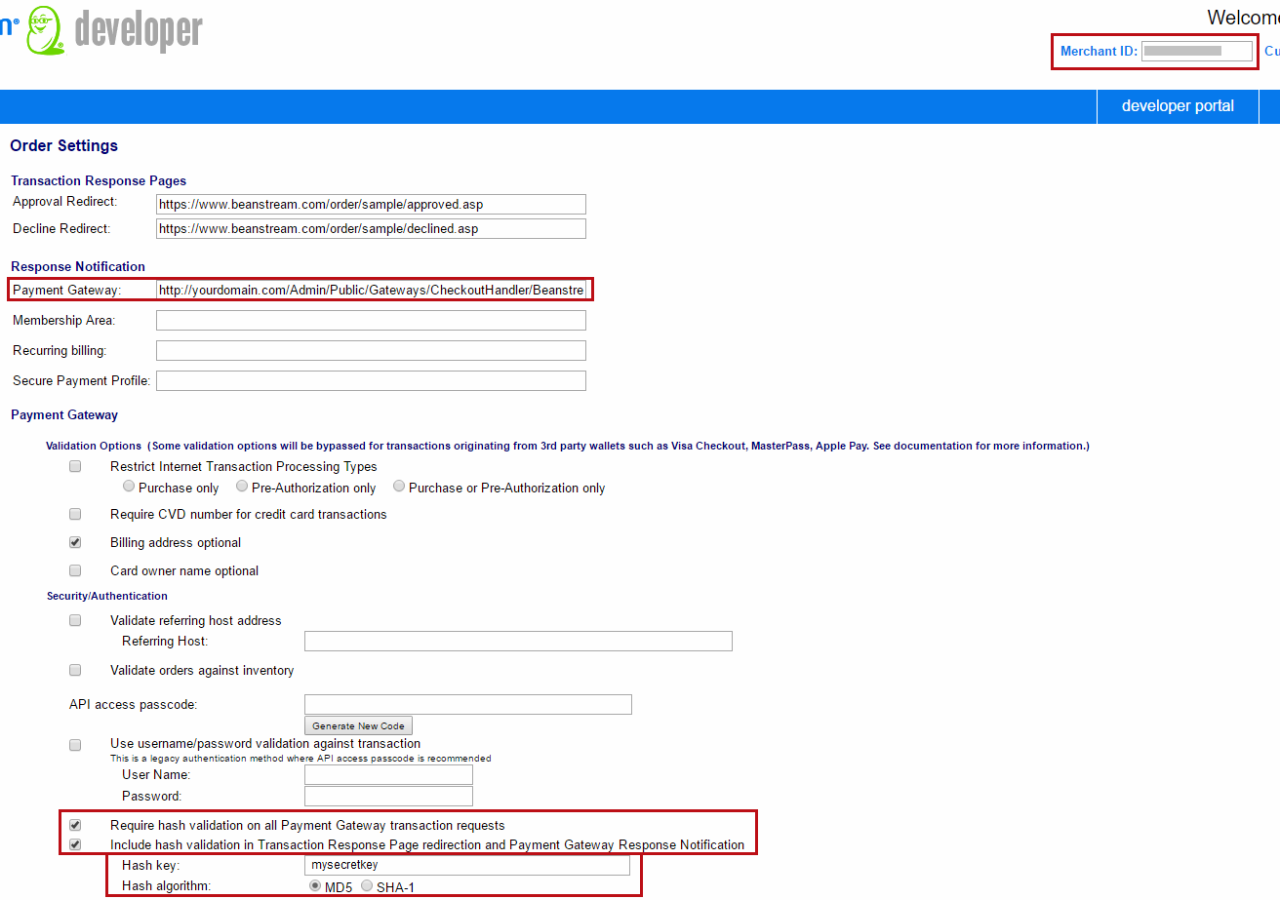
- Go to Administration > Account settings > Order settings:
- Set Payment Gateway (Optional). Example: http://yourdomain.com/Admin/Public/Gateways/CheckoutHandler/Beanstream/BeanstreamFormCallBack.aspx
- Enable Require hash validation on all Payment Gateway transaction requests (Required)
- Enable Include hash validation in Transaction Response Page redirection and Payment Gateway Response Notification (Required)
- Insert a new Hash key (secret key) or use the one that is generated randomly for you (Required). This is used in the Hash key field in Dynamicweb administration
- Select MD5 in Hash algorithm (Required)
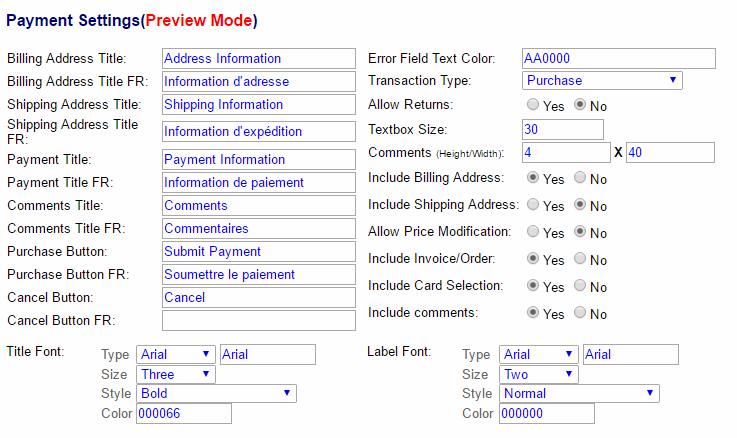
- Go to Configuration > Payment form to setup your payment form
And that’s it!
Configuring the checkout handler
Once your account has been configured, you can create and configure the matching payment method in Dynamicweb.
To do so:
- Create or edit a payment method in the Management Center > Ecommerce > Orders > Payment following the regular procedure
- Select the Beanstream hosted form checkout handler from the dropdown
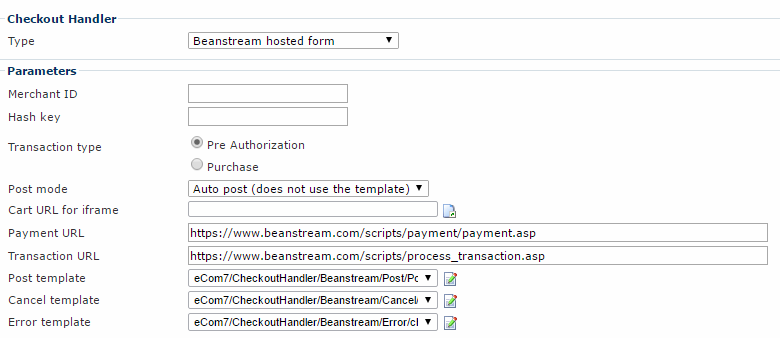
- Fill in the associated parameters (Figure 3.1)
You must:
- Enter your Merchant ID provided by mail from Beanstream. You can also check it in the upper right corner at the Beanstream developer site
- Enter your Hash key (secret key), the exact same one you inserted in the Beanstream Administration > Account settings > Order settings
- Choose a transaction type:
- Pre Authorization - The order is authorized at AuthorizeNET and then you can manually authorize from ecommerce backend order list.
You can configure the Pre Authorization transaction type which allows delayed capturing. This transaction type is required in countries where it is not allowed to authorize the credit card before you ship the order or you want to review the orders before shipping the products or simply do not have a product in stock at the moment. - Purchase - The amount is sent for authorization, and if approved, is automatically submitted for settlement.
Purchase is the most common type of credit card transaction. This type is completely automatic.
- Pre Authorization - The order is authorized at AuthorizeNET and then you can manually authorize from ecommerce backend order list.
- Choose a post mode:
- Auto post - in this case the post data is sent automatically to Beanstream.
- Render template - This allows you to customize the data that is sent to Beanstream, e.g. to use the payment form in an iframe. It uses the selected template in the Post template field.
- Insert the standard Payment and Transaction URLs - https://www.beanstream.com/scripts/payment/payment.asp and https://www.beanstream.com/scripts/process_transaction.asp
Additionally, you can:
- Provide a URL to cart for iframe if you want to use the payment form in an Iframe. You need to select a customized page with the shopping cart with the same layout.
- Customize any templates you want to use:
- Post template – the template that is used for posting transaction information to Beanstream if Post mode is set to Render template.
- Cancel template – template for message in case of cancelling.
- Error template – template for message in case of error.
The HTML template files are located in your File Manager in the folder /Templates/eCom7/CheckoutHandler/Beanstream.
trnCardNumber: For webform integrations, this field is not available by default. When enabled, the first digit and last four digits of the customer card number will be returned. Contact Beanstream Support to request that this parameter be included in your response.
Setting up an Iframed payment form
- Create a page with a cart module
- Select a page with a matching design in layouts (Example with a minimal design is attached to project - minimal.html)
- Change payment settings:
- Post mode: Select Render template
- Post template: Select the template post_iframe.html
- URL to cart for iframe: Select the cart page designed to this purpose from (1)
Testing
You should test your setup thoroughly before going live.
You can use the following card numbers for testing purposes:
- Visa 4030000010001234 (CVV 123)
- MasterCard 5100000010001004 (CVV 123)
- AMEX 371100001000131 (CVV 1234)
For more information, see Beanstream’s website.