
QuickPay Payment Window
QuickPay is a Payment Service Provider – a link between your shop and one or more acquirers, like Teller, PayPal or Nets.
The QuickPay Payment Window checkout handler is designed to work with QuickPay v10 – released in 2015 – which supports Danske Bank Mobile Pay online and embedded payment windows.
In this document, you can read about the basic setup process for QuickPay Payment Window in both Dynamicweb and the QuickPay administration.
For more information about the QuickPay v10 platform, please refer to the QuickPay documentation:
- Technical documentation (in english)
Since QuickPay v10 is a new platform, you can still use the old QuickPay checkout handler, which is based on more stable technology, for the foreseeable future.
If you want to use e.g. Danske Bank Mobile Pay online through QuickPay, you must use the v10 platform. If you want to use both, we recommend that you create and configure two separate QuickPay checkout handlers – a QuickPay Payment Window checkout handler locked to Mobile Pay, and a Quickpay 3 checkout handler handling the rest of your payments.
Limitations
- You need to use a public website in order to complete orders through QuickPay Payment Provider.
- QuickPay has support for handling transaction fees and cancellations/returns – but these are handled natively in Dynamicweb, and are not a part of the integration
Creating a QuickPay account
The QuickPay v10 platform does not have a dedicated test mode, so testing happens with your regular account and a number of test cards.
As long as you use those test cards only, using QuickPay is free.
To get started, sign up for an account at the QuickPay website – for a traditional web shop you should also create a merchant account.
Read more about getting your account ready for test.
Selecting or creating a QuickPay user
Once you have registered an account with QuickPay, you must configure your QuickPay Manager settings to ready the system for integrating with Dynamicweb.
Once you’ve selected or created a user, you can then get the IDs and Keys needed from there.
Selecting default user
You can either use the default user – called ‘Payment Window’ – or create a custom user.
To view or edit your default user:
- Login to https://manage.quickpay.net/
- Go to Settings - Users.
From here, you can see the API Key and the permissions for the default user.
Or you can create a custom user.
Creating a custom user
To create a custom user:
- Go to https://manage.quickpay.net/
- Go to Settings - Users.
- Click Create system user (Figure 5.1)
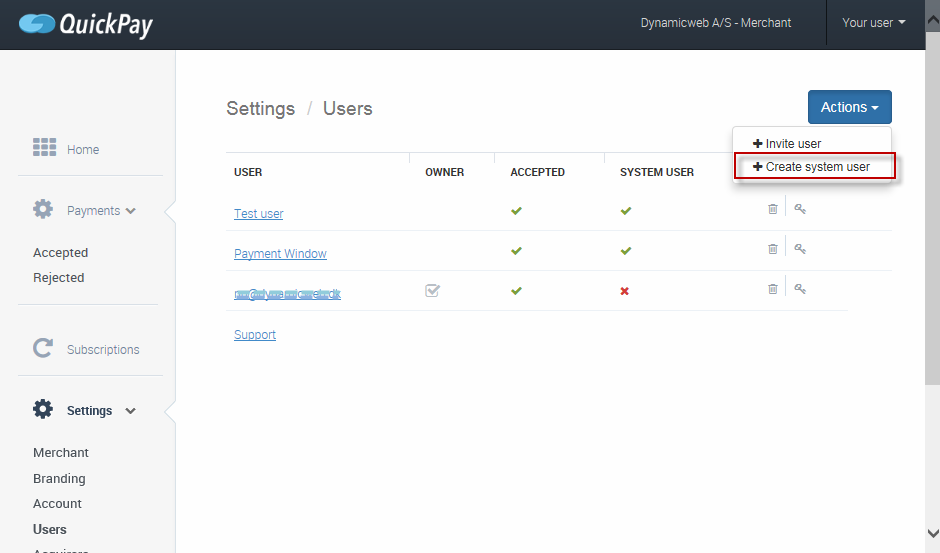
- Click on the created user to open and edit the user permissions view (Figure 5.2). See the default setup below.
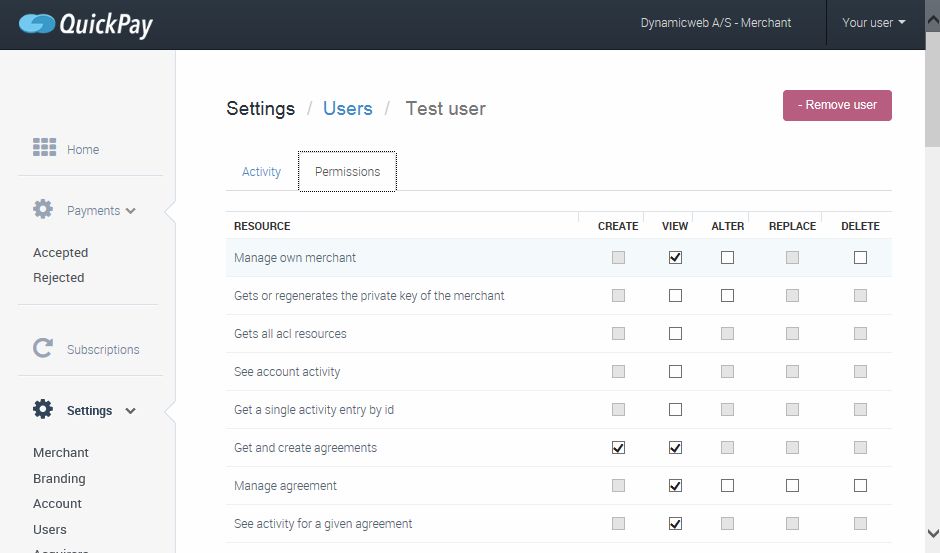
Default user permissions
The default user has the following default permissions set.
|
Resource |
Description |
Create |
View |
Alter |
Replace |
Delete |
|
/account |
Manage own merchant |
|
V |
|
|
|
|
/brandings/:id |
Get, update or delete a branding |
|
V |
|
|
|
|
/brandings/standard |
Get the QP standard branding |
|
V |
|
|
|
|
/cards |
Create cards |
V |
|
|
|
|
|
/cards/:id |
See card details |
|
V |
|
|
|
|
/cards/:id/authorize |
Authorize card |
V |
|
|
|
|
|
/cards/:id/operations/:operation_id |
Get card operation details |
|
V |
|
|
|
|
/cards/:id/tokens |
Create card token |
V |
|
|
|
|
|
/fees |
Create calculated fee from auth params |
V |
|
|
|
|
|
/payment-methods |
Get all available payment methods for specific acquirers |
|
V |
|
|
|
|
/payments |
See/create payments |
V |
V |
|
|
|
|
/payments/:id |
Get or update payment details |
|
V |
V |
|
|
|
/payments/:id/authorize |
Authorize payment |
V |
|
|
|
|
|
/payments/:id/capture |
Capture payment |
V |
|
|
|
|
|
/payments/:id/operations/:operation_id |
See payment operation details |
|
V |
|
|
|
|
/payments/:id/session |
Create payment session |
V |
|
|
|
|
|
/subscriptions |
Get/create subscriptions |
V |
|
|
|
|
|
/subscriptions/:id |
Get or update subscription details |
|
V |
V |
|
|
|
/subscriptions/:id/authorize |
Authorize subscription |
V |
|
|
|
|
|
/subscriptions/:id/operations/:operation_id |
|
|
V |
|
|
|
|
/subscriptions/:id/session |
Create subscription session |
V |
|
|
|
|
Accessing your IDs and Keys
In order to configure your QuickPay Payment Window checkout handler in Dynamicweb, you need:
- An API Key
- A Merchant ID
- An Agreement ID
- A Private key
To access these, go to https://manage.quickpay.net/ and access Settings > Integration (Figure 7.1).
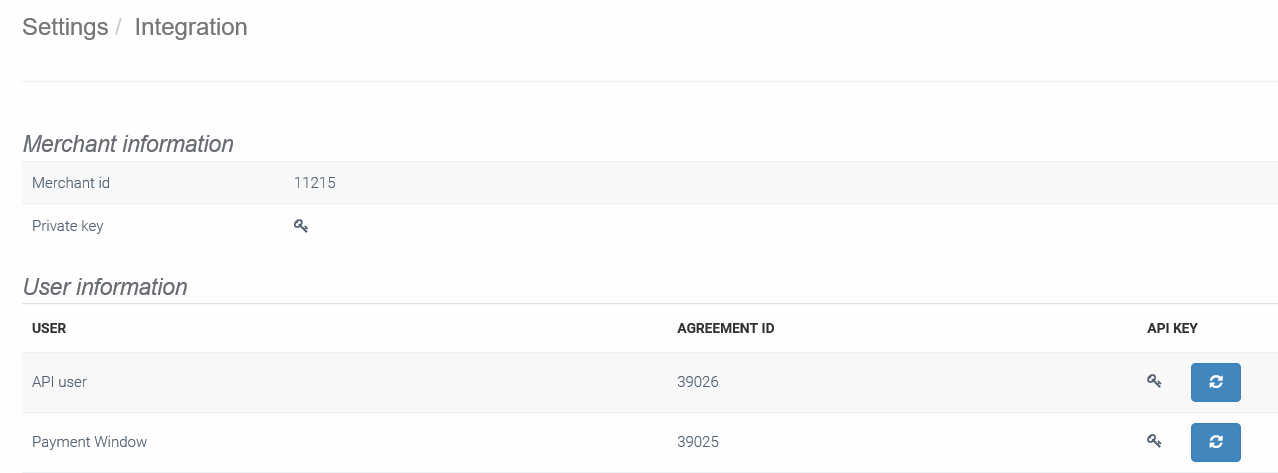
The Merchant ID and Agreement ID are readily available – click the key-icons to access the Private Key for your account, and the API key for any of your users.
Acquirer Agreements
Since QuickPay is a Payment Service Provider, not an acquirer like e.g. Nets, Teller or Paypal, you must supply QuickPay with your acquirer details.
To fill in the acquirer details:
- Login to https://manage.quickpay.net.
- Click Settings -> Acquirers
- Choose the relevant acquirer, and fill in the information you got from your acquirer.
- Save your settings
Your customers are not able to use the cards supported by the acquirer.
You can see a list of acquirers supported by QuickPay here.
Configuring the checkout handler
Once you have obtained your IDs and keys, you can configure the Dynamicweb checkout handler for QuickPay Payment Window.
To do so:
- Create or edit a payment method in the Management Center > Ecommerce > Orders > Payment following the regular procedure
- Select the QuickPay Payment Window checkout handler from the dropdown
- Fill in the associated parameters (Figure 9.1)
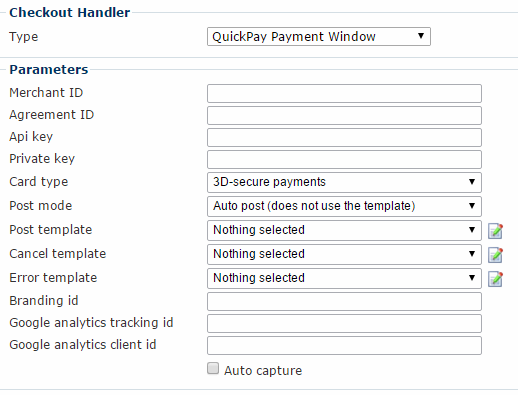
You must:
- Enter your Merchant ID, Agreement ID, API key and Private Key in the appropriate fields.
- Select a card type in the dropdown – you can select single card types, 3d-Secure payments, allow all card types, and so forth.
- Select a post mode – auto post or render template. The latter allows you to customize what information you post to QuickPay with the post template (see below)
In addition, you can:
- Customize any templates you want to use:
- The Post template is used when your post mode is set to Render template
- The Cancel and Error templates render cancellation and error messages
You can also:
- Supply a branding ID. Read more about QuickPay branding.
- Specify a Google analytics tracking and client ID
- Check the auto capture checkbox, to auto capture orders as soon as they are authorized. In some countries it is illegal to capture an order before the items bought have been shipped. You may also want to review orders before capture – e.g. to check the stock level.
QuickPay Payment Window supports MobilePay Online
Simply select Mobile Pay in the card type dropdown and proceed in the standard manner.
You need:
- An agreement with and an account from QuickPay
- An agreement with an acquirer which provides MobilPayOnline
You can read more about activating MobilePay Online and requirements and prices in the QuickPay documentation.
Testing
Before going live, test your setup thoroughly.
QuickPay supplies a list of credit card numbers for test purposes.
You may also find the codes & errors documentations useful.
Please note that not all acquirers allow you to complete test orders. For instance, MobilePay Online requires a real phone number and ViaBill requires a real social security number in order to complete the order.