
Orders
Orders are great. They let you see how much money you are making, and also let you see which goods to ship to which customers. I think I speak for everyone when I say that orders are just swell.
Happy days! Dynamicweb Ecommerce comes with an extensive system for managing orders, consisting of:
- The Order list, which lets you view orders and order details, as well as filter them on properties such as state, progress, creation date, etc.
- The Order details of each order, allowing you to view detailed information about an order, and to take action based on the info
- The Recurring orders section, which lets you view and manage recurring orders
- The RMA (Returned Merchandize Authorization) section, which lets you handle returns
- The Quotes section, which lets you work with custom quote flows for your goods & services
- The Shopping Cart module, which handles the checkout process (and creates orders and quotes)
- The Customer Center module, which allows the extranet user to create RMAs, see previous orders, and more.
In this document, you can read about the order list and how to manage it, how to capture payment for an order, as well as related topics such as order states and order flows.
You can access the documentation for the other topics – order details, quotes, RMA, recurring orders – and so forth – from the menu.

Basic Concepts
In this section, you will learn about:
- The order list, and how to filter or customize it
- Printing orders, creating shipping documents, and setting a new order state from an order list
- How to capture payment for an order, and the different capture states in Dynamicweb Ecommerce
The order list
The order list provides you with an overview of the most recent orders, and filtering and search tools for finding previous orders.
From the order list you also have access to the order details of each order – read more about order details here.
To access the Order list:
- Click Ecommerce on your accordion
- Locate the Orders-node in the Ecommerce tree (Figure 3.1)
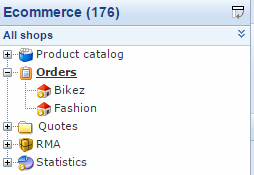
- Click it to open the order list view (Figure 3.2). The orders-node gives you access to all orders on the system – but you can click the shop icons located under the node to see orders from that shop only.
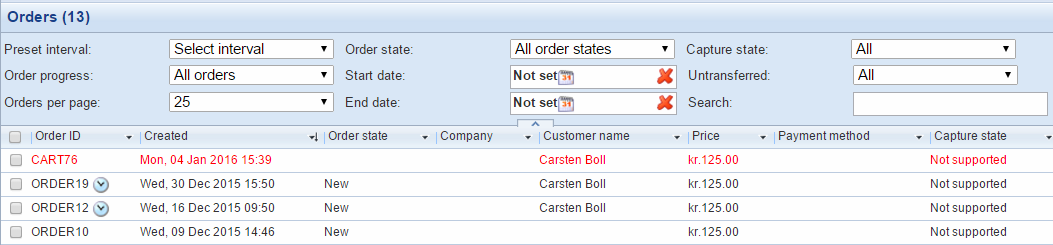
The Order list consists of three things:
- A set of tools in a toolbar
- A filtering area
- A list of orders – the most recent orders, or those matching the filtering or search criteria
Orders may be colored red (not completed) or black (completed). An order is considered incomplete if it was interrupted during the last order step (before showing order confirmation). This means that the color red does not indicate whether an order has been paid or not.
A clock-icon next to the order ID means that it was generated automatically as part of a recurring order series.
The tools in the toolbar are described below, where they are used.
Searching or filtering the order list
A prominent feature of the order list is the filtering and search options (Figure 4.1).

With the filtering a search option, you can:
- Find orders based on start and end date, or on a preset interval (like today or latest week). Choosing an interval automatically inserts the corresponding dates in the date fields.
- Filter on order state (custom work-flow states), order progress (system controlled) or capture state (depending on payment provider details)
- Isolate orders which have been transferred to Dynamicweb Ecommerce from an outside system (via the integration framework)
- Search your orders
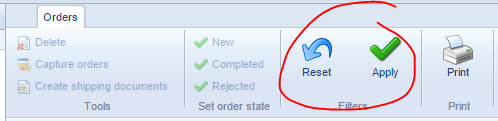
Once a set of filters and criteria have been selected, click the apply button to apply the filters – or the reset button to reset the selection (Figure 4.2).
This will limit the order list to showing only the orders matching your filters and search terms.
You can hide the filter settings to get a better overview of the orders by clicking the arrow under the filter settings area.
Your filter settings are automatically remembered by the system. This means that when opening the order list the next time, all filter settings will be pre-filled. If the filter area is hidden, then the area will blink shortly to indicate that special filter settings has been applied. To reset the filter settings, click Reset in the toolbar.
Customizing the order list columns
In the order list, you can see a number of orders, and a number of columns showing you some information about the order (Figure 5.1).

In this case, the columns show the order ID, the created-timestamp, the order state, the customer company and name, the total order price, the payment method used, and the capture state of the order.
But you can customize which columns you want to see, based on your particular needs.
To do so:
- Right-click on an existing column in the order list (Figure 5.2)
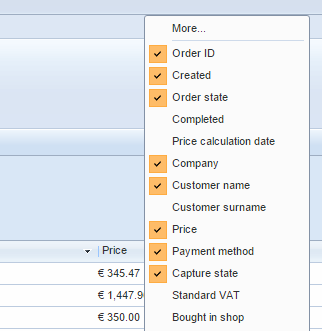
- Click on the column name you want to activate or deactivate – or click More for an in-depth look at your options.
Printing orders
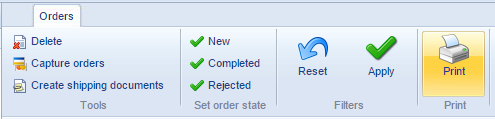
If you want to print one or more orders for offline use, simply select the order(s) and click the print button in the toolbar (Figure 6.1).
This opens a print-friendly preview of the order, along with a toolbar (Figure 6.2).
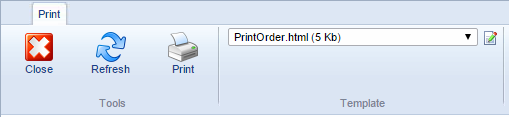
From here, you can:
- Print the order
- Access (and modify) the printer-friendly template to your liking
- Refresh the page (if you’ve made any template changes)
- Close the print view (and return to the order list)
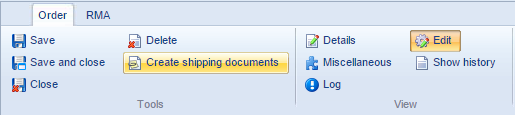
Creating shipping documents
If your shipping provider supports it, you can click the Create shipping documents button (Figure 7.1) to create a .csv file (GLS) or send the data to the PacSoft webservice (Post Danmark) with the delivery details of an order, and use that with third party software to create labels automatically.
The GLS .csv file will be created in the folder specified in the shipping provider settings (default is the /Files folder) – you must manually import this to the GLS Interline 7.0 service.
The Post Danmark provider send the data to the PacSoftt webservice, and also saves the data to DB:EcomOrders >> OrderShippingDocumentData.
Creating shipping documents is implemented for the:
- GLS shipping provider - compatible with GLS Interline 7.0 (Uni-Connect).
- Post Danmark PacSoft provider
Setting a new order state on an order
Order states are customizable order flow states which can be created in the management center – read more below.
From the toolbar, you have access to the order state buttons (Figure 8.1), matching order states created for your solution.
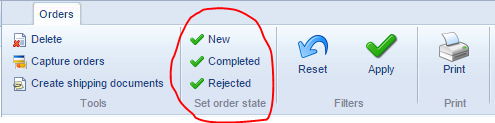
Marking one or more orders and checking one of these order state buttons will change the order state for the order(s).
Capturing payment
Capturing payment is the process of authorizing and accepting funds from your customer for a particular order.
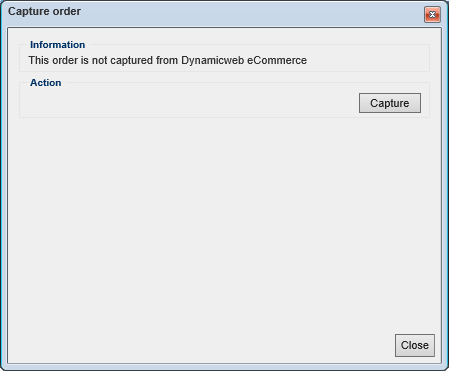
If an order has been made through a payment gateway which supports payment capture in Dynamicweb it will occur in the order list with the capture state column showing not captured (Figure 9.1).

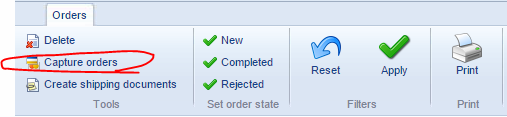
To capture one or more of these orders, select them from the order list (check their checkbox), and click the capture order(s) button in the toolbar (Figure 9.2).
This opens a capture order window (Figure 9.3), from which you can capture the payment.
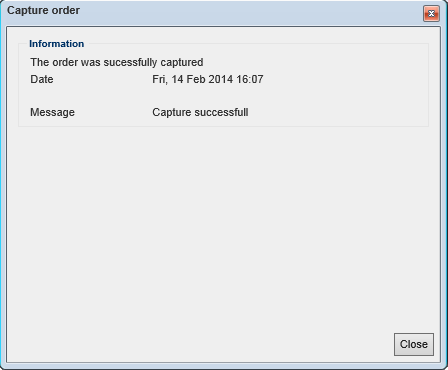
To do so, click Capture – you will see a timestamp and a result of your capture payment action (Figure 10.1).
Once an order has been captured, the capture state will change.
Capture states
Depending on your solution setup, the following capture states can be encountered:
- Not captured/Not supported:
If the provider is setup to only authorize the payment, all incoming orders are set to Not captured in the order list when successfully completed. A few providers don’t support capture from external services like Dynamicweb. They are listed with Not supported and you need to capture the payment from the administration at the provider website. - Captured
When you have captured an order manually the state is changed to Captured in the order list. Some payment providers (mainly the US providers) have the option to setup if the payment should only be authorized or both authorize and capture. If authorization and capture is used, the amount is sent for authorization, and if approved, is automatically captured. Then all incoming orders are set to Captured in the order list when successfully completed. - Split captured
Split capture allows you to capture partial payments on a running basis, until the full transaction amount has been captured. This is useful (and, in some countries, required by law) if you ship items separately, or some items are in backorder.
If your provider and card supports split capture, you can select split capture in the capture order window ({figureef}).
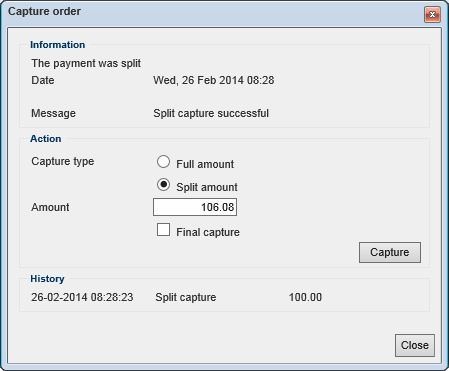
This allows you to type in partial amounts and capture them – although the combined amount can never exceed the total order price.
To finalize an order with split capture, you can either capture the full amount – this captures the part of the total order amount not paid so far – or manually select final capture. Using final capture lets you finalize an order after capturing only part of the initial total, e.g. in cases where part of an order cannot be delivered.
Using split capture is only possible for single orders, and is currently only supported by DIBS and Quickpay.

Implementing
In this section you will learn about:
- Creating custom order flows and order states
- Customizing how orders are auto-numbered
Creating custom order flows
An order flow is a set of order states, which can be used internally to control how an order should be processed.
In most cases, it makes sense to have a default order state called ‘New’, and an order state called ‘Completed’ – but you may have several other steps in your order work flow. In that case, you can create and use custom order states.
To create a new order flow:
- Go to Management Center > Ecommerce > Orders > Order flows
- Click New order flow in the toolbar
- Name the order flow – and optionally provide a description for it
- If you want to use it by default, check the default checkbox
- Save the order flow
This creates a new (but empty) order flow. To make it useful, you must add order states to it.
Creating an order state
To create an order state click New order state in the order flow toolbar to open the edit order state view (Figure 14.1):
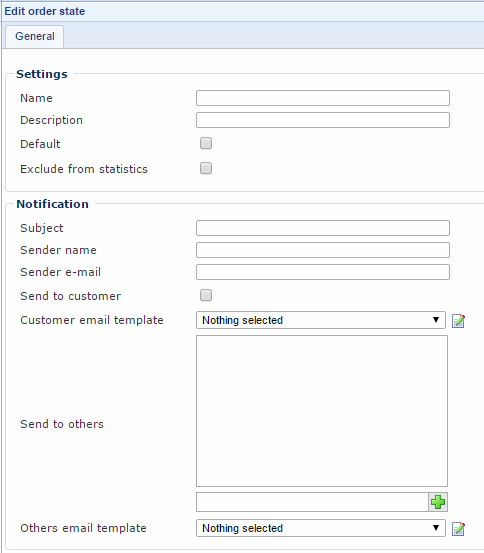
From here, you must:
- Name the order flow, and optionally provide a description for it.
- Check the default checkbox, if you want this state to be the default state. New orders will be created with this state set.
- Decide if you want to include or exclude the order state from the Ecommerce statistics.
In the Notification area you can set up automatically sending an email to your customer (or others) when an order enters the order state.
To set up email notifications:
- Specify a subject, a sender name and sender email
- Check the send to customer checkbox to send the email notification to the customer who placed the order (provided you have an email address to send to) – or add other emails to the send to others area manually.
- Select (or create/modify) an email template to use for your notification emails – you can use different templates for customers and other recipients.
Once you are happy with your settings, save your order state – and repeat as necessary until your order flow contains the states you need.
Customizing the Email distribution method
By default, a direct connection to your mail server is created every time an email has to be sent out.
With the email distribution method settings (Figure 14.3), you can instead elect to generate an email file in the IIS dropbox folder. The mail server can then be configured to monitor this folder and send out all emails in it at configurable intervals.
Please note that this setting affects all Ecommerce emails.

Customizing auto-numbering of orders
Dynamicweb auto-numbers every order registered in the system – ORDER1, then ORDER2, etc.
However, you can customize the way orders are assigned a number:
- Go to Management Center > Ecommerce > Advanced configuration > Auto-numbering
- Click the Order auto-numbering scheme to open the edit view (Figure 15.1)
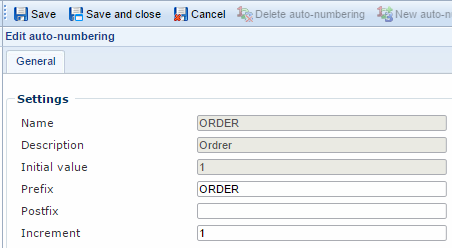
From here, you can change:
- The order prefix (ORDER by default)
- The order postfix (empty by default)
- The increment by which an order value should increase when a new order number is generated
Query string operations
The following query string operations are supported by Dynamicweb for orders.
Changing the OrderTime context
Occasionally, you may need to change the Context.OrderTime parameter of an order - e.g. if you want to test whether price calculations, discounts, or product publication periods work as intended.
To do so, simply use the OrdeTime parameter in your query string, using one of the following formats:
- OrderTime=MM/dd/yyyy
- OrderTime=MM.dd.yyyy
- OrderTime=MM-dd-yyyy
To change OrderTime context, you must go to Management Center > Ecommerce > Advanced configuration > General and check the Allow different context dates checkbox in the Settings-section.


Automatically exporting completed orders
Dynamicweb can be set up to automatically generate and export and XML file containing the order details every time an order is completed.
To do so, go to Management Center > Integration and click the Export Orders node to open the tool (Figure 21.1).
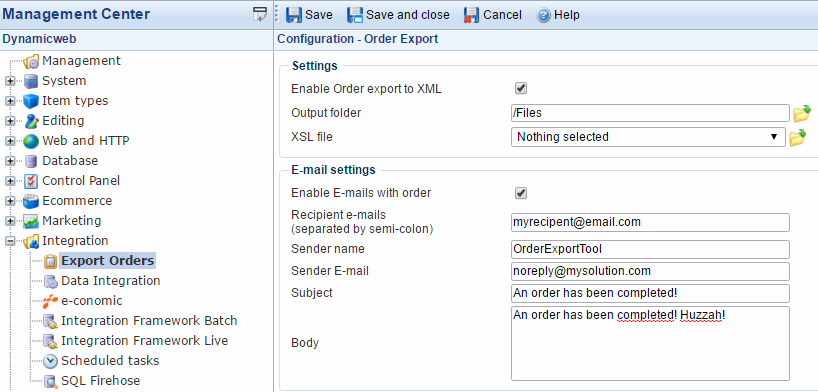
To use the export order tool you must:
- Check Enable Order exports to XML to activate the tool
- Specify an output folder
- Optionally select an XSL file to transform the XML output – by default, the output format is identical to the format used by the XML Provider in the Data Integration module
You can also set up email notifications, in which case the recipients will be mailed the order xml in an email (it will still be generated in the output folder as well).