
Shopping Cart
The Shopping Cart module is the main entry point for the ordering process. By adding the Shopping Cart module to a paragraph on a page in the frontend, a customer can:
- Add products to the cart
- Complete the checkout process defined on the cart – typically providing shipping details, selecting a payment provider and a shipping provider, and completing the order
- Receive order confirmation on site and by email
In short, the Shopping Cart module is absolutely essential to an Ecommerce solution!
Implementers will be happy to learn that the Shopping Cart is very easy to interact with, with numerous tags and loops available for adding, removing and displaying products located in a shopping cart.

Basic Concepts
In this section, you will learn about:
- Adding the shopping cart module to a paragraph
- The module settings available to you when creating and configuring a new shopping cart
Adding the module to a paragraph
To use the Shopping Cart module, it must be added to a paragraph on a page.
From the paragraph you then have access to the module settings window (Figure 3.1).
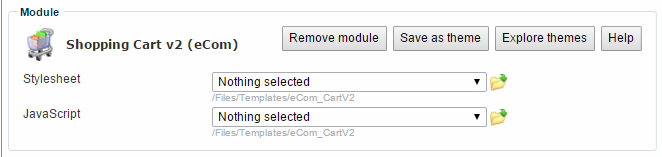
From here, you can control the behavior of the module – or remove it altogether.
Read about your settings and configuration options below.
We strongly discourage you from creating new sites using stylesheets, Javascript, or the theme-functionality. This is old technology, and is supported for legacy reasons.
Module settings
Once added to a paragraph, you have access to all the module settings and configuration options available for the Shopping Cart.
Here’s an overview at what they allow you to do.
Shop settings
The shop settings (Figure 5.1) control which shop the orders from this cart go to.

You can:
- Select one of your shops from the Shop dropdown
- Optionally, select an Order context from the Context cart dropdown – read more about order context carts below.
- Check the Checkout to quote checkbox if this is a quotes cart – read more about quotes here.
If you don’t select a shop explicitly, the orders created will go to the shop set as the default shop in the Management Center, but for clarity you should always explicitly select a shop.
The order steps area
The Order steps area (Figure 6.1) allow you to configure existing or add new order steps to your checkout process.
You can read more about customizing and working with order steps in the implementing section of this document.
Notification emails settings
The notification emails settings (Figure 7.1) allow you to configure email notifications for customers, site admins, etc.

To add a new notification email, click Add notification to open the email notification window (Figure 7.2).
From this window, you can:
- Specify a recipient email or check the for customer checkbox to use the email provided by the user
- Select, edit or create an email-template to use
- Specify a sender name and sender email and an encoding to use
- Select an attachment (e.g. a Terms and Conditions pdf) to send with each notification email
Please note, that in order to use email notifications, you must have an email server configured on your solution.
Field validation settings
The field validation settings (Figure 8.1) allow you to select which validation rules should be applied to the order on checkout.
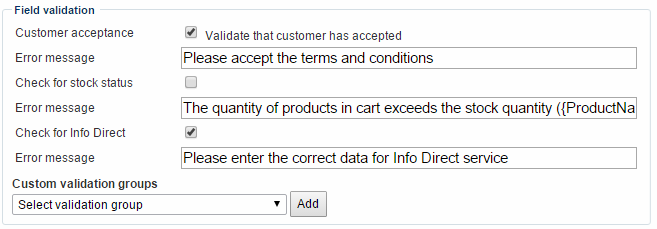
You can:
- Force the customer to accept your terms and conditions
- Check for stock status, so you won’t end up selling more than you can deliver. You can use the placeholder {ProductName} in your error message to render the actual product name of the product which causes the validation to fail.
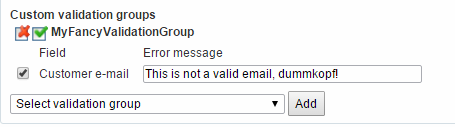
- Select and add custom validation groups – you can read more about creating custom validation groups in the implementing section of this document.
When a custom validation group is selected and added to the Shopping Cart, you can specify a localized error message to display when a field is invalid (Figure 8.2). This means that you don’t need to have language-specific validation groups created.
On stock level validation and product reservation
If you use stock level validation on the cart, consider using product reservation as well. With product reservation, a product added to the cart becomes unavailable to other customers for an amount of time.
To use product reservation:
- Go to Management Center > Ecommerce > Advanced Configuration > General
- Select the Reserve when product is added to cart option (Figure 8.3), and specify an amount of time the reservation should be valid for. You may also customize for how many days a shopping cart should be saved.

Newsletter settings
The newsletter setting (Figure 9.1) allows you to ask users for permission to send them emails.

If checked, the section of the order step Information-template starting with <!--@If Defined(Ecom:Cart.UseNewsletterSubscription)--> will be rendered during checkout.
“Would you like to subscribe to our newsletter?”
It may be a good idea to change the wording of the text being rendered – for legacy reasons (newsletter v3 integration) it ask users if they want to subscribe to a newsletter, but actually it simply sets the email permission for the user to true, and therefore lets you send all kinds of emails to them, not just newsletters.
Empty cart settings
The Empty cart settings (Figure 10.1) control what a user will see when they view an empty cart.
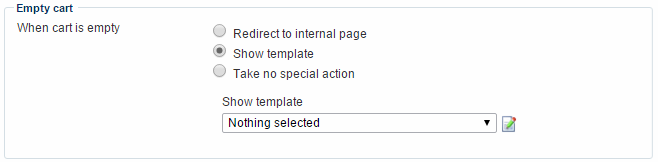
You have three options:
- Redirect to an internal page lets you select a specific page on your website to redirect users to
- Show template allows you to select a custom template to show instead of the cart. You can then add cool stuff to the template, of course, like suggested or personalized products and news.
- Take no special action does exactly what it says, and simply displays the first step of the order process as with a full cart. However, you can use the Ecom:Order.IsEmpty tag to test for and do stuff if a cart is empty.
User management settings
The User management settings (Figure 11.1) allows you to control how the cart interacts with your user management module.
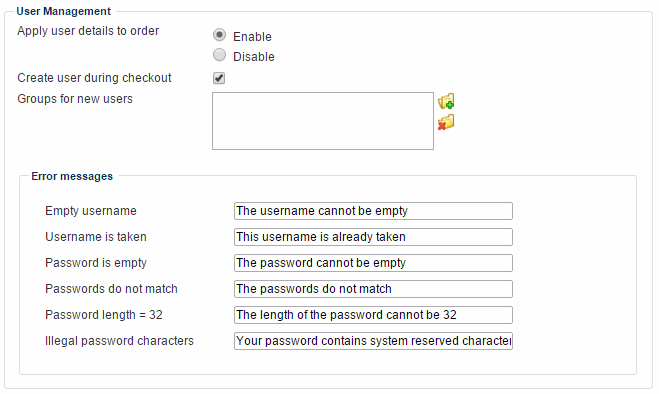
You can:
- Enable or disable auto-filling order fields with the user details of a logged in user
- Require new users to create a new user during checkout – and specify which user group these new users should belong to, and which error messages should be displayed during the user creation process if something goes wrong
To setup creating a user during checkout, select the InformationCreateUser.html template as step 2 in your order steps section – or create or modify a custom template to suit your purposes and use that.
Note that If a user is logged in to extranet on two separate computers, the shopping cart content will be automatically synchronized.
Saving an address to user management
Dynamicweb supports saving an address on a logged in user on checkout. Look at the InformationSaveCart.hmtl template for example code.
The address will be saved to the addresses section of the user, if it doesn’t match an existing address.
Save anonymous user data in cookie
By default anonymous users are exactly that - anonymous. But if you want to, you can save the delivery and billing address details of the last anonymous user in a cookie on the device used to visit your site. This may make placing new orders less of a hassle for anonymous or non-registered users.
To enable saving anonymous user data in a cookie:
- Go to Management Center > Ecommerce > Advanced configuration > General
- Activate the Save last used customer data checkbox in the settings section
Payment & delivery settings
If your solution has multiple shops attached, you will have access to the payment & delivery settings (Figure 13.1).
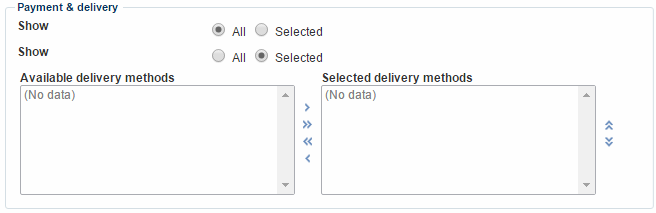
With these settings, you can specify which payment and delivery providers you want available for this particular cart. This is useful if, for instance, you don’t want to list Danish payment providers on your American website.
To make a delivery or payment method available on a particular cart, move it from the list of available methods (left column) to the list of selected methods (right column).
Behavior settings
The behavior settings (Figure 14.1) control cart behavior in a variety of situations, as outlined below.
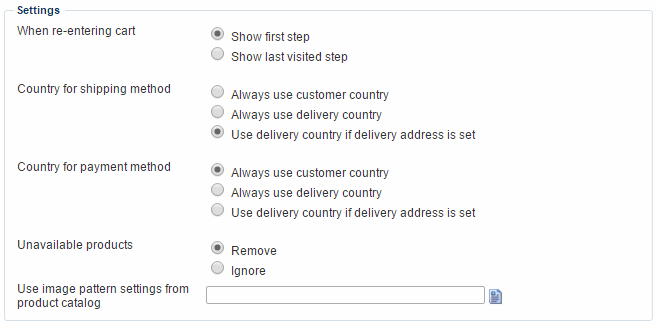
You can control:
- If the cart should show the first order step or show the last visited step for users returning to the cart after leaving the order flow.
- How the cart selects which shipping and payment methods should be available – the options being customer country, delivery country, or delivery country if a delivery address has been selected.
- Prices in the shopping cart are recalculated when the billing or delivery country is changed. VAT is recalculated when a new bulling country is set, and Taxes are recalculated when a new delivery country is set.
- If products which have become unavailable should be removed or ignored
- If you want to use an image pattern from a product catalog in the cart

Implementing
Under the hood, the Cart is really an order (both from an API and a database point of view), with a set of special flags set marking it as a cart rather than an order. The cart keeps track of customer and order information, including (but not limited to):
- Customer data, such as name, address and contact information
- Order lines, which are the products the user has added to the cart
- Discount data, e.g. sales discounts applicable to the order
- Shipping provider and payment provider details
- Transaction details of the transaction between the Ecommerce system and the payment provider
- Etc.
Since the cart is readily available, it is easily updated – you can add products to it using links, for instance – and displayed – e.g. presenting a summary on each page and a detailed view during the checkout process.
In this section you will learn about:
- The Shopping Cart tags and loops available to you
- Cart commands (cartcmd)
- How to create custom order steps
- The different kinds of validation available to you from the Shopping Cart
- How to create order context carts
- The advanced configuration options available to you from the Management Center
Shopping Cart tags & loops
The Shopping Cart is a rich module, with a lot of template tags and loops available – far too many to list here.
For a detailed view of the tags and loops available to you, please see the template tag reference.
Cart Commands
Dynamicweb Ecommerce uses a special query string parameter – cartcmd – when adding, removing, or otherwise modifying a product in a cart.
You can use cartcmd in either a direct link or when submitting a form, with one of the following values:
|
Query string value |
Description |
Example |
|
add |
Adds the requested product to the cart |
|
|
addmulti |
Add multiple products to the cart at the same time |
|
|
emptycart |
Empties the cart. |
You can link to a specific page after emptying the cart:
<a href="Default.aspx?ID=123&cartcmd=emptycart">
This empties the cart, then shows the requested page. |
|
converttoorder |
Converts a cart to an order (without going through payment/checkout). |
Useful for integration purposes, if payment is handled outside Dynamicweb Ecommerce |
|
updateorderlines |
Updates the quantity of several orderliness, using the parameter QuantityOrderLineOL[ID]=quantity
|
?cartcmd=updateorderlines&QuantityOrderLineOL1=20 |
|
incorderline |
Increases the quantity of an item in the cart |
|
|
decorderline |
Decreases the quantity of an item in the cart. When the quantity reaches zero, the item is removed from the cart. |
|
|
delorderline |
Removes an item from the cart |
|
|
orderline |
Used with values “key” and “quantity” to update the quantity on an orderline directly from the OrderLineID. |
?CartCmd=orderline&key=OL28&quantity=4 |
|
addwithpoints |
Adds a single item to the cart with loyalty points. |
|
|
loadorder |
Loads an abandoned cart based on an order secret which must be send along with the command. |
"/Default.aspx?CartCmd=loadorder&LoadingOrderId=" + @GetString("Ecom:Order.ID") + "&LoadingOrderSecret=" + @GetString("Ecom:Order.LoadingOrderSecret") |
For examples on how to use cart commands, please see below. For more examples see the standard Ecommerce templates.
Adding a product to cart
There are three ways you can create a simple add-to-cart button:
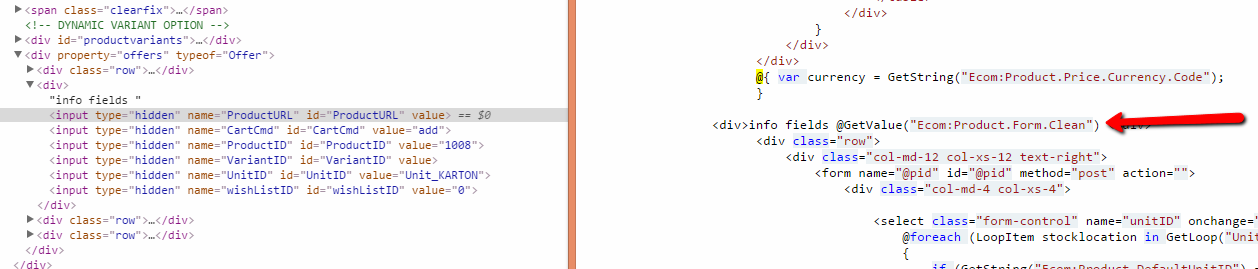
- Create a form using the Ecom:Product.Form.Clean tag, which outputs a set of hidden-fields (Figure 18.1) containing the information needed when adding a product to the cart
- Create a form and supply the information manually – at the minimum the ProductID, VariantID, UnitID, cartcmd=add, and optionally the PageID you want to redirect users to after adding the product to the cart
- Create an <a href> link with the relevant parameters - at the minimum cartcmd=add, productID, and often PageID (optional)
Add multiple products to cart with one click
With the cart command addmulti you can let your customers add more than one product to the shopping cart with a single click.
All you have to do is change the product list template:
- Insert a form tag around the entire products loop
- Add a hidden field which act as cart command for the addMulti function;
<input type="hidden" name="CartCmd" id="CartCmd" value="addMulti" /> - Insert a form field handler tag inside the product loop:
- Insert an quantity input field and change the default name to "Quantity<!--@Ecom:Product.LoopCounter-->
Example:
To finish things off then simply let users submit the form when adding products to the shopping cart.
Custom order steps
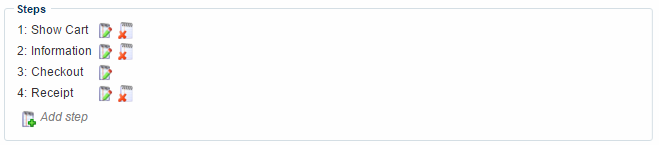
The shopping cart module is born with a set of order steps – Show cart, Information, Checkout and Receipt – which together constitute the standard checkout process (Figure 20.1).
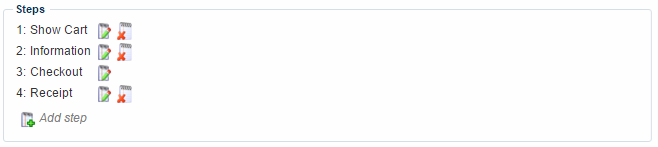
It is useful think of the order steps as a virtual breakdown of the information that a user needs to supply and receive during the process of creating an order. Each step handles a different kind of exchange of information.
You can, of course, customize the checkout process to suit your needs – by customizing, removing or introducing steps as needed – the only required step is the checkout step.
So, if you want to, you can have all your data on a single page, or you can break it down as you want.
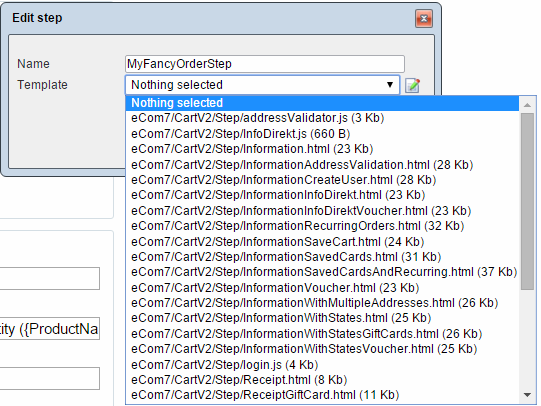
You can add, edit, or remove steps by clicking the appropriate icons next to the order step to open the edit step window (Figure 20.2) – an order step simply consists of a name and a template.
Dynamicweb ships with a number of templates showcasing how to use the different Ecommerce functionalities.
For a detailed overview of the tags and loops available for the shopping cart module, see the template tag reference.
Validation
There’s a saying in software: Never trust user input.
For an open system like an Ecommerce website, this is even more important – and that’s why we have data validation on the shopping cart. This is not only useful for stopping malicious users from submitting bad data, it’s also a helping hand to users who make mistakes. All it takes is a comma instead of a dot in an email address, and suddenly you have missing order confirmations, tracking codes, and so forth.
Here’s how to validate user data on the Shopping Cart.
Validation groups
To force users to enter valid data, Dynamicweb Ecommerce ships with a feature called Validation groups.
A validation group contains a number of validation fields, which define rules that are applied to a field in the checkout flow.
To create a validation group:
- Go to Management Center > Ecommerce > Orders > Validation groups and click New in the toolbar (Figure 22.1)
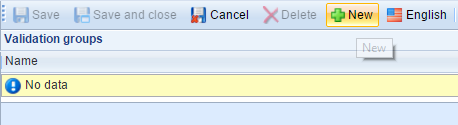
This opens the validation group view (Figure 22.2).
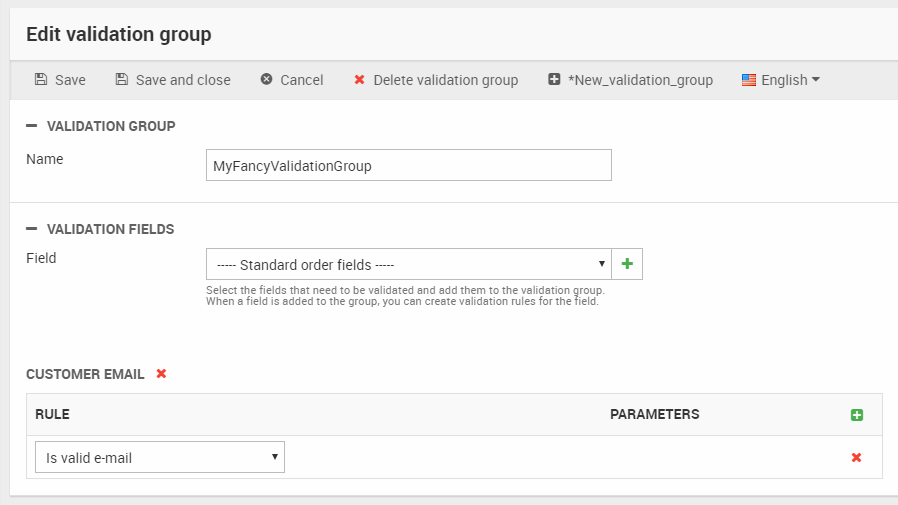
From here, you can:
- Name the validation group
- Add fields (standard order fields, custom order fields, and custom order line fields)
- Define one or more rules, consisting of an operator and possibly a parameter, which need to return true for the field content to be considered valid
- If two rules are created for a field, define if all or only one of the rules must validate
The operators available to you are:
|
Operator |
Description |
|
Required |
Checks that the field is not empty |
|
Contains/Does not contain |
Checks for the presence/absence of a specific value |
|
Equals/Does not equal |
Checks the field for an exact value (and either approves or rejects it) |
|
Is integer/Is numeric |
Checks that the field contains an integer (whole numbers) or is numeric (whole numbers and decimals) |
|
Minimum length/Maximum length |
Checks the minimum of maximum length of a field value (in characters) |
|
Is less/greater than |
Checks against a minimum or maximum value. Works for both numbers and alphanumeric characters |
|
Is valid email |
Checks if the value is a valid email address |
|
Regular expression |
Allows you to enter a regular expression and check the field value against that. This allows you to check for a variety of formats, e.g. postal codes, phone numbers, and so forth.
|
Once your validation group has been created, you can add it to a shopping cart as described in the Basic Concepts section of this document.
Localizing validation group names
Validation group names can be localized. Create a validation group in the default language, then change to another language using the language selector in the toolbar, and enter a name for the group in that language. Don’t forget to save the localized name.
Order step validation
Order step validation exists to make sure users cannot modify the underlying HTML of your checkout process to skip order steps.
To prevent this from happening:
- Go to Management Center > Ecommerce Advanced Configuration > Shopping Cart
- Check the Enable step validation checkbox (Figure 24.1)
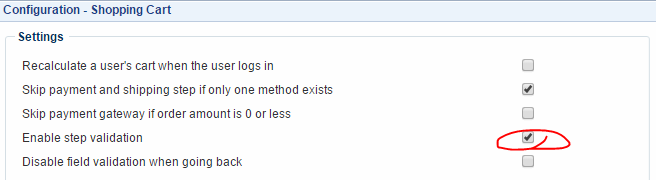
This ensures that no orders will be marked as Completed before it has passed the payment step.
It’s advisable to combine this with making the Payment method ID field a required in your validation group.
Address validation
Address validation lets you set up and manage address validation methods based on address validation providers.
When a customer progresses through the checkout process, their billing and delivery addresses are then validated against the information provided by the address validation provider.
Dynamicweb currently supports using the Avalara address validation provider, which can be used with the Avalara Tax provider, and the FedEx address validation provider, for use with the FedEx shipping provider.
To set up address validation:
- Go to Management Center > Ecommerce > Orders > Address validation and click new in the toolbar (Figure 25.1)

This opens the Address validator window (Figure 25.2).
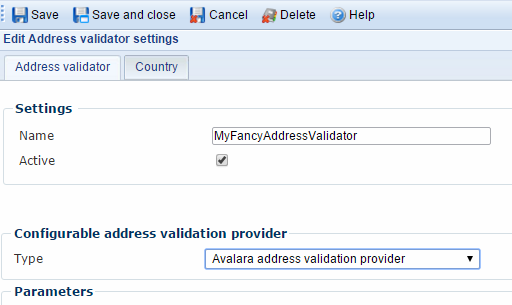
From here, you must:
- Name the address validator
- Activate the address validator by checking the Active checkbox
- Select your address validation provider
- Fill out any parameters required by the provider – these will vary depending on the provider you use.
To implement the address validator in your order flow you have access to the AddressValidators loop and associated tags. For an example, refer to the InformationAddressValidation.html template (located in Files/Templates/eCom7/CartV2/Step).
Order Context Carts
With order contexts carts, you can create more than one type of shopping cart for a shop, website or solution. This makes it possible to e.g. create a Daily, a Weekly and a Monthly cart on a website, or to create a specific Quotes cart – read more about quotes here.
Creating an order context cart
To create an order context cart:
- Go to Management center > Ecommerce > Orders > Order contexts
- Click New order context from the menu
- Name the order context and select the shop(s) it should to work with (Figure 27.1)
- Save the order context
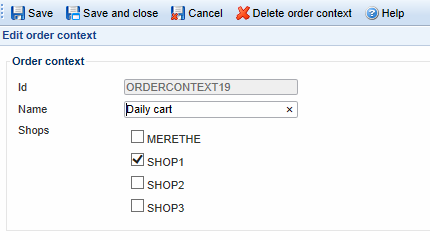
You can create any number of context carts for your solution.
For instance, in Figure 27.2 I have created a daily and weekly cart for SHOP1 and SHOP2, and a total cart used by both shops at the same time.
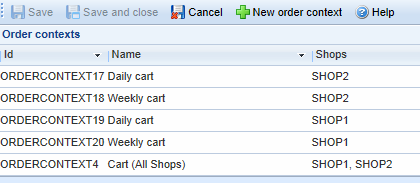
Once created, you will be able to select the context cart in the Context Cart dropdown of the shopping cart module settings, and select a context cart as the default cart on a shop.
Setting a shop context for a website
Once an order context has been associated with a shop, you must set that shop to be the shop context of your website.
To so do:
- Go to Modules > Websites and select your website to open the website settings
- Click the Ecommerce button in the ribbon bar to open the Ecommerce website settings (Figure 28.1)
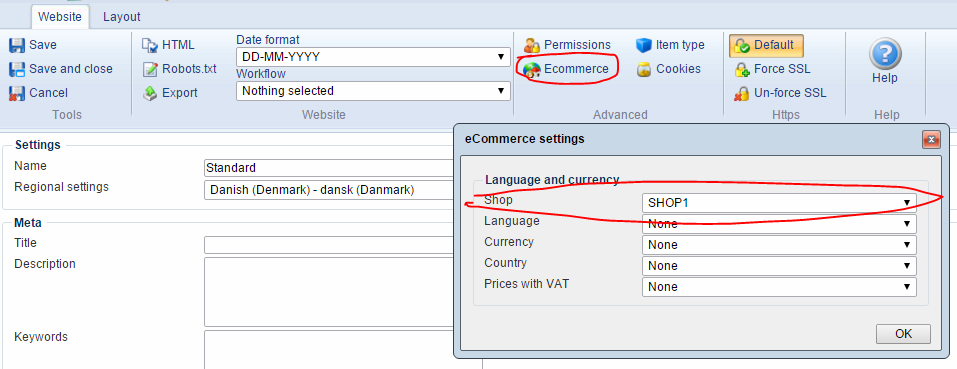
- Select the shop context in the Shop dropdown menu
You will now be able to associate your order context with the shop context of the website in the templates used on your site. If nothing is selected in the shop-dropdown, order context carts are not rendered in frontend, since the system won’t know what the shop context is (and therefore will assume there are no order contexts to render).
Order context template setup
In order to use your context carts in the frontend, you must render buttons which add products to your context cart.
For that purpose, you have the OrderContexts loop and the associated tags available to you.
Please note that order contexts are not rendered in frontend unless you have set a shop context for your website.
Advanced configuration options
From your management center, you have access to a number of advanced configuration options for your Shopping Cart modules.
Most are found by going to Management Center > Ecommerce > Advanced configuration > Shopping Cart.
Settings options
First on the list of options are the settings options (Figure 31.1).
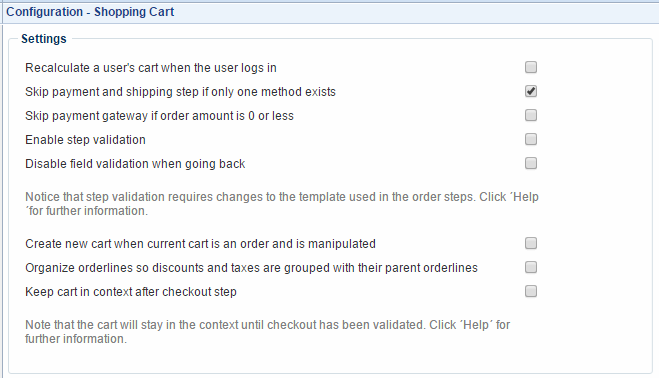
With the settings configuration options you can:
- Recalculate a user's cart when the user logs in.
Products added to an anonymous cart do not have their prices recalculated on login by default, but if you check this checkbox they do. - Skip payment and shipping step if only one method exists.
Check this to omit the payment and shipping information steps from the order process, provided that you have only created one of each in the backend. - Skip payment gateway if order amounts to 0 or less
Check this to omit the payment step from the order process if your order total amounts to 0 or less. You must also Allow negative total order prices in Management Center > Ecommerce > Advanced > Prices. - Enable step validation
Check this to enable the built-in order step validation procedure. . - Disable field validation when going back
Check this to prevent field validation from triggering when a user goes backwards in the order flow. - Create a new cart when current cart is an order and is manipulated
By checking this field a new shopping cart will be created when a customer tries to manipulate (add more products, empty the cart, increase order line etc.) an existing cart that is already considered an order by the system. This prevents issues with differences between the contents of a cart, when the customer pays at checkout, and the actual contents of the created eCommerce order. - Organize order lines so discounts and taxes are grouped with their parent order lines
Enable this checkbox to group discounts and taxes so they are displayed right after their parent order line in the shopping cart. - Keep cart in context after checkout step
When checked you can return to your cart from the payment provider by using the browsers back arrow without loosing the content in the cart. When the checkout has been validated the cart is emptied.
The Extranet options
Next up are the Extranet options (Figure 32.1).

With the Extranet options, you can:
- Do not replace existing cart when user logs in
By default, an anonymous cart will replace an existing (saved) cart on login. Check this to use the saved cart on login instead.
If you use this setting, you get access to the next setting: - Merge the anonymous cart content with the cart saved on the user when logging in
On login, the current (anonymous) cart will be merged with the cart saved on the user.
The default methods options
You also have access to the default methods options (Figure 33.1).
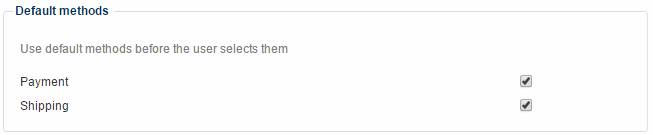
Here you can decide if the country-specific payment and shipping methods you can select in your country settings should be preselected during checkout or not.


