
Variants
Variants enable you to differentiate products which are essentially the same, but vary in color, size, etc.
Working with variants is straight forward:
- First, you create variant groups (categories), e.g. color and size
- Second, you assign values to the groups, e.g. red, green & blue and small, medium & large
- Third, you attach one or more variant groups to the product you want to differentiate – and manually specify the combinations you want to be active
There are two kinds of variants – simple variants and extended variants. Simple variants only differ from each other in regards to the variant group values, whereas extended variants allow for differentiated field content (e.g. when it comes to price etc.) – this means that extended variants have their own database entries. Read more below.

Basic Concepts
In this section, you will learn about:
- Creating variant groups (categories, like color or size)
- Creating simple variants
- Creating extended variants
Creating a variant group (category)
To create a variant group:
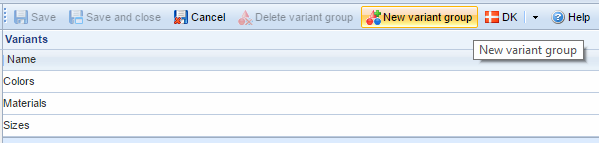
- Go to Management Center > Ecommerce > Product catalog > Variants
- Click New variant group (Figure 3.1)
This opens the variant group view (Figure 3.2).
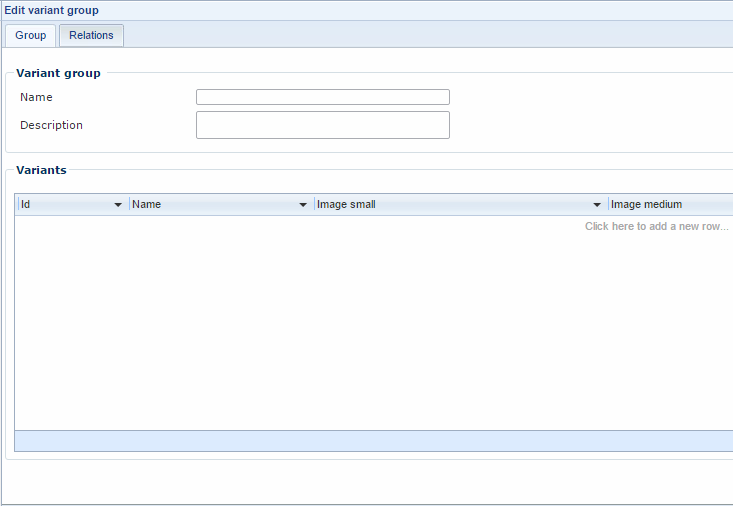
- Name the group, e.g. Colors or Sizes, and provide a description for it (optional)
From the variant group view, you create and manage your variant group values – the actual variation values, like green, blue and or small, medium, large.
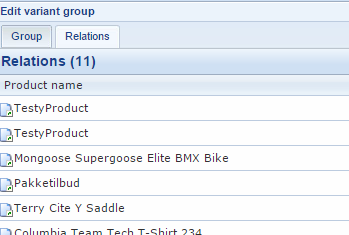
The Relations-tab
The Relations-tab (Figure 4.1) provides you with an overview of all the products which use the variant group in question. Click the products to go to the product details view for the main product.
Creating a variant group value
From your variant group view, you can create new variant group values (e.g. red or small).
- Click the click here to add a new row text to add a new variant value – this opens the variant value window (Figure 5.1).
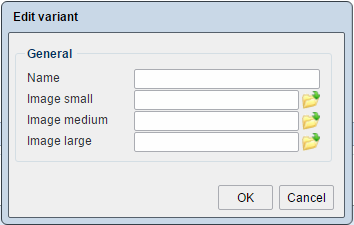
- Name the variant option (an ID will be assigned to it automatically when you click OK).
- Optionally, provide one or more images for the variant (e.g. a square showing the color, or a shirt-icon with an S on it for the size-value small, etc.).
- Click OK
You can create as many variant groups and variant group values as needed – since each variant must be manually created, you won’t risk breaking anything by creating too many possible variant combinations.
Creating simple variants
Once you have created one or more variant groups and variant group values, you can start creating simple variants based on one of your existing products.
To do so:
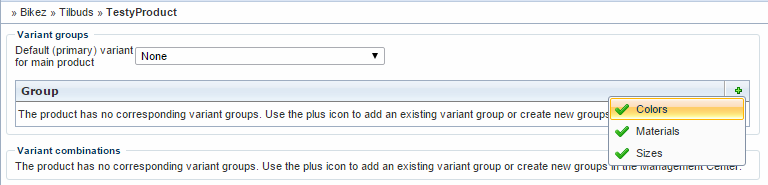
- Go to Ecommerce and edit your product and click Variants in the ribbon bar. This will take you to the variants view (Figure 6.1).
From here, you must:
- Add all the variant groups you want to use for the variants by clicking the green plus-icon and clicking the variant group from the dropdown. Adding or deleting a variant group after you have created combinations will reset the combinations area, and you’ll have to create your combinations again.
- Once you have added all the variant groups you want to use, add the variant combinations you want to create by clicking the Click here to add a new row area and selecting the variant options you want to use (Figure 6.2).
- Save and close the product to create your new variants.
Once the variant configuration has been saved, you can select a default variant in the Default dropdown. You can have this default variant displayed in the frontend instead of the main product by going to Management Center > Ecommerce > Advanced configuration > General and checking the Show default variant in product list checkbox (Figure 6.3).
After you have created your variant combinations, your variant combination area will look similar to Figure 7.1.
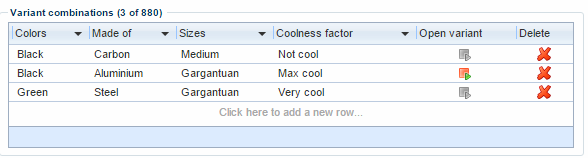
From here, you can:
- View all your variant combinations
- Delete a variant combination by clicking the red X-icon at the end of the row.
- Open (and edit) a variant by clicking the open variant icon – this creates an extended variant. Read more about extended variants below.
“Hey, wouldn’t it be cool if all variant combinations were auto-generated, so I wouldn’t have to do this manually?”
In principle, yeah, sure. In reality no, not really. For instance, 11 colors, 5 types of materials and 4 sizes result in 220 possible combinations. Add a fourth category with 4 variant group values, and you’re looking at 880 different possible combinations. And what if you have 30 colors across your entire product catalog? It’s much easier to just create the variant combinations you actually need.
Creating extended variants
Once your variants have been created, they exist with only the variation you’ve created in your variant groups and variant, as simple variants. This may be all you need to do.
Often, however, you need to make further changes to one or more of the variants – perhaps red dye has become more expensive than black dye, and you need to adjust the price of your red products accordingly, or perhaps size XXXXXL shirts are more expensive to make than size M shirts. Don’t worry. We’ve got your back.
But first, you need to allow product fields to be differentiated.
To do so:
- Go to Management Center > Ecommerce > Advanced configuration> Fields
- In the Across all variants column, locate the field you want to allow differentiation for and make sure the checkbox is checked (Figure 8.1). This allows differentiated values for the field.
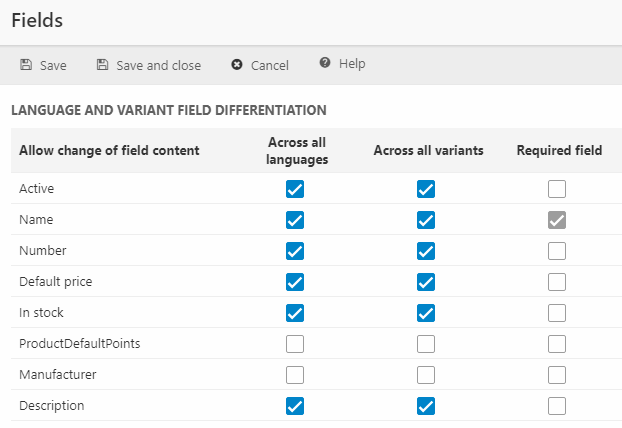
The fields screen enables you to override many of the properties of a product, such as Name, Number, description, meta tags, custom fields, images and more. You can’t however, override each and every property of the product.
Some properties, such as related products, related searches, field groups and parts lists need to be set on the main product.
To change field values for a variant:
- Go to a product list showing the main product with variant options
- Click the plus-sign next to the field number to fold out the variants (Figure 8.2)

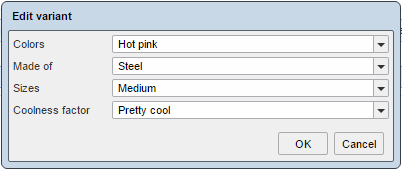
- Click the variant-icon to open the details-view of a variant
- Make the changes and Save the variant.
In the screenshot above, the price of a variant has been changed to 120, rather than the default 100 the original product was created with.
Notice how the variant icon is now orange. This indicates that the product has moved from being a simple variant to being an extended variant, with differentiated field content (and, consequently, its own database row).
Don't forget that you can access and edit each variant from the variant view of a particular product.
Sum of all variants in "Stock level" field
The Stock level field in the details view of the main product is read-only and sums up all variant stocks if both these settings are set:
- The Default dropdown in Variants is selected to something other than "none"
- Stock is marked as Across all variants in Management Center -> Ecommerce -> Advanced -> Fields.
If you create a new variant when you have this setup, the Stock level field is set to read-only - as on the main product. You need to save the new variant in order to make it an extended variant and then be able to edit the stock field.

Implementing
In this section, you will learn about:
- The loops and tags available to you when working with variants
Variant loops and tags
To render variant combinations on the frontend, use the VariantCombinations loop. All product tags and product loops are available from inside this loop.
To render variant groups, use the VariantGroups loop.
Read more about the tags and loops available to you when working with variants in the TemplateTag documentation.
Advanced display-settings for variants
From the management center, you can control how variants are displayed in your product catalog module.
To access the advanced settings:
- Go to Management Center > Ecommerce > Advanced configuration > General
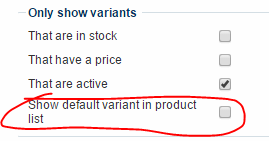
- Locate the Only show variants settings (Figure 12.1)
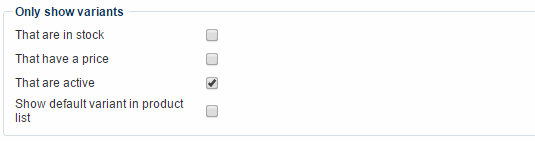
From here, you can choose to:
- Only show variants which are in stock, have a price, and are active
- Show default variants in the product list (instead of the main product)


