Discounts & Vouchers
Everyone loves a good discount!
From a customer point of view, you can get a good deal by doing business at the right time and place, and from a business view they serve to increase short-term sales, move out-of-date stock, reward vigilant customers, or simply serve to draw people in as a sales promotion mechanism.
In Dynamicweb Ecommerce, discounts are handled by the:
- Order discounts tool, which is a powerful tool for creating and configuring discounts of many types, with various triggers and application rules
- Vouchers, which are unique codes you can create and use to trigger discounts like e.g. free shipping or
In this article, you can learn more about setting up and managing order discounts, and how to create and use vouchers in Dynamicweb.
Sales Discounts
An older implementation of discounts called Sales Discounts may be present on some solutions. Don’t use it – it’s been replaced by Order Discounts. If you are already using Sales Discounts, don’t use Order Discounts, as the combined results may be unpredictable and are untested.
We recommend switching your older solutions to Order Discounts instead.
Basic Concepts
In this section, you will learn about:
- Order discounts and how to create them – types, triggers and application rules
- How to create and use vouchers to trigger discounts
Order Discounts
Discounts in Dynamicweb are handled by the discount matrix, which is a powerful tool for creating and assigning discounts based on various conditions – as known from many ERP systems.
To break it down, you can create several types of discounts, control the criteria for triggering them, and how they are applied to the order or product when checking out.
For instance, you can:
- Create 10% discounts and control when they are active, and which products they are active for
- Create discounts of the buy one, get one free type for selected products
- Create free shipping for orders over $100 – discounts
- Award discounts based on promotional codes or vouchers
- Etc.
To access the Discount Matrix:
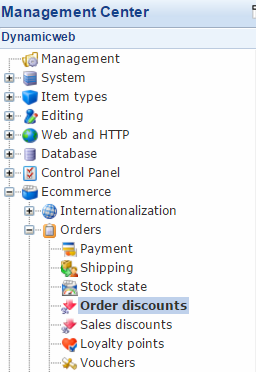
- Go to Management Center > Ecommerce > Orders and click Order Discounts (Figure 3.1)
This opens the discount matrix view (Figure 3.2), from which you can view, edit or create your discounts.

From the discount matrix view, you can see all sorts of information about each discount, the name, type, amount/percentage/product awarded, and whether the discount is active or not.
From the discount matrix view, you can also create (or delete) a discount – simply use the buttons in the toolbar above the list.
Creating or editing a discount will take you to the edit discount interface.
You have a lot of options for customization when creating discounts – and here’s a breakdown of what they do.
General settings
First up are the general settings (Figure 4.1).
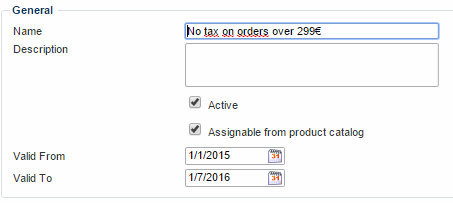
With the general settings, you can:
- Provide a name and optionally a description for the discount
- Activate or deactivate the discount. An inactive discount will not appear in frontend, and will not be applied on checkout.
- Allow or disallow the discount to be assignable from the product catalog
- Use the Valid from and Valid to fields to specify a timespan during which the discount applies.
Discount settings
The discount settings (Figure 5.1) allow you to select what type of discount this is, and how it should be applied one the order.
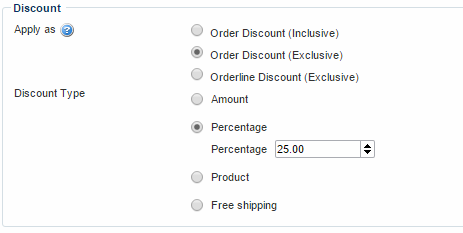
You can:
- Specify how the discount should be applied:
- An Order Discount (inclusive) will be applied and calculated AFTER order line discounts have been applied, based on the discounted price
- An Order Discount (exclusive) is applied and calculated based on the order price BEFORE any other discounts have been applied
- An Orderline Discount (Exclusive) applies to a single product, and is applied BEFORE any other discounts have been applied
- Select a discount type:
- A fixed amount of a currency of your choice
- A percentage of the total price
- A product may be given as a discount – e.g. “buy for 100 dollars and get a free mug”…
- Free shipping
Users and Group settings
If you want to restrict the discount to only select users or customers, you can do so using the user group settings ({figurref}).

You can:
- Select a specific user or a user group
- Enter a customer number (which may be shared by several users, e.g. everyone who works for company X)
If no restrictions are created, the discount applies to all users.
Total price settings
The total price settings (Figure 7.1) allow you to create conditions for triggering the discount based on the total price of the order.

Simply select a condition (equal to/not equal to, greater than/less than, greater than or equal to/less than or equal to) and specify an amount in the total price field.
Product Catalog settings
The product catalog settings (Figure 8.1) allow you restrict the discount to e.g. certain shops and languages.
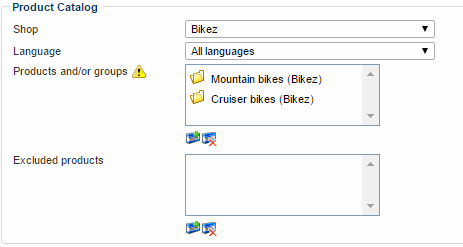
You can:
- Restrict the discount to a specific shop (or select all shops)
- Restrict the discount to a specific language (or select all languages)
- Select or exclude one or more products and or product groups for the discount to apply to
Variants and smart searches
If a variant is selected, only the variant is part of the discount – if a main product is selected, all variants are included in the offer.
You can select or exclude products based on (product) smart searches – but if you do, please use cached smart searches – or you will most likely face serious performance issues.
Order settings
The order settings (Figure 9.1) allow you to restrict the discount based on order details.

You can:
- Restrict the discount to a specific order context cart
- Restrict the discount to a particular country
- Restrict the discount to a particular shipping method or payment method
Product Quantity settings
The Product Quantity settings (Figure 10.1) allow you award a discount based on, well, how many products are bought – e.g. buy one get one free

You can:
- Select if the total quantity of any products should trigger the discount, or if only the total quantity of the same product should trigger the discount
- Specify a quantity
- Decide if the discount can be applied more than once or not
Fields and Vouchers settings
The Fields and Vouchers settings (Figure 11.1) are for handling discounts awarded on the basis of a promotion code or a voucher code, e.g. for handling free shipping vouchers etc.

You may set up the following type of field- or voucher-based discounts:
- A Default Voucher Code Field which accepts either:
- An manually selected code (“order field value”)
- A value from a voucher list - read
- An order field discount, awarded on the basis of entering a specific value in the field
My ‘Save $3’ voucher is added once per product. Help!
When creating a voucher discount of the type amount with otherwise default settings, the amount will be discounted once for every item in the order.
This is because the discount applies to any product by default. The solution is to check the "Apply discount only once" checkbox.
Advanced Order Discount behavior
If more than one discount applies to an order, you can control how/if they stack.
To do so:
- Go to Management Center > Ecommerce > Advanced configuration > Order discounts (Figure 12.1)

From here, you can control the discount behavior:
- Aggregated allows discounts to stack
- Highest makes the system use the discount with the highest value
- Lowest makes the system use the discount with the lowest value
Vouchers
With Vouchers you can generate unique voucher codes, which can then be used by your customers during checkout to receive certain discounts.
To create and manage vouchers:
- Go to Management Center > Ecommerce > Orders
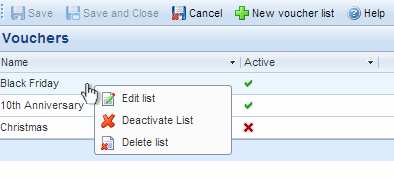
- Click Vouchers to open the voucher list overview (Figure 13.1)

From here, you can create and manage voucher lists – which in turn contain vouchers.
Right-clicking a list allows you to edit, delete and re/deactivate a list (Figure 13.2).
Non unique vouchers
The Vouchers tool creates unique codes, which can only be used once.
If you need a non-unique code, usable by multiple customers on multiple orders, you don’t need to use the vouchers tool. Instead, create a discount and use the order field value option under Field and Voucher settings on a discount instead.
Creating a voucher list
To create a new voucher list:
- Click new voucher list in the toolbar
- Name the voucher list – and set it to be active or inactive (Figure 14.1)
- Save the list
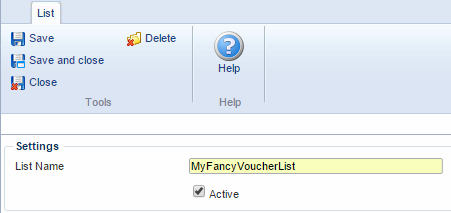
A newly created voucher list is empty, however, and you must create or generate vouchers for it to make it useful.
Creating new vouchers
To create new vouchers within a voucher list, click it in the voucher list overview to open it.
You will see a list of vouchers (if any have been created), as well as a set of tools (Figure 15.1).

You can:
- Add vouchers manually, provided that you give them a unique code. You can add multiple vouchers, provided that they are separated by a comma or a line break
- Delete vouchers – this deletes all selected vouchers from the list
- Generate vouchers. Click this option to open a dialogue which allows you to generate a fixed number of vouchers, or to generate an exact number of vouchers based on a number of individually selected users or user groups. This can be useful if you want to mail all users in e.g. the product group German users a unique voucher code.
- Activate or deactivate a list, e.g. once an offer has expired.
- You can also click send mails to distribute the vouchers to your customers – read more below.
- Finally, you can download the voucher list content as a .csv file, in case you need it for some nefarious purpose
From the voucher list, you can also see if and when a voucher has been used.
You can always open a list and generate new vouchers if your list if low on vouchers.
Emailing vouchers to your customers
Before emailing vouchers to your customers, you must:
- Create a discount triggered by vouchers in a voucher list – see Field and Voucher settings above.
- Generate an appropriate number of vouchers in the voucher list.
Once that’s settled, simply:
- Open the voucher list
- Click the Send mails button in the toolbar to open the email window (Figure 16.1)
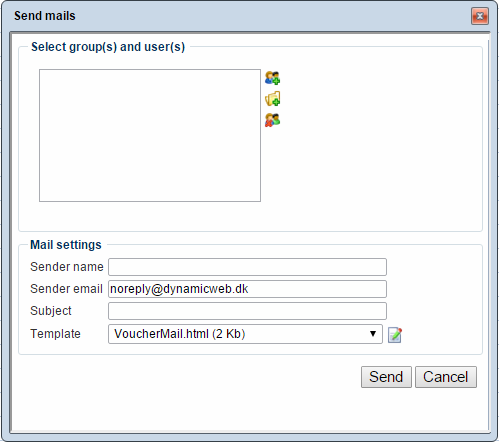
From here, you can:
- Select individual users or user groups to email
- Provide a sender name, sender email and a subject for your emails
- Select, edit or create an email template for your email
The VoucherMail.html template provides an example of how to include one of the unique voucher codes in the email and more.
Once your vouchers have been emailed, you will have access to more information about each code in the voucher list – who received it, if and when it was used, and which order it was used on.
Using vouchers during checkout
To allow your customers to actually use the vouchers during checkout, you must modify your shopping cart order steps.
For an example:
- Go to the paragraph with your shopping cart module attached
- In the Steps section, change the Information step template from Information.html to InformationVoucher.html –
- Save your changes
This renders a dedicated voucher field during checkout, where customers can enter their voucher code. Once a valid voucher is entered (you can use Validation groups to set up a validation rule for the field) and the order is completed, the voucher list is automatically updated with the new information.
For information about the template tags available for vouchers, please see the template tag documentation.
Negative prices?
If a voucher code would result in negative prices, e.g. if the order was for $100 and the voucher was a $200 voucher, the code is set to used and the price is set to zero. In other words, the customer can save up to the amount on the voucher, but won’t actually get the difference refunded.


