
Product Groups
Product groups are containers for groups of products located in a particular shop.
With product groups, you can organize products in any way you’d like – in groups or subgroups, and with access to a number of functions to make your life easier.
In Dynamicweb, products and product groups are very rich objects, with loads of properties, settings, options and abilities – and things can get pretty complicated.
Selected features are:
- Set default values for a number of product details on the group level, and save time when working with products
- Create product categories and product category fields, and have products located in the product group inherit the values
- Add media and other information to a product group, and render the information on the frontend

Basic Concepts
In this section you will learn about:
- Creating, moving, attaching and deleting product groups
- The basic (details) settings available when creating or editing a product group
- Your options when interactiv with the buttons in the ribbon bar
Creating a product group
To create a new product group:
- Click Ecommerce on your accordion
- Open the Product catalog on your Ecommerce
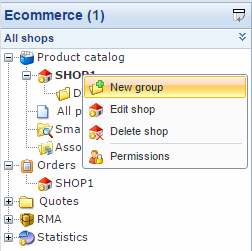
- Right-click the shop under which you want to create a new product group (or right-click an existing product group to create a subgroup)
- Click New group (Figure 3.1)
This opens the details view for the new group, which is where you configure your product group settings.
Moving, editing or deleting a product group – etc.
You can edit or delete a product group by right clicking the product group in the Ecommerce tree (Figure 4.1).
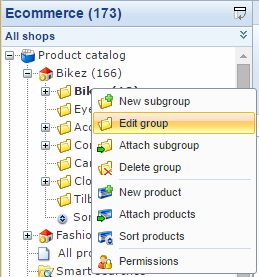
With the right-click menu, you can:
- Create, edit, attach or delete groups and subgroups
- Create, attach or sort products in the group
- Set backend permissions for the product group. Read about permissions here
Attaching a group to another group (or to a shop) makes the group, and all products in it, a subset of the parent group. Groups can be attached to more than one group at the time.
Deleting an attached group will delete all instances of it, and all products located in the group, unless they are also members of other groups. Deleting a group with subgroups will also delete the subgroups.
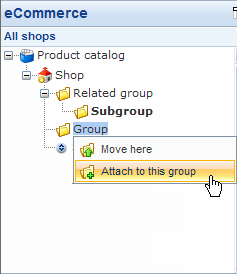
To move a group, simply drag and drop it from its location in the shop tree to the desired location. This will open a menu, where you can choose between moving the group (and thus removing it from the original destination) or attaching it (Figure 4.2).
Similarly, attaching a product to a group does not copy or remove it from its original group, but creates a group relation. To remove an attached product from a group, remove the group-relation from the product details - if deleted, it will be deleted in all product groups.
Product group details
When creating or editing a product group, you will have immediate access to the details view – which is the view you need, when configuring a group at the most basic level. More advanced options and settings are available from the product group ribbon bar.
In the following sections, you can read about the basic configuration options you have for product groups.
The more advanced options and settings available to you from the ribbon bar are described under the Implementing section of this document.
Basic product group settings
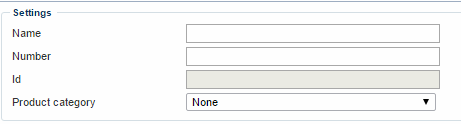
The first thing you will usually see is the basic product group settings (Figure 6.1).
With the basic product group settings, you can:
- Provide a name and number for the group. The product group name will be used in the frontend product catalog, and the product group number may be relevant for integration purposes, or simply as an identifier if you have two groups with the same frontend name.
- Select a product category for all products belonging to this group (or leave it as ‘None’). You create new product categories from Management center > eCommerce > Product catalog > Product Categories.
You cannot edit the Id field. This is a unique identifier given to all products, groups and shops and it is used, for instance, when integrating Dynamicweb Ecommerce with third party solutions.
Media settings
After the most basic settings, you will see the media settings (Figure 7.1).

With the media settings, you can:
- Attach a small and large picture to the product group in frontend
- Select an icon for the product group, which will be displayed on the list of groups instead of the standard folder icon in backend
Default group images
You can set default images for product groups by going to Management center > Ecommerce >Advanced configurations > Images and locating the group default images area (Figure 7.3).

Meta information fields
With the meta-information fields (Figure 8.1), you can create meta-information about the product group.
Meta information is used by search engines to index searches, and can have an effect on how your website is ranked.
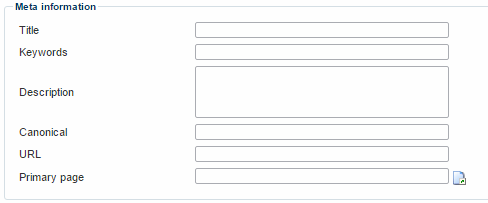
You can specify:
- A title, one or more keywords, and a description
- A canonical URL, for search engine indexing purposes. The page displaying the product group will then be regarded as an instance of the canonical URL.
- A user friendly URL for the group (if empty, the system will use the product group name)
- A primary page for the product group (if you use it in several shops, and across several product catalogs).
To use canonical or other types of custom URLs for your product group, you must first enable them under Management center > WEB and HTTP > Customized URLs. Make sure you’ve checked the following checkbox:

Default values for new product settings
With the default values settings (Figure 9.1), you can – well – set default values for products created under this group.

Setting these can optimize your workflow when creating multiple products with the same manufacturer, VAT group or stock status.
- To create Manufacturer values go to Management Center > Ecommerce >Product Catalog > Manufacturers.
- To create VAT group values go to Management Center > Ecommerce > Internationalization > VAT groups.
- To create Stock Status values go to Management Center > Ecommerce > Orders > Stock States.
Using this feature does not preclude you from using other values.
The green checkmarks are for making this selection apply to all products in the group – e.g. forcing the value onto existing products. You have to do this separately for each shop language.
Discount settings
If you have created any Sales discounts of the Product discount-type on your solution, you can select which (if any) sales discounts should apply to the products in this group (Figure 10.1).

Custom field types
Depending on your setup, you may have access to one of more types of custom fields on your product group details:
- Product group fields, which are custom fields which occur on all product groups on a solution
- Product category fields, which can be created an selectively attached to product groups. Products created in that group will then inherit the fields (and field values).
Read more about both types of custom fields in the Implementing section.
The Product Group description
If you click the Description button, your view will switch from the default Details view (where you provide the product group details) to the description view (Figure 12.1).
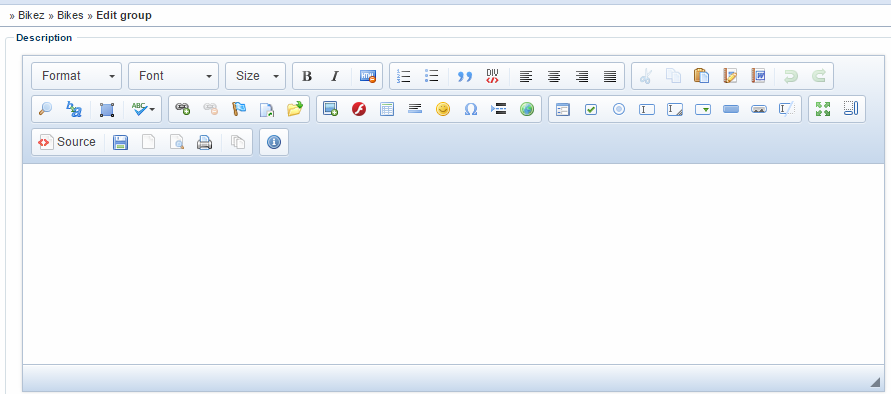
The description view basically gives you access to a rich text editor, where you can provide a description for the product group.
Additional product group options and settings
From the product group ribbon bar (Figure 13.1), you also have access to a number of more advanced settings and options for a product group.
Here's a basic overview of what the buttons do, but most of these areas are described more thoroughly elsewhere.

Location settings
The Location button gives you access to the location view (Figure 14.1).
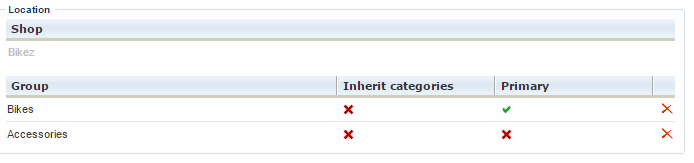
From here, you can:
- See the parent group (if any) and parent shop of the product group
- Enable or disable product category inheritance from parent groups – read more below.
- Select which parent group is the primary parent group (if any).
The order line fields view
Order line fields give you the opportunity to provide extra information about products in the order process. Order line fields can be inherited from the parent group of a product.
To add order line fields to the products in a product group, click the order line fields button (Figure 15.1) on the ribbon bar.
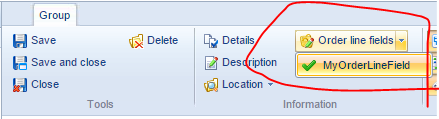
This allows you to attach any order line fields you have created to a product group – and shows you the order line fields view (Figure 15.2).
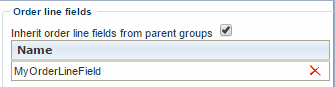
From here, you can see which order line fields are attached to the group, and whether they are set to be inherited from the parent group or not.
To delete an order line field, click the red X-icon to the right of the order line field entry. Inherited order line fields are shown in a separate list.
The Discounts view
If any of your order discounts are set to be assignable from product catalog, you can use the discounts-button (Figure 16.1) to assign a product to a discount directly from the product group.
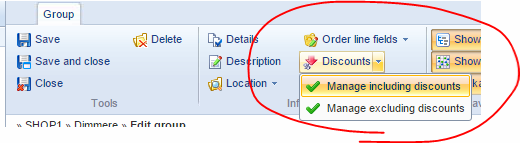
To do so:
- Click the little arrow-icon on the discount button and select either Manage including discounts or Manage excluding discounts. This opens a window showing the discounts you have made assignable from the Management Center.
- Select the discounts you want to include the product group in
- Click save and close
- The discount will be added to the discount overview for the product (Figure 20.2)

Read more about order discounts, sales discounts, including/excluding discounts and much more in the discounts documentation.
Navigation options
From the product group ribbon (Figure 17.1), you have access to the navigation options for the product group.

With the navigation options, you can control whether a product group should appear in the menu, in the sitemap, and if it should be clickable.
To enable or disable a setting, simply click the appropriate button.
New Products-settings
From the product group ribbon (Figure 18.1), you have access to the New products options for the product group.

The New products settings allow you to create default behavior settings, and are only applicable when creating new products in the product group.
You can:
- View or add one or more default related groups for new products created in this group – products created within this group are then automatically added to all the related groups.
- View or add any default related products for new products created in this group.
- Add a smart search which will automatically populate the list of related products for all products in the product group (e.g. a smart search finding red lamps, for a red-sofas product group, or something). Read more about product smart searches.
All related product groups, products and searches can be viewed and edited from the product details of a product - read more here.
Languages and Delocalization
From the product group ribbon (Figure 19.1), you have access to the Language and localization settings for the product group.

The Language dropdown shows the current working language. When you create a new group it is created in the default language and in the working language.
With the Delocalize button you can remove the language-specific versions of a group, i.e. non-default languages. To do so, change the language to go to the localized instance of the group and click delocalize.
Delocalizing groups in the standard language
Note that you cannot delocalize standard language versions of a group – they must be deleted instead. Deleting a product group in the default language, however, also deletes all products in the product group. Treat with caution!

Implementing
As stated in the introduction, products and product groups in Dynamicweb are very rich objects, with loads of properties, settings, options and abilities. Things can get pretty complicated. In this section, you can read about some of the more advanced native properties of product groups – options which should only need to be set up once or very rarely.
In this section you will learn about:
- How to create and apply product group fields on your Ecommerce
- How to create product category fields and control product category field inheritance
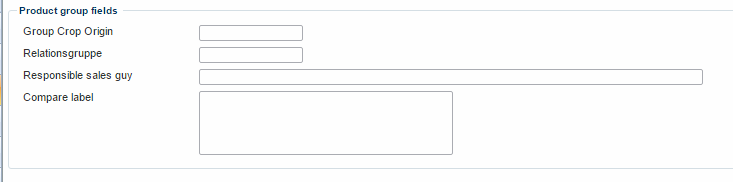
Product group fields
Product group fields are custom fields, which you can create, and which will then be available on all product groups.
When creating or editing a product group, you will then have access to the custom fields.
Product group fields on a product group could look like Figure 21.1.
To create a product group field:
- Go to Management center > Ecommerce > Product catalog > Product group fields
- Click New field in the toolbar (Figure 24.2). (If editing an existing field, simply click it)

- This opens the Product group field window (Figure 21.3)
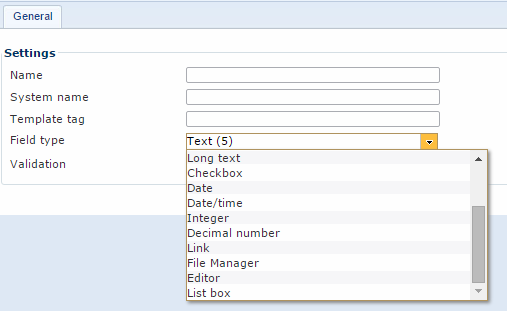
From here, you must:
- Specify a name and a system name for the field
- Provide a template tag-value for the field. Use this value in your templates to render the field content on the frontend. Read more about template tags for product groups below.
- Select a field type for the field – see table below
- Decide if the field requires validation or not (i.e. if it is required or not)
The field types available to you are:
|
Field type |
Function |
|
Text (5-255) |
Standard text field where you can type between 5 and 255 characters |
|
Editor |
Inserts a WYSIWYG editor where you write a text using various text editing tools. |
|
Long text |
Inserts a text box where you can type several thousand characters. |
|
Checkbox |
Inserts a checkbox |
|
Date |
Inserts a drop down where a date can be selected |
|
Date/time |
Inserts a drop down where a date and time can be selected |
|
Integer |
Inserts a field where integers can be entered |
|
Decimal number |
Inserts a field where decimal numbers can be entered |
|
Link |
Inserts a field where you can enter a link to another web page or a file in your File Manager |
|
File Manager |
Inserts a field where you can select a file from your File Manager |
|
List box |
Inserts a list of options that can be selected/deselected. This option comes with extra settings, see below. |
List box options
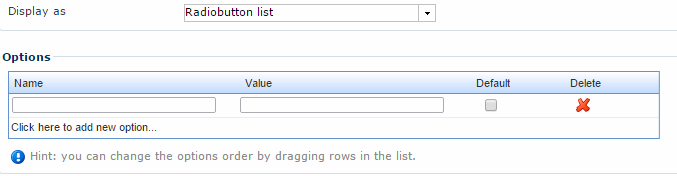
If you create a list box field, you will have extra options available to you (Figure 22.2).
You must:
- Choose between list box types, radio button, checkbox, dropdown, and multiselect, in the Display as dropdown
- Specify a name and a value for each of the list box options
- Choose whether you want each option to be selected by default or not
(Inherited) Product Category fields
Product category fields are used to extend the products in a particular group (and subgroups) with custom (and possibly inherited) fields and field values.
The process is straight forward:
- Create a number of product categories (e.g. wine, spirits and beer) and associated fields
- Attach product categories to product groups, and create default field values
- Customize which fields should be inherited by which subgroups
Once you have configured your product category fields, you can then enter custom values (or restore default values) from the edit group view – values, which will then be present on all new products located in the product group.
Here are the details!
Creating a product category
To create a product category:
- Go to Management Center > Ecommerce > Product catalog > Product categories
- Click New in the toolbar (Figure 27.1)

This will take you to the Product category view (Figure 24.2).
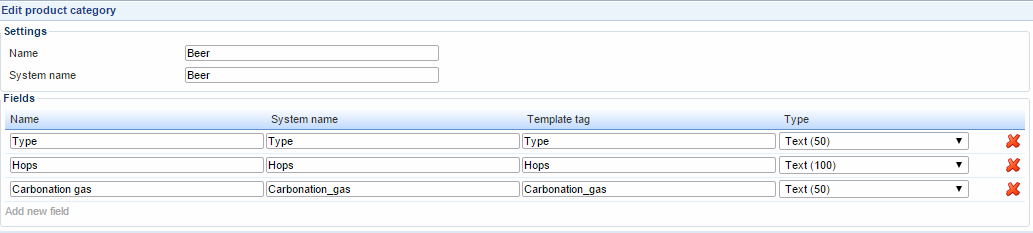
From here, you can:
- Specify a name for the product category, which will be used as the section name when editing a product or product group with product category fields (a system name will be generated based on the name).
- Add any number of fields to the product category – and name them and select a field type (a system name and template tag will be generated based on the name).
The field types available to you are:
|
Field type |
Function |
|
Text (5-255) |
Standard text field where you can type between 5 and 255 characters |
|
Editor |
Inserts a WYSIWYG editor where you write a text using various text editing tools. |
|
Long text |
Inserts a text box where you can type several thousand characters. |
|
Checkbox |
Inserts a checkbox |
|
Date |
Inserts a drop down where a date can be selected |
|
Date/time |
Inserts a drop down where a date and time can be selected |
|
Integer |
Inserts a field where integers can be entered |
|
Decimal number |
Inserts a field where decimal numbers can be entered |
|
Link |
Inserts a field where you can enter a link to another web page or a file in your File Manager |
|
File Manager |
Inserts a field where you can select a file from your File Manager |
|
List box |
Inserts a list of options that can be selected/deselected. This option comes with extra settings, see below. |
List box options
If you create a list box field, you will have extra options available to you (Figure 25.1).
You must:
- Choose between list box types, radio button, checkbox, dropdown, and multiselect, in the Display as dropdown
- Specify a name and a value for each of the list box options
- Choose whether you want each option to be selected by default or not
Attaching a product category to a group
When you attach a product category to a product group, all the products in the group will be extended with the fields defined in the product category.

To attach a product category to a group:
- Edit the group whose products should be extended with category fields
- Select the product category in the in the drop down in the Settings box
- Click OK to the popup appearing with a warning
- Save the group and confirm again
- Now all products in the group has been extended with the defined product category fields
Note: The category field values for all the products in the group will be lost when changing an existing product category on a group.
Setting default product category field values on the group
You can define default category field values on the product group. Note that these values are both inherited to groups and products below the parent group (Figure 27.1).
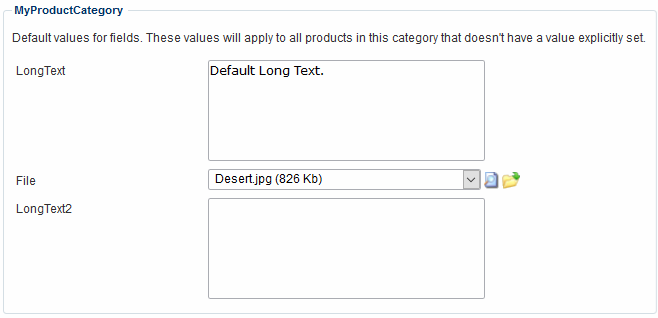
To set default values on a group:
- Edit a group with a product category attached
- Scroll down to the bottom of the edit group frame
- All the product categories on the group will have an individual box containing all their fields
- Input default text or default options in these fields to apply to all the products in this group that do not have a value explicitly set
You can always override the default values on the product if needed
Controlling product category inheritance
You can control what category fields are inherited from groups to subgroups under the Location button in the ribbon (Figure 28.1).
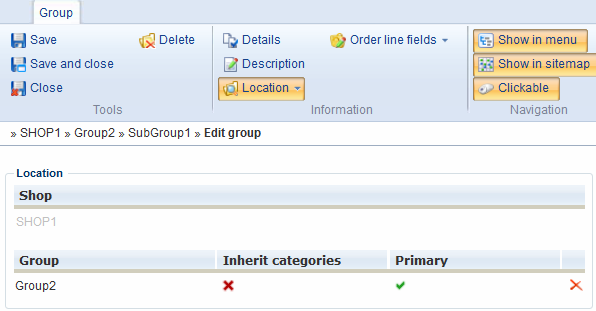
Here you can select the parent group(s) from which to inherit category fields. If several groups are selected, the available fields will be a merge of all the parent group fields.
To enable or disable product category inheritance:
- Edit the group where you want to enable inherit categories
- Click the Location button in the ribbon
- Click the red cross for the groups whose categories should be inherited
- Click the green checkmark for the groups whose categories should not be inherited
- Save the group
Entering and restoring product category values
Once you have parent groups defined, you can see the inherited product category fields when editing a product (Figure 29.1).
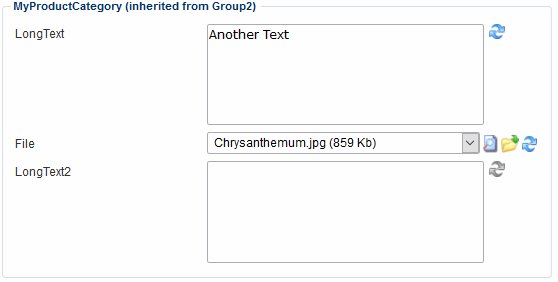
With the blue arrows, you can restore category field values to the default defined on the parent group(s).
When a field has an inherited value the text is dimmed (Figure 29.2).


