Google Tag Manager
Google Tag Manager is a tool that can be used to manage and deploy marketing tags on your website solution, without having to modify the code. In Rapido, we have implemented the code snippets for Google Tag Manager custom events, for example supporting Enhanced Ecommerce.
You can add different tags using the events and thereby retrieve useful user behavior when customers are visiting their websites.
All this retrieved information can then be presented visually using Google Analytics.
Account setup
To use this tool, start by setting up your Google Tag Manager account. Go to the Google Tag Manager webpage and click "Start for free". If you do not have a Google account already, you will have to create one to utilize this tool.
After creating your account, you will be given a Google Tag Manager ID (referenced to as GTM-ID in this article). You can find your ID this way:
- Click on the admin section from the ribbon bar
- Your GTM ID will be located on the right side as shown in Figure 2.1

Google Analytics
Google Analytics is a tool used to help you analyze the traffic on your website. It helps you keep track of your digital marketing effectiveness by providing in-depth detail about the traffic on your solution. Get valuable insights that can be used to maximize your impact on potential customers.
- Information is gathered using Google Tag Manager
- This information is then sent to Google Analytics which processes this information
- The results are then presented in Google Analytics with relevant graphs and statistics of the activity on your website
So, it isn't relevant to dive into Google Analytics just yet, as Google Tag Manager needs to be set up first. For now, just create an account (to get the Google Analytics tracking ID) and enable the Ecommerce features.
Create a Google Analytics account
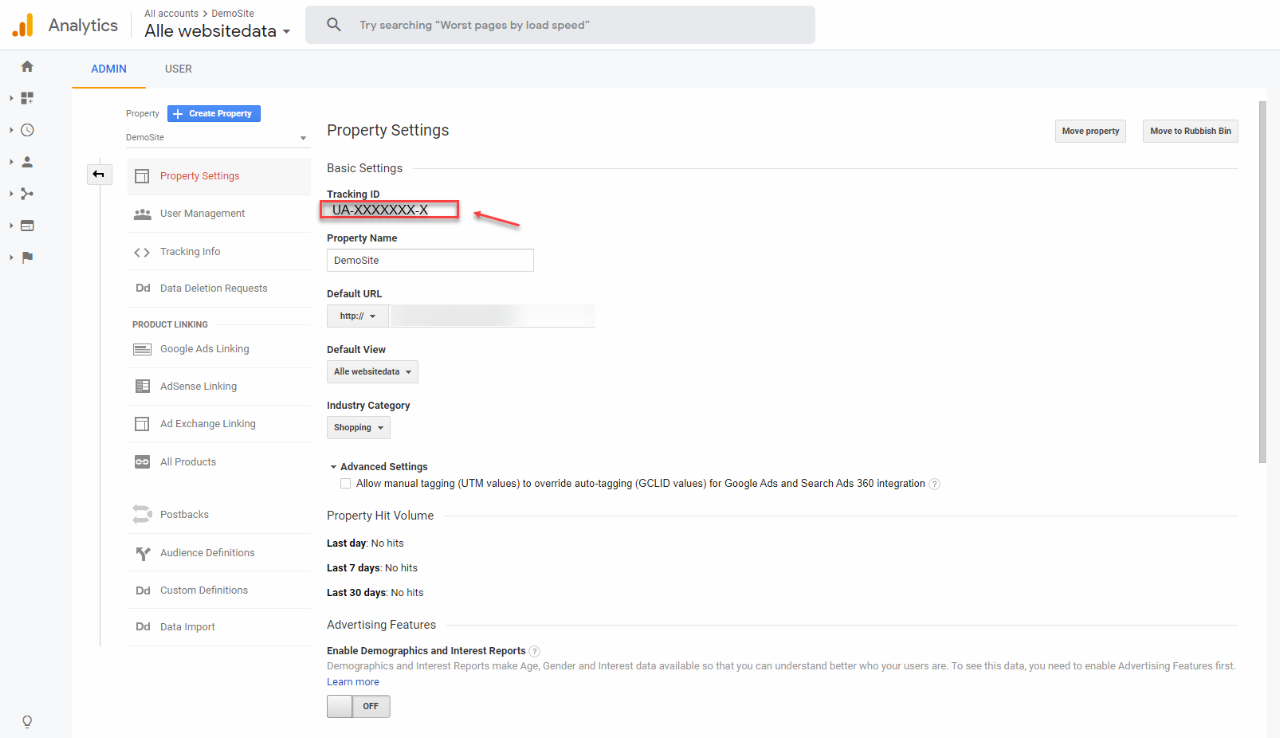
To use Google Analytics with Rapido, you will also need to create a Google Analytics account and get a tracking ID. To create an account and get the ID, follow these steps:
- Go to the Google Analytics webpage and create a free account
- After creating the account, enter the admin section
- Then, go to Property settings and you will find your tracking ID as shown in Figure 4.1
Enhanced Ecommerce
Enhanced Ecommerce is a feature provided by Google Analytics, that assists you in gathering information regarding how users interact with the products from your web shop. With enhanced ecommerce, you can measure anything from, product clicks, views of product details and additions or removals from shopping cart etc.
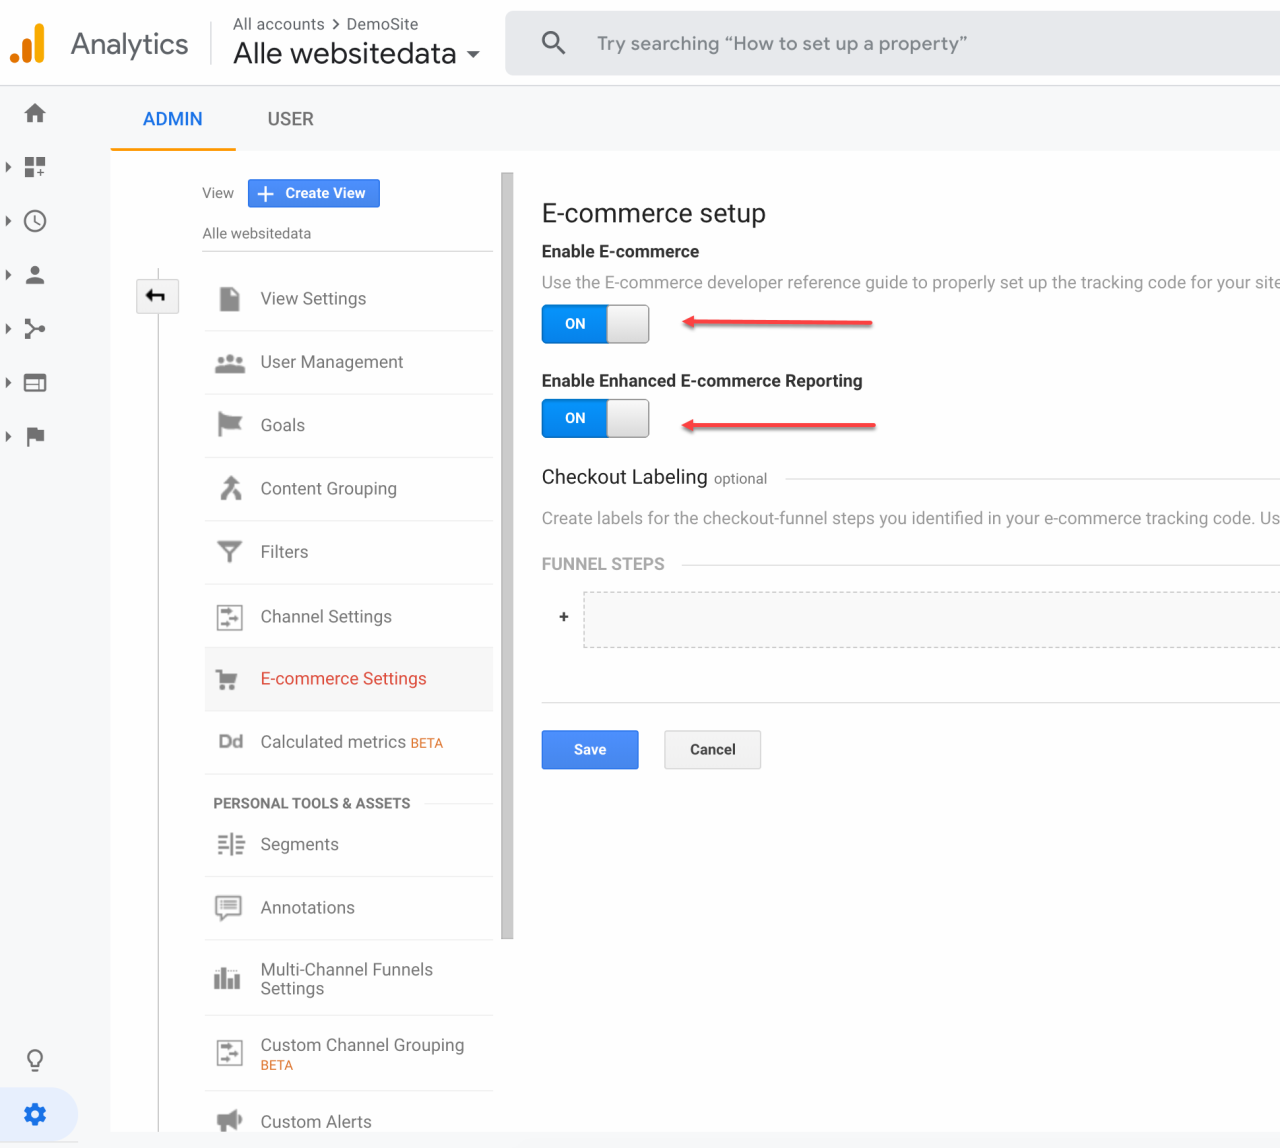
To use the Ecommerce features, you will have to configure your settings in Google Analytics. To do so, go to admin, click on E-commerce Settings and enable E-commerce and enable Enhanced E-commerce reporting (Figure 5.1).
Using Google Tag Manager
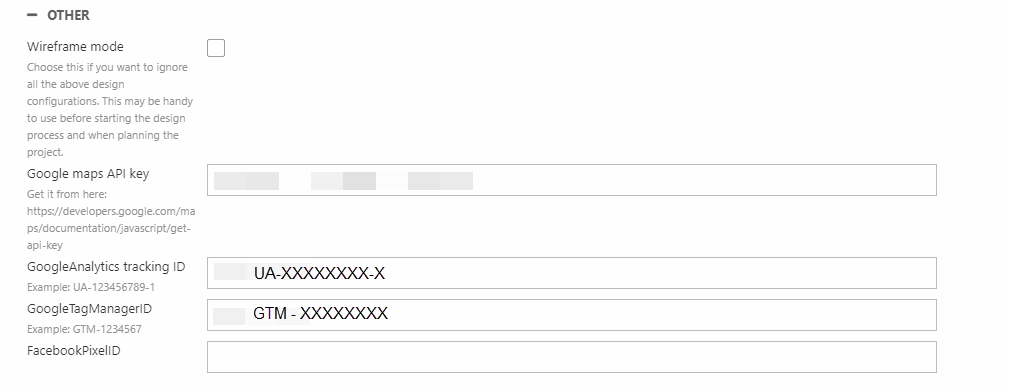
To make Rapido compatible with Google Tag Manager, you must insert your GTM ID & Google Analytics (GA) tracking ID to the website settings:
- Enter your website settings and go to the Settings tab
- Under the Other section, input your GTM ID & GA tracking ID as shown in Figure 6.1
Now, let's set up Google Tag Manager so we can retrieve some data.
In order to utilize Google Tag Manager (GTM), you must have knowledge of the different components needed. There are tags, triggers, and variables:
- Tags are used to send data, to e.g. Google Analytics
- A trigger is the listener for the different events - it listens to clicks, form submissions, page loads etc.
When an event is matched with a trigger, any tags with reference to the trigger will be fired - A variable is just a placeholder for a value that can be changed
See Google's documentation for further explanation.
Ecommerce events
Rapido has some existings ecommerce events that can be utilized by the use of Google Tag Manager. These events are listed below:
|
Events |
Comments |
|
addToCart |
If one of your products is added to cart, this event will be activated |
|
checkout |
When a user goes to the checkout, this event will be activated |
|
productClick |
When a product is clicked on your website, this event will be activated |
|
productDetails |
If entering the product detail, this event will be activated |
|
productView |
When a product if viewed e.g. on the list, related products, this event will be activated |
|
purchase |
If a product has been purchased in checkout, this event will be activated |
|
removeFromCart |
If a product is removed from the cart on your website, this event will be activated |
Variables
Variables are simply just placeholders that represents values that will change.
Here's a brief explanation of how variables work with triggers and tags:
- When combined with triggers, variables are used to define filters that specify when a certain tag should fire.
- e.g.: "Fire a form submission trigger, when a form has been submitted"
- When combined with tags, variables are used to capture values that are dynamic.
- e.g.: "Pass a product ID to a tracking tag".
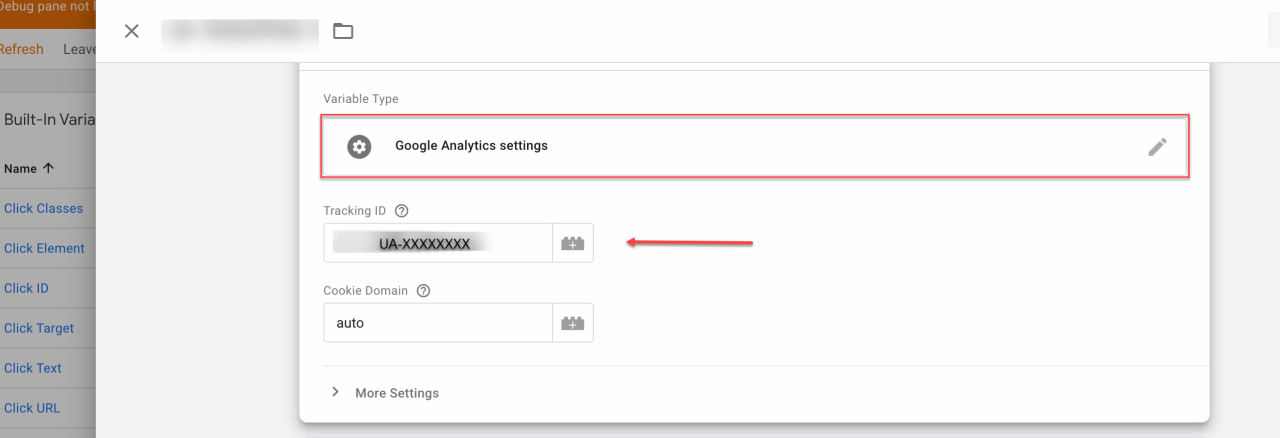
Create variables
To create variables in GTM, enter your Workspace and then click Variables. Please follow the steps below:
- Create new variable
- Select variable type Google analytics settings as shown on Figure 9.1
- Insert Your Google analytics tracking ID UA-xxxxxxxxxx
- Optional: You can set your GA ID as your name of the variable
- Under More settings/Ecommerce, you must tick the checkboxes: Enable Enhanced Ecommerce Features & Use data layer
Triggers
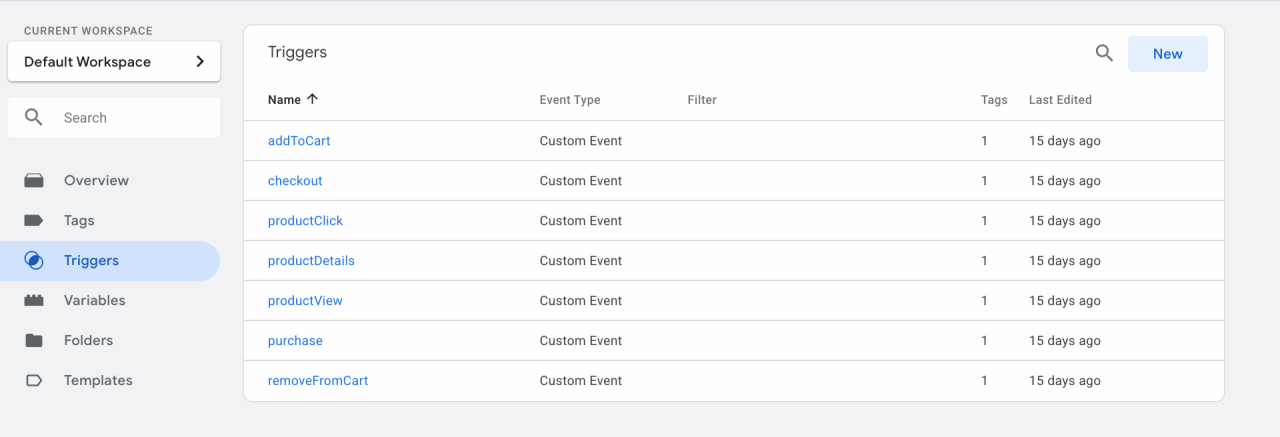
To use GTM with Rapido, you need to add the following triggers:
- addToCart
- checkout
- productClick
- productDetails
- productView
- purchase
- removeFromCart
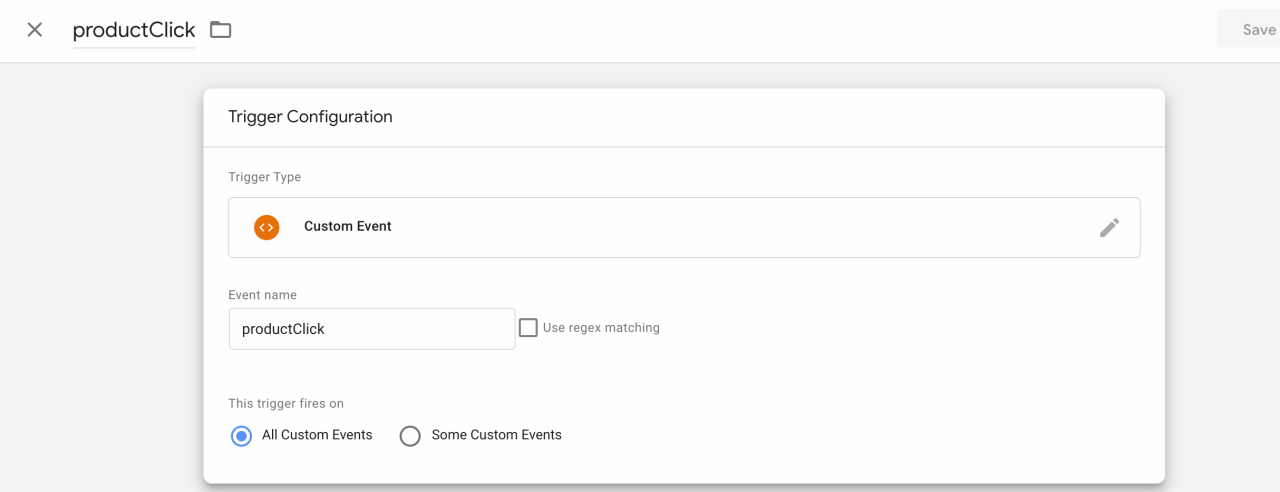
To create triggers, enter your Workspace and click Triggers. Then, use the procedure described here to add all the mentioned triggers - the only variation is the event name.
- Create new trigger
- Select the trigger type custom event
- Insert the event name - the name needs to be identical to the triggers made in the Rapido template, so e.g. productClick
- Set the trigger to fire on “All custom events”
- Optional: set your title to the same as your event name
After creating all the triggers above, they can be seen from the overview section in GTM as shown in Figure 10.2.
If you feel like you still want more information regarding triggers, see Google's documentation here.
Tags
To get more information on tags, please see the Google documentation here.
To create tags in GTM, go to your Workspace and click Tags. Then, please follow the steps below:
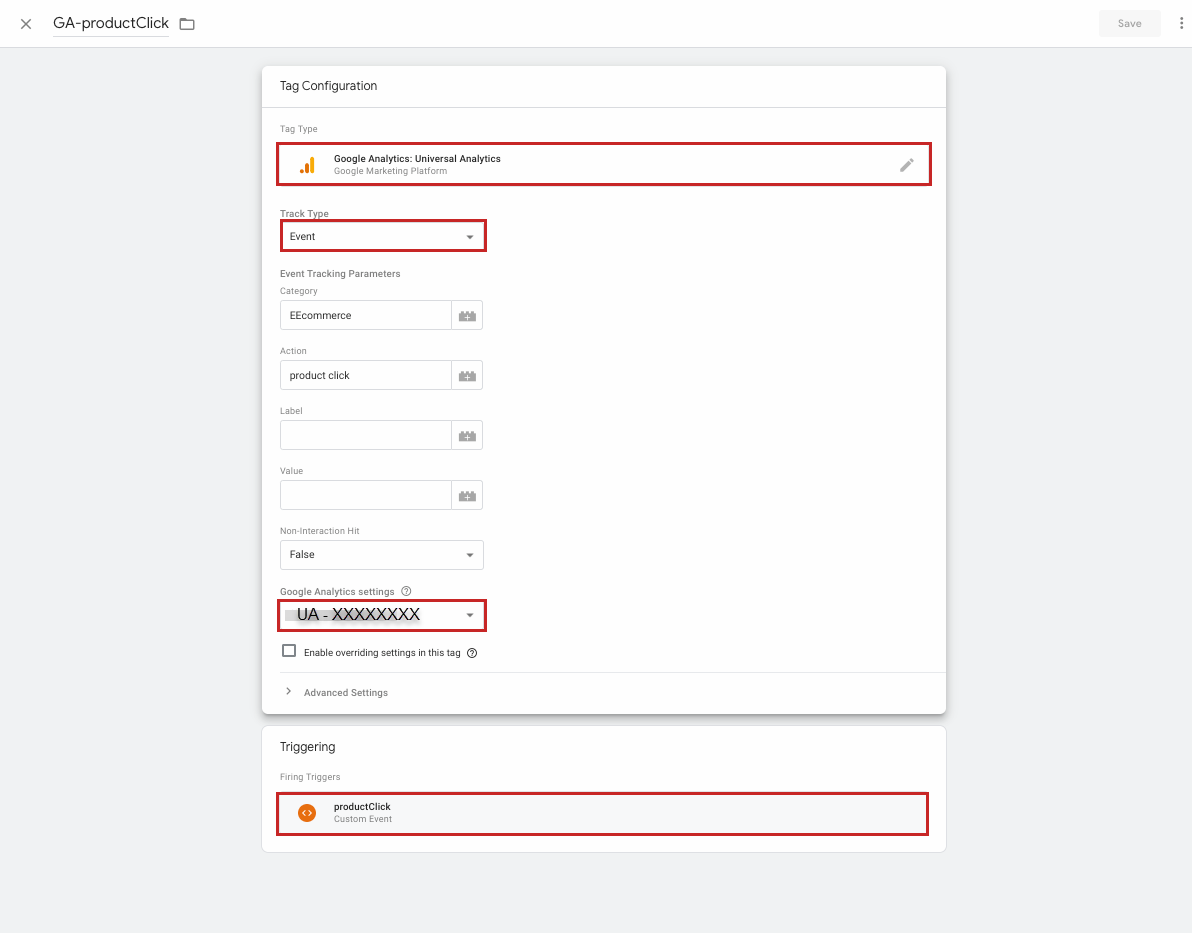
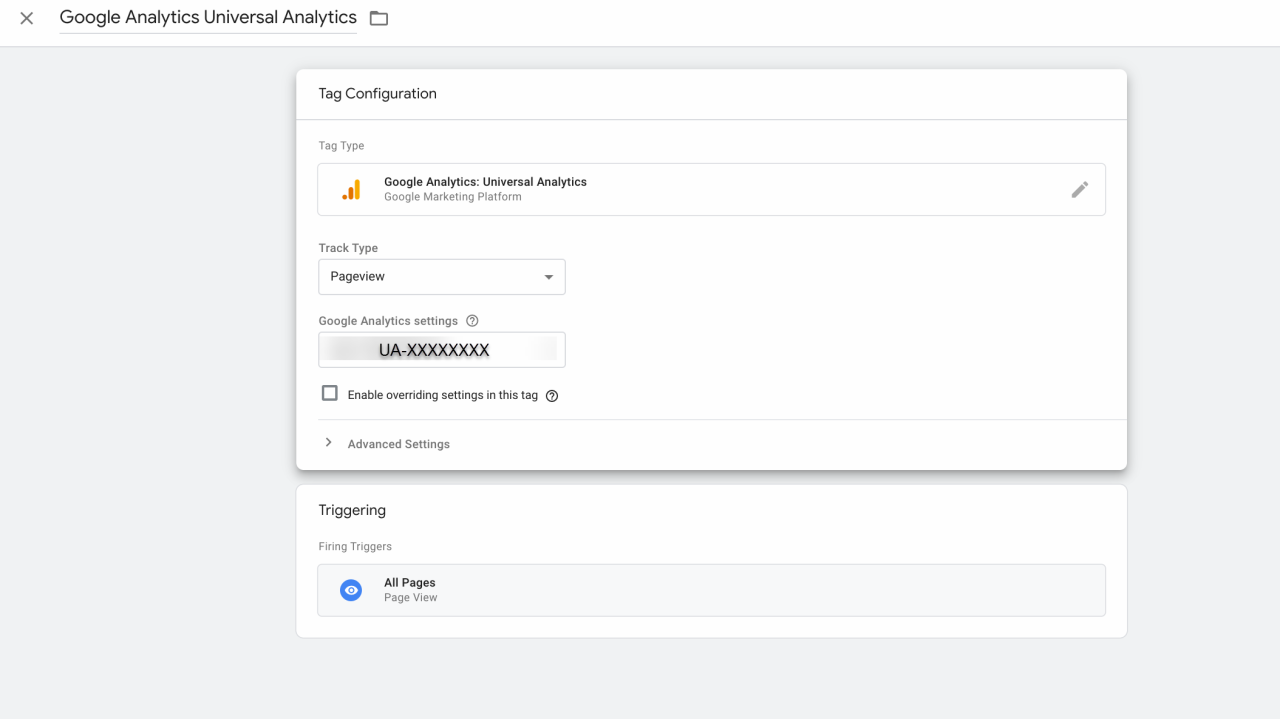
Example for creating the GA-productClick tag
- Create new tag
- Select tag type – Google Analytics: Universal Analytics
- Select track type: Event
- Insert category name e.g. EEcommerce
- Insert action name e.g. ActionProductListClick
- Insert GA tracking ID UA-xxxxxxxxxx (select your predefined variable)
- Select triggering - custom event: productClick
- Optional: set your title to GA-productClick
After creating the first tag, we still need to create a bunch more. The procedure is the same, you just need to replace the previous custom event name with the ones listed below:
- addToCart
- checkout
- productClick
- productDetails
- productView
- purchase
- removeFromCart
Lastly, we need one more tag to be created. Please follow these steps:
- Create the new tag
- Select tag type – Google Analytics: Universal Analytics
- Select track type: Pageview
- Insert GA tracking ID: UA-xxxxxxxxxx (select your predefined variable)
- Select triggering – All Pages
Now, go back to the overview section, to view all the different tags you have created earlier. It should match the tags in Figure 12.2 .

Preview & submit
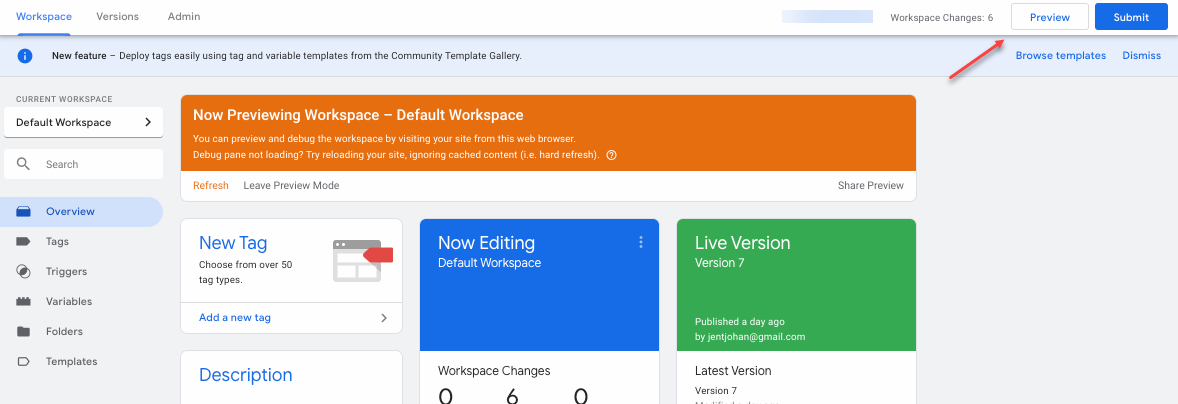
When the variable, triggers and tags are created, it is possible to see if your triggers works and are fired in the frontend. Use the Preview button (Figure 13.1) to test the triggers.
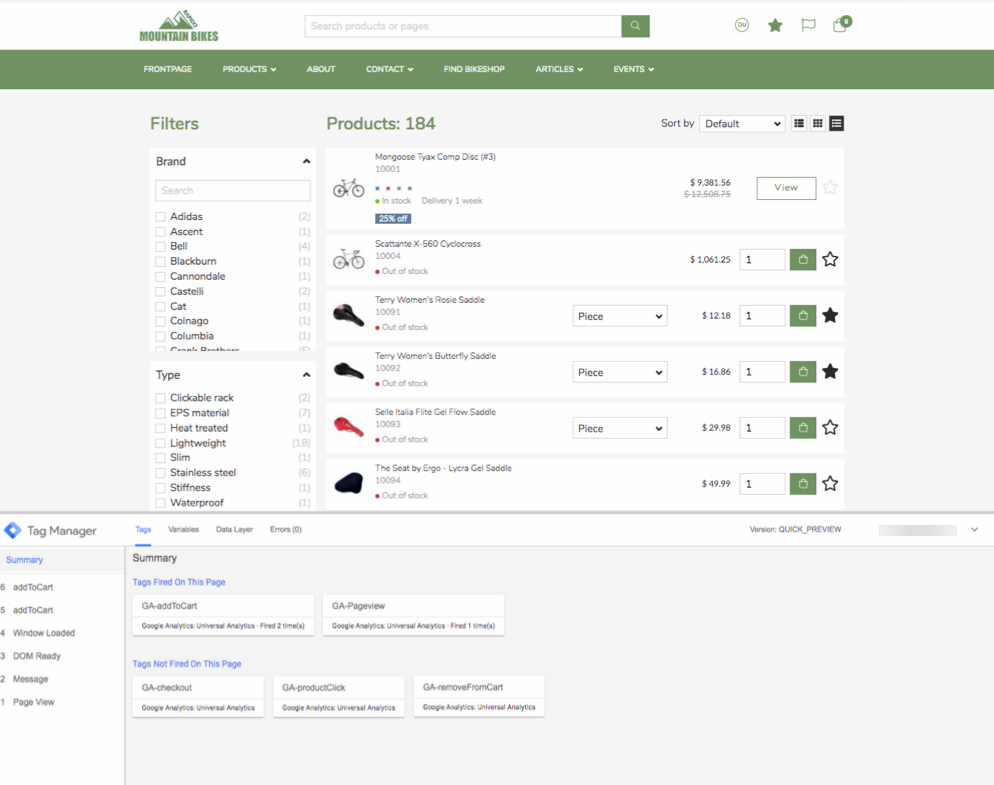
After clicking preview, you will be shown the frontend of your website and enter GTM debug mode (Figure 13.2). Here, you will be able to see everything you have created so far. You can for example see which tags got fired and which didn't. The debug mode is made for previewing everything you have developed, before you choose to submit it.
When satisfied, the results can be submitted and will then be sent to Google Analytics, which will process the information.
So, after previewing everything you made, it's time to submit what you have developed so far. To do so, follow these steps:
- Go back to your workspace
- Click on submit as shown on Figure 14.1

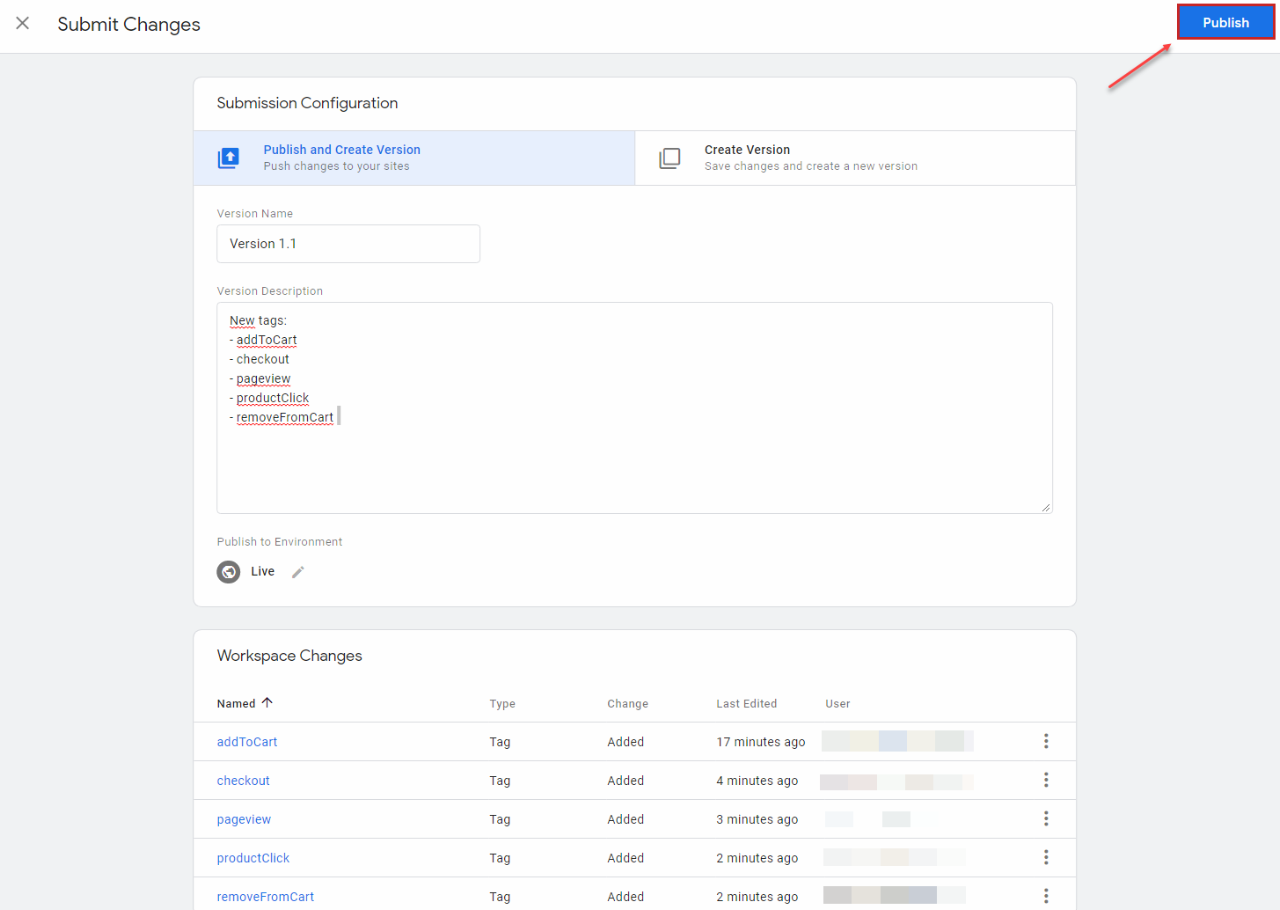
After pressing submit, you will be redirected to the submission configuration. Here, you can describe the changes that you have developed. Follow these steps to do so:
- Input a version name
- Add a detailed description of the changes
- Choose the enviroment where you want to publish it (Live is selected by default)
- When you are satisfied, click publish as shown on Figure 14.2
Viewing the analyzed information
So, the user activity on your website has been picked up by Google Tag Manager's variables, triggers, and tags. This information has then been sent to Google Analytics for analyzation, and now it's time to see the analyzed results!
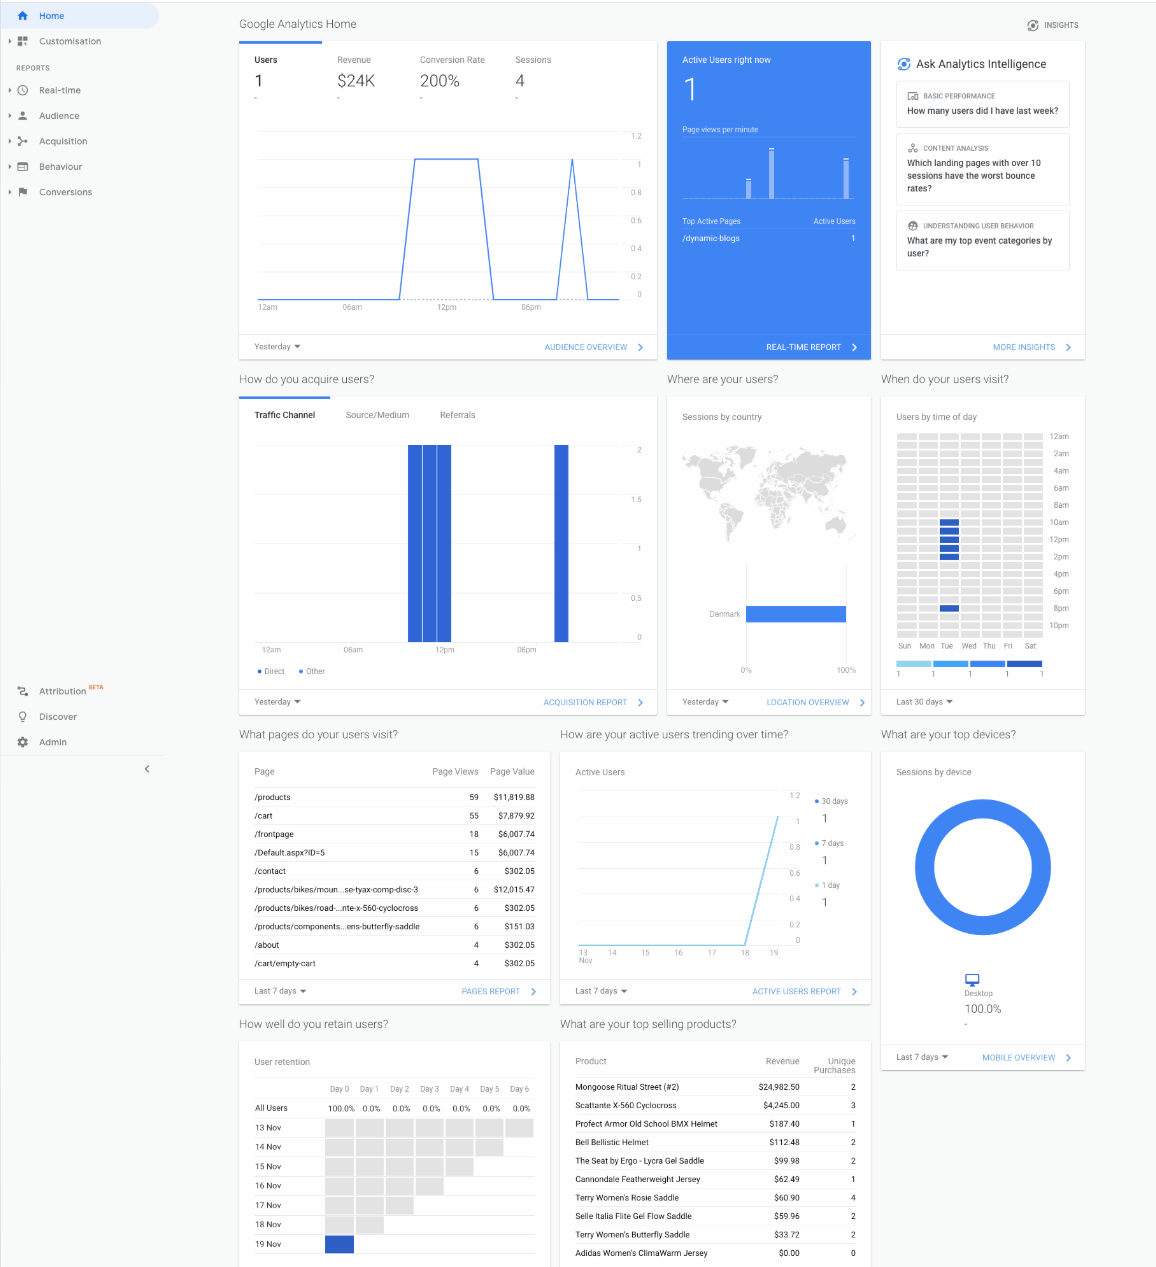
On the Home page in Google Analytics (Figure 15.1), you will be able to see a data overview with the actions that have been made on the website. These are some of the things you will be able to see:
- Pages visited
- Devices used
- Top selling products
- Real time reports
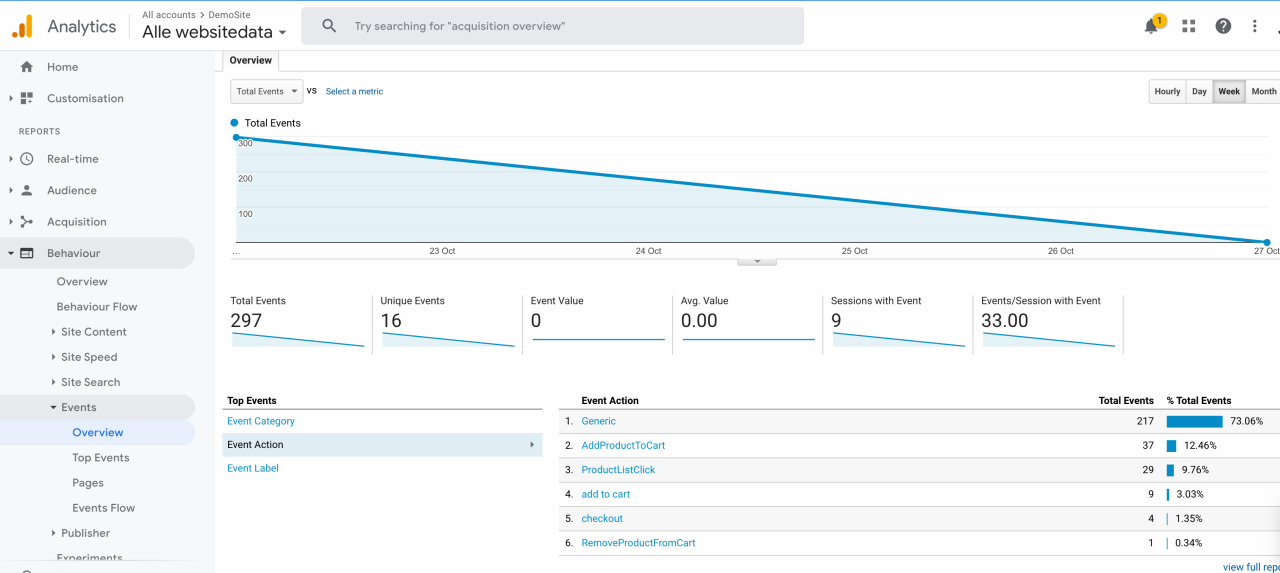
You are able to view all the events that have occured on your website, based on the tags and custom events set in Google Tag Manager. Go to the Behaviour section and click events to see an overview of the different events (Figure 15.2). You can see the:
- Total events
- Top events
- Event action
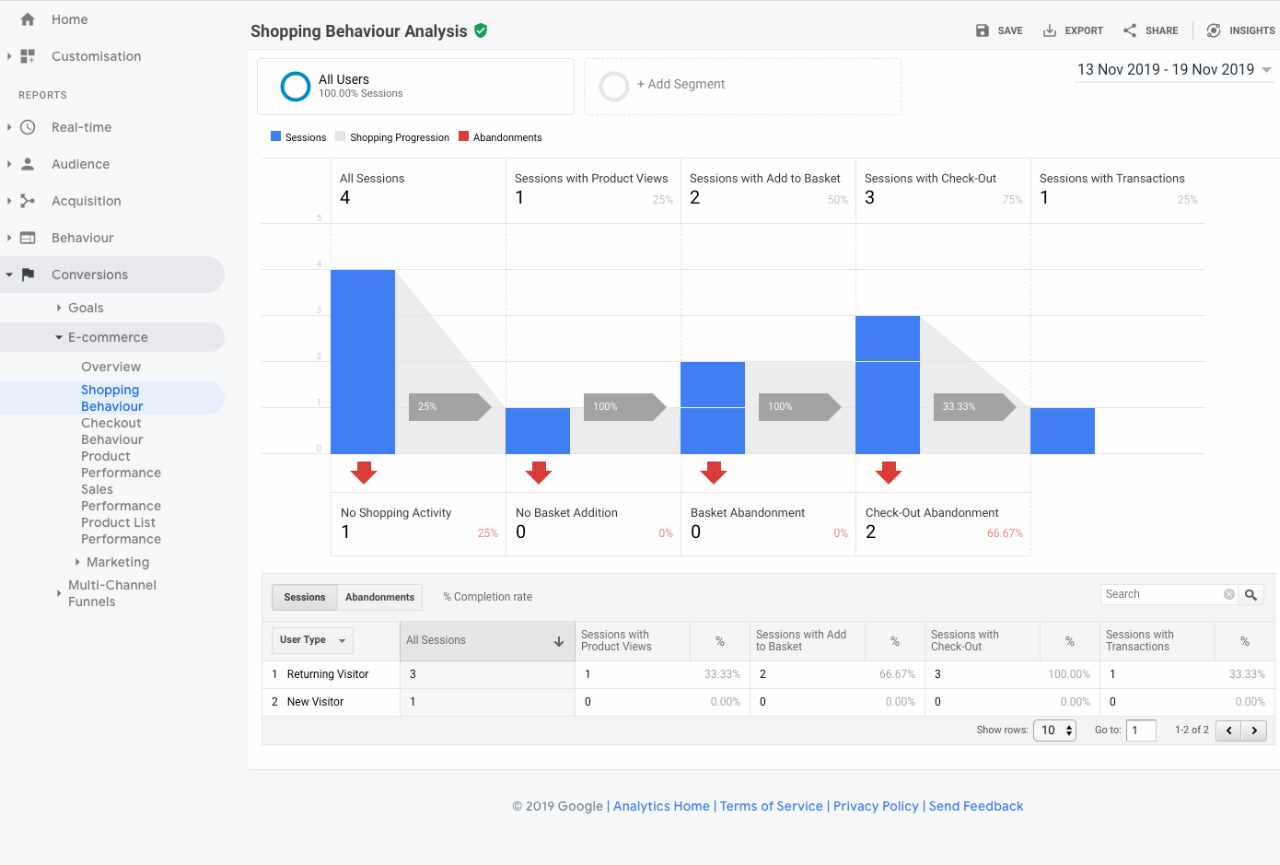
In the Conversions section and under E-commerce > Shopping-behavior, you will be able to see the users' behavior on the site, based on the data from the Enhanced E-commerce feature.