
Image Handler
The Dynamicweb Image Handler – GetImage.ashx – is a tool for generating images dynamically based on a source file located in the file archive. This eliminates the need for generating thumbnails or resizing images manually or automatically from the file manager.
The image handler is used by calling GetImage.ashx directly in a template with a set of relevant parameters, e.g.:
Based on these parameters an image is generated and stored in the /Files/Cache/Images folder, from where it is served until the cache is invalidated and a new image is generated.
To help you familiarize yourself with the Image handler a graphical tool – the Image Handler tool – is available from Settings > Developer > Image Handler (Figure 1.2).
Please note that this tool is simply a convenient tool for familiarizing yourself with the image handler parameters and their effect - it does not, in fact, have any impact on how images are served in your templates, that is all defined by the parameters included in the GetImage-call.
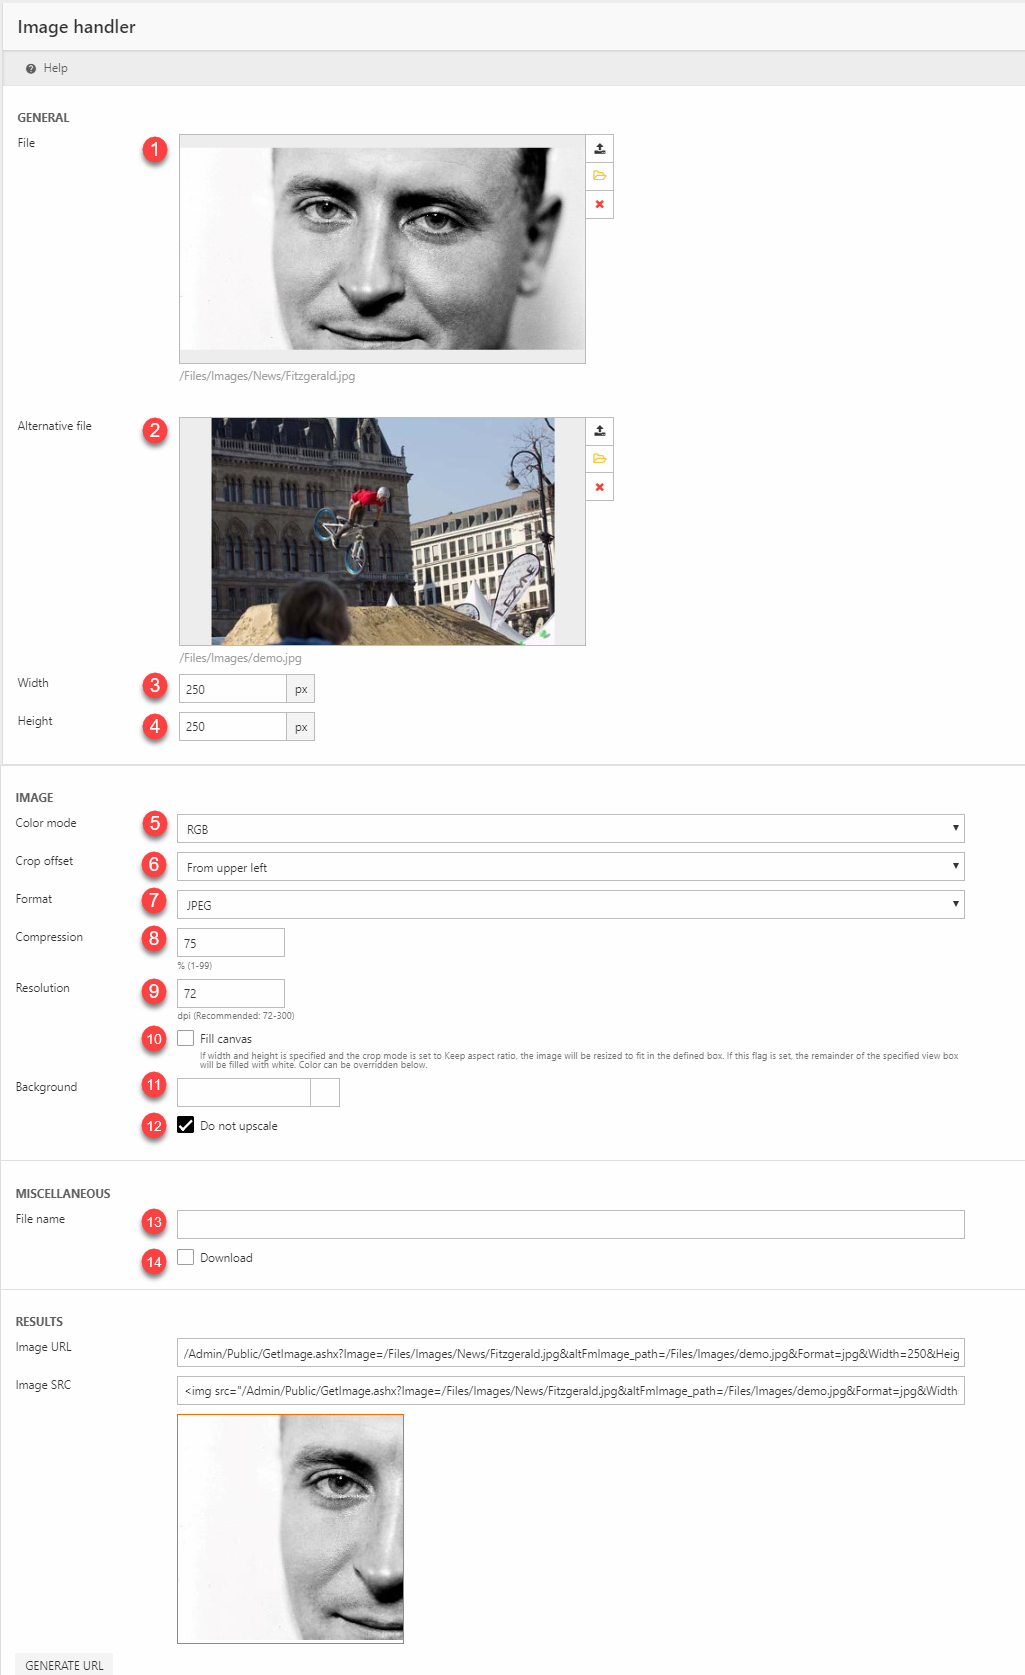
Using this tool, you can try out different parameter combinations and generate an URL and a preview image.
The following parameters can be set – please note that the parameter name may not match the Image Handler UI name:
|
# |
Parameter |
Value |
Notes |
|
1 |
Image |
A path to an image file in the file manager – written or retrieved using a template tag. |
Required |
|
2 |
AlternativeImage |
A path to an image file |
If the primary image does not exist, the image specified here will be shown instead.
Can also be specified using the &altFmImage_path= parameter – this is the old parameter |
|
3 |
Width |
1-99999 |
Required |
|
4 |
Height |
1-99999 |
Required |
|
5 |
ColorSpace |
RGB, CMYK or Grayscale |
RGB is default |
|
6 |
Crop |
Center: 0 |
|
|
7 |
Format |
Jpg, gif, png, tiff, bmp, psd, pdf, webP |
See section below for more information |
|
8 |
Compression |
1-99 |
Only for .jpg output. 1 is lowest quality, 99 best |
| - | Quality | 1-99 |
Only for WebP images - default is 50, which is quite low, so please use a specific value -1 = lossless compression |
|
9 |
Resolution |
72-300 |
DPI |
|
10 |
fillcanvas |
True/False |
If width and height is specified and the crop mode is set to Keep aspect ratio, the image will be resized to fit in the defined box.
If this flag is set, the remainder of the specified view box will be filled with the color specified via the Background parameter. |
|
11 |
Background |
Hex color code |
Sets the background color for transparent png’s |
|
12 |
DoNotUpscale |
True/False |
If cropmode 5 is used, DoNotUpscale is always set to true - this cannot be overridden. |
|
13 |
Filename |
A filename with an extension, e.g. MyFancyImage.jpg |
|
|
14 |
ForceDownload |
True/False |
|
|
- |
donotcache |
True/False |
Bypasses any image cache – can’t be set from the Image Handler tool |
You can also visit www.yoursolution.com/admin/examples/getimagetest.html and examine the testsite we use internally to test the image handler functionality.
Format
The Format parameter is a deceptively simple parameter which allows you to a very cool thing; convert images to other formats on the fly. Currently the following formats are supported:
- JPEG
- GIF
- PNG
- TIFF
- BMP
- PSD
- WEBP
The Format parameter is added to the getImage URL like any other parameter, e.g.:
However, some of the formats come with additional parameters and settings:
- Using JPG adds an additional parameter – Compression – which defaults to 75
- Using GIF adds an additional parameter – Color – which controls the number of colors used in the generated gif (1-256)
- Using WebP adds an additional parameter – Quality – which controls the quality level of the generated webP image. The default quality is set to 50
- The PDF format is for generating pdf files from text files, not for handling images.
Since support for the WebP format is not yet universal, we check the accept header for an image/webp value before serving a WebP image – if the header is not found, we instead generate and serve a .jpg.
Focal Points
Focal points is an advanced image feature used to crop responsive images intelligently, making sure that the selected focal point is always included in the image shown in frontend.
Focal points can be activated on:
- All item fields of the type File when used as image selectors
- All image fields on a standard paragraph – if toggled in the interface settings
When focal points are enabled, you will be able to set a focal point on an image using the curser (Figure 3.1).
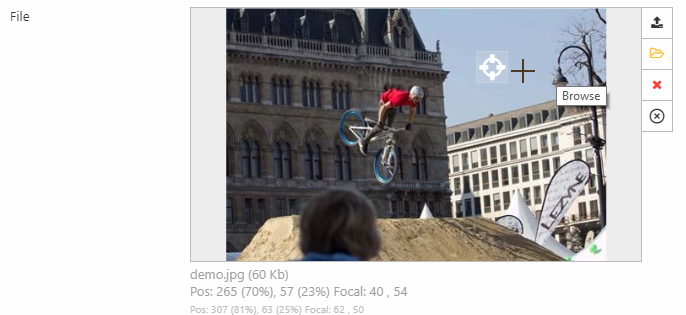
When a focal point has been set, the focal point coordinates are made available in frontend via template tags and ViewModel properties, can can be passed to GetImage:
Focal points are used by all crop modes except crop mode 5 – Keep aspect ratio.
You can visit www.yoursolution.com/admin/examples/getimagefocaltest.html and examine a couple of examples we use to test focal points internally.
Embedded ICC Profiles
GetImage.ashx supports embedded ICC profiles when files are downloaded, which is essential when working with images for e.g. print media.
Embedding ICC profiles is supported for TIFF and JPEG images only.
To embed an ICC profile in an image generated by the Image Handler, you simply use a set of query string parameters which detail whether to include ICC information, and which profile to use.
|
Parameter |
Function |
|
ICC=true/false |
If true, this embeds an ICC profile – defaults to auto |
|
ICCprofile=auto |
This profile preserves original color profiles where possible, and is generally faster than using standard because less conversion is done. |
|
ICCprofile=standard |
The built-in default color profile will be used – sRGB |
|
ICCprofile=device |
The device ColorSpace will be used |
|
ICCprofile=[icm file] |
Uses the color profile in a particular ICM file – e.g. AdobeRGB1998.icc – provided that the default color profile folder on the server (\Windows\System32\spool\drivers\color) contains a file of that name |
