Marketing
The Marketing settings contain settings and tools related to the Dynamicweb Marketing tools:
- Email Marketing
- Split Tests
- Personalization
- Social Media Publishing
- Leads
- Etc.
They are accessed from Settings > Marketing - read more below.
General
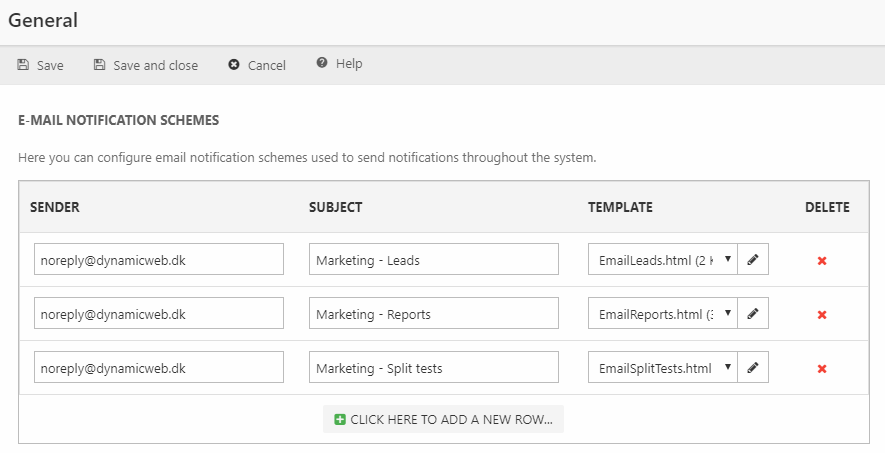
You can find the most general settings regarding Marketing under this section. Currently, you can only set up email notification schemes.
Email notification schemes
Under Settings > Marketing > General, you can set up email notification schemes. These provide an easy way to send email notifications using the same sender, subject and template.
Split Tests
In the advanced settings here, you can set up email notifications for split tests (Figure 4.1). These emails will contain split test report data and will be sent in intervals if certain requirements are met.
You can read more about setting up and using split tests in this article.
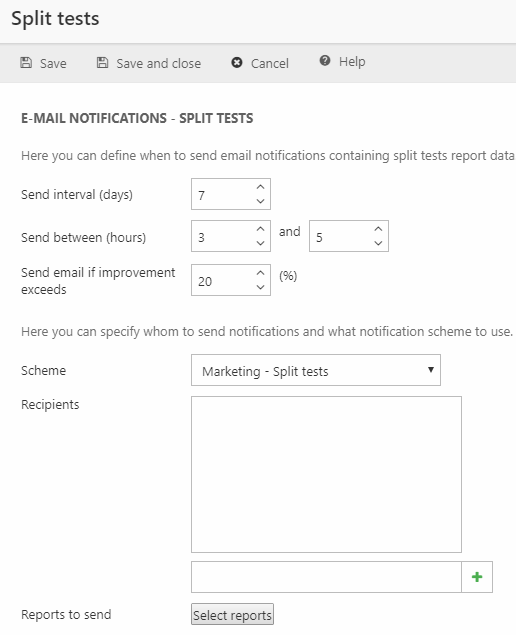
You must:
- Specify the interval for the email notification
- Choose a time interval in which the email notification can be send
- Set a minimum improvent (%) requirement
- Select a notification scheme defined in Settings > Marketing > General
- Select recepients and which reports to include
Personalization
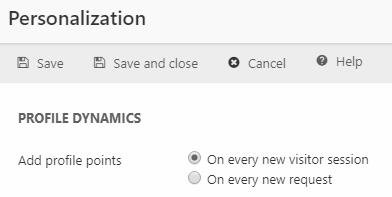
With these settings, you can decide if profile points should be added on every new visitor session (e.g. if a link is clicked in the current session) or on every request (e.g. each time a link is clicked).
You can reed more about using Personalization in this article.
Social Media Publishing
Please note: Social Media Publishing has been deprecated since 2018, and it completely removed in newer versions.
Before you can publish content on social media, you must set up one or more social media publishing channels to publish your content through.
Dynamicweb supports Twitter and Facebook natively.
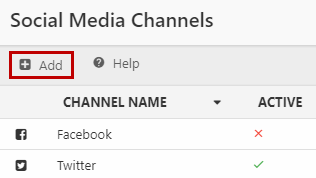
To set up a publishing channel go to Settings > Marketing > Social Media Publishing (Figure 6.1).

This takes you to the Social Media Channels page. From here, you can add new social media channels.
- Click the Add button (Figure 6.2) in the toolbar
This opens the channel setup view (Figure 6.3):
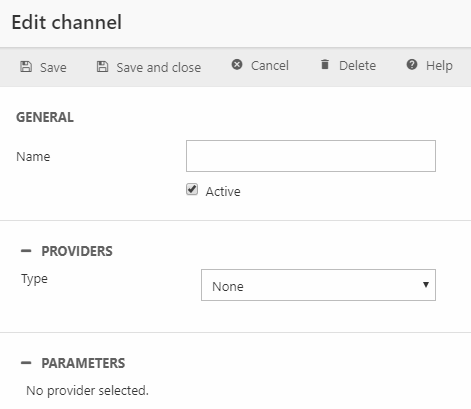
From here you must:
- Name your channel
- Select the type of channel (Facebook or Twitter)
- Specify any parameters required by the social media provider
Parameters are social media specific, and based on the authentication process for the social media in question.
Social Media Parameters for Twitter
For Twitter, you must:
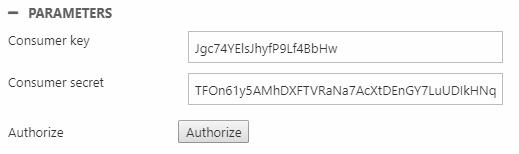
- Provide a consumer key, which is an API key provided by Twitter when your application is created
- Provide a consumer secret, which is a kind of password provided by Twitter when your application is created
- Click authorize to get your social media channel validated and authorized
For a(n external) guide on how to create a Twitter app, read here.
Social Media Parameters for Facebook
For Facebook, you must:
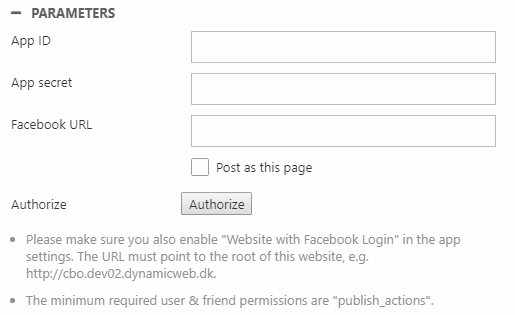
- Specify an App ID, which is provided by Facebook when your application is created
- Specify an App secret, which is provided by Facebook when your application is created
- Provide the URL to your Facebook page – you need this, if you want to post as a page, rather than with your personal account. Check post as this page if you want to post as the page – if unchecked, you post with your personal account on the page provided.
- Click Authorize to validate and authorize your social media channel
For a(n external) guide on how to create a Facebook app, read here.
SMS
In the settings here, you can set up an SMS gateway. You need to provide an SMS gateway to use the SMS app. You can read more about using the SMS app in this article.
To set up an SMS gateway:
- Go to the Settings area
- Navigate to Marketing > SMS
- Click SMS
You will see the SMS gateway configuration options (Figure 10.1).
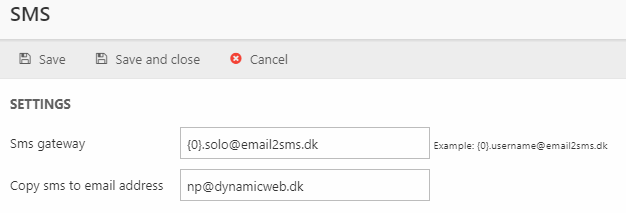
From here you can:
- Provide the email-address of your SMS Gateway – containing a placeholder for the user phone number. The gateway email doubles as the From address when sending texts, so don't use little.miss.piggy@ham.com (unless that's what you do, sell hams).
- Provide an email, if you want to receive copies of the texts sent out by the app
The Gateway address format depends on your service provider, but should start with {0} – the system substitutes the 0 with the phone number of each user you send a text to.
You should only provide an email for testing purposes – unless you want to receive an email for every single text you send out.
Leads
You can use the Leads-tool to monitor visitor engagement and flag the most engaged visitors as potential leads.
Engagement is measured by assigning an Engagement Index value to various actions, and collecting visitor statistics based on that.
You can read more about the Leads tool in this article.
Leads settings
The Lead settings control various aspects of the Leads tool behavior, but most importantly it controls the Engagement Index configuration for your website.
To access the lead settings:
- Open the Settings area
- Go Marketing > Leads > Lead Settings
Here’s a rundown of the Lead settings, starting with the most important one – the Engagement Index.
The Engagement Index
The heart of the Leads tool is the Engagement Index, which is used to rank your visitors by their engagement.
But how do you measure engagement?
You assign a points value to certain actions, and measuring how many points a visitor collects during their time on your website.
To make your Engagement Index more relevant, change the EI-points value of the actions below, so they reflect the value they have in your business model.
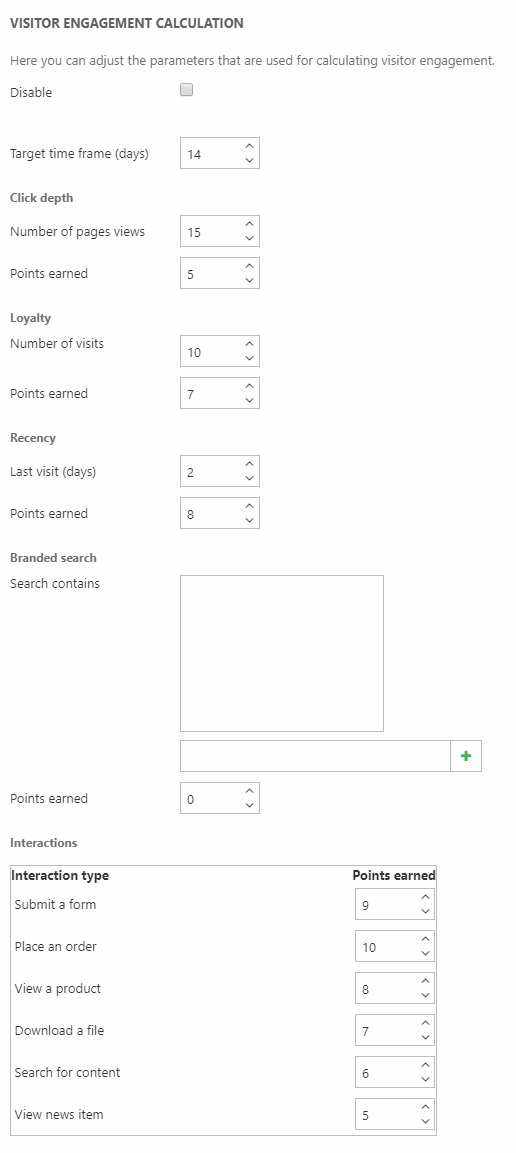
Your customization options are:
- You can disable the Engagement Index completely – if you are not using the Leads tool, this may result in a minor performance improvement on your website.
- You can set a time frame, during which EI-points are considered of interest. By default, the timeframe is 14 days, meaning that EI-points accumulated outside of that timeframe are ignored by the Engagement Index ranking.
- Assign click depth threshold and value – the number of points awarded for a customizable number of page views within the set timeframe
- Assign loyalty threshold and value – the number of visits and the points value of being a recurring visitor within the set time frame
- Assign recency threshold and value – the maximum number of days to allow between two visits to award EI-points for being a recent visitor
- Define branded search terms and assign a value for searching for them. Only works with weighted search.
- Interaction values for these actions:
- Submitting a form (only works with the Forms for Datalists and Forms for Editors apps, not item-based forms)
- Placing an order
- Viewing a product
- Downloading a file (requires the filelink to be inserted using the editor - i.e. uses DWDownload)
- Searching for content (does not currently work with index-based searches)
- Viewing a news item (from the News app, not an Item based news item)
Email Notifications for returning visitors
If you have set up email notifications for when a lead returns to your website, you can customize the frequency of email notifications (Figure 14.1).
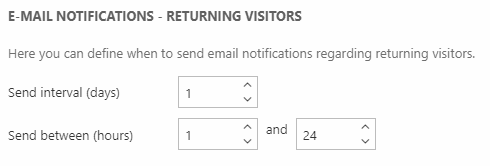
You can customize the send interval in days and the hours inbetween which you send the notifications.
Custom lead states
Dynamicweb comes with just a single lead state by default – approved – but you can create custom lead states here (Figure 15.1).
Simply enter a lead state name, and click the green plus sign – don’t forget to save the lead settings afterwards.
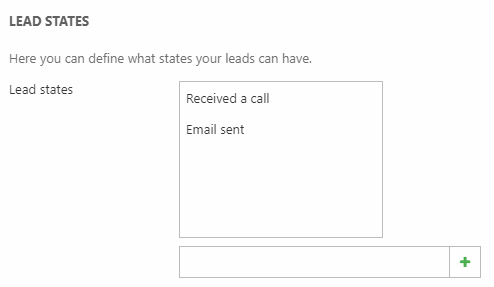
In this manner, you can define lead states to suit your needs.
Renamed leads
From the renamed leads area, you can remove any custom company names you have created for a specific IP address (Figure 16.1).
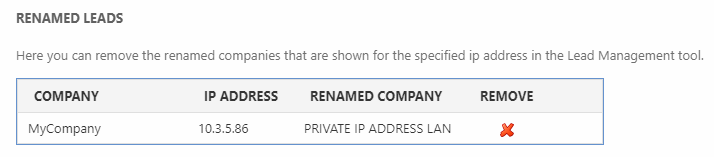
Custom names for an IP address are created (and can also be cleared) from the visitor details view, but if you need to find and clear the custom name of more than one visitor, it may be useful to see the complete list here.
Sources/domains
Advanced filtering of potential leads allows you to filter potential leads based on sources (Figure 17.1).
You create those sources here, adding any number of referrer domains to a source.
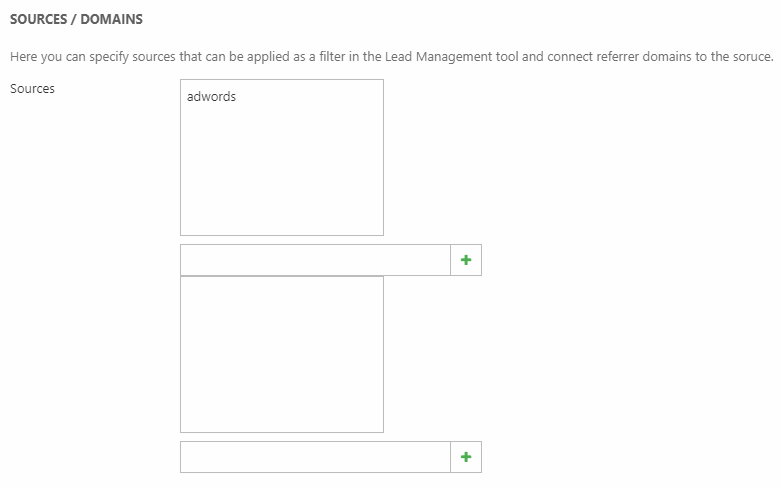
When filtering by source, only leads with referrer domains matching one of the domains defined here are shown.
Management tool
You can customize how many leads are displayed in your lead management windows here.
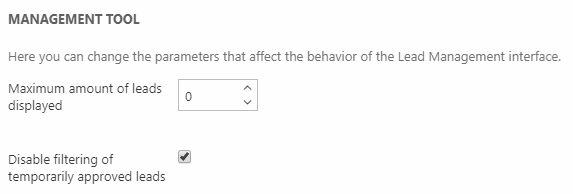
You can also disable filtering of temporarily approved leads, meaning that any filtering changes you make do not uncheck potential leads that you have already marked, until the filter settings are saved. By default, this should be checked.
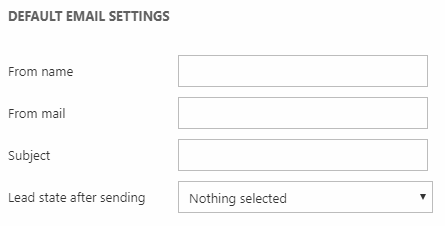
Default email settings
Create default values for lead-mails here (Figure 19.1). Your options are:
- Specify a from name, telling the recipient who is sending them an email
- Specify a from mail
- Specify a default subject
- Select a lead state to change the lead to after sending an email on it – e.g. ‘Email send to sales department’
These values can also be entered or customized manually when sending an email, but using default settings can save you time.
Lead emails
Lead emails are emails containing a lead. You can send lead emails to someone in your organization - e.g. the sales department - manually, or you can automate the process by configuring scheduling of lead emails.
Scheduling has many advantages, such as:
- The ability to work with leads without requiring a backend login, by enabling lead state changes from the lead emails
- Time saved, if you have many new potential leads every day
- The ability to automate more complex lead-state workflows
In short, if you work with many leads, you should probably work with scheduled Lead emails.
To get started with scheduled lead emails:
- Open the Settings area
- Go to Marketing > Leads > Lead Mails
- Click New lead mail
This takes you to the schedules lead mail setup window. This is where you configure your scheduled lead mails.
Read about your configuration options below.
General lead mail options
This is your general configuration options for lead mails (Figure 21.1).
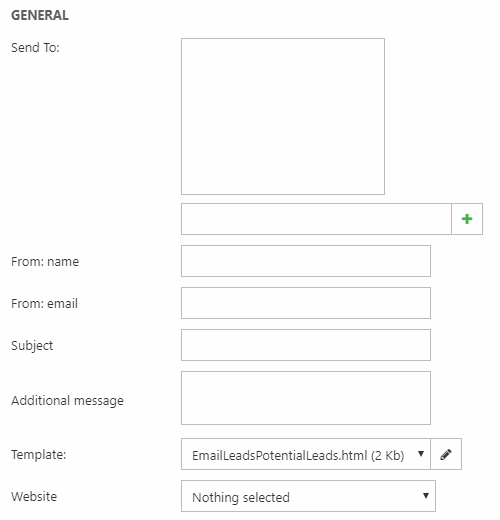
With the general options, you:
- Specify your recipients
- Specify a sender name and email, and an email subject
- Write an additional message, which will appear in the body of the email
- Select a template to use – lead mail templates are located under Templates/OMC/Notifications in the file manager.
- Select a website on your solution – only leads from the selected website will be included in the email.
Lead states
You can specify one or more lead states to include in the lead email. This is useful for creating complex lead state workflows, where you send e.g. approved leads to one team, and leads which are in other states to another team.
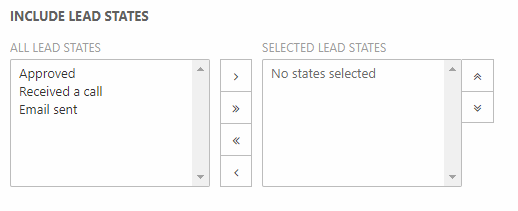
You simply add the lead states you want to add to your scheduled email to the right column.
If you combine this feature with the ability to allow lead state changes from the email, you can create very powerful workflows for your organization.
Scheduling options
This is your lead email scheduling options (Figure 23.1).
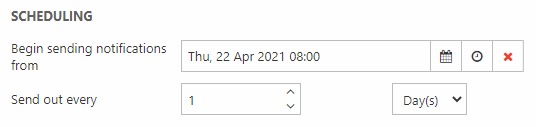
You must:
- Select a date and time for the first email to be send
- Select the frequency of future lead emails
Send settings
These are your lead email send settings (Figure 24.1).
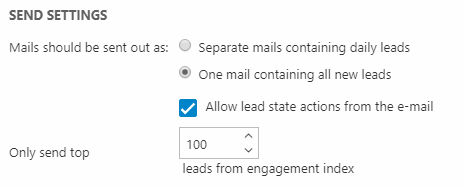
You must:
- Select between sending one email per lead, or a single email with all leads
- Allow or disallow recipients changing the lead state of a lead directly from the email
- Select the maximum number of leads to include in the email – taken from the top, based on the Engagement Index
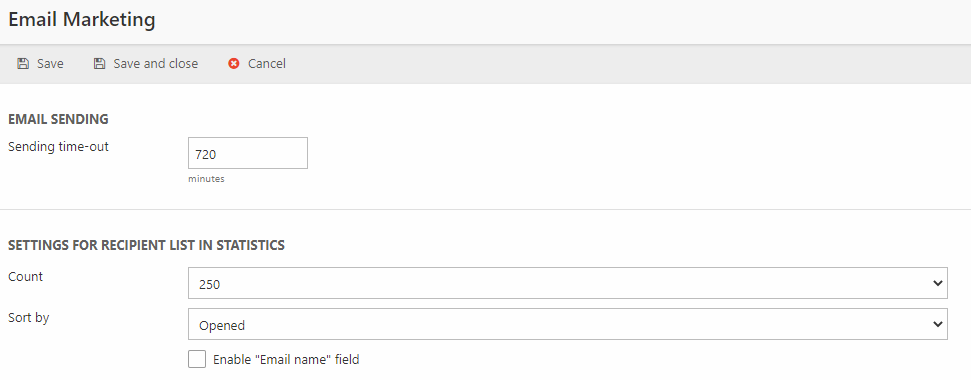
Email Marketing
In the settings here, you can change the view of the recipient list in statistics and enable the Email name field which lets you give emails an internal name to use in the email list. You can also configure delivery providers.
You can read more about using Email Marketing in this article.