Data Lists & Forms for Data Lists
The Data Lists app allows you to connect to databases, extract data from them, and publish that data in list-form on your websites.
The Data Lists app therefore consists of two components:
- An interface for connecting with data sources, creating lists, etc.
- An app for publishing the contents of a list in frontend.
This means that you can easily extract content from both internal and external databases and publish them in frontend.
The Forms for Data Lists app allows you to create forms which can be used to create database entries directly from frontend – either in existing system tables or in custom tables.
Together, Data Lists and Forms for Data Lists constitute a powerful framework for retrieving, publishing and creating data in Dynamicweb.
To get started go to Apps > Data Lists or Forms for Data Lists – this will open the Data Lists interface (Figure 1.1).
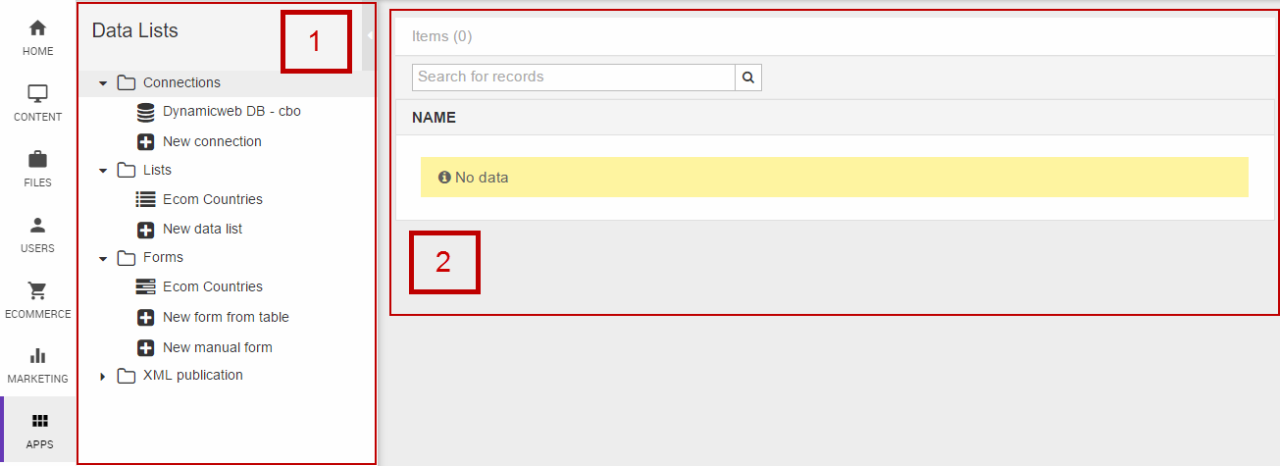
The interface consists of:
- A tree menu (1) from which you can create new connections, data lists, forms and XML publication templates
- A content pane (2) where e.g. list content and various creation forms are rendered
Connections
A Connection is simply a connection to an SQL database. By default, the Data Lists app is connected to the solution database – but you can easily create new connections.
To create a connection:
- Fold out the Connections node and click New connection
- Fill in the connection details in the connection settings (Figure 2.1)

You must:
- Name the connection
- Provide a server name and a database name
- Provide a user name and password for a user with access to the database – or check the Use trusted connection checkbox use windows authentication
- Save
Data Lists
Once you’ve connected to a database, you can create data lists by querying any table in the database and listing the retrieved data in frontend.
To create a data list:
- Fold out the Lists node
- Click New data list
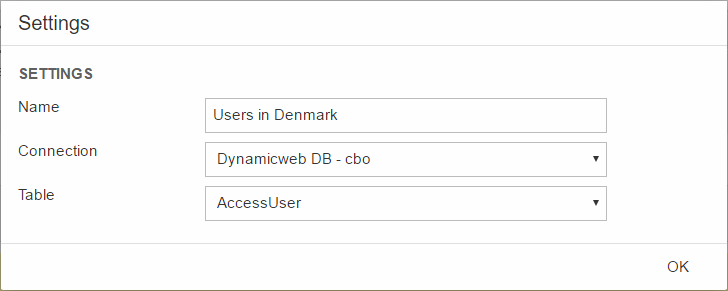
- Name the list and select a connection and a table (Figure 3.1)
- Click OK
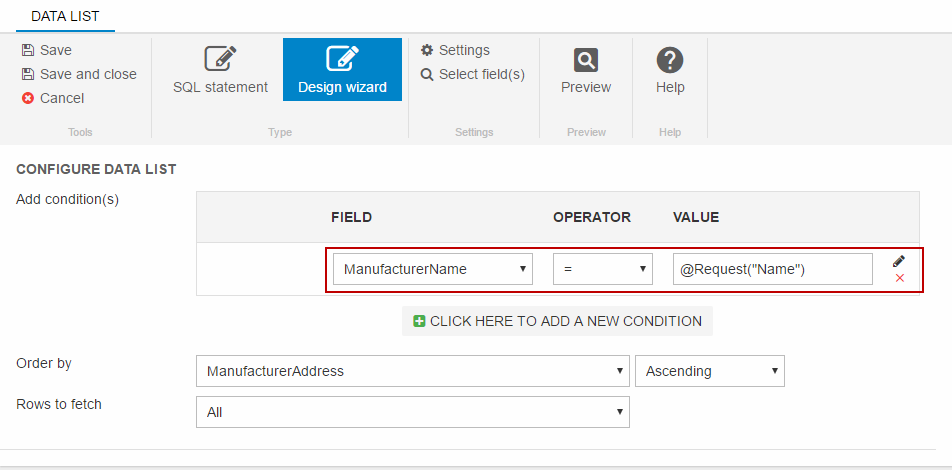
Once you’ve clicked OK, you can use the data list settings to limit the data retrieved (Figure 3.2).
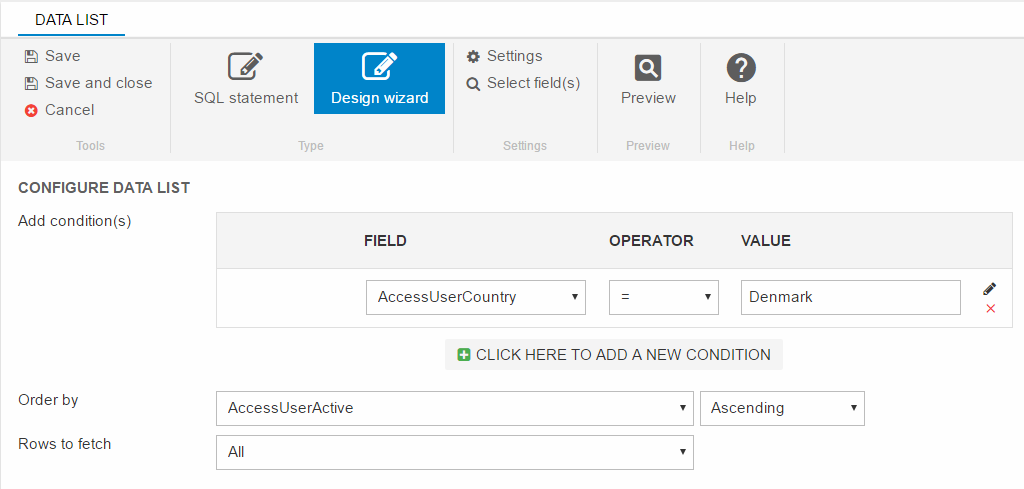
You can use either the Design Wizard – as above – to select fields, operators and values to test against, or you can use the SQL statement mode, which allows you to create the SQL statement manually.
You can specify the sort order and the number of rows you want to retrieve below the conditions area.
To use dynamic test values, you can use the pencil icon to set a session variables or request variables. In that way, you can use e.g. user or page IDs retrieved from the session or request to filter the data displayed in frontend.
For example, if you want to be able to filter a list of manufacturers by name, you can add a request variable parameter and pass values to it through the query string; yoururl.com/yourdata-list?Name=yourfiltervalue (Figure 3.3).
Select Field(s)
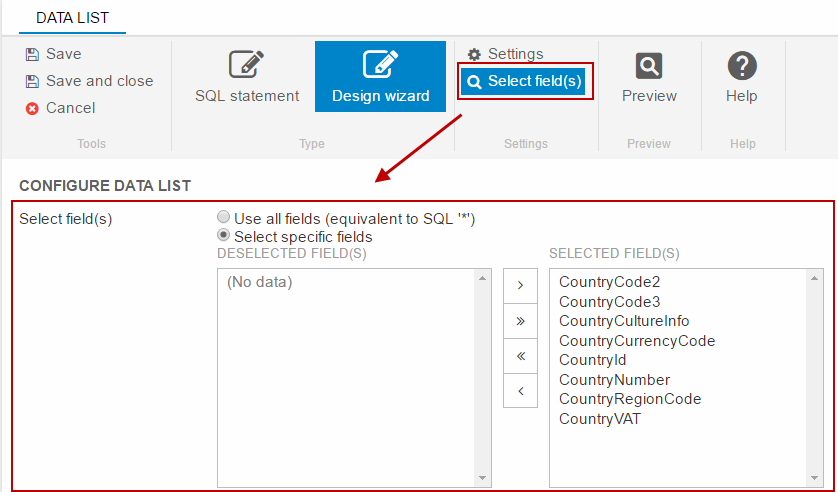
If you use the design wizard, the Select Field(s) button in the ribbon bar allows you to specify which fields from the database table you want to render in frontend when publishing the data list (Figure 4.1). Simply move the fields between the two lists until you have the desired configuration.
Publishing Data Lists
To publish a data list in frontend, attach the Data List app to a paragraph and use the app settings (Figure 5.1) to control the process.
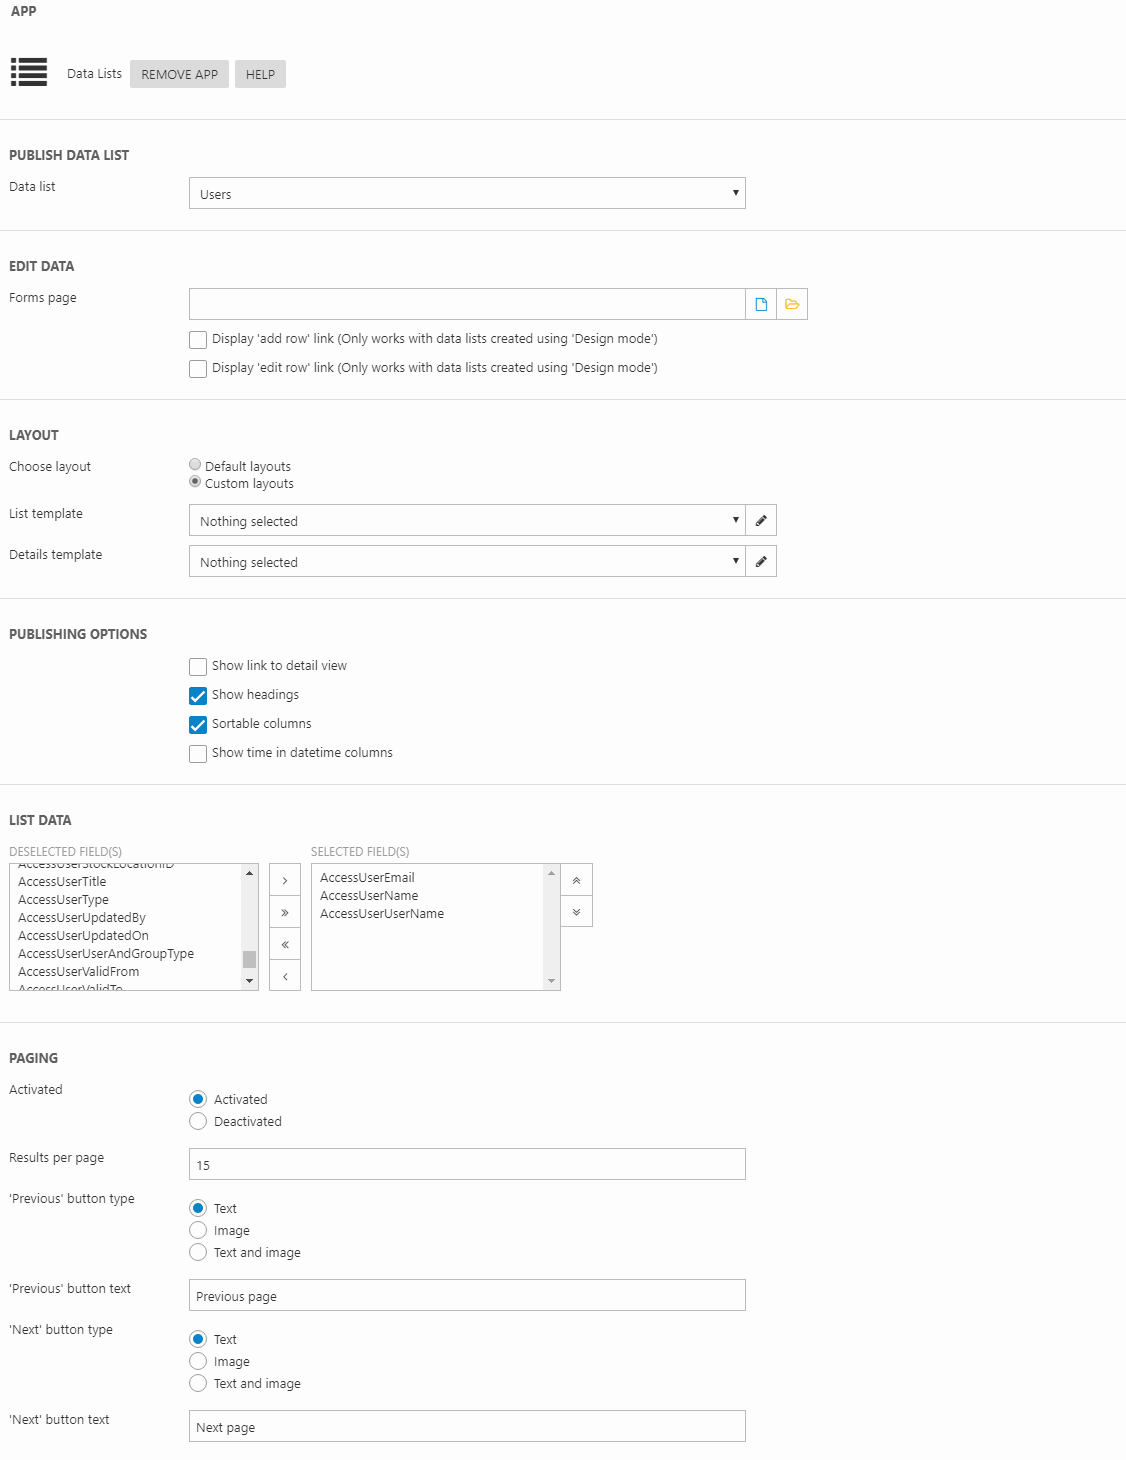
You can:
- Use the Data list dropdown to select the data list you want to publish
- Use the layout section to select either a default layout or a custom (template-based) layout for the list
- Use the list data and detail data settings to select which fields to publish
- Use the publishing options to show column headers, link to the details view, time in datetime columns, or make columns sortable
- Use the paging settings to activate and control paging on the published list
The Edit data settings allow you to select a particular form (forms for data lists) which can be used to edit or create new data from. You must select the page with the form on it using the page selector, and check the display add row link and display edit row link checkboxes to render those in frontend. The setting Allow the form to update the existing data must be checked on the forms for data lists app if you want to enable the editing of data through a published form.
Forms for Data Lists
Forms for Data Lists are forms which can be used to create or edit data directly in a database table. Forms for data lists are created from the Data Lists interface, and may be created from an existing database table or by creating a new table and defining the fields manually.
To create a form from an existing database table:
- Fold out the Forms node
- Click New form from table
- Provide a name
- Select a connection and a database table
- Click OK
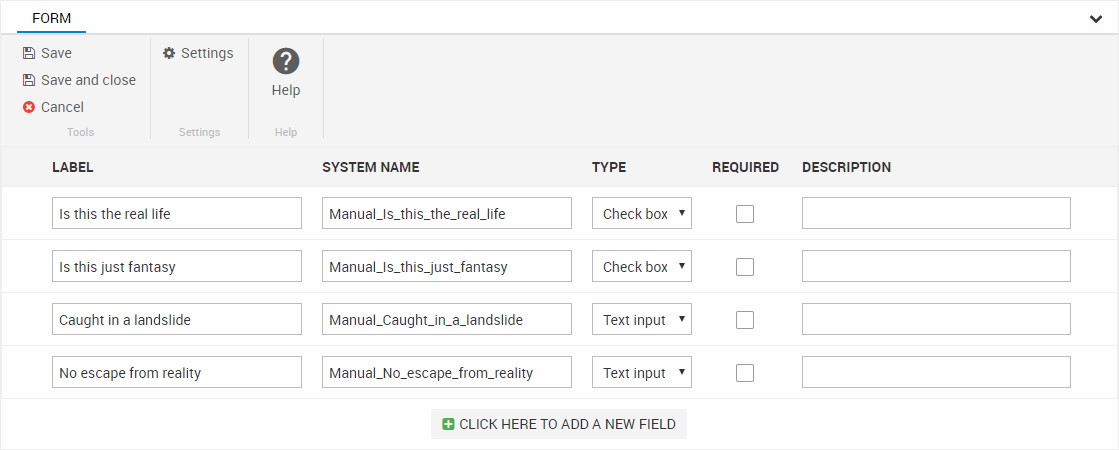
You will now see an automatically rendered list of form fields, including labels, system names, type specifications, a required checkbox and a description field (Figure 6.1).
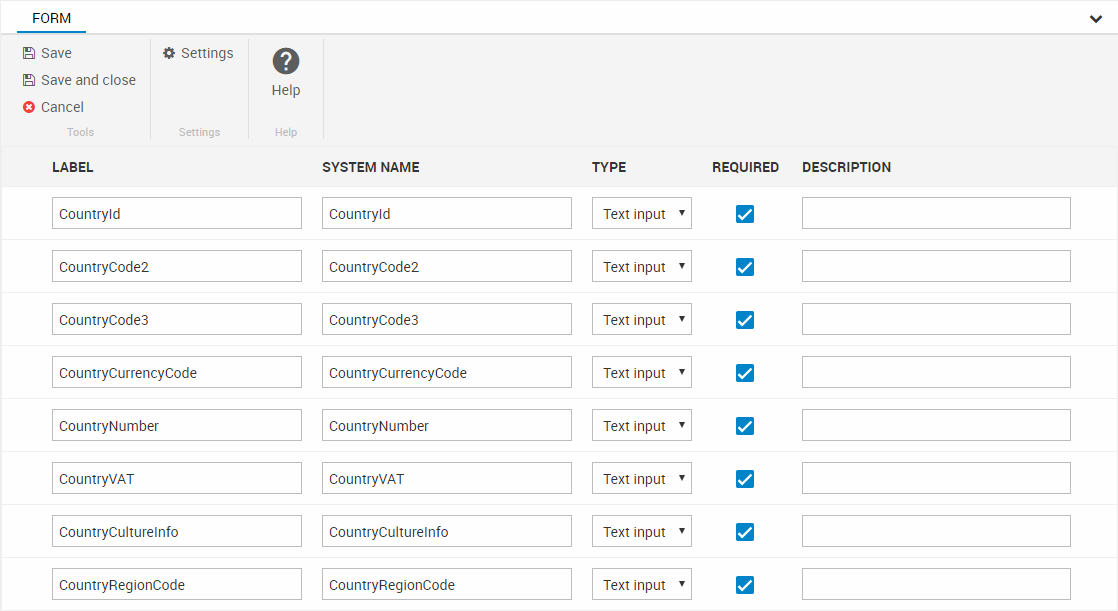
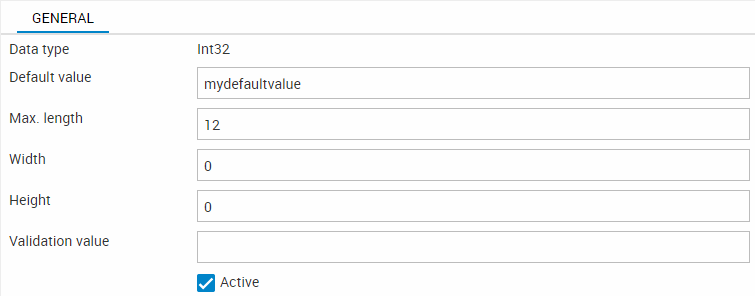
The content of the type dropdown depends on the data type of the field in the database – so String fields have one set of controls available, Int32 another, and Boolean a third – and so forth.
Click on any of the fields to open the field settings (Figure 6.2) and configure the settings related to the field type.
To create a form manually:
- Fold out the Forms node and click New manual form
- Provide a name
- Select a connection
- Specify a table name of the table you want to create
- Click OK
You will then see a list of empty form fields which you can configure to suit your needs (Figure 6.3). You must select a data type for the field before you enter any field details.
Rendering the form in frontend
To render a form in frontend, attach the Forms for Data Lists app to a paragraph and use the app settings (Figure 7.1) to control the process.
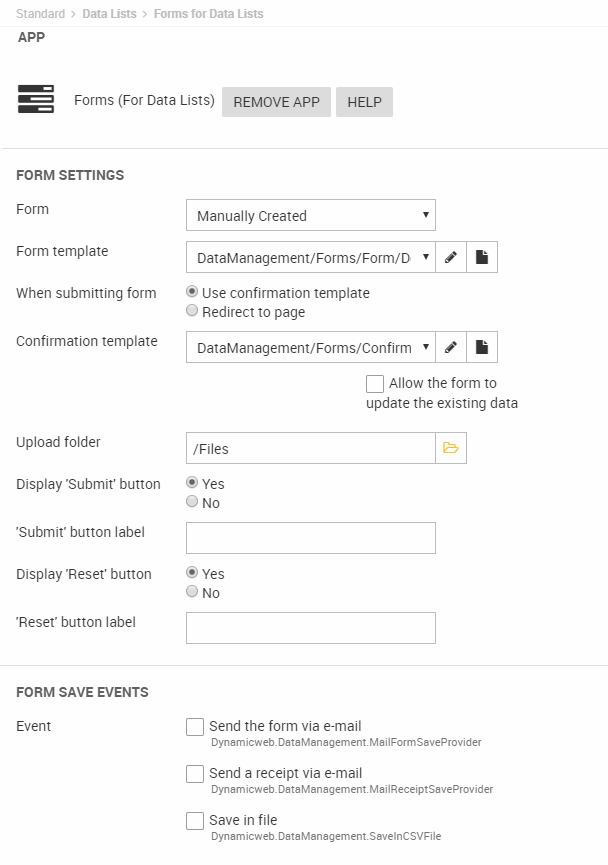
You must:
- Select a form to render
- Select or create a template for rendering the form
- Decide what should happen after the form has been submitted – either use a confirmation template or redirect to a page
- If the form contains upload controls, select a destination folder for the uploaded files
- Decide whether to render submit and reset buttons, and what they should be labeled as
You can also use the form save events section to set up email receipts, email the form to someone on submit, or save the form date in a csv file. Check the appropriate checkbox and fill in the associated settings.
XML Publication
The contents of a data list can be published as an XML feed using the XML Publication feature.
To create an XML feed:
- Fold out the XML Publication node
- Click New publication
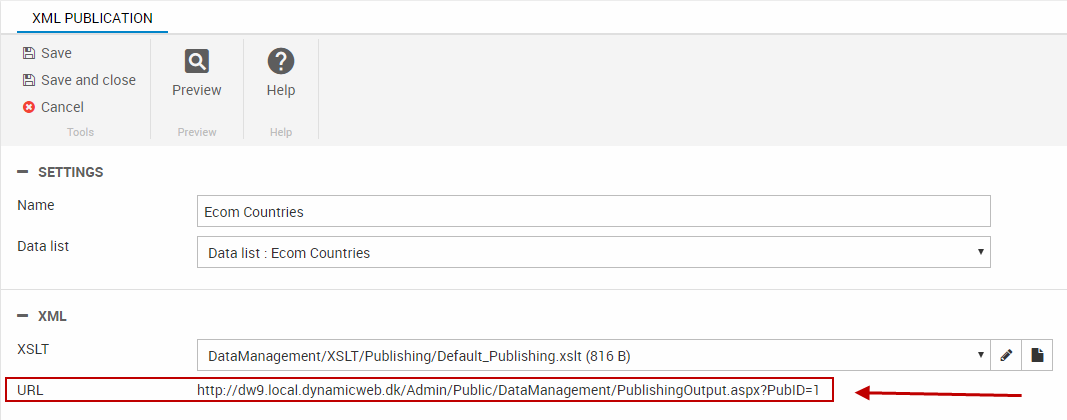
- Name the publication
- Select a data list to publish
- Select/create an XSLT file for generating the feed
Once you save the publication, an URL will be generated (Figure 8.1) – visit this URL to view the XML feed.