
Websites
A website is a collection of web pages – like the one you’re reading now – accessible via a browser.
All Dynamicweb solutions are created with an empty website called Standard, but a solution can contain several websites if the license permits it. Each of these websites can exist as independent websites in frontend, so a solution could easily host several branding sites run by the same digital department or bureau.
A language layer is a special type of website which functions as a structural mirror to another website, so that all pages and paragraphs created on the master are also created on the language layer but may be localized to another language.
Both websites and language layers have a (large) number of properties, settings, and tools associated with them – they are used to configure and control website behavior, appearance, and how the website interacts with other parts of a Dynamicweb solution such as Ecommerce.
Websites are managed from the Websites app (Figure 2.1) which is accessed via Apps > Configurable apps > Websites.

This app presents you with a list of all existing websites with some key data shown – e.g. the id, language, primary domain, page count, etc. – and provides you with some basic tools for:
- Creating websites
- Copying websites
- Sorting websites in the list
- Setting permissions on all websites
Right-click any existing website to open a context menu (Figure 2.2).
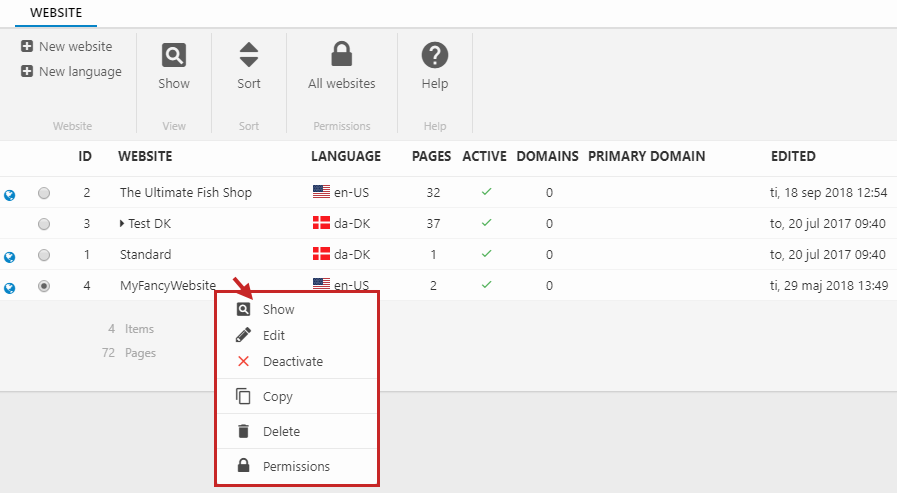
The context menu allows you to click:
- Show to open the website
- Edit to open the website settings
- Deactivate to make the website inactive (can't be accessed from backend or frontend)
- Copy to copy a website
- Click export to export an XML for translation purposes
- Delete to delete the website - please note that you cannot delete a master website before all language layers have been deleted
- Permissions to set permissions for this specific website
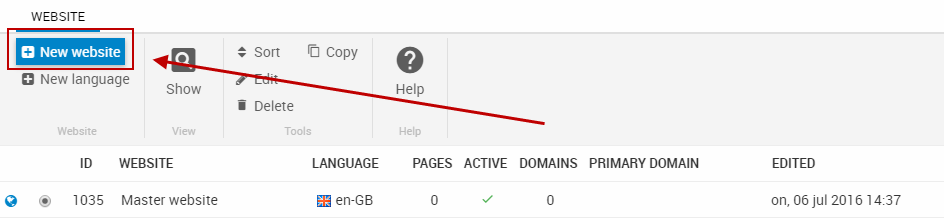
Creating a website
To create a website, click the new website button in the toolbar (Figure 3.1).
You will be prompted (Figure 3.2) to name the website and select a regional setting.
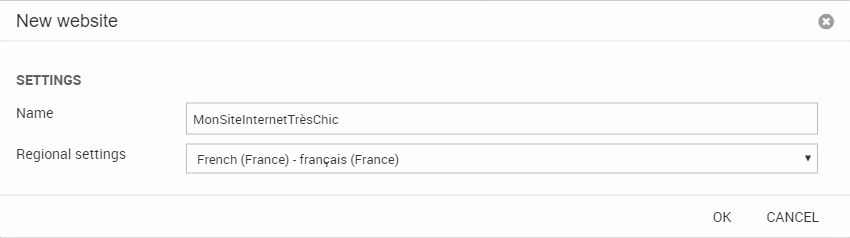
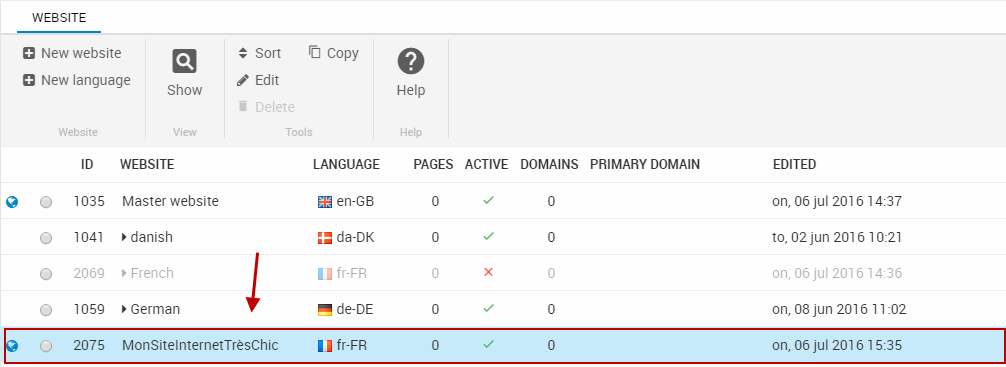
Click OK – and that’s it, you’ve added a new website to the solution (Figure 3.3).
After creating a new website you should perform the following:
- Review the website settings and make any necessary changes
- Open the website Ecommerce settings and specify a default shop, language, currency, country, etc.
- Select a design to use on the website
After these steps have been performed you will only return to the website settings on rare occasions, when a particular situation warrants it.
Copying a website
Copying a website or language layer is a convenient way of saving effort when creating new websites.
The copy-tool comes with a number of options for which parts to copy, e.g. permissions or website-settings only, giving you a degree of freedom when creating new websites.
To copy a website:
- Select the website/language layer
- Click Copy in the toolbar to open the copy website interface (Figure 4.1)
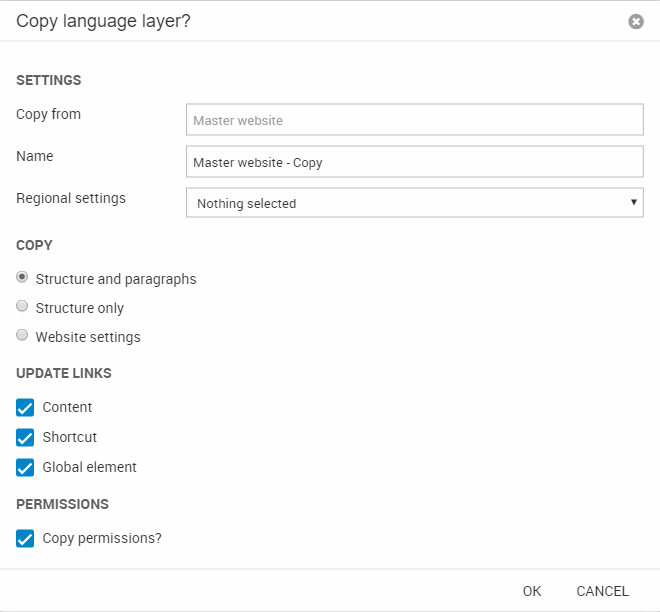
From the copy website interface, you must:
- Name the copy and select a regional setting (website language)
- Specify what to copy:
- Structure & paragraphs
- Structure only
- Website settings
- Decide if you want to update link references on the new website to point to the copied content, pages & global elements – or if they should continue to point to the original website. Normally, you want them to be updated.
- Decide if the website permissions should be copied (only works for old permissions)
If copying a website / language layer fails, the details of the error can be found in Settings > Logs > System > Log > AreaService.
Website settings
Each website or language layer comes with a set of website settings which are used to e.g.
- Specify a name and a regional setting
- Add domains and select a primary domain
- Set up a Content Delivery Network (CDN)
- Etc.
You can access the website settings in two ways:
- Via the Websites app by clicking on a website in the list
- From the content tree, via the website selector context menu
When you open the website settings you are presented with the most basic of settings (Figure 5.1) which are used to:
- Specify a name
- Specify a regional setting
- Publish/unpublish the website - if a website is unpublished all pages will show a 404 in frontend
Master websites - which have a language layer under them - also have a checkbox called rename languages. If you check this and save your website, all language layers will be renamed following the [Master page name] (Language code) format.

The rest of the website settings are divided into a series of sections, with each section containing settings related to the same topic – they are described in the sections below.
Details
The Details settings (Figure 6.1) control website domains and 404-handling practices.
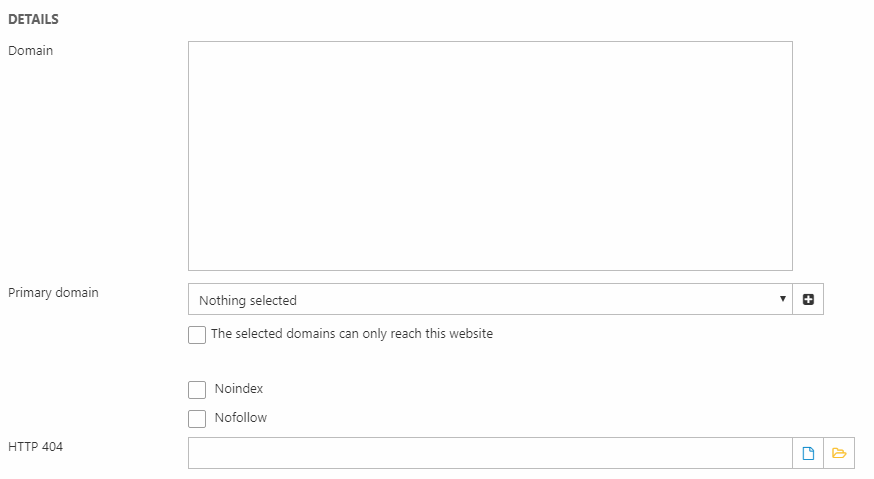
You can:
- Enter a number of domain names associated with the website
- Select a primary domain for the website – you can limit the primary domain so it will only be able to reach this website, not other websites on the solution
- Set up noindex and nofollow for all pages on this website
- Specify a HTTP 404 page to redirect visitors to if an URL cannot be found. The 404 page is only active for the domains specified above, and will be used instead of the one defined in your solution settings. This means that you can create separate 404-pages for websites and language layers.
URL
The URL settings (Figure 7.1) allow you to configure URL settings for this website.

You can:
- View the current URL slug for this website or language layer
- Set a Use in URL value - this overwrites any auto-generated value from the Customized URLs tool
- Check Do not include URL in subpage URLs
- Check the Redirect first page to ‘/’ to prevent search engines from indexing your first page as duplicate content.
The redirect setting is only available if you use Location and page name (/Path/…/Page name.aspx)” as the URL type under Settings > Web & HTTP > Customized URLs. The setting also has no effect if:
- No domains have been added to the details settings
- No primary domain has been selected in the details settings
- The page has parameters in the URL
Content Delivery Network settings
Finally, the Content Delivery Network settings (Figure 8.1) make it possible to set up a content delivery network (CDN) for the website (Figure 8.1).
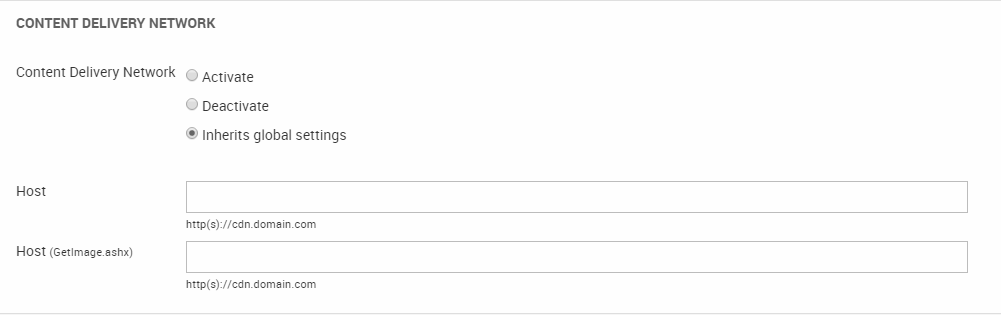
A content delivery network is a network of servers - usually located at various sites around the world - that deliver cached static content to websites, e.g. images, CSS and JavaScript files. You can:
- Activate or deactivate CDN for the website – the host settings are disabled if CDN is deactivated
- Inherit the global settings if set - if the global settings are not inherited, you must provide:
- An URL for the CDN host
- An URL for the CDN host for GetImage requests
You can set up CDN at the global level by going to Settings > Web & HTTP > CDN.
Ecommerce Settings
From the toolbar, you can access the Ecommerce settings (Figure 9.1) for the website - they are used to define default Ecommerce context values for the website.
The Ecommerce settings are very important – even if you have only one shop, currency or language on your solution – as a number of tools and features rely on a connection between e.g. a website ID and a default shop ID being in place. You should make it a habit to always configure the Dynamicweb Ecommerce settings when creating a new website.
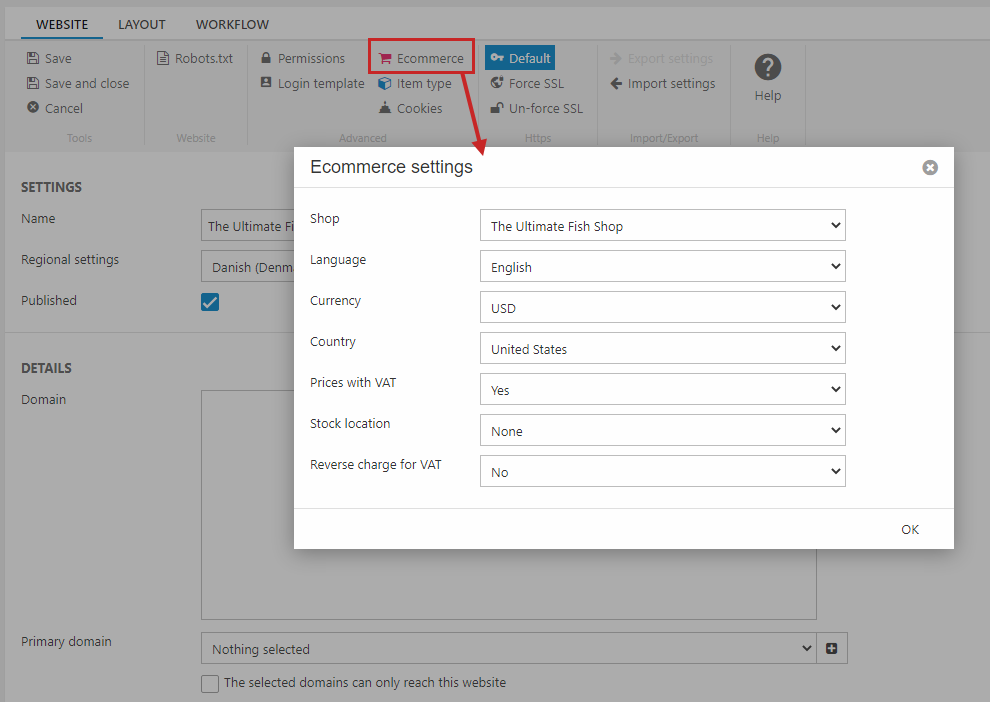
You can:
- Set a default shop
- Set a default language
- Set a default currency
- Set a default country
- Set a Prices with VAT configuration, controlling whether prices should be displayed with VAT by default. Basically, this is a way to specify at the website-level how prices should be displayed. This setting affects all price tags that have price tag extensions; tags like Ecom:Order.Price are affected, but tags like Ecom:Order.OrderLines.Total.Price are not affected. The state can also be changed using the PricesWithVat query string parameter, with the values true or false.
- None means the setting is not set (no state selected) - in practice, this is equivalent to selecting Yes explicitly.
- No means that VAT is not displayed on the frontend (e.g. for B2B websites)
- Yes means that VAT is displayed in the frontend, based on the most specific VAT rate set for the product
- Set a default stock location
- Enable reverse VAT charges for this website
Layout
In the toolbar, the Layout tab (Figure 10.1) provides you with access to a couple of more advanced settings, the most important being that you can select a layout for the website. The layout selected here controls the basic layout of all pages created under this website. You can read more about designs and layouts here.
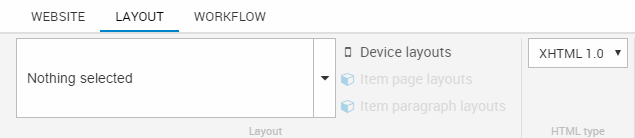
You can also:
- Select device layouts for phones and tablets - this is typically not used on modern websites, where the framework will handle responsivity
- Select a default layout for each of your page item types
- Select a default layout for each of your paragraph item types
- Specify the HTML type used on the website
Other settings & tools
At the top the website settings page is the toolbar (Figure 11.1), from which you have access to a number of more advanced tools for website management.

From the website tab you can:
- Customize the robots.txt file content– see below
- Set up website permissions – read more about permissions here
- Open the Ecommerce settings for the website – see below
- Select item types for extending the website or page properties on the website – read more about extending your website or page properties here
- Override the general cookie settings on this particular website – read more about cookies in Dynamicweb
- Configure the HTTPS settings for the website (requires a SSL Certificate):
- Default allows visitors to use both HTTP & HTTPS
- Force SSL forces a 301 redirect to HTTPS
- Un-force SSL forces a 301 redirect to HTTP
-
Export or import your website settings in a XML/Json file
-
The file is stored in Files/System/Items/Websitesettings
-
The file will contain the settings from the General section in Website settings including custom made items
-
Robots.txt (SEO)
The Robots.txt button opens the robots.txt settings (Figure 12.1) which give you a degree of control over how crawlers index your website.
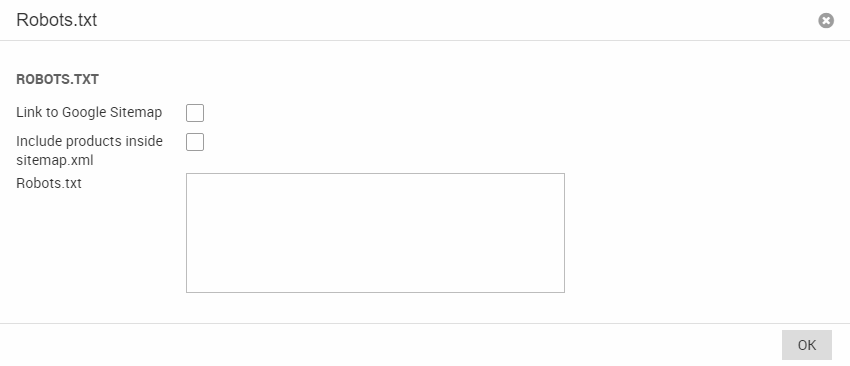
You can:
- Allow or disallow crawlers access to the Google Sitemap for your website
- Include all products in the sitemap.xml (this requires a primary group on all products)
- Enter the content for the robots.txt file for the website
The contents of the Robots.txt file specified here should be considered virtual, e.g. an actual file will not exist on the disk. Instead it will be served by the 404 handler in Dynamicweb (Admin/public/404.aspx) which has to be set up in the IIS settings in order to work. If an actual robots.txt file exists on the disk, the virtual content specified in the field will not be used.
By default Disallow: /*?cartcmd=* is added to Robots.txt to avoid bots from indexing carts (the command is not visible from the Robots.txt input field).
The settings will not work on websites located on a *.dynamicweb.dk domain, as these domains are excluded from search engine indexing.
In Dynamicweb 9, sitemap.xml is html encoded - this is more in line with current SEO practices.
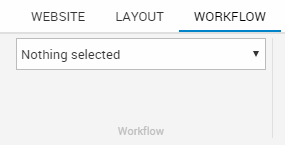
Workflow
From the toolbar you can access the Workflow tab, which is used to select a workflow for the website.

Area
Contains data for the Websites module. Named when websites were called areas and now we're stuck with it.
| Field name | Data type | Length | |
|---|---|---|---|
| AreaId | int | 4 | |
| AreaStyleId | int | 4 | |
| AreaName | nvarchar | 255 | |
| AreaDomain | nvarchar | 255 | |
| AreaEncoding | nvarchar | 255 | |
| AreaPermission | nvarchar | 255 | |
| AreaPermissionTemplate | nvarchar | 50 | |
| AreaTitle | nvarchar | 255 | |
| AreaKeywords | nvarchar | Max | |
| AreaDescription | nvarchar | Max | |
| AreaFrontpage | nvarchar | 255 | |
| AreaDateformat | nvarchar | 50 | |
| AreaCodepage | int | 4 | |
| AreaLanguage | int | 4 | |
| StyleId | int | 4 | |
| AreaMasterTemplate | nvarchar | 100 | |
| AreaHtmlType | nvarchar | 10 | |
| AreaCulture | nvarchar | 50 | |
| AreaApprovalType | int | 4 | |
| AreaEcomLanguageId | nvarchar | 50 | |
| AreaEcomCurrencyId | nvarchar | 3 | |
| AreaActive | bit | 1 | |
| AreaSort | int | 4 | |
| AreaMasterAreaId | int | 4 | |
| AreaRobotsTxt | nvarchar | Max | |
| AreaRobotsTxtIncludeSitemap | bit | 1 | |
| AreaDomainLock | nvarchar | 255 | |
| AreaUserManagementPermissions | nvarchar | Max | |
| AreaUrlName | nvarchar | 50 | |
| AreaUpdatedDate | datetime | 8 | |
| AreaCreatedDate | datetime | 8 | |
| AreaCopyOf | int | 4 | |
| AreaLayout | nvarchar | 255 | |
| AreaNotFound | nvarchar | 255 | |
| AreaRedirectFirstPage | int | 4 | |
| AreaLayoutPhone | nvarchar | 255 | |
| AreaLayoutTablet | nvarchar | 255 | |
| AreaLockPagesToDomain | bit | 1 | |
| AreaEcomCountryCode | nchar | 2 | |
| AreaEcomShopId | nvarchar | 50 | |
| AreaUrlIgnoreForChildren | bit | 1 | |
| AreaItemType | nvarchar | 255 | |
| AreaItemId | nvarchar | 255 | |
| AreaCookieWarningTemplate | nvarchar | 255 | |
| AreaCookieCustomNotifications | bit | 1 | |
| AreaItemTypePageProperty | nvarchar | 255 | |
| AreaIncludeProductsInSitemap | bit | 1 | |
| AreaSSLMode | int | 4 | |
| AreaEcomPricesWithVat | nvarchar | 10 | |
| AreaIsCdnActive | bit | 1 | |
| AreaCdnHost | nvarchar | 255 | |
| AreaCdnImageHost | nvarchar | 255 | |
| AreaStockLocationID | bigint | 8 | |
| AreaUniqueId | uniqueidentifier | 16 | |
| AreaNofollow | bit | 1 | |
| AreaNoindex | bit | 1 | |
| AreaReverseChargeForVat | bit | 1 | |
| AreaPublished | bit | 1 |