
Forms for Editors
Forms for Editors is tool for creating forms, which in turn enable you to collect data from visitors in a structured manner.
Forms for Editors consists of two different parts:
- A configurable app which is used to create forms and view form submits
- A paragraph app which is used to publish forms to frontend
So forms are created from the Dynamicweb administration interface, and then published to a paragraph using the Forms for Editors paragraph app.
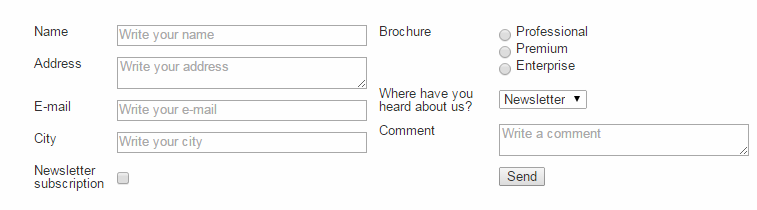
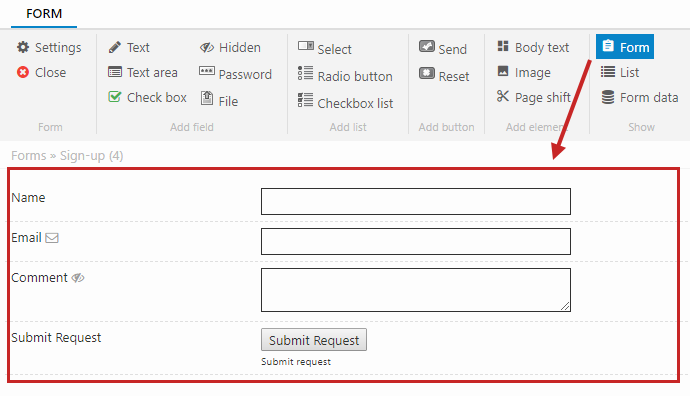
To a website visitor a form might look like Figure 1.1) – although the actual styling depends on how your website design is put together.
In this document we will look at both the configurable app and the paragraph app.
Creating Forms
Forms are created and configured in the Dynamicweb administration, and then later added to a paragraph using the Forms for Editors app.
To create a new form:
- Go to Apps > Forms for Editors and click New form in the toolbar
- Name the form
- Save
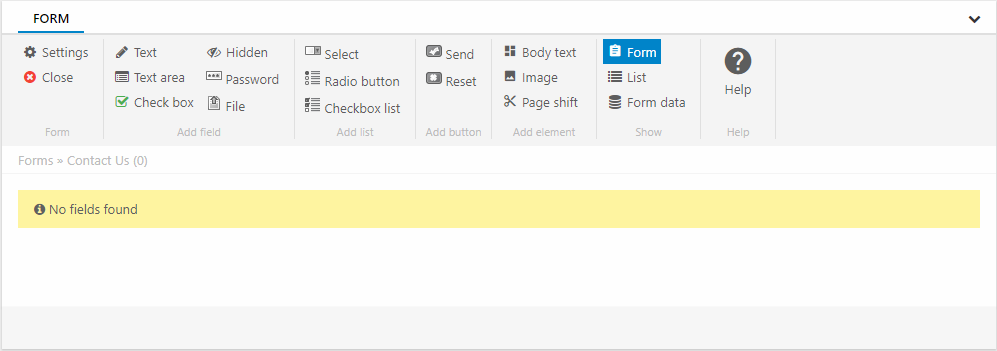
You have now created a(n empty) form (Figure 2.1).
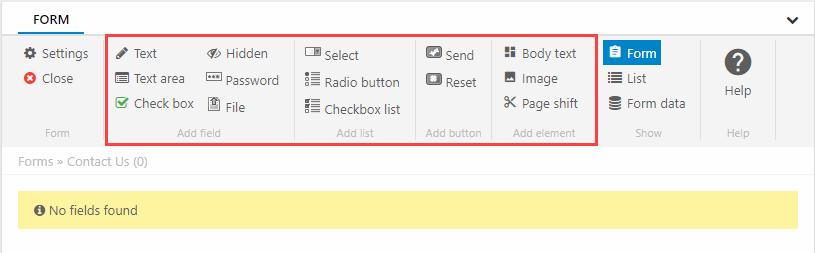
When viewing or editing a form you can use the ribbon bar buttons (Figure 3.1) to add fields to it - these are the fields which the user will fill inand submit in frontend.
You can add the following types of fields:
- Fields
- List
- Buttons
- Elements
You can add the following fields:
|
Name |
Description |
Why you need it |
Notes |
|
Text |
A text field for entering a single line of text |
You may need users to submit their name, address, email, etc. |
|
|
Hidden |
A hidden field |
Allows an implementer to pass temporary, or session-based data, from one form to another or to store information that has already been entered in by the user. |
|
|
Text area |
A text-area for entering several lines of text |
Describing a problem, adding a comment, or adding a multi-line address |
|
|
Password |
A password field |
Used for capturing user input. It disguise each character with an asterisk (*) instead of displaying the entered digits in order to offer an on-screen privacy while entering a password. |
|
|
Check Box |
A checkbox for users to check or leave unchecked |
Accepting user agreements, opting in, and so forth |
To have it unchecked by default, open the edit view and set the default value to ‘unchecked’ |
|
File |
A file selector button, for submitting files |
Users can upload files, e.g. a resume or a report.
|
You can upload several files to the same field by naming the additional input controls “FileFieldSystemName_{N}”. Files are saved to the /Files/System/FormUploads/Form-Name/ folder. Some file extensions are not allowed, e.g. .cshtml, .aspx and similar, and filenames are automatically cleaned of illegal characters. |
These are the list fields at your disposal:
|
Select |
A dropdown list of options for the user to select from |
You can set a default option from the edit view |
|
Radio Button |
A list of options; users select one |
You can set a default option from the edit view |
|
Checkbox list |
A list of checkboxes – users may check more than one |
You can set a default option from the edit view |
You can add the following buttons to your form:
|
Send |
A button for submitting the form content |
|
|
Reset |
A button for resetting the form |
The following elements can be created:
|
Body text |
Add a text to the form |
|
|
Image |
Add an image to the form |
|
| Page Shift | Add a page shift to the form | Use for long forms - must be implemented in your form templates |
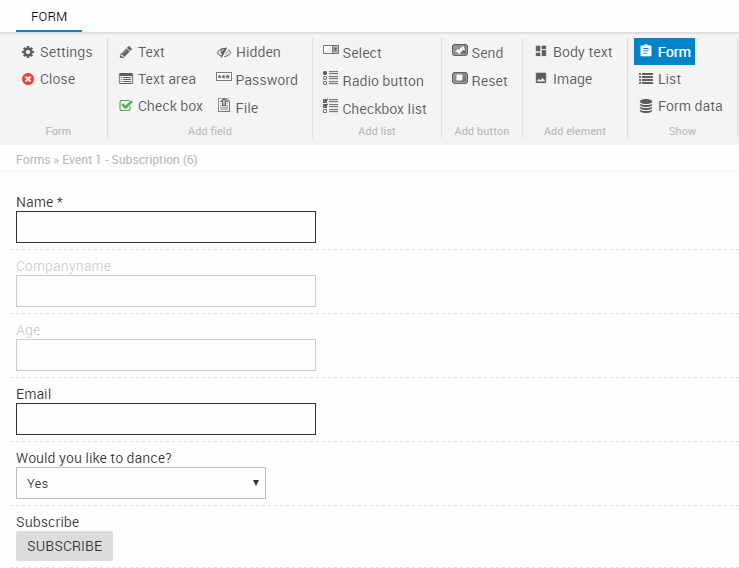
You can add any combination of these fields to the form to create the forms you need (Figure 3.2).
Field views
By default, the field you create are shown in form-mode (Figure 4.1).
Form mode is useful because it shows you an approximation of how this form will be rendered in frontend - but in some cases you may need to change the view to list-mode (Figure 4.2).
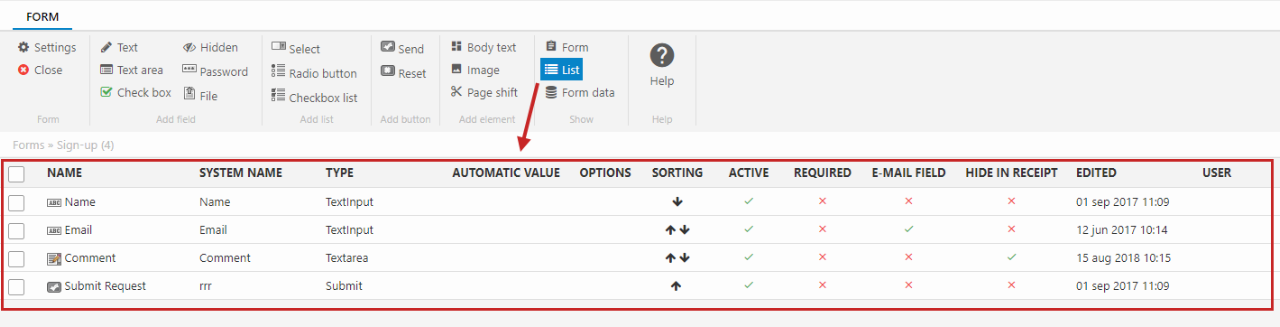
The List-mode is useful because it lets you review the structure of large forms without being distracted by the controls used, and because it provides you with more information about each form field.
Field details
All fields you create are preconfigured and should work out of the box - but in some cases, you may want to change the default configuration. Click the field to open the field details view (Figure 5.1).
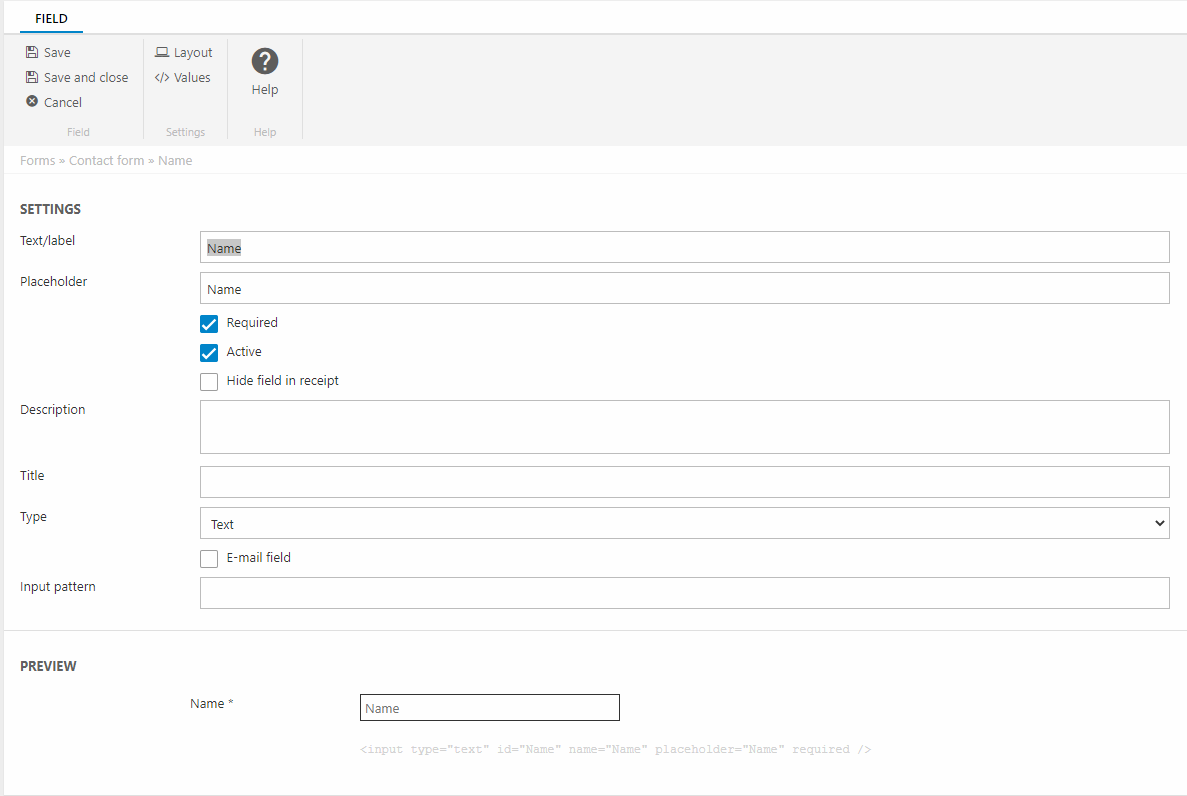
You can:
- Change the label and placeholder
- Set the field to:
- Required
- Active
- Hide field in receipt
- Change the field type - if you select a text type you can mark the field as the Email field. This is relevant for the app setting Get from Email field which will then refer to this field
- Specify a value for the input pattern attribute
The type dropdown allows you to select HTML5 input types - please be aware that not all browsers fully support HTML5.
Layout and Values
When editing a field, you can use the Layout and Values tools to set up more advanced behaviors.
The Layout tool allows you to control and set layout-specific values (Figure 6.1).
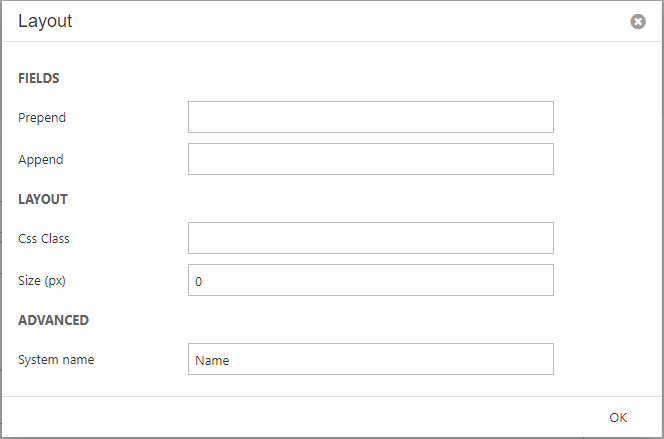
- Set values which should be prepended or appended to the field value on submit, e.g. a currency symbol
- Set a CSS class value or a size in pixels to a field
- Customize the system name of the field
The values specified here are then made available in the template context.
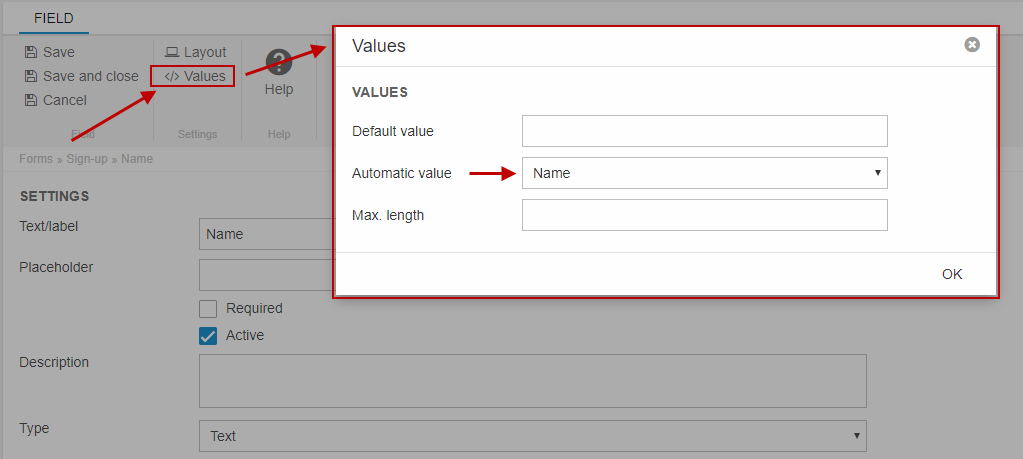
The Values tool (Figure 6.2) is used to configure more advanced behavior relating to form values.
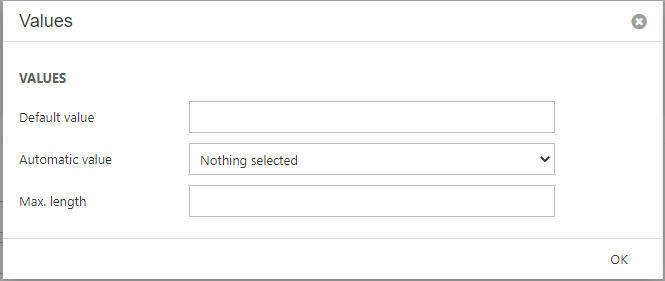
You can:
- Set a default value
- Map to an existing value in user management (for logged in users) and use that as an automatic value
- Set a max length on the field
Form list
All forms appear in a list view when you open the Forms for Editors app (Figure 7.1).
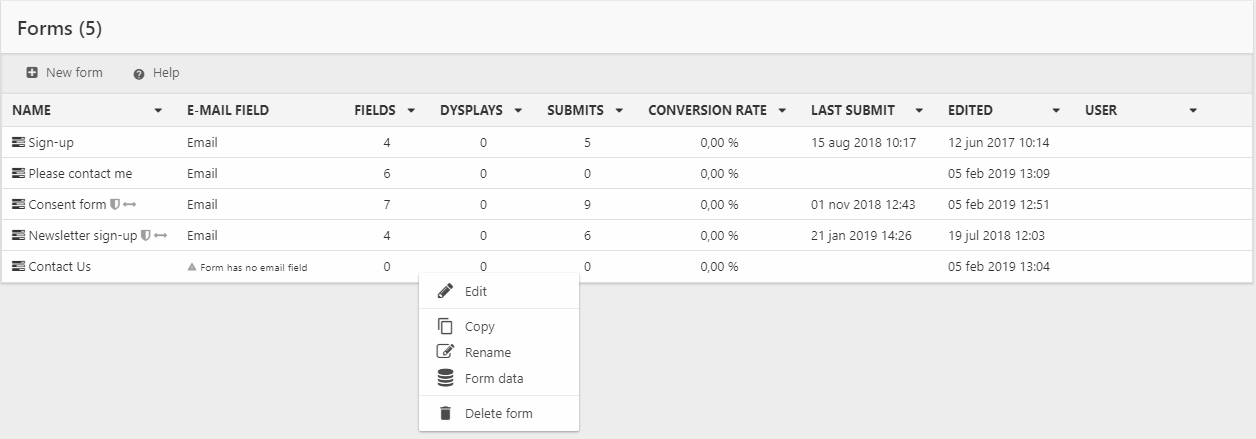
As you can see you have access to a lot of interesting information from the list view:
- Name & adornments (associated consent-activity, auto-values, etc.)
- Email field/no email field specified
- Fields count
- Displays, submits, and the calculated conversion rate
- Last submit
- Last edit
You can right-click a list item to open a context manu which allows you to edit, copy, rename, or delete a form - and to view a list of the form data submitted by visitors.
Form data
When a form has been filled out and submitted the form data is stored in Dynamicweb. You can then browse or download it via the Forms for Editors configurable app.
There are two ways to access form data:
- Right-click a form in the form list and select Form data
- Open the form and click Form data in the ribbon bar
Either way will take you to the Submits overview (Figure 8.2).
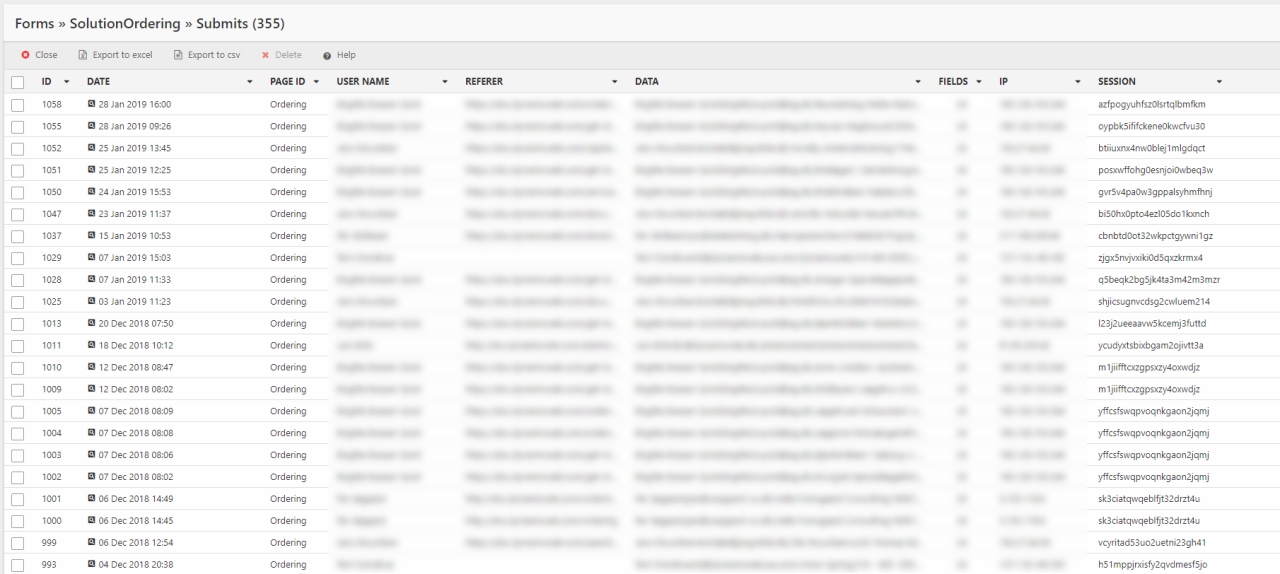
From the Submits overview you can see all submits for the current form, including:
- The submit ID
- The date and time of submission
- The page id of the page from which the form was submitted
- The user name of the submitter (if the user is registered)
- The referrer
- A summary of the form data (click the date column to see the full data for each submit)
- The number of fields filled out in the form, and the IP & session key of the visitor
From the toolbar, you can export all the submitted data as either .csv or a .xls file, or delete any checked submits if necessary.
The Forms for Editors app
To show a form in frontend, you must attach the Forms for Editors app to a paragraph. This app allows you to select a form and control how it is rendered, what happens when the form is submitted, and more.
The Form settings (Figure 10.1) are used for baseline functionality, like selecting which form to render.
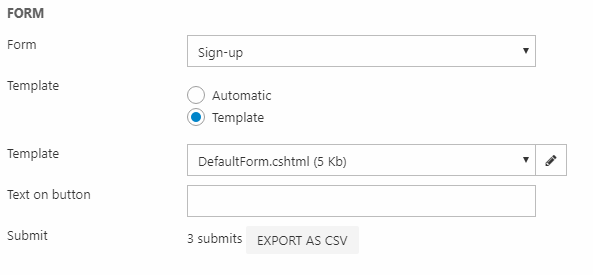
You must:
- Select a form to publish
- Select a template for rendering the form.
- Automatic uses an automatic system template
- Template allows you to create or select a template manually
You can also specify a custom text for the submit button (e.g. for localization purposes), and export the submitted form data in a .csv file.
The 'when submitting form' settings
The when submitting form settings (Figure 11.1) allows you to control what happens when a user submits a form.
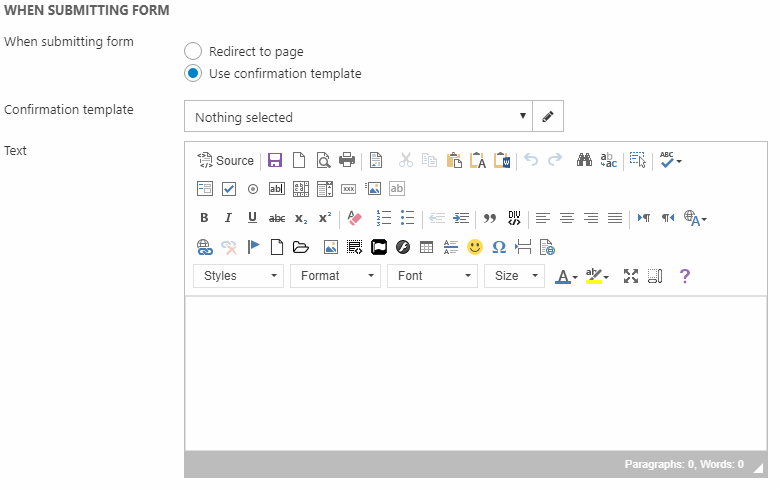
With the when submitting form settings you can:
- Specify a page to redirect the user to after they submit the form
- Select or create a confirmation template to use, and specify a text to publish using that template
To both redirect AND show a receipt, simply set up the forms for editors app with the same form and the confirmation template you want to use on the page you redirect users to. The redirect will contain a submit token that will allow the receipt page to load the result of the form and display the information on the page.
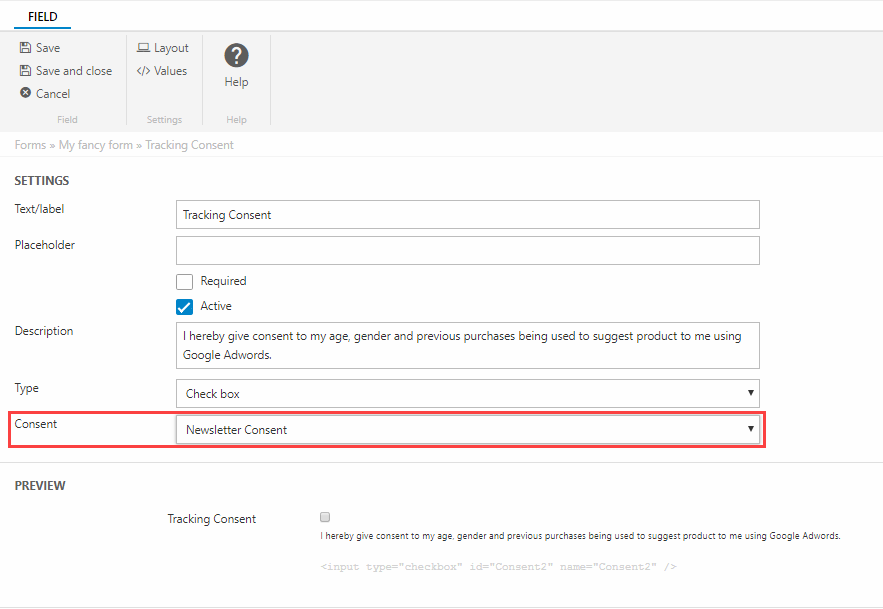
GDPR Consent
A form can be used to collect consent for a particular GDPR activity and store them in the Data Processing app – read more about the Data Processing app here.
To collect consent using a form:
- Go to Apps > Forms for Editors and open or create a form
- Create a new checkbox field
- Click the field to edit it
- Select an appropriate consent activity using the Consent dropdown (Figure 12.1)
When this form is submitted in frontend with the checkbox checked, a new consent is created in the database based on either the user ID, an email field on the form, or (for truly anonymous users) a checksum value.
Email settings
The email settings (Figure 13.1) allow you to set up automatic email notifications when a form is submitted.
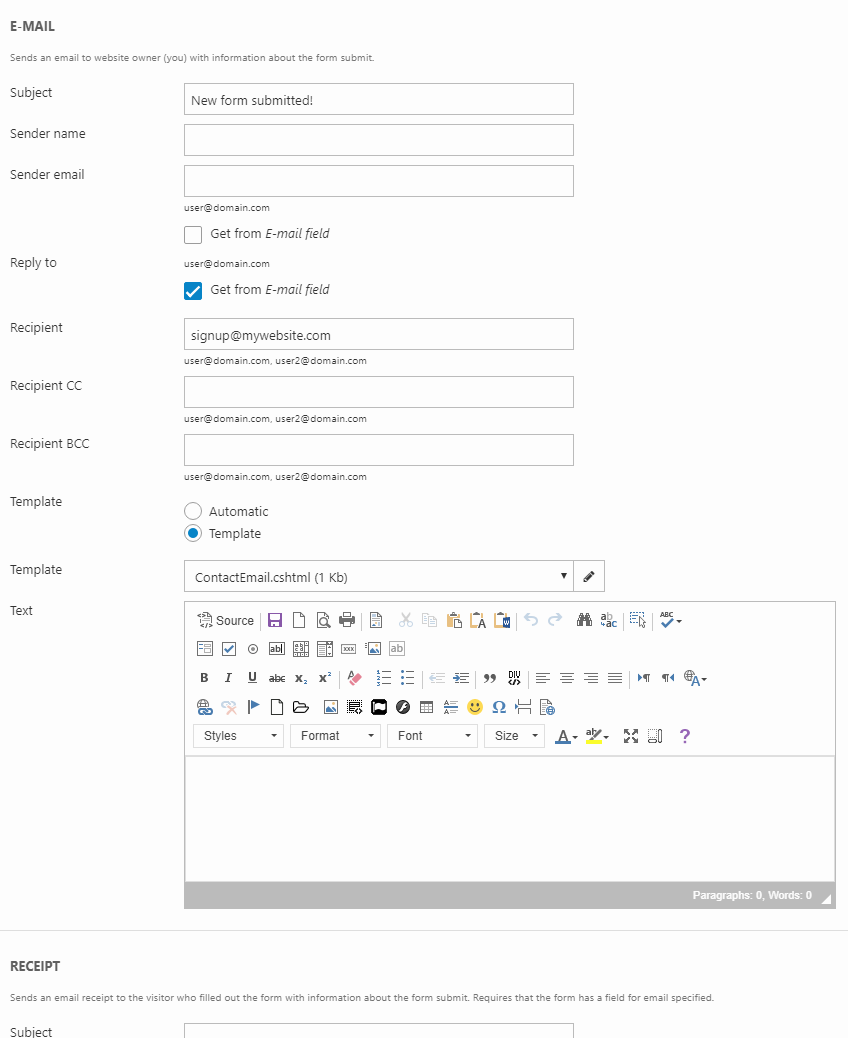
With the email settings you can:
- Specify a subject for the email
- Specify a sender name and email – or retrieve it from the form using the Email field setting from the list view
- Specify one or more recipients (CC or BCC)
- Select a template for rendering the email. Choose between the automatic system template or select or create a custom email template from the dropdown menu
- Enter a text (if using a custom template)
Receipt settings
You can use the receipt settings (Figure 14.1) to email a receipt to the visitor submitting the form.

With the receipt settings you can:
- Specify a subject for the email
- Specify a sender name and email
- Specify one or more recipients (CC or BCC)
- Select a template for rendering the email - you can choose between the automatic system template or select/create a custom email template from the dropdown menu
- Enter a text (if using a custom template)
Max submits settings
The max submit settings (Figure 15.1) allow you to control if and how the form should limit users from submitting form data.
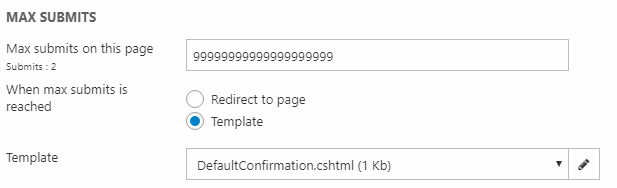
With the max submit setting you can:
- Specify how many times a form can be submitted from this page
- Specify what to do when a max submits limit is reached:
- Redirect the visitor to a specific page
- Select or create a template to render
Upload settings
Finally, you can use the upload settings (Figure 16.1) to specify a path to where you want user-submitted files to be stored.

User Management settings
The User Management settings (Figure 17.1) are used to create users on form submit and add them to one or more user groups.
This is particularly useful for signing users up for newsletters - simply add users to a newsletter group and use email marketing to target that group.
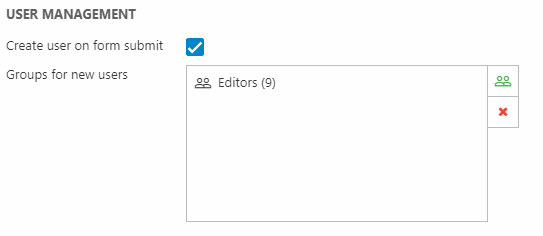
To use this feature:
- Check the Create user on form submit and select one or more user groups to add new users to
- Edit your form fields and map them to the corresponding user management field (Figure 17.2)
When using this feature, you must always have a field mapped to the standard Email field, and this form field should be marked as an Email field in the form field settings.
The following behavior rules apply to this feature:
- If the email corresponds to an existing user, only the email permission field and group membership is updated. This makes it possible to sign existing users up for newsletters. You cannot update other fields this way - use the Extranet app.
- If no user with the email is found, a new user is created using the value from the email field as the Username and Email. Email permission will be set to 'true'. If mapped to, the following fields will also be updated on submit:
- Name
- FirstName
- MiddleName
- LastName
- Address
- Address2
- Zip
- City
- Country
- Phone
- PhonePrivate
- PhoneMobile
- Company
- Department
- JobTitle
- Any custom fields
Overriding app settings
You can override any setting from a Forms for Editors app by creating a field in the form (hidden or not) with the same name as the setting.
For instance, to override the subject of the mail being sent to the website owner when a form is submitted, create a field (hidden or not hidden) with the name “MailSubject”. Then the form handler will pick up the value from the form and use that instead of the value set on the paragraph app settings.
Example:
Here are some more examples to get you started.
Checkboxes & Lists
Checkboxes can be set to checked by passing either “True” or the specified value of the checkbox:
By accessing the page with the form with the URL parameter ‘?enable=true’, the field will be checked:
For checkbox lists, radio buttons and select boxes, by adding the field system name with the desired selected value to the query string the default selected option is bypassed, and the option(s) whose values are in the query string are set to selected.
A comma separated list of values can be used to set several options to selected for checkbox lists.
For instance, consider the following checkbox list:
By accessing the page with the form with URL parameter ‘?Pleasechoose=Extra,Additional’ the specified fields will be checked (selected):
Post backs
You can also use query string parameters to post the form to itself and keep the values of the form.
When the form is submitted, the default action is the URL of the page the form is on.
The form has a hidden element called cmd with the value “save”.
To use this type of post back of the form, set the hidden cmd field value to nothing.
Set the value of the field cmd to save when the content of the form is ready to be saved. When the form is submitted with cmd=save, the form will be saved, mailed and a confirmation sent.
Overriding form field values
When rendering the form, it is possible to override the value of the form fields by either submitting a value to the form with the same name as the field system name, or by adding a query string parameter with the system name and a value.
For example:
By accessing the page with the form with the URL parameter ’?firstname=John&20Doe’, the field will be filled with that value automatically.
See below for examples for specific field types.
Default Templates
All three templates used on the Form for Editors app – Form, Email, and Receipt – have an Automatic option, which uses a system template to render the form or email content in frontend.
While this template cannot be accessed, it be overridden at the website level.
To do so:
- Go to Apps > Forms for Editors
- Click Templates in the toolbar to open the Templates interface (Figure 23.1)
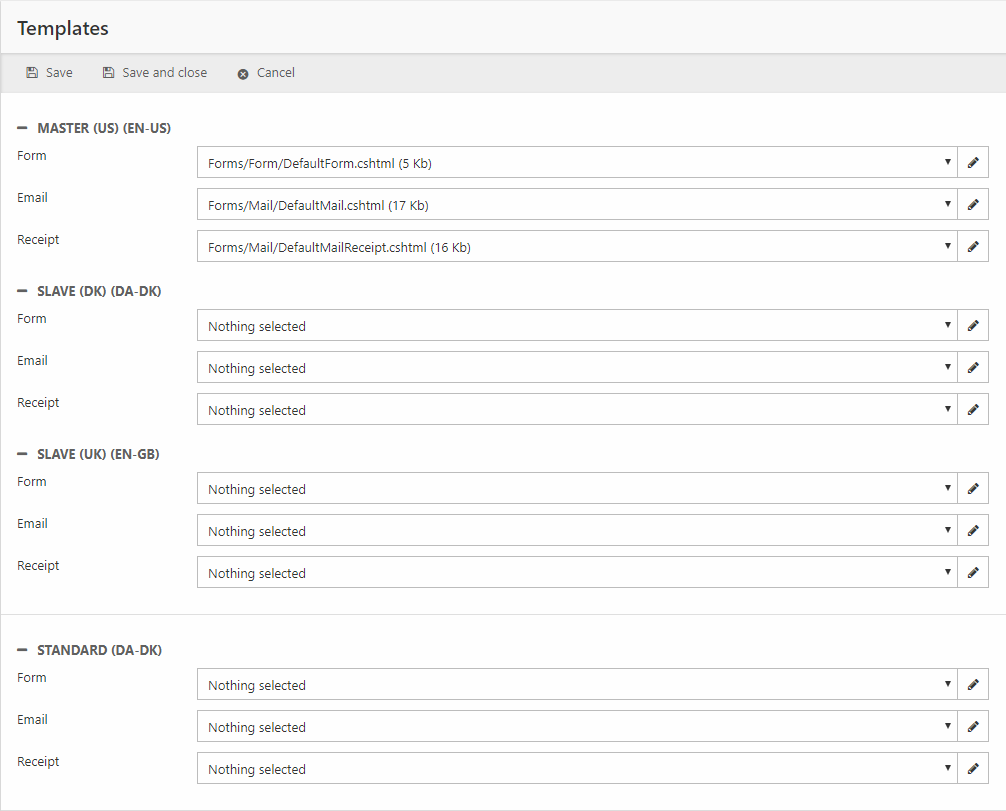
Using this interface, you can select or create website-specific templates to use when a user selects the Automatic option in a forms for editors app.
As with other hierarchies, the more specific option ”wins”:
- If the form has a template specified in the form settings it is used
- If not, the template specified in the interface above is used
- If no such template is selected, the original system template is used

Form
Contains setup data for forms created in the Forms for Editors app.
| Field name | Data type | Length | |
|---|---|---|---|
| FormId | int | 4 | |
| FormName | nvarchar | 255 | |
| FormEmailFieldId | int | 4 | |
| FormColumnShiftFormFieldId | int | 4 | |
| FormLabelOverField | bit | 1 | |
| FormLabelBold | bit | 1 | |
| FormLabelRequired | nvarchar | 255 | |
| FormAttenoDependencyFieldId | int | 4 | |
| FormAttenoEmailFieldId | int | 4 | |
| FormAttenoSettings | nvarchar | 255 | |
| FormMaxSubmits | int | 4 | |
| FormDefaultTemplate | nvarchar | 255 | |
| FormCssClass | nvarchar | 255 | |
| FormCreatedDate | datetime | 8 | |
| FormUpdatedDate | datetime | 8 | |
| FormCreatedBy | int | 4 | |
| FormUpdatedBy | int | 4 | |
| FormFieldSize | int | 4 | |
| FormUniqueId | uniqueidentifier | 16 | |
| FormDisplayCount | int | 4 |
FormField
Contains field definitions for forms (FormFieldFormID) in the Forms for Editors app.
| Field name | Data type | Length | |
|---|---|---|---|
| FormFieldId | int | 4 | |
| FormFieldFormId | int | 4 | |
| FormFieldName | nvarchar | 255 | |
| FormFieldType | nvarchar | 50 | |
| FormFieldDefaultValue | nvarchar | 255 | |
| FormFieldMaxLength | int | 4 | |
| FormFieldSize | int | 4 | |
| FormFieldRequired | bit | 1 | |
| FormFieldTextareaHeight | int | 4 | |
| FormFieldSort | int | 4 | |
| FormFieldActive | bit | 1 | |
| FormFieldText | nvarchar | Max | |
| FormFieldImage | nvarchar | 255 | |
| FormFieldColor | nvarchar | 50 | |
| FormFieldAutoValue | nvarchar | 255 | |
| FormFieldSystemName | nvarchar | 255 | |
| FormFieldAttenoFieldName | nvarchar | 255 | |
| FormFieldCreatedDate | datetime | 8 | |
| FormFieldUpdatedDate | datetime | 8 | |
| FormFieldCreatedBy | int | 4 | |
| FormFieldUpdatedBy | int | 4 | |
| FormFieldGroupID | int | 4 | |
| FormFieldCssClass | nvarchar | 255 | |
| FormFieldPlaceholder | nvarchar | 255 | |
| FormFieldDescription | nvarchar | Max | |
| FormFieldPrepend | nvarchar | 255 | |
| FormFieldAppend | nvarchar | 255 | |
| FormFieldActivityId | nvarchar | 50 | |
| FormFieldHideInReceipt | bit | 1 | |
| FormFieldUniqueId | uniqueidentifier | 16 | |
| FormFieldInputPattern | nvarchar | 255 | |
| FormFieldTitle | nvarchar | 255 |
FormFieldOption
Contains option value for Form fields
| Field name | Data type | Length | |
|---|---|---|---|
| FormFieldOptionId | int | 4 | |
| FormFieldOptionFieldId | int | 4 | |
| FormFieldOptionText | nvarchar | 255 | |
| FormFieldOptionValue | nvarchar | 255 | |
| FormFieldOptionDefault | bit | 1 | |
| FormFieldOptionActive | bit | 1 | |
| FormFieldOptionSort | int | 4 |
FormOptions
Contains option values for multiple value fields (ForFieldOptionFieldId) such as dropdowns or radio button groups.
| Field name | Data type | Length | |
|---|---|---|---|
| FormOptionsId | int | 4 | |
| FormOptionsFormFieldId | int | 4 | |
| FormOptionsText | nvarchar | 255 | |
| FormOptionsValue | nvarchar | 255 | |
| FormOptionsDefaultSelected | bit | 1 | |
| FormOptionsSort | int | 4 | |
| FormOptionsActive | bit | 1 | |
| FormOptionsUniqueId | uniqueidentifier | 16 |
FormSubmit
Tracks submits of forms (FormSubmitFormId) by ip (FormSubmitIp), page (FormSubmitPageId) and extranet user (FormSubmitUserId).
| Field name | Data type | Length | |
|---|---|---|---|
| FormSubmitID | int | 4 | |
| FormSubmitFormID | int | 4 | |
| FormSubmitDate | datetime | 8 | |
| FormSubmitIp | nvarchar | 30 | |
| FormSubmitSessionId | nvarchar | 30 | |
| FormSubmitPageId | int | 4 | |
| FormSubmitUserId | int | 4 | |
| FormSubmitReferer | nvarchar | 1000 |
FormSubmitData
Contains the data submitted (FormSubmitDataSubmitId) in a form field (FormSubmitDataFieldId)
| Field name | Data type | Length | |
|---|---|---|---|
| FormSubmitDataID | int | 4 | |
| FormSubmitDataSubmitID | int | 4 | |
| FormSubmitDataFieldID | int | 4 | |
| FormSubmitDataFieldname | nvarchar | 255 | |
| FormSubmitDataValue | nvarchar | Max |