
Customer Center
The Swift Customer Center allows registered users to:
- See their orders
- Edit their account information
- Manage billing and deliver addresses
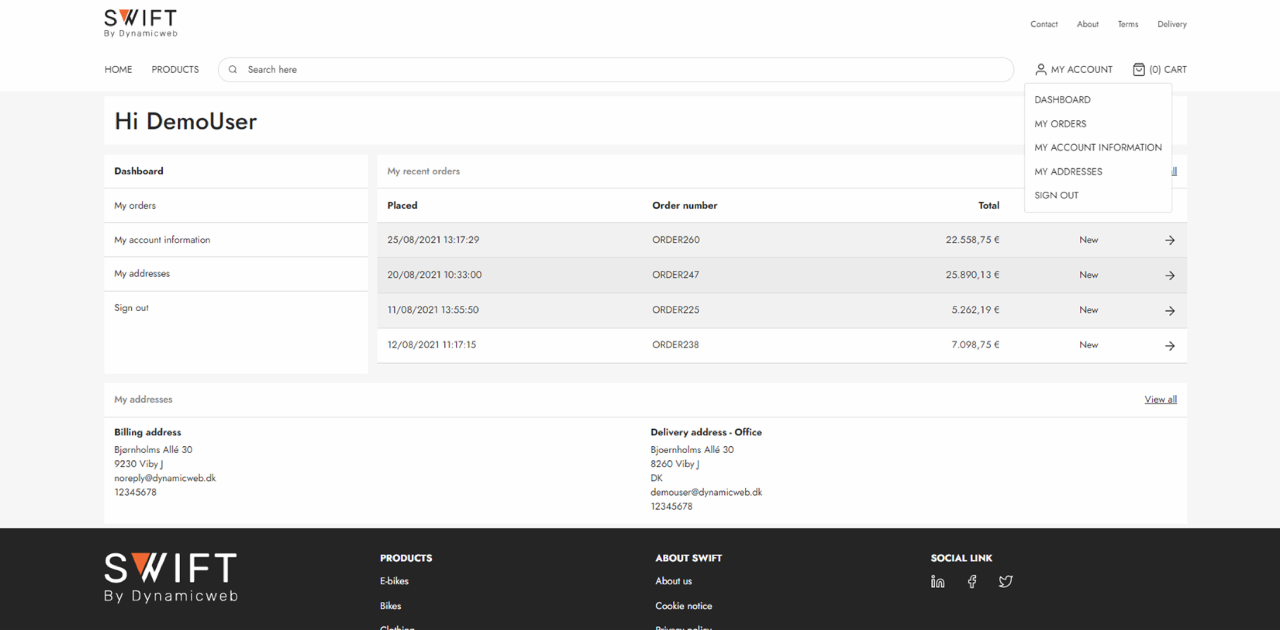
On the example website, the customer center is accessed via a dropdown under My account and consists of a dashboard and a series of related pages like My orders, My account information, and My addresses (Figure 1.1).
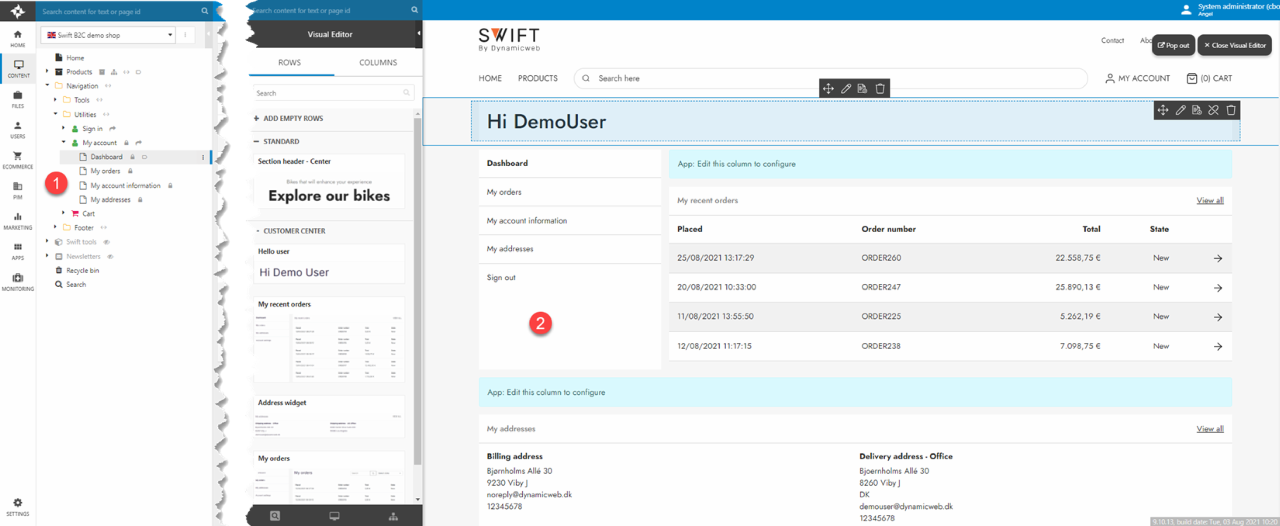
In the backend (Figure 1.2), the customer center pages are located under Navigation > Utilities > My Account (1). As with most other Swift-pages, the Customer Center pages may be edited using the visual editor (2) – they all contain at the minimum:
- A vertical navigation column which has the My account page set as the root node
- A customer center app column with an app appropriate to their specific function attached – for the My orders page this is a customer experience center app, for the account details & address pages it’s an Extranet app
Since this is a specialized area of the website, you don’t have access to all the column types you have access to on regular content pages – this is by design.
Navigation tags in Customer Center
For now, only two pages in the customer center are using navigation tags. The navigation tags are meant to make accessing specific pages easier and faster. This is because you can refer to the pages by the tag instead of the path of the page.
The pages using navigation tags are:
- Dashboard - This page uses the tag called "MyAccountDashboardPage"
- My customers - This pages uses the tag called "ManageCustomers"
If your setup doesn't already have these tags configured and you want to add these tags or others, checkout our quick guide below.
Manual setup
This guide will show how to set up the "ManageCustomers" tag for the My customers page, but the process is the same for all other navigation tag. It is just the page and tag you will have to swap.
- Locate the page to place the navigation tag on. In this case it is the My customers page located in navigation -> Utilities -> My account -> My customers
- In the top menu click on Properties
- Go to Options and click on Navigation
- In the "Navigation tag" field enter the navigation tag. In this case that is "ManageCustomers"
- Hit "OK" and then "Save and close"
And that is that. Now the page will have a navigation tag. This is also shown by the small tag symbol next to the page name.
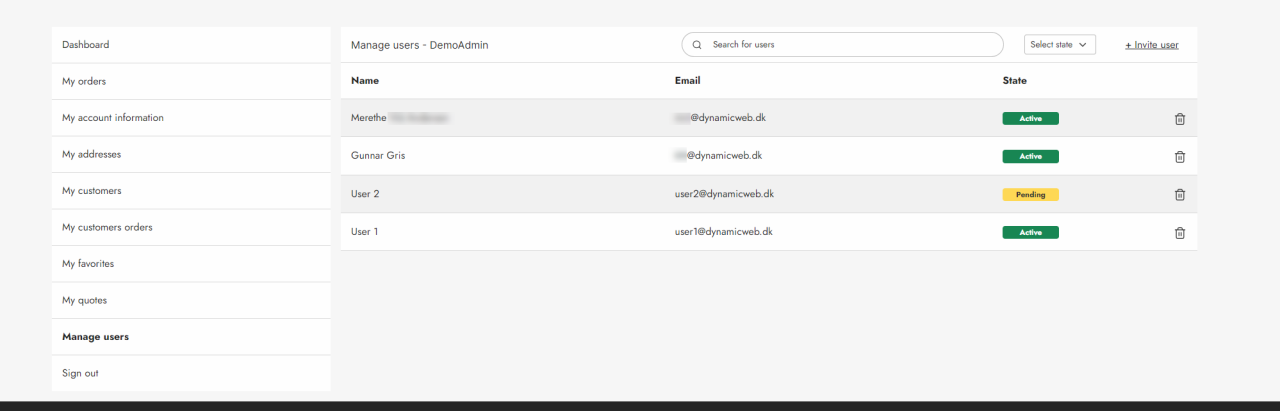
Create and Manage Users
In the Swift Customer Center, you can create and manage users on the website. These are displayed with a name, their email and status. As this role should be an Account manager you might want to use our Permissions to make sure that only the Account manager have access to this.
For the Create and Manage users page to work, the Account manager must have a valid customer number. You can check the customer number in the Users section. When a new user has been invited and later on created the user will have the same customer number as the Account manager. This way the Account manager is linked to the users.
Manual setup
This guide will show how to setup the Create and manage users tool for Swift.
- Go to the Customer Center folder in the content tree, locate the “My orders” page
- Right click the page and click “Copy here”
- Name it “Manage users” and let the publication state be “As the original”
- Enter the Visual Editor
- Delete the “My orders” paragraph on the right
- Add the “Customer center App” paragraph to the empty column
Now it is time to configure the Customer center App
- In the App settings choose the Query Publisher App in the Content Section
- In the Query field choose “Manage users.query”
- In the Sort by field click Add a new row
- Set Field to “Auto update ID”
- Set Direction to “Descending”
- In the Template section choose “QueryPublisher/ManageUsers.cshtml”
- Hit OK on the modal and then on the column editor
At this point you might get an error message. This will happen if you are not logged in in the frontend with an Account Manager. As mentioned, we strongly recommend using our permissions tool to ensure that only an Account manager will have access to this page.
You will need to add another app paragraph, this time in a 1 column row.
- In the Visual Editor, add a 1 column row at the top of the page
- Drag and drop a “Customer center App” paragraph on the empty column
- In the App settings choose “Extranet” in the Content section
- In the Show section choose “Create profile / Manage subscription”
- In the Create User section:
- For template choose “ManageUsersInviteModal.cshtml”
- In Approval choose “By user”
- In Group for new users choose the relevant group for new users to be added in. This will choose which user group the newly created users will be placed in - this could be “Accounts”
- Make sure to tick “Require unique emails”, “Use email for user name” and “Set profile”
- In the User confirmation Email section choose “ManageUsersInviteEmail.cshtml” as Template
- In the User Notification Email section:
- As “On user notification, redirect to” choose template
- As the template choose “ManageUsersInviteEmail.cshtml”
- Fill out the last three fields with the relevant information (email, name, and subject for email)
- In the Redirect section:
- As “After creation, redirect to” choose template
- As the template choose “RedirectToThisCleanPage.cshtml”
- Hit Ok
Now you have created the possibility to invite new users. Next, we must create a page for the users to create a password on. The users will automatically be redirected to this page, when they click the link in the email.
- Go to the Utilities folder in the content tree
- Create a new “Customer center” page in the folder, call it “Create password” and make it hidden in menu. It is important that it is not just a “Page”. It must be the Customer center page type
- Now go to the page properties, then to options and set the Navigation tag of the page to “CreatePasswordPage”
- Hit Save and Close
The next thing to do is to setup the Create Password page. To do this:
- Enter the Visual Editor of the Create Password page
- Add an empty 1 column row
- Add a “Customer center App” paragraph
- In the App settings choose “Extranet” from the Content section
- In the Show section choose “Create profile / Manage subscription”
- In the Create User section in the “Groups for new users” choose the same group as before. (Again, this could be “Accounts”)
- Scroll to the Redirection section and choose page
- As the page choose the “Dashboard” page located in the My account folder in the Utilities folder
- In “After approval, redirect to” choose the newly created “Create password” page
- Hit Ok on the column editor for the changes to get saved
- Close the Visual editor and click on the Extra net column
- In the App settings in the Show section change it to “Login”
- In the Login settings section:
- In Password Recovery Template choose “CreatePassword.cshtml”
- In Restore password method choose “Send link to reset page” and set the Link active for to 48 hours
- Go to the Item settings. in the Sign in page field choose your “Sign in” page from the Sign in folder in the Utilities folder
When this is done you should have created a Create and Manage Users page in the customer center. Here you can either delete existing users or invite new users. You have also created a page for the invited users to create a password for their new user.
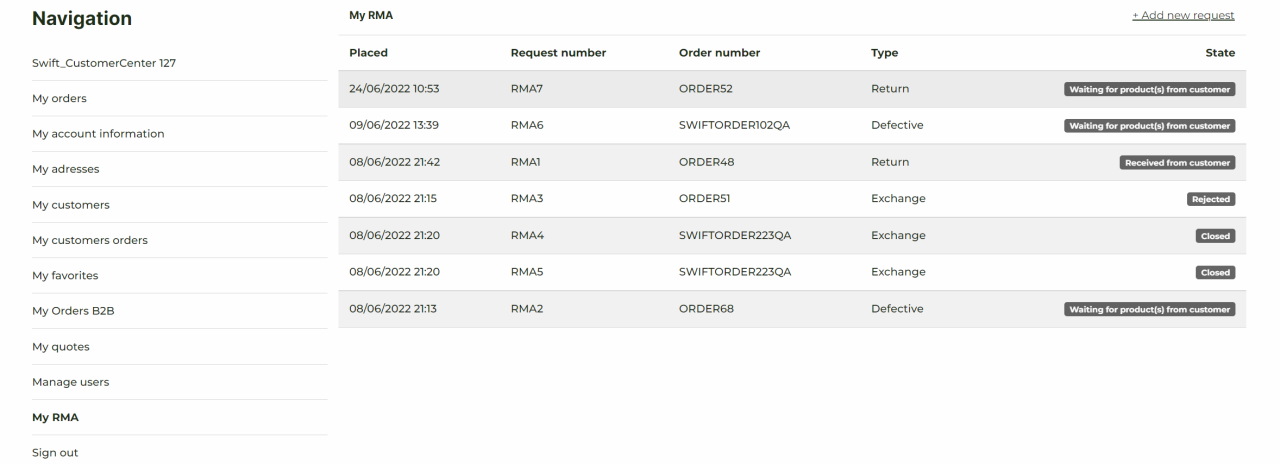
RMA
In the customer center in Swift, it is possible to create a Return Merchandize Authorization feature. This allows customers to create and keep track of return requests for an order. While creating the return request customers can use comments to specify the reason for the return.
Manual setup
As this is a customer center feature, the setup will take place in the folder containing the customer center pages. On the Swift demo site, it is called “My account”.
- Go to Navigation -> Utilities -> My account
- Create a new side called “My RMA” in the My account folder
- Enter the Visual Editor on the newly created page
- Add a 2 columns 3/9 row to the empty page
- As the first empty column, add a Vertical navigation column – Make it point to the “My account” folder and match the design from the other pages in the customer center
The other empty column is where the RMA feature should be placed.
- On the empty column add a “Customer center app” column
- Name the column “My RMA”, link the Cart page field to your cart page, and the Product list page field to your product list.
- Now enter the App part of the settings
- Choose the Customer center app
- Scroll to the Default View section. In the Default View dropdown choose RMA
- Scroll to the Templates section. In the RMA list dropdown choose “RMAList.cshtml”. In the RMA details dropdown choose “RMADetails.cshtml”. Please make sure to choose cshtml files and not html files in these two dropdowns.
Now the RMA feature has been created. To check if it is working make sure to log in in the frontend using a user with processed orders.
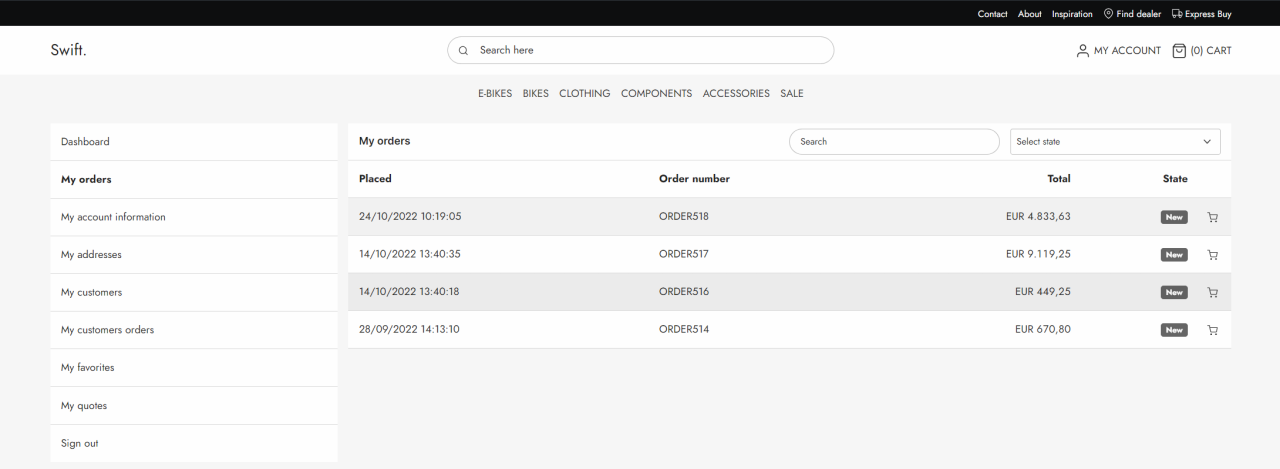
My Orders
The My orders section in the customer center is for the users to rewatch earlier made orders. This section displays orders the user has made earlier. It can keep track of the state of the orders, showing whether they are e.g. new or completed.
Manual setup
If you want to manually setup a new My Orders page, or if you want to check if an existing setup is correctly configured, follow this guide.
We’ll start by creating the My Orders page. The page should be in the My account folder. This way you can keep all the user pages stored together.
- Locate the My account folder. It should be somewhere like Navigation > Utilities > My account
- Create a new costumer center page in the folder, and call it My Orders
Ideally, you want all your customer center pages to generally look alike, at least in terms of structure and theme. In this manual setup we will match the design from the Swift Demo site.
- Add a 2 column 3/9 row to the empty page
- Add a vertical navigation column in the left empty column and configure it to match the layout from the other customer center pages
- In the right empty column space add a Customer center app
When you add the Customer center app, you will be seeing a lot of empty fields. You do not need to fill out all the fields, but should link the following:
- Orders page – Link the Customer center app to the My orders page, you just created
- Account settings page – Link to the account information page in customer center. Typically called My account information
- Addresses page – Link to the My addresses page in customer center
Additionally, you might want to name the column something like “My orders”.
Next, you want to enter the App part of the settings. Choose the Customer experience center in the ecommerce section.
In the list section
- In the “Sort by field” dropdown choose “CreatedAt”
- In “Sort direction” dropdown choose “Descending”
In the Templates section
- In the “List” dropdown choose “OrderViewSearchList.cshtml”
- In the “Detail” dropdown choose “OrderDetails.cshtml”
When you’ve changed this, hit OK. The My orders page is now configured.
You might want to make sure your user permissions match on your different customer center pages. You can read more about user permissions here.
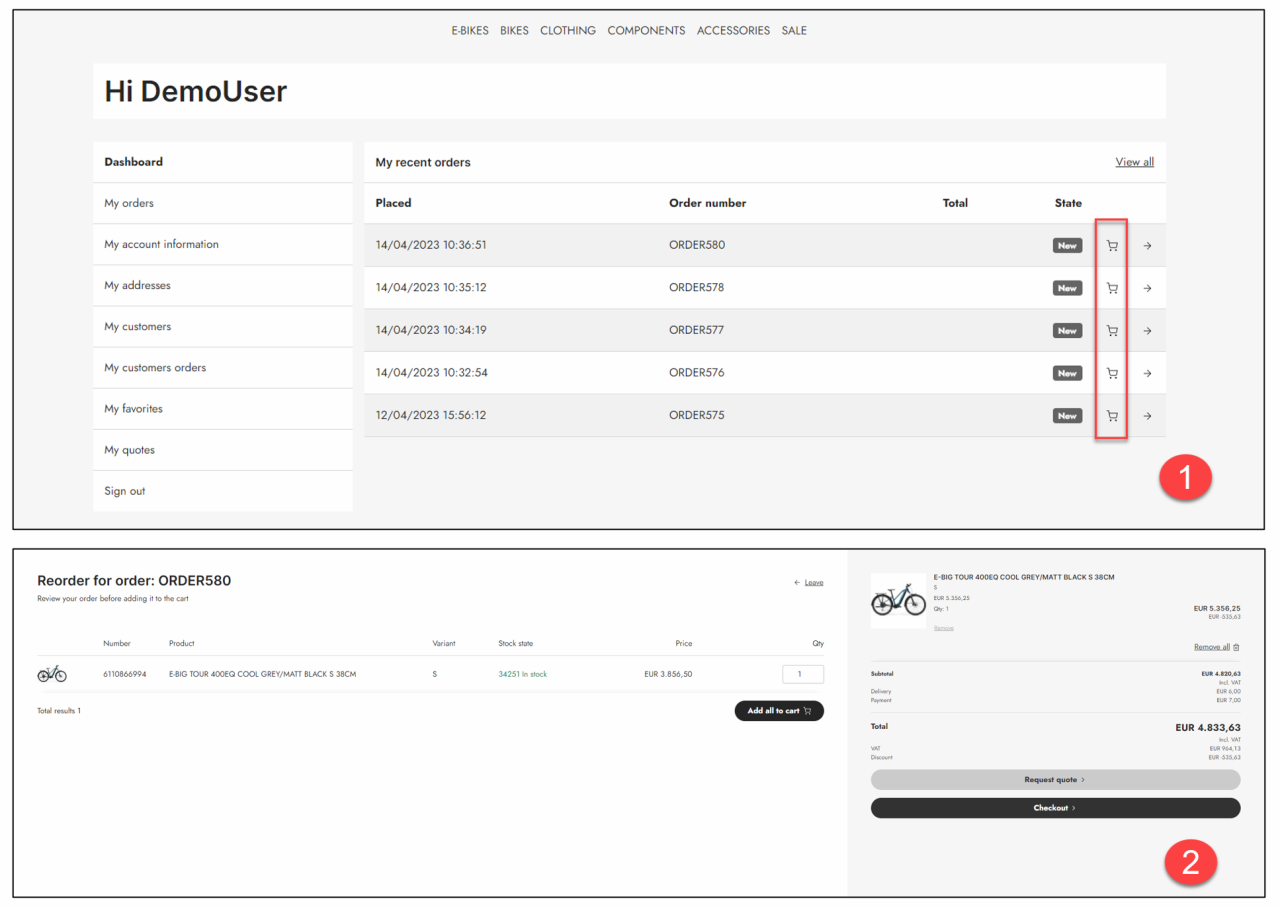
Reorder
In the My Orders section users have the ability to Reorder an old order. This is the cart icon displayed to the far right of the orders table ((1) on Figure 10.1). When users click this icon the products from the old order will be added to an express buy window (2). Here, users will be alerted if any of the products in the cart are out of stock. But otherwise the products can easily be added to the cart and bought again.
Re-download product assets
It is possible to quickly download product assets from the My Orders page. When a user is logged in and enters the My Orders page a small download icon will apear to the right of each order. Clicking this will open a download side menu, where the user can download the product assets.

This setting can be enabled or disabled in the app column settings.