
Web and HTTP
The Web & HTTP settings let you control how your solution handles Web & HTTP-related events.
Using the Web & HTTP settings you can:
- Upgrade or downgrade your Dynamicweb solution
- Configure host headers
- Configure the WebDAV service
- Control if and how your solution should generate SEO-friendly customized URLs for your content
- Create and manage virtual direct paths
- Configure the form and SQL inject security settings
- Configure the Cookie Manager
- Configure your HTTP Compression settings
- Set a global CDN provider
- Set up load balancing of your solution
Most of these options are administrator only – so if you need any changes, please contact your administrator before you contact support.
Manage Versions
Provided that you have Administrator access, the Manage Versions area (Figure 2.1) allows you to upgrade (or downgrade) your Dynamicweb solution.
To access the Manage Version area go to Management Center > Web and Http and click the Manage Versions node.
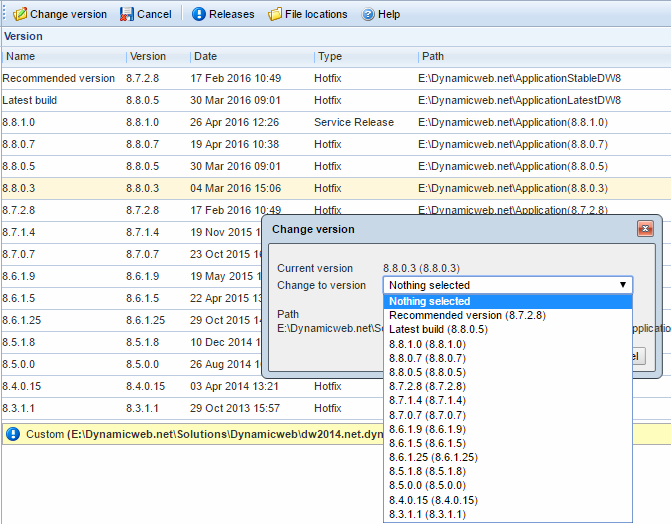
To change version:
- Click Change version in the toolbar to open the Change version window
- Select the version you want to change to
- Click Ok
Your solution will now upgrade (or downgrade) to the selected version. Please note that the solution will restart and you will be logged off.
On Recommended version & Latest Build
If you select recommended version you will be automatically upgraded to the version recommended by our technical support staff. This will generally ensure you the most problem-free experience.
If you select latest build you will be automatically upgraded to the latest available build.
Before updating, please consult the release notes for your version.
Host Headers
If you have administrator access, you have access to the Host Headers settings (Figure 3.1). They allow you to create and configure multiple host headers for your solution directly on the IIS.
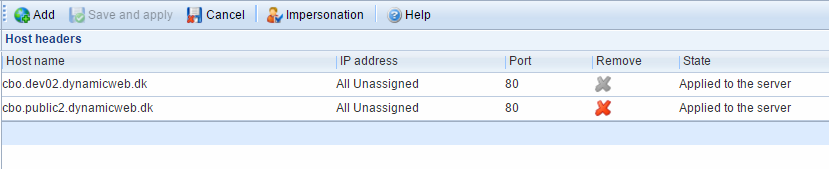
To create a new host header:
- Click Add in the toolbar
- Specify a host name, and optionally an IP address and a port to use (port 80 is default)
- Click OK to add the host header to the list
Once you’ve added the host headers you need, click Save and apply to save the host headers to the IIS. Please note that your solution will restart and you will be logged off.
On special characters
Dynamicweb automatically detects the IIS version you are running on and converts to/from punycode as needed.
Older versions may receive a ‘Operation failed’ error when trying to save a hos header using spaces or special characters.
WebDAV
Dynamicweb supports using WebDAV to access and edit files directly from your favorite template editor.
To use WebDAV, enter an appropriate name in the virtual path field and save. The folder can now be accessed through the path [domain]/[webdav folder name], e.g. www.dynamicweb.dk/design.
Only administrator accounts with unencrypted passwords can access the Dynamicweb WebDAV connection.
Customized URLs
Customized URLs in Dynamicweb depend on the 404-handler on your IIS server, so if you experience problems please ensure that it is configured correctly
Dynamicweb has a number of ways of handling search friendly URLs for pages. A normal page in the frontend has a URL like /Default.aspx?ID=123 which shows the page with the ID of 123.
The Customized URLs function replaces the standard URLs with more SEO-friendly versions – so /Default.aspx?ID=123 becomes /Products for instance – and you can to a large degree control how.
You can:
- Select an URL- type for regular pages
- Select an URL-type for any non-regular pages you use, e.g. Ecommerce products & groups, item types, News-articles, etc.
Here’s how to do both.
Selecting an URL type for regular pages
To select a custom URL type for regular pages, simply select the desired type on the radio button list (Figure 6.1).
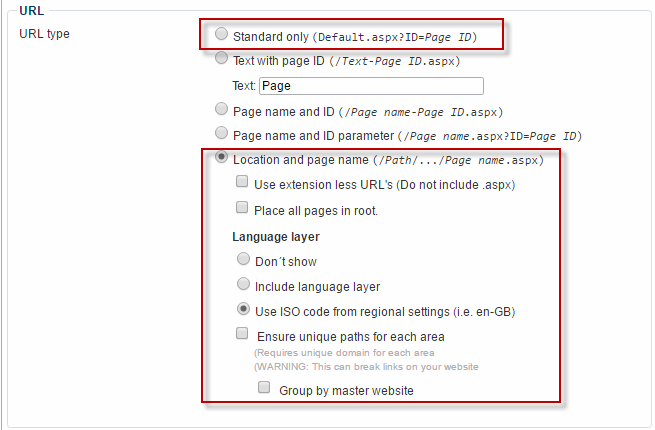
We recommend that you use either Standard only or location and page name, as Google will rank those custom URL types higher.
If you select Location and page name you can:
- Check use extensionless URLs to remove .aspx from your URLs (will only work for sites running in IIS 7/8 in integrated pipeline mode with the 404 handler configured, and is NOT supported for IIS 6 and IIS 7+8 running in app pools with classic pipelines)
- Select Place all pages in root to leave out any information about page structure in URLs. This means that www.mydomain.com/page/subpage will be displayed as www.mydomain.com/subpage
- Handle language layers:
- If you select don’t show the language layer is not shown in the URL
- If you select include language layer the language layer name will be included in the URL
- If you select use ISO code from regional settings the regional ISO code will be used (e.g. en-GB)
By default, the Dynamicweb URL handler will ensure unique URL extensions by adding a number to URLS with the same extension, e.g. /home-1 and /home-2. If you have a unique domain for each website on your solution, you can check ensure unique paths for each area to disable this behavior, as the URL handler will take the full domain name into consideration when creating URLs and not only the extension. If you group by master website language layers will belong to the same URL index as the master website – should be combined with a language layer setting to ensure unique URLs.
Selecting an URL type for other types of content
Chances are you will be using more than regular pages on your solution, and to generate custom URLs for those you must configure the various add-in settings (Figure 7.1).
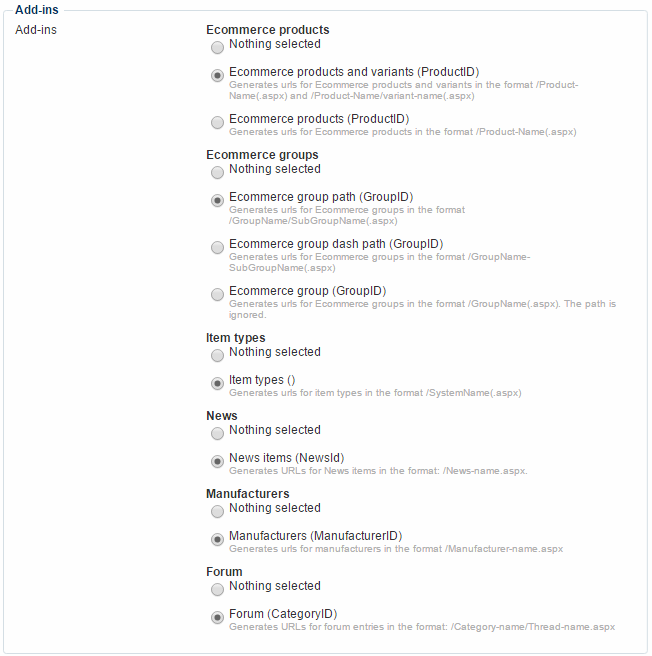
You can customize how URLs are generated for:
- Ecommerce products and groups
- Item types published by the Item Publisher, provided that you have activated Customized URLs in the item-type settings. If item is a paragraph item the name is taken from the paragraph name, and if item is a page item the name is taken from the page name, unless Use in URL has been checked in the page properties settings
- News articles (from the News module)
- Manufacturers
- Forum categories
Customized URL settings
The Customized URL settings (Figure 8.1) give you further control over how your custom URLs are generated.
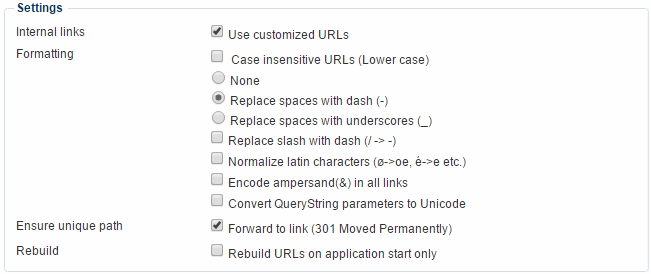
You can:
- Use customized URLs for internal links
- Control formatting practices, e.g. replacing spaces with underscores or dashes, normalize Latin characters, etc. The setting Encode ampersand(&) in all links only works if don’t use the Standard only URL type. Please also note that normalizing latin characters may conflict with the SEO Express recommendations
- Check Forward to link (301 Moved Permanently) to use 301 forwarding to redirect users and search engines to the new URL. This may prevent a loss of Google page ranking.
- Check Rebuild URLs on application start only to disable rebuilding the URL index every time e.g. a product is changed. This may improve performance for solutions with more than 100.000 products.
Customized URLs Ecommerce Settings
The Ecommerce customized URL settings (Figure 9.1) allow you to further control how custom URLs for Ecommerce content works.
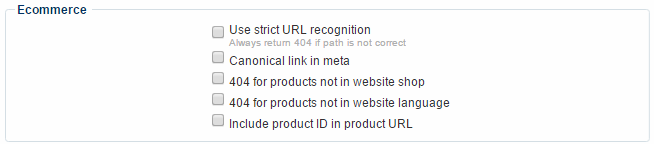
You can:
- Check Use strict URL recognition to always return a 404 page if the path to a group, product, variant etc. is not 100% correct. If unchecked and incorrect URL may return e.g. a product from another group.
- If your Ecommerce contains pages with different URLs but identical content, such as /productlist.aspx and /productlist.aspx?sort=price, you can check canonical links in meta to make the most basic URL canonical and prevent content from being indexed as separate pages by search engines
- Check 404 for products not in website shop and 404 for products not in website language to return 404-pages when users try and access products outside the shop/language context. Will also return 404 for products not in the right group context.
- Check include product ID in product URL to activate that behavior
Customized URLs Meta settings
The customized URL meta settings (Figure 10.1) let you control meta behavior.

You can check Use noindex, nofollow for *.dynamicweb.* URLs to tell search engines NOT to index or follow links to Dynamicweb.dk domains. If disabled on *.net.dynamicweb.dk solutions, you will still get a <meta name="robots" content="noindex,nofollow"> in the page source on your *.net.dynamicweb.dk addresses. This is intended behavior. Dynamicweb cannot have pages indexed ending with .dynamicweb.dk or any other Dynamicweb domain, as it breaks SEO for our own Dynamicweb page. You need to buy a domain for your solution.
If your Ecommerce contains pages with different URLs but identical content, such as /productlist.aspx and /productlist.aspx?sort=price, you can check canonical links in meta to make the most basic URL canonical and prevent content from being indexed as separate pages by search engines.
Direct Paths
The Direct Paths options let you add virtual URLs (or paths) to your solution. Provided the path does not actually exist on your solution, the 404-handler on your IIS server will then redirect the request to the link you provided. Please note, that if a page with the same path as the virtual URL exists, no redirect will happen (as you will not activate the 404-handler). The IIS server must be set up to resend 404 to the Dynamicweb 404-handler (Admin/Public/404.aspx).
To access the Direct Paths area (Figure 11.1), go to Management Center > Web and Http > Direct paths.
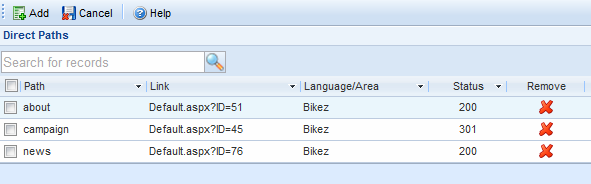
To add a new direct path to your solution, click Add in the toolbar to open the Direct Path window (Figure 11.2).
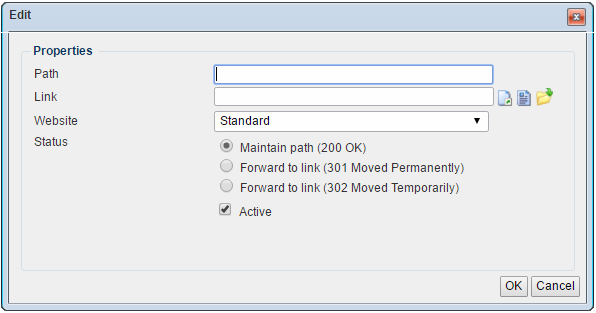
From the Direct Path window you must:
- Provide a virtual path – e.g. news, in which case the path will be www.mydomain.com/news
- Provide a link to redirect visitors to when they enter the direct path
- Select the website you want the direct path to apply to
- Select a status code for the virtual path:
- 200 OK to keep the virtual path in the address bar
- 301 Moved Permanently to redirect to the new URL and inform the search engine of the permanent move
- 302 to redirect to the new URL and inform the search engine that the move is temporary. Rarely used.
You can deactivate or activate a direct path redirect using the Active checkbox.
Security
The Security settings (Figure 12.1) lets you control various security settings related to your solution.
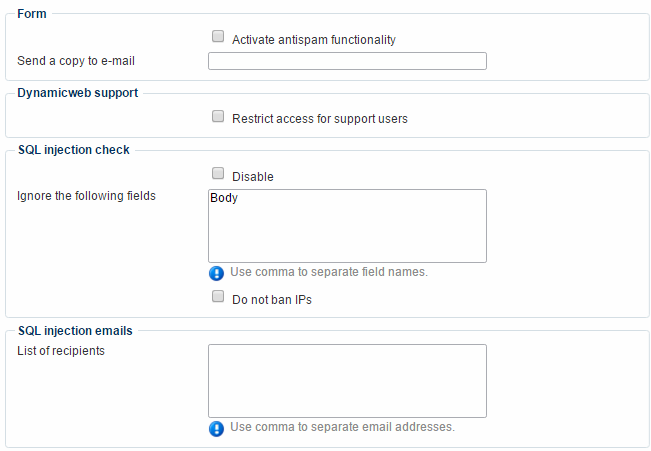
You can:
- Activate antispam functionality for forms – this will create hidden input fields in forms, which will then be filled by bots and used to filter. You can enter an email to send a copy of the filtered forms to, this can be useful for debugging and investigation tasks.
- Restrict access for support users, which removed angel access for our support staff. They may throw a hissy-fit if you then need support. Use with extreme caution.
- Completely disable Dynamicweb’s built-in security measures against SQL injections. We strongly advise against this. Use at your own risk. You can also disable the security measures for specific fields only using the ignore the following fields list.
When the SQL injection check is active, injection attempts will result in a 15 minute IP ban of the injection source. The IPs will be listed in \Files\System\_BannedIps.txt. Delete the file to lift any active bans. Only SQL injection attempts will return in IP bans – other forms of attack, such as cross scripting attempts, will only result in 404 on subsequent tries.
You can also specify one or more emails to notify when an SQL injection attack is detected.
Cookie Manager
In the EU, all websites must explicitly give individuals the opportunity to refuse the use of cookies.
This means that you are required to obtain consent from each website visitor before storing or accessing information stored in a cookie, except under very particular circumstances – read more about EU legislation on cookies here.
In order to comply with the EU law and present a cookie compliance warning on the front page of your websites, Dynamicweb contains a Cookie Manager.
To access the Cookie Manager, go to Management Center > Web and Http and click the Cookie Manager node to open the Cookie Manager settings (Figure 13.1).
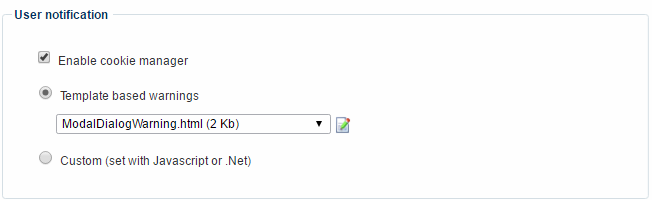
The Cookie Manager is disabled by default – to enable it click enable cookie manager.
Once enabled, the Cookie Manager can render either template-based or custom cookie warnings. If you want to use a custom cookie warning, you can use Javascript og .NET to render a warning message – check the Template Tags and API documentation for details.
Managing cookies
The Cookie deactivation lists (Figure 14.1) are populated with all Dynamicweb cookies, categorized according to Danish law. This is where you manage, add and remove cookies from your solution.
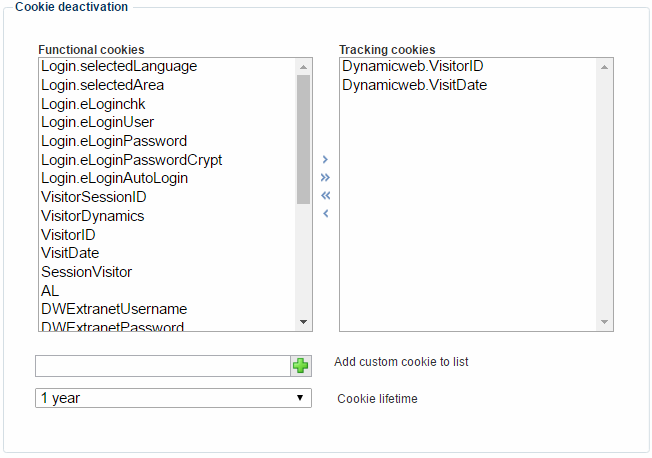
Using the Cookie deactivation settings you can:
- Move cookies between the list of functional cookies and tracking cookies lists
- Add a custom cookie to the functional cookies list (you can manually move it to the tracking cookie list)
- Set a default cookie lifespan
Disabling the Cookie Manager settings on specific websites
The template selected in the Cookie Manager settings are used on all websites in a solution – and cannot be fully disabled.
However, you can create an empty warning template and use it on the websites which should not display a cookie warning.
To do so:
- Go to the Website settings
- Click the Cookies-button in the ribbon bar
- Select the empty template (or select Custom and don’t implement any custom code)
This de facto disables the Cookie Manager on that website.
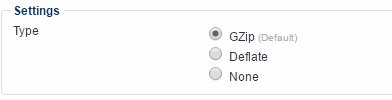
HTTP Compression
With the HTTP Compression settings (Figure 15.1) you can choose between GZip and Deflate compression. You may also select None.
CDN (Content Delivery Network)
A Content Delivery Network is a network of servers - usually located at various sites around the world - that deliver cached static content from websites, such as images, CSS and JavaScript files.
Using the CDN settings in the management center (Figure 16.1), you can configure a global CDN network, which can then be inherited or overwritten in the website settings for each of your websites, as appropriate.
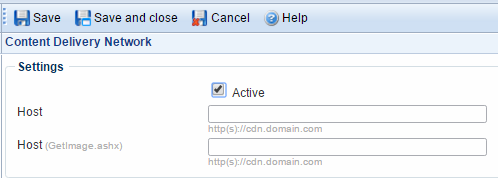
If your website uses the HTTPS protocol the CDN host should also use the HTTPS protocol.
Static resources placed under /Files will not be replaced.
Load Balancing
Depending on your license, you may have access to the Load Balancing area (Figure 17.1).
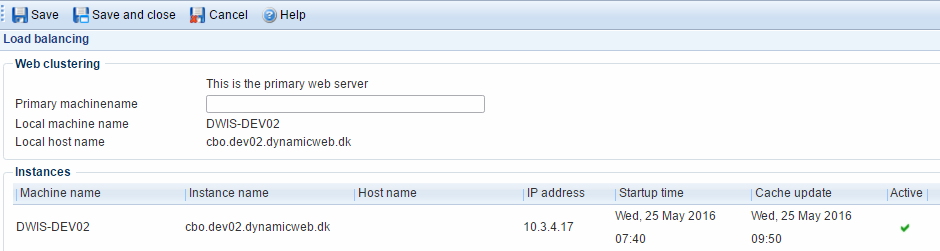
For an example of how to use Load Balancing, see the Setting up Dynamicweb for Load Balancing with Microsoft ARR for IIS8 how-to.