
Pages
A webpage is a document written in a markup language (typically HTML) and accessed through the internet by way of a web browser. Ok, now that’s out of the way, here’s how to work with webpages in Dynamicweb.
In Dynamicweb, pages are used for defining the structure of your website – and generating dynamic navigation menus – and of course as containers for content from paragraphs.
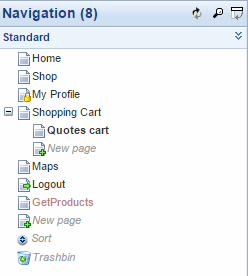
Pages are created from and hierarchically nested in the content tree for your website (Figure 1.1).
There are two types of pages in Dynamicweb:
- Regular pages
- Item-based pages
This document is about regular pages – for more information on item-based pages, please see the items documentation.
Please note that item-based pages are extensions of regular pages, so to fully understand item-based pages you may still find this document useful.

Basic Concepts
In this section, you will learn about:
- Creating, moving, deleting and copying pages – and other similar actions
- The paragraph list view
- The tools and toolbars associated with the paragraph list
- The page properties settings, which you can use to control page behavior in detail
Creating pages
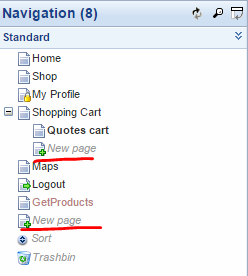
Pages can be created by clicking one of the New page nodes (Figure 3.1) in the content tree.
This will open the page-type selector (Figure 3.2), from where you can select either a blank page – the default page type – or any page-items you may have created on your solution.
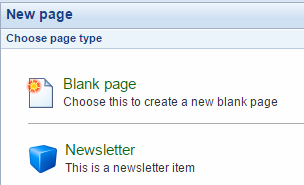
Whichever type you select, you will be prompted to name the page – you can rename it later if you want to – and click OK.
This will take you to an (empty) paragraph list view.
The paragraph list
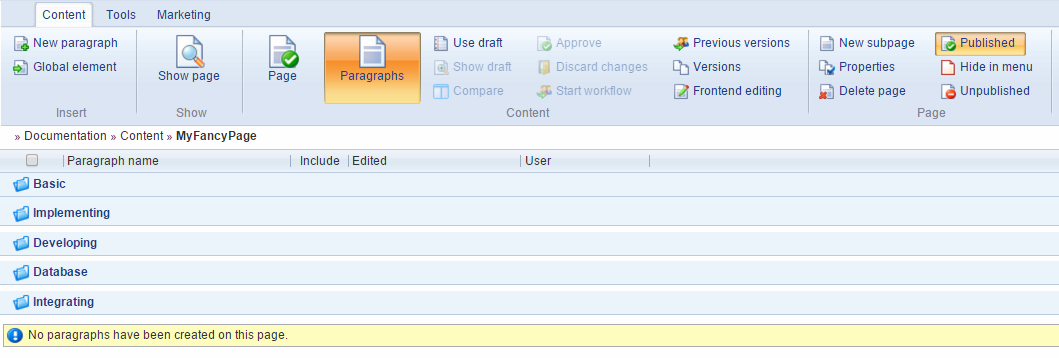
An empty page (Figure 4.1) consists of a toolbar with several tabs, and a(n empty) paragraph list with one or more content placeholders – here Basic, Implementing, etc.
- The toolbar allows you to do a lot of stuff with pages, including basic stuff such as creating paragraphs, more advanced stuff such as setting up split tests, and so forth
- The paragraph list lets you see the content you create on a page – paragraphs with text, attached modules, and so forth
- The content placeholders allow you to organize content, both in the backend and in frontend – read more in the Designs & Layouts article
First, let’s take a look at the toolbar.
The Content tab
When a new page is created, you have immediate access to the content toolbar (Figure 5.1).

With the content tab, you can:
- Create new paragraphs and add global elements (paragraphs) to the page – read about global paragraphs here
- Click Show page to open the page in frontend
- Use drafts, start workflows – read more about workflows and drafts
- Go to frontend editing (see below)
The page-section allows you to:
- Create a new subpage under the current page
- Go directly to the page properties
- Delete the current page
- Set the publish state for the page – Published, Hide in menu or Unpublished. By default, newly created pages are published on your website. Unpublished pages are automatically removed from the sitemap.
If your website has more than one language layer, you also have access to the language layer button, which allows you to switch between your master website and your language layers.
From the content toolbar, you can also access the tools and marketing tabs.
Frontend editing
Frontend editing allows you to edit paragraph content from, well, the frontend.
To use frontend editing:
- Click the page you want to edit in the content tree
- In the ribbon bar, click the frontend editing button
This will open the page in frontend editing mode in a new tab in your browser (Figure 6.1).

When in frontend editing mode, you can:
- Move the cursor around – if the curser touches an editable field, a frame will appear around it
- Click on a text or an empty text field to open an editor toolbar
Once you’re happy with your edits, remember to save the field content using the save buttons on the editor toolbar
Frontend editing supports draft mode. If a page exists in draft you will always get that version with the frontend editor. You will see a yellow info bar in the top of the frontend editing window when you edit a draft.
If you use item-based pages, you can edit Text, Long Text, Rich Text and HTML5 fields from frontend.
The Tools-tab
Next to the content tab is the tools tab (Figure 7.1). This tab is automatically selected when you select one or more paragraphs on the paragraph list.

The tools tab allows you to:
- Copy, Copy Here, Move, Delete and switch include state for a paragraph
- Preview the page content
- Use one or more of the optimization options available to you
Previewing page content
Clicking the Preview button opens the preview window. The preview window consists of the current page and a preview toolbar (Figure 8.1).

With the preview toolbar, you can:
- View the page as a particular personalization profile – read about personalization here
- View the page using a particular resolution
- Switch between a draft and the currently published page
The Marketing-tab
From the marketing tab (Figure 9.1), you have access to the marketing tools in Dynamicweb which are relevant on the page level.
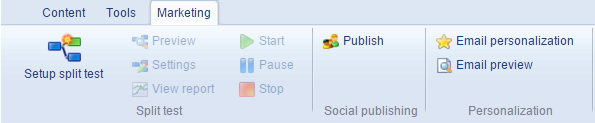
You can:
- Set up and work with split tests on the page –read about split tests here
- Publish the page on social media platforms, using the social publishing tool – read about social media publishing here
- Set up email personalization on the page – read about email personalization here
Deleting, moving & copying pages – etc.
To delete, move or copy a page, right click on the page in the content tree to bring up the right-click menu (Figure 10.1).

The right-click menu allows you to:
- Create a new subpage or a new paragraph
- Show the page, show the current draft, or preview the page as a particular personalization profile
- Click move, copy or copy here to move or copy the page
- Delete the page
- Refresh the content tree
- Go to the page properties of the page
Page Properties
To access the page properties of a webpage, either right-click it in the content tree and click Properties or use the properties button on the page content tab.
You will then see the basic page properties (Figure 11.1).

With the basic page properties, you can:
- Change the name of the page
- Fill in the metadata for the webpage:
- Provide a title and description
- Describe the content of the webpage using keywords (or use the suggest keywords function).
- Use the noindex and nofollow to exclude e.g. confirmation pages from being indexed and don’t want crawlers to follow the links on the page
- Toggle the 404 for detected robots to present a 404-page to visitors identified as robots (based on user-agent)
If you use a non-standard customized URL setting, you can also customize the URL behavior of the webpage:
- View the Dynamicweb auto-generated URL for the page
- Enter a custom-URL in the Use in URL field. Illegal characters are: '+', '?', '#', '%', ':', ';', '|', '<', '>', '*' ,' '(two whitespaces) ,'""' (two doublequotes)
- Check the Do not include URL in subpage URLs checkbox to allow URLs to be trimmed by ignoring the parent page part of the URL in the subpage URL. You can use this if you don´t want the parent page name in the URL for the subpage, e.g.www.yourdomain.dk/Frontpage/subpage.aspx is changed to www.yourdomain.dk/subpage.aspx
- If your solution runs in Integrated Pipeline mode, you can specify an Exact URL for this page – e.g. without an extension or with a different extension, a different name, a specific path etc. The content in this field overrules the whole URL (after yourdomain.dk/) for the current page. It does not have an effect on the subpage URLs. You can e.g. name your page contact, products.php or feeds/googleshopping.xml
Most search engines no longer use keywords. For those that do, we recommend you use a maximum of 13 keywords, and put the most important words first.
The Menu-tab
When editing the page properties, you have access to a toolbar with several tabs – of which the menu tab (Figure 12.1] is the first.

From the menu tab, you can:
- Save, save and close or cancel your changes to the page settings using the tools on the left side of the toolbar
- Open the page by clicking the Show button
- Customize webpage accessibility options (some of these must then be implemented in your navigation XSLTs):
- The Clickable, Show in breadcrumb trail, Display ‘last update’, Show in searches, and Show in sitemap checkboxes
- The Hide for phones/tablets/desktops are primarily supported for legacy reasons
- Set the publish state for the page – Published, Hide in menu or Unpublished. By default, newly created pages are published on your website. Unpublished pages are automatically removed from the sitemap.
If you have more than one website language on your solution, you can switch between language layers using the languages button.
The Options-tab
Next you have the Options tab (Figure 13.1).

From the options tab, you can:
- Save, save and close or cancel your changes to the page settings usingthe tools on the left side of the toolbar
- Set a publication period activation date and deactivation date – the page will only be published during that time span. The end date year can be set to never if you want to page to remain published indefinitely.
From the Composition area of the toolbar, you can open the Navigation and Composition views.
How to work with navigation is described in the Navigation article, and Composition is an outdated means of working with static content supported only for legacy reasons.
The Advanced-tab
The advanced tab (Figure 14.1) contains a lot of settings for, well, advanced use – most often controlling page behavior in relation to other parts of Dynamicweb, such as content personalization and website language layers.

From the advanced tab, you can:
- Save, save and close or cancel your changes to the page settings using the tools on the left side of the toolbar
- Click Cache to access the caching settings for the page. You can specify how long the page should be cached, and specify if you want to cache the content (default), the entire page, or want no caching of the page at all. Read more about caching in Dynamicweb in the caching article
- Click Shortcut to open a dialog from which you can specify an external or internal link. If linking internally, you can either redirect users to the page you link to, or let users stay on their current page but show them the content from the linked page.
- Click permissions to access the permissions settings for the page – read more about permissions
- Click password to add a simple password protection to a page. This may be useful for scenarios where you don’t want to use the Extranet module
- Click path to add a virtual URL path to the page – read more about direct paths in the Customizing URLs documentation
- Click comments to moderate page comments – read about comments & ratings here
- Click Item type to change the page item type. The item type is not changed before you save the page.
- Click item lists to select a named item list (item bucket) to associate with the page. A named item list is used for storing items (e.g. comment-items or form-items), without publishing them directly. Read more about named item lists here.
You can also configure the HTTPS settings for the webpage (requires a SLL Certificate) :
- Default allows visitors to use both HTTP & HTTPS
- Force SSL forces a 301 redirect to HTTPS
- Un-force SSL forces a 301 redirect to HTTP
The HTTPS settings for a page allow you to override the website-wide HTTPS settings.
With the workflow dropdown, you can select a workflow to use for this webpage – read more about workflows here.
The language management settings allow you to lock language versions of the page on all language layers and to restore language layer versions of the page to match the master page using the languages button – read more about working with language layers.
And with the Personalization settings, you can use the personalization marketing tool at a page level –read more about personalization
Changing item types
If you change the item type of a page, all item content is lost. This is irreversible.
You can change from an item based page/paragraph to an ordinary page/paragraph by selecting "Nothing selected" in the Item type dropdown, unless disable standard paragraph and/or Disable standard page is selected in Management Center > Editing > Interface settings.
You can change from an existing ordinary page/paragraph to item based page or paragraph without losing existing content.
The Layout-tab
Finally you have access to the page layout tab (Figure 15.1).

From the layout tab, you can:
- Save, save and close or cancel your changes to the webpage settings using tools on the left side of the toolbar
- Select a page layout for the page. The available layouts in the dropdown depends on the overall design you have selected under the Layout tab for your website. Read more about layouts in the Designs & Layouts article. You can make subpages inherit this layout by checking the Inherit to subpages checkbox.
- Select device layouts to use when the page is visited by users using a phone or a tablet.
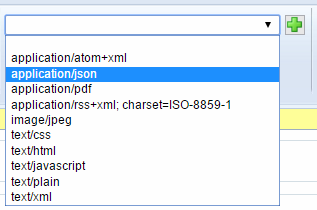
Additionally, you can select a custom content type for the page using the content type dropdown menu. This allows you to publish data in other text-based formats than HTML, such as JSON or XML.
This may be used to e.g. add autocomplete to your Ecommerce search, or setting up a Google Merchant product feed in Dynamicweb.
Dynamicweb ships with the content types listed in the dropdown in Figure 15.2), but you can add custom content types with the green plus-icon.

Implementing
In this section you will learn about:
- How to generate a pdf from any webpage on your solution – and the query string parameters available for controlling the process
PDF-generation
You can generate a PDF from any page in Dynamicweb by adding ‘pdf=true’ (as either ‘?pdf=true’ or ‘&pdf=true’) to the page URL.
The default pdf-size can be set in Management Center > System > Solution settings > Pdf – but is can be overruled by query string parameters.
The following query string parameters can be used to control the pdf-generation process:
|
Parameter |
Effect |
|
&filename=YourFileName.pdf |
Controls the name of the file |
|
&leftRightMargin=10 |
Controls the left and right margin in mm |
|
&topBottomMargin=10 |
Controls the top and bottom margin in mm |
|
&landscape=true |
Set orientation to landscape instead of horizontal |
|
&letter=true |
Changes the document size to Letter format |
|
&pagesize=A4 |
Changes the format to A4 |


