
Indexing & Search
Dynamicweb contains a lot of data.
Using that data, as a content provider or a content consumer, requires good ways of finding what you’re looking for.
From Dynamicweb 8.6 and forward, you have access to a generalized searching framework, which can search in any type of data in a fast, easy and consistent manner, and can accommodate almost any scenario.
To do so, you must:
- Create one or more repositories
- Create and configure one or more indexes in each repository, indexing the data you want to make available for searching
- Create and configure queries which search your indexes
- Use those queries on the front end, using e.g. facets or ranges

Basic Concepts
In this section you will learn about:
- Repositories and their function
- Creating and configuring an index
- Creating a basic query
- Refining queries
- Creating and using facets
Repositories
Repositories help organize and structure different searching scenarios. For example, you could have one repository for Ecommerce, and another repository that deals with pages and items.
Repositories work as containers for configuration files, but are basically folders in the File Archive. They are easy to move from one solution to another. Each repository exists as a folder inside the main repository folder:
/Files/System/Repositories
If the folder does not exist on your solution yet, it will be created automatically when it’s needed.
Creating a repository
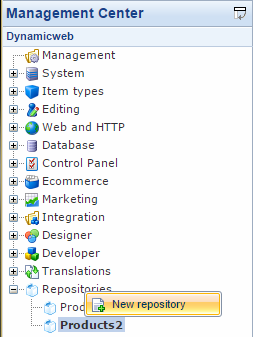
Adding a new repository is easy.
- Right click the Repositories node in the Management Center tree
- Click New repository (Figure 4.1)
- Name the repository and click OK
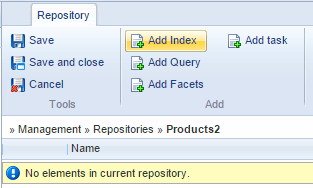
This creates and opens the repository view, from where you add the elements of the repository.
Repositories can only be created by Admin and Administrator users, but any user with backend privileges can edit an existing repository.
Elements of the repository
A repository can contain elements related to index-based search. Those elements are:
- Index definitions
- Query definitions
- Facet group definitions
They are added individually, but for dependency reasons they need to be added in the proper order. By definition, facet groups use queries which – in turn – use indexes. Always start by adding an index to the repository.
Add elements to the repository by clicking the relevant button in the ribbon (Figure 5.1).
Creating and configuring an index
To add an index to your repository:
- Click Add Index
- Name the index. You use this name to reference the index later on. It also doubles as the filename for the index definition file.
- Click OK
This takes you to the index edit page (Figure 6.1).
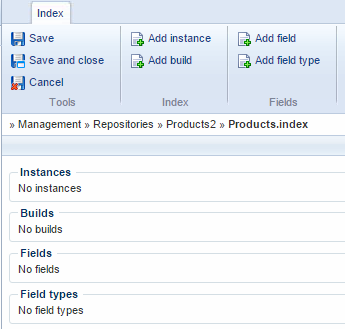
As you can see, an index consists of three main elements:
- Instances
- Builds
- Fields
Here's a rundown of what they are, and how you configure them.
Instances
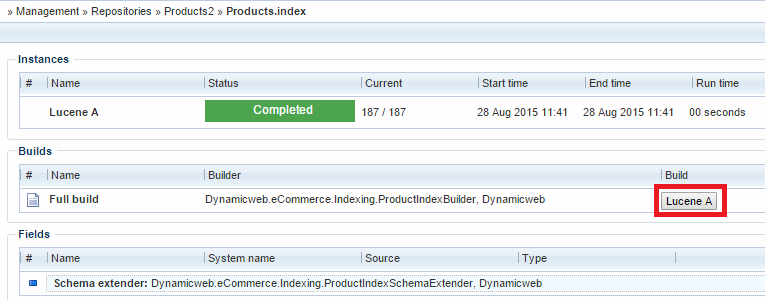
Instances are used to specify the data destinations. By default, Dynamicweb uses Lucene 3.0.3 and comes with the LuceneIndexProvider, which builds indexes in a folder in the file archive.
An instance based on the default LuceneIndexProvider requires only a name for identification and a path for the index (Figure 7.1).
{Figureref} shows an instance definition for a Lucene index named Lucene A, residing in the folder:
/Files/System/Indexes/Products2/A
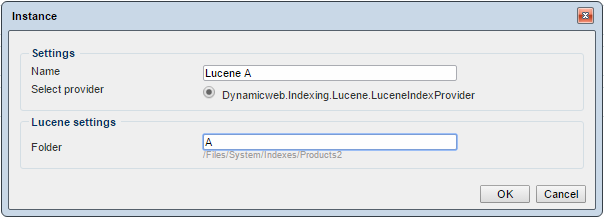
It’s not required to specify a folder for the instance, but it is highly recommended. On sites with a high load, duplicating the index during updates will minimize downtime, but is problematic without a proper folder structure.
Builds
Builds are configurations for retrieving data.
To set up a build (Figure 8.1), you must specify:
- A name for identification
- A builder for retrieving and manipulating data
- A builder action telling the builder how to operate
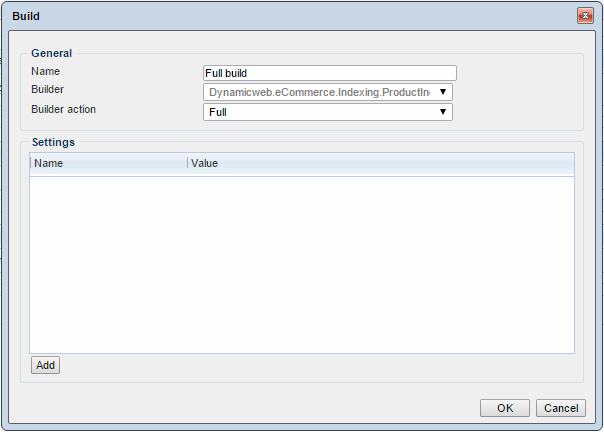
By default, Dynamicweb comes with four builders:
- The ContentIndexProvider indexes regular pages and paragraphs – names, ID, text, etc. - excluding attached module data. Item based content is not supported at the moment.
- The ProductIndexBuilder indexes aggregating data from multiple Ecommerce data tables, calculating group hierarchies and more. Currently only understands the builder action Full
- The UserIndexBuilder indexes all fields on users, including custom fields (but not user behavior, like orders placed, or order value, etc.)
- The SqlIndexBuilder executes a query without manipulating any date. Currently only understands the builder action Execute
You can create custom builders, and create or modify builder actions to support e.g. fetching only changed items through a builder action like Partial.
The Settings area of the Build specification is for adding and loading custom settings into your builder, if your builder supports them.
Fields
Fields are mappings between data retrieved by the builder, and the index you are building.
There are four types of field available to you:
- Standard fields
- Summary fields
- Grouping fields
- Schema extender fields
These types of fields make it easy to create a highly customizable schema for the index, specifically suited for the exact scenario in which they are intended to function.
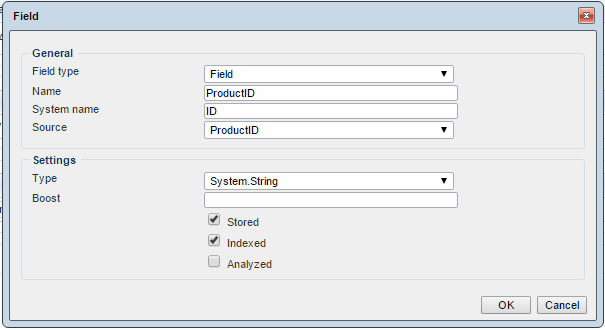
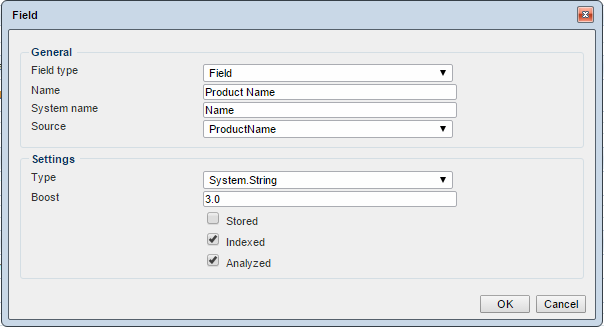
A standard field maps a field value from the builder to the index. Figure 9.1 shows a standard field called Product ID, with ID as the field system name in the index, taking its value from the ProductID field from the builder.
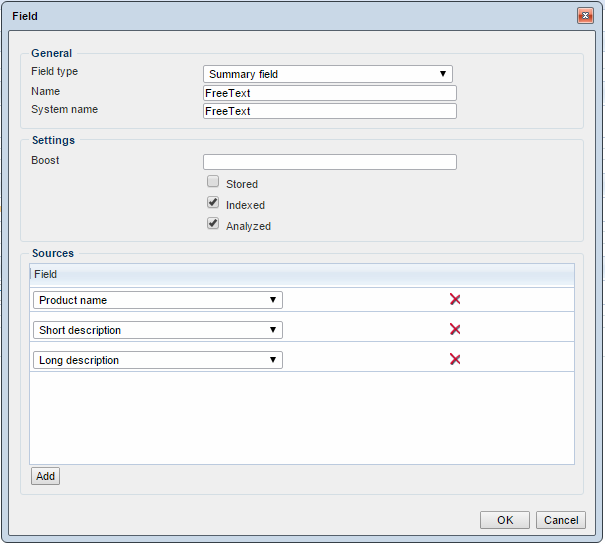
A summary field takes the values of other fields and stores them in a new, aggregated value.
Data mapped to a summary field is always converted to text and separated by spaces.
This makes it useful for implementing free-text search – read more here.
Figure 9.2 shows a summary field called FreeText, summarizing the fields Product name, Short description and Long description.
A grouping field allows you to group values together, under a common value. This is useful for grouping product prices together, so that they are easily available for query – and also makes it easy to create facets from values not inherently suited for faceting.
A schema extender field allows for programmatically extending an existing or empty index schema. The extender provides a list of fields, complete with source, type and storage settings. Click the plus-sign in the upper right corner of the schema extender field (Figure 9.3) to get a detailed overview of the fields provided by the schema extender. This is useful, if you want to index all – or most – of the fields available to you.

Note that string-type fields provided by the schema extender are analyzed by default, which means that spaces are considered a divider. If you want to pull facet options from a string type field, you may want to exclude it and add it separately - and make sure it's not analyzed.
You can create your own schema extenders.
Field settings
Standard fields, grouping fields and summary fields have field settings associated with them (Figure 11.1.
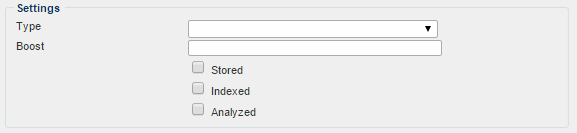
When creating a new field:
- You must specify the type of data the field contains.
- You can specify a custom boost value. Leave blank to use the default value.
- A stored field is saved as-is in the index. This is useful for using the value in lexical queries, sorting, or if you need the exact value for facets.
- An indexed field can be used in queries. You normally want to index a field – unless you want to add additional information about entries in the index, but don’t want that information to be searchable.
- An analyzed field can be used for free-text (Google-like) searches.
Custom field types
You may occasionally need to analyze data in a non-standard manner when building an index, e.g. if you want case-insensitive sorting.
On those occasions, you can define your own field types, and select a custom provider and analyzer for it.
To do so:
- Click Add field type on your index ribbon to bring up the Field type window (Figure 12.1)
- Name your custom field type and select an output type and boost value for it (if any)
- Click Add to add a provider and select an analyzer for your custom field
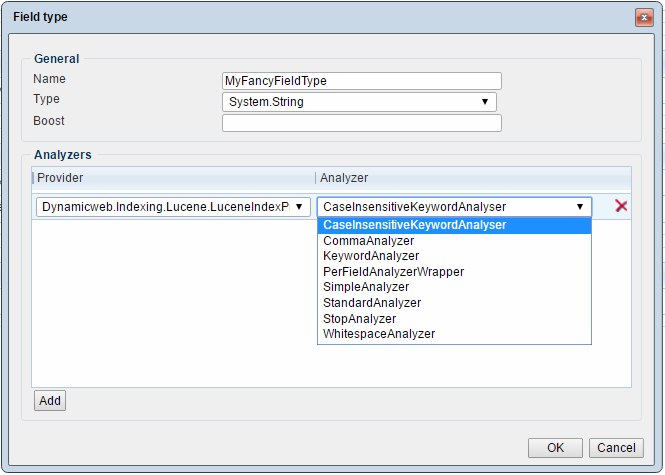
Once you've created a custom field type, you can create a standard field and select it as the field type - the data will then be analyzed using the analyzer you selected.
Building an index
To build an index, click the build button next to the build you wish to execute (Figure 13.1).
If the build process does not start, save the index definition first.
Building indexes automatically
Instead of building your indexes manually, you can create scheduled tasks to do it automatically at an interval selected by you.
To create a scheduled build task:
- Go to the repository view
- Click Add task in the ribbon bar to open the task interface (Figure 14.1)
- Select a start time and end time
- Specify a repeat interval in minutes and select the IndexBuilderTaskProvider
- Select the appropriate parameters
- The index you want to build
- The build type you want to build (usually full)
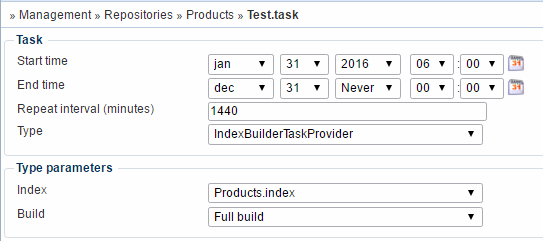
Once the task runs, it will build all instances of the index in sequence (so you won't be without a working index at any time). If all instances fail to build due to an error, the last instance will not be built - this is also to ensure that you will not be without a working index at any time.
Creating a basic query
When you have an index built, you can query the data inside.
To create a new query:
- Go to your repository
- Click Add Query in the ribbon
- Specify a name and a data source (the index you want to query)
- Click OK
This brings up the edit query view (Figure 15.1).
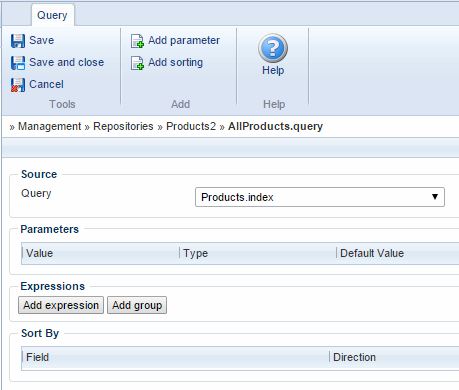
No parameters or expressions have been added yet – this results in a query that matches all elements in the index.
You can now start refining the query.
Refining a query
Until you start refining your query, your setup process will almost always be exactly the same.
But when you start refining your query, the setup is different from scenario to scenario.
Refining a query consists of configuring four main elements:
- The index used by the query
- One or more parameters that the query understands
- One or more expressions, which limit the result
- The sorting that should be applied
Expressions are the most important part of refining the query, so let’s start with them.
Adding expressions
Expressions are used for limiting your query results.
An expression consists of a field, an operator, and a test value.
Your expression then checks if the relationship between the test value and the field is true, and limits the query result based on that.
For example, if you want to return only active products, you can do so very easily (Figure 17.1).

Expressions can be combined in AND-groups and OR-groups, and can be negated to return all elements not matching the expressions.
This makes it easy to construct very powerful and complex queries.
To add expressions:
- Click add expression or add group
- If you add an expression as the first element, you are limited to that expression only. A group can contain any number of expressions and groups, so most of the time it’s recommended to add a group as the first element.
- Select a field to evaluate the expression against
- Select an operator
- Select a test value type
- The constant type allows for static values to be assigned
- The parameter type allows an expression to depend on dynamic data provided by the customer
- The macro type is a way to provide dynamic data from context. For example, this allows you to reuse queries across websites with different ecommerce languages.
On Expression Operators and Null values
The expression operators available to you work pretty much as you would expect them to, save for the contains operator.
The Contains operator does not match values in the middle of terms – but can be summarized as follow:
- Find results where F has at least one term beginning with each of the terms in P, where F is the field in question and P is the search parameter value, i.e. the customer input.
For example, the string value "this is a fantastic bike" will be found by the search term "fanta bik", but not the search term "anta ik".
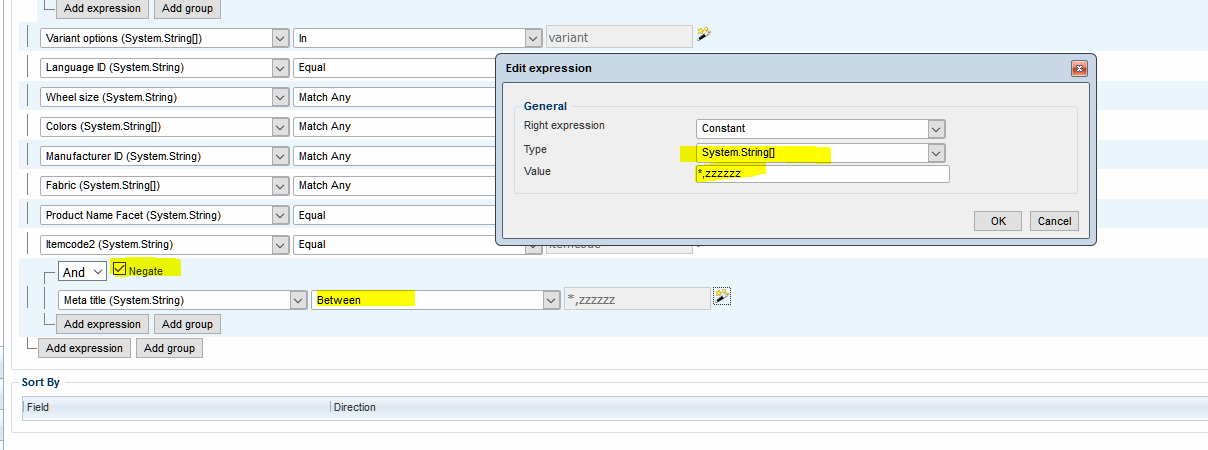
Furthermore, since fields with no values are not indexed, you must be creative if you want to match an empty string or null value. Instead, you have to match records with a value and negate the expression (Figure 17.3):
- Add an expression group
- Select the fields you want to search
- Select the Between operator
- Specify a min and max value – for string content, between * and zzzzz
- Negate the expression group
This will match the empty or null value entries in your database.
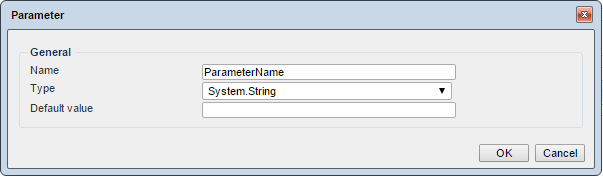
Adding parameters
A parameter works like a variable, which can be used in expressions. For instance, a parameter called Search may be assigned to several expressions, so that a user need only query in one place to search several different description fields in the index.
To add a new parameter:
- Click Add parameter to bring up the parameter dialogue (Figure 18.1)
- Name the parameter
- Specify the data type of the field you are pointing to
- Specify a default value for the parameter (if any)
The value of a parameter is resolved in the following order:
- If a value for the parameter is present in the context – a GET or a POST request – that value is used
- If a value does not exist in the context, the default value is used.
- If the default value is not specified and no value exists in the context, then any expression using that parameter is ignored in the query.
The name also works as the url parameter for the value for this parameter, for example, the url http://mydomain.com/products?GroupID=GROUP1 would result in the parameter value being GROUP1 for the parameter above – where the page products is a page with a product catalog that is configured for using indexes.
Sorting a query result
To add sorting criteria to a query result:
- Click Add sorting on your query ribbon to bring up the sorting window (Figure 19.1)
- Select a field to sort by, and a direction (ascending/descending)

Facets
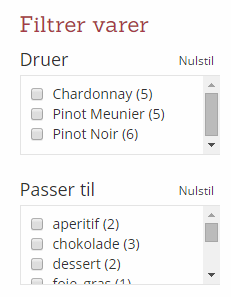
Facets are used to display field values on the frontend, and allow the user to refine their search based on them. Basically, a facet is a mapping between a parameter in the query, and the values which will be made available for that parameter.
For example:
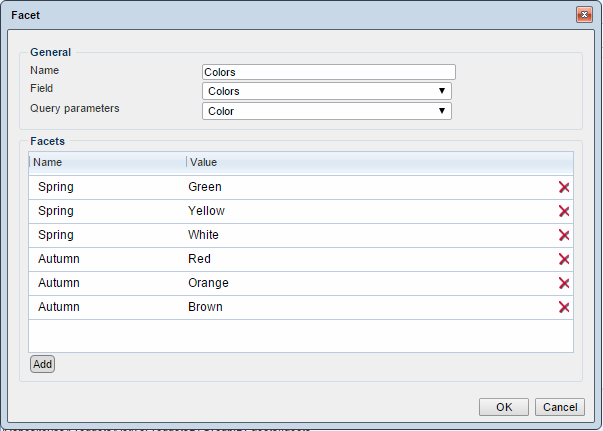
You have a variant field value called COLOR. You can use facets to display the variants RED, GREEN and BLUE on the frontend. This allows users to find green products through a selector, and not through searching. Or you could group selected colors into AUTUMN and SPRING facets, and allow the user to select autumn and spring colors.
To the user, an implementation of facets could look like (Figure 20.1).
To get started with facets:
- Go to your repository
- Click Add facets
- Specify a name for the facet group and a query to use
Click OK to the facets overview (Figure 20.2).

From here, you can create the facets you need.
Facet types
There are two types of facets available to you:
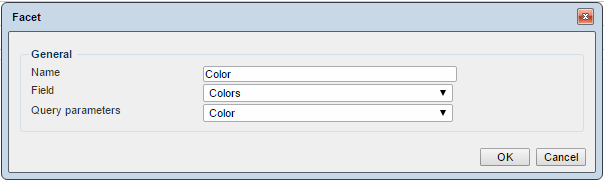
- Field facets pull their options from a specified field making all the possible values available for a selector (Figure 21.1).
- In Figure 21.1, the facet options are pulled using a custom parameter, called Color. Read about parameters.
- List facets allow you to specify a list of options, and give them custom labels. Giving multiple options the same custom label makes it possible to create facet option groups (Figure 21.2). Note that no validation is taking place. Make sure the options fit the data source, or they will never produce a result
Both types of facets can find the count of matching elements, in the entire query result set, for all their options.
This can help customers refine their search.
Adding facets to a template
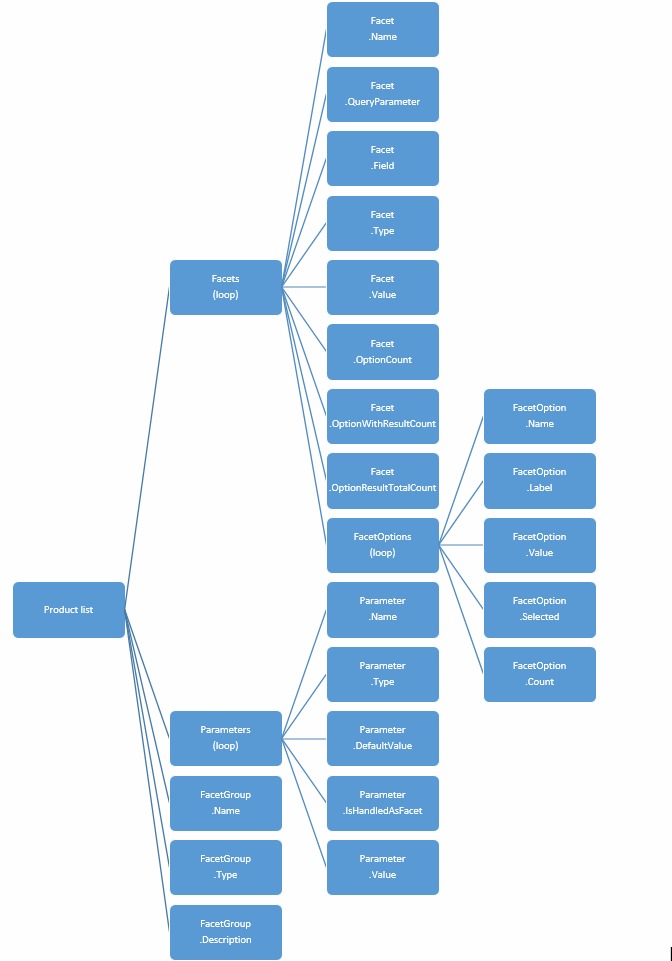
To add facets to a template, use the Facets loop below.
This loop contains all elements related to the selected facet group, and the facet result that came from the query.
Loop through the FacetOptions for each Facet element in the Facets loop.
For example:
The template above renders all facets in the facet group in the same way, but you can change the template above to switch which type of control to render, based on the data type of the value, or simply the name of the facet.
Which html elements to use, and which type of behavior they should have, is completely up to the implementer. Dynamicweb does not provide any predefined html elements for things like ranges or lists.

Implementing
In this section, you will learn about:
- Using queries (with the Ecommerce Product Catalog)
- Tags and loops available to you
- Using ranges in a query
- Setting up free-text searches
- Boosting search results
Using Queries (with the Ecommerce Product Catalog)
Before using a query, make sure that the index which provides the data is built. If your data inside Dynamicweb changes, you will need to rebuild the index manually.
To start using your query:
- Navigate to a page with the Ecommerce Product Catalog attached
- Open the module settings
- Select the Index option in the Show settings (Figure 24.2)

Next, select your query under the index settings (Figure 24.3).
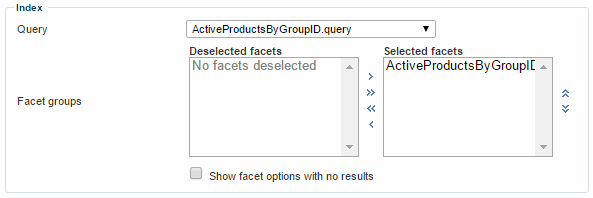
You will see a list of facets associated with the query, which you can select or deselect by moving them between the two columns.
Once you are done, save the paragraph – you can click Show page to test your query immediately. (Don’t forget to customize your templates, to loop through your facets and facet groups, though.)
If you have Ecommerce navigation configured for the page, you can use that to change the url parameter, but keep in mind that if you use friendly urls, the group id parameter might be translated into something else. It will still work with our query, but you can’t actually tell which group id is passed to the query.
A query result should always be thought of as the authoritative truth, meaning that you should not remove or add elements in the set, nor should you replace elements therein. Once the query is executed, you get the exact result that matches that query, including paging. If you start manipulating the result set after the query was executed, it’s possible to end up in a situation where no results are shown even though the query returned results.
An example of this could be a query that returns products. If Ecommerce were to remove products that it thinks are inactive, then the Product Catalog could render an empty page while still claiming there are in fact products to show. Therefore, whenever a query result is used, think of it as the authoritative truth.
If you want to add more criteria like stock state or price checks, add them as expressions.
Tags and loops available to you
The following tags and loops are available to you (Figure 26.1).
Facet-related and query-related tags are only available on the product list template, but you can use snippets to move them somewhere else.
Using ranges in a query
Using a range as input for a query is simple.
You simply:
- Add a parameter to your query – you could call it YourfieldnameRange
- Select the bracketed system type matching the field system type – for instance, System.Double[] if your field system type is System.Double
- Leave the default value field blank
- Click ok
Next, you need to add an expression limiting the query result based in your new range:
- Add an expression
- Select the Yourfieldname field from the dropdown menu
- Choose the Between operator
- Click the magic wand and choose the YourfieldnameRange
- Save the query
You can always find the type of a field by checking the index definition or the field dropdown for an expression on the query.
The brackets at the end of the type, indicate that the value of the parameter can contain multiple values of the system type. And you want to send multiple values into the parameter, namely a minimum and a maximum value for your range.
Adding a range selector to your template
You need to modify your template to display a YourfieldnameRange selector.
For example:
The template example above:
- Loops through each element in the parameters loop
- Renders a selector for each of those elements, which is not handled by a facet already.
- Facets are already being rendered by the Facets loop and you (presumably) don’t want two selectors for the same parameter.
In this example, we add two input boxes, but you can use a jQuery range slider if you want.
Add the code from above to the facets loop, below the foreach block, to get a new selector consisting of two input boxes for your range min and max values, right below your facet dropdown selectors.
Free-text Search
Most customers expect to be able to do a free-text search for something they are looking for.
The recommended way to implement free-text search, is to select the fields you want to use on the query.
This gives you the option to boost your fields, floating the most relevant results to the top of the list.
To add free text search:
- Go to your query
- Add a new parameter. Name it Search and give it the System.String type.
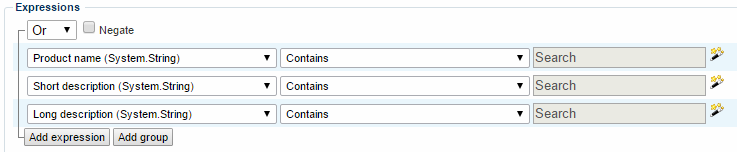
- Add a new group to your expression. Set the logical operator to be OR.
- Add an expression for each field you want to include in the query
- For instance; Product name, Short description and Long description.
- Give each expression the Contains operator and the search parameter on the right (Figure 29.1):
Free-text search on non-string field values
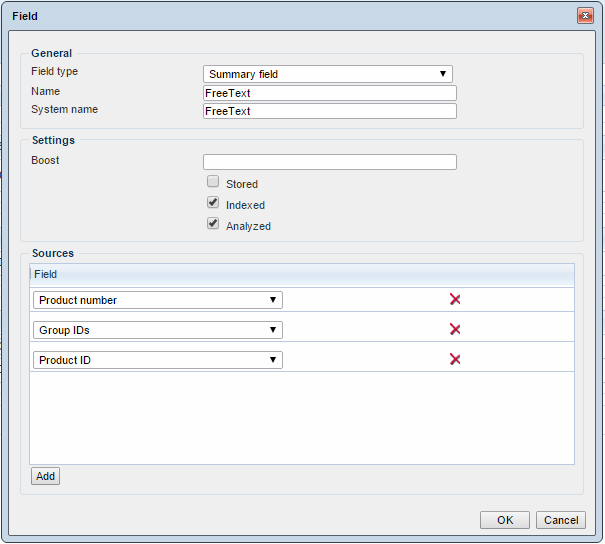
If you need to do free-text search on non-string field values, you can create a summary field to on your index, and search that.
To do so:
- Add a new summary field called FreeText to your index (Figure 30.1)
- Add the fields you want to make searchable to the summary field
- For instance Product number, Group IDs and Product ID
- Mark the field as indexed and analyzed
- Click OK
- Save and rebuild the index
Finally, go to your query and set up an expression searching your summary field in the standard manner.
Changing your template to render free-text input boxes
To render a free-text input box for the customer’s input, you need to change your template.
This is done by appending the else block below to the last if block of the parameters loop.
This renders an input box where the customer can type free-text search terms.
Boosting search results
A standard query – without a specified sort order – will always sort the results based on the relevance of the results.
Normally, relevance is something the index maintains internally, but you can boost fields to influence their relevance.
To boost a field:
- Go to your index
- Open the field you want to boost (Figure 32.1)
- Fill in a boost value - the default value is 1.0
Boosting works as a factor that is multiplied onto the base relevance for a given field.
If you boost many different fields with varying factors, it a good idea to leave enough room between the different boost factors so you can squeeze another in, if need be.
For instance, you could boost Product name by a factor of 5.0, then boost Short description by a factor of 2.0 and leave the boost field for Long description blank.
Boosting fields provided by a schema extender
Fields provided by a schema extender, like the ProductIndexSchemaExtender, cannot be boosted, but you can work around that:
- Tell the schema extender that it should exclude the field Product name (Figure 33.1) - you must enter the system name of the field your want to exclude
- Add a new field with the same source as the excluded field.
- Specify a custom boost value for the new field in the standard manner
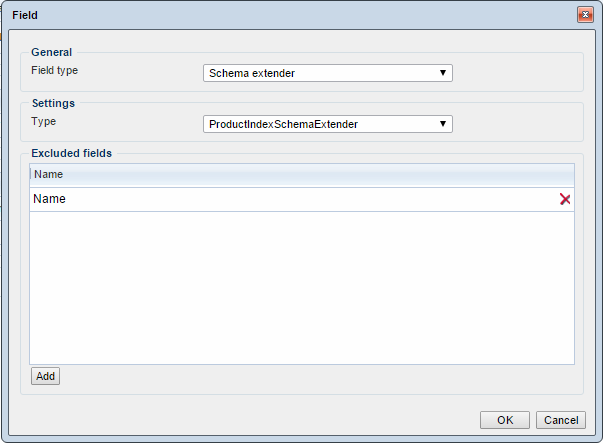
Note that you need to specify the system name of the field, which in this case is Name. You can check the system name of a specific field from a schema extender by taking a closer look at the schema extender fields.

Developing
Watch the 'Index Everything' webinar with Senior Architect Jeppe Agger from June 2015 to learn more about creating your own index builders, schema extenders, and more.
For tips on improving the searching or indexing speed of your Lucene application, please see the Lucene documentation on improving searching speed or improving indexing speed.


Integrating
The standard Dynamicweb and Ecom providers, available for data integration, support updating indexes during import. Read more about data integration.