
Content and Product Search
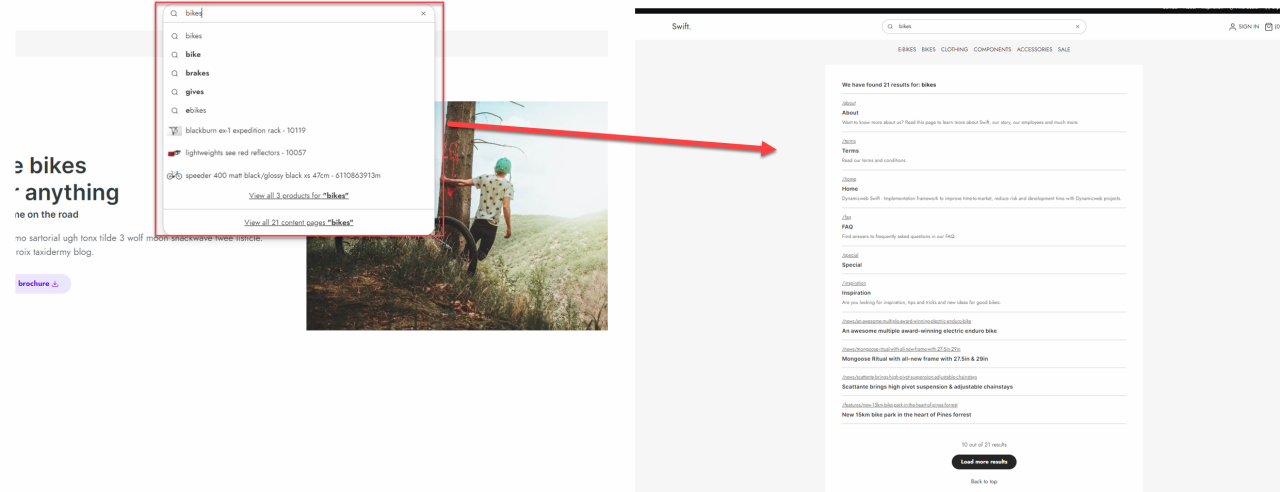
The new content search feature allows you to customize what customers/users can search for when using the search field. Earlier the search bar columns were only for searching for products. Now you can create searches for either content or products or both products and content.
Manual setup
This guide for the manual setup will show how to setup content and product search. If you only want separate content and product search you should check our documentation below.
To setup the content and product search manually, you will have to do some configuration in the backend.
- Go to the search result service page. It is located in the Services folder ind the Swift tools folder.
Here you need to make sure, that the properties of the page is configured correctly.
- On the Search service page click on properties.
- In the top menu bar in the Accessibility section uncheck “Show in searches”.
- Click on the Layout pane. Click on the Template dropdown menu.
- Choose the “Swift: Swift_PageClean.csthml” template.
- Hit Save and close
Now that the page properties are configured correctly it is time to setup the app column.
- Add a new paragraph to the page
- Add an App column. Name it something like “Content and product search results”.
- Go to the app part of the column. Choose a Query publisher as the app type.
- In the Queries section
- In the query dropdown choose “Content search.query”.
- In the Items per page field set it to 5
- Scroll to the bottom. In the Template dropdown in the Template section choose the “ContentDropdownResponse.cshtml” file.
- Hit Save and close
Now you need to create a Search results page. This page will display the content pages matching with the searched words.
- Click on the three vertical dots next to the website name in the content pane.
- Create a new page. Call it something like “Search results”. If you like, you could place it at the top e.g. just below the product list. This is done using the sort tool.
- When you have created the page, make sure it is hidden.
- Enter the Visual Editor of the Search results page.
- Add a 1 column row. On the empty row add an App column and call it something like “Search results”.
- Go to the app part of the column and choose the query publisher.
- In the Queries section in the query dropdown menu, choose “Content search.query”
- Scroll to the bottom. In the Template dropdown in the Template section choose the “Content.cshtml” file.
- Hit OK and exit the Visual Editor
Next up you need to create a navigation tag on the Search results page.
- Click on properties.
- In the Options pane click on navigation.
- In the navigation tag field, write “ContentSearch”. Hit OK.
- Click Save and close.
The last thing to do is to make sure the content index is built.
- Enter the Settings.
- Go to Repositories -> Content. In the indexes click on the Content builder.
- In the Builds section build both “ContentIndex” and “ContentIndex 2”.
- Hit Save and close.
Searching for either products or content
As mentioned in the guide above, the manual setup is when the search field should search for both products and content. The output of the search field depend on the setup of the service page linked to. You could change the settings on the existing service page. This means that you would only need one page. Alternatively you could create three different service pages. One for products, one for content and one for both. This would allow you to use the Search field in different ways. You could e.g. have a main search field searching both content and products and also have a content search field in the footer.
Here are two quick guides showing how the service page should look should you want searches for only products or only content.
Product search
- Go to the service pages folder: Swift tools -> Services.
- Create a new page and call it something like “Product search”. Make sure it is hidden in menu.
Again you should make sure that the properties of the page are configured correctly.
- On the Search service page click on properties.
- In the top menu bar in the Accessibility section uncheck “Show in searches”.
- Click on the Layout pane. Click on the Template dropdown menu.
- Choose the “Swift: Swift_PageClean.csthml” template.
- Hit Save and close
Next is to add the Product catalog for ViewmModel app.
- Open the page in the Visual Editor.
- Add a 1 column row.
- Add an App column on the empty row
- Choose the Product catalog for ViewModel as the app type
As this will be the service page for product search, we will setup the app to show product results.
- In the Query dropdown choose “Products.query”.
- In the Templates section in the List dropdownmenu choose the “ProductSearchDropdownRespone.cshtml”
- In the other dropdowns, Product, Compare, and Feed, choose “Noting Selected”.
- Hit Save and close
That is it for the products search service page. If you want a search field to only search for products, link it to this service page.
Content Search
- Go to the service pages folder: Swift tools -> Services.
- Create a new page and call it something like “Content search”. Make sure it is hidden in menu.
Again you should make sure that the properties of the page is configured correctly.
- On the Search service page click on properties.
- In the top menu bar in the Accessibility section uncheck “Show in searches”.
- Click on the Layout pane. Click on the Template dropdown menu.
- Choose the “Swift: Swift_PageClean.csthml” template.
- Hit Save and close
Next is to add the Query publisher app to the page.
- Add a new paragraph to the page
- Add an App column. Name it something like “Content search”.
- Go to the app part of the column. Choose a Query publisher as the app type.
- In the Queries section
- In the query dropdown choose “Content search.query”.
- In the Items per page field set it to 5
- Scroll to the bottom. In the Template dropdown in the Template section choose the “ContentDropdownResponse.cshtml” file.
- Hit Save and close
That is it for the content search service page. If you want a search field to only search for content, link the column to this service page.