
Quote Cart
The quote cart allows you to create a checkout scenario for customers to ask for a quote instead of the normal checkout by purchasing.
The quote feature will be available for customers during checkout for both express buy and the normal cart.
Manual setup
First up, we will need to create the quote cart page. This should be placed as a subpage to your cart page. In the default Swift setup you can find the cart in Navigation -> Utilities.
- Go to the cart folder in the content tree
- Create new checkout page and call it “Quote checkout user”
- In Visual Editor, add a 1 column row
- Add the quote checkout app and choose the shopping cart
Next is the configuration of the app column. You have to do both the item and the app setup for the column.
For the item setup:
- Choose logo and logo link
- In the link section, link the product page field to your product details page and the cart page field to you cart page
- Hit “Save”
Now to the app setup of the column
- In the Settings section choose your shop and enable checkout to quote
- In the Steps section your steps should be as shown in table 1
- In field validation section disable customer acceptance
- Hit “Save and close”
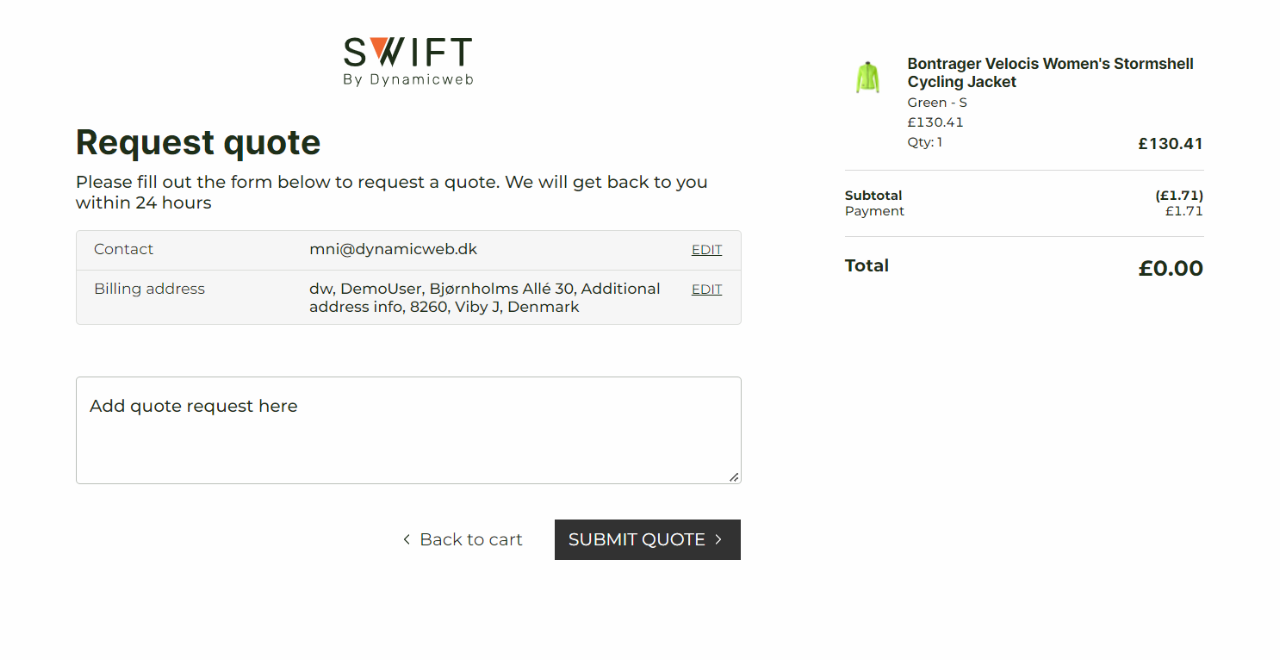
| Step | Name | Template |
| 1. | Quote request | QuoteRequestUser.cshtml |
| 2. | Submit quote | |
| 3. | Receipt | QuoteReceipt.cshtml |
Before we end the setup of the quote checkout app, you will need to enter the properties of the quote checkout page.
- Enter the properties of the quote checkout page
- Go to layout in the top menu bar
- In the dropdown choose the file called “Swift: Swift_PageNoLayout”
- Hit “Save and Close”
To make your customers access the new quote checkout feature, you must link the cart with the quote page. Otherwise, they can only complete the order through normal checkout by paying.
- Locate your cart page. As mentioned in default Swift it is Navigation -> Utilities -> Cart
- Click the app column. Go to the item setup of the column
- In the links section link the Quote checkout page field with your quote checkout page.
- Hit “Save and close”
As a final thing, you must make sure, that the order fields are configured correctly. If not, the quote requests will end up being mixed with the order comments. The default setup in Swift, should have this sorted, but again, if you want to check if the setup is done correctly or set it up from scratch, we will guide you through it.
- Enter the Settings placed at the bottom of the area menu
- Go to Ecommerce -> Orders –> Order fields
- Create a new order field
- Write “QuoteRequest” in the Name, System Name, and Template tag fields
- Make sure the Field type is “Text (255)”
- Hit “Save and close”
Quotes in customer center
Before the complete setup is done, you should create a My quotes section in the customer center for your customers to view their quotes. In default Swift setup, that is located on the My account page in the Navigation -> Utilities folder.
- On the My account page create a subpage called “My quotes”
- Enter the Visual Editor and add a 2 Columns 3/9 row
- In the first column add a vertical navigation and configure it to make it look like the other customer center pages
- Add an app column in the second column and choose the customer experience center as the app.
The app column will need some configuration.
In the item setup of the column, you should
- Let the title be “My Quotes”
- Link Orders, Account settings, and Addresses field with the corresponding to the My account pages in the content tree
In the app setup of the column, you should:
- Change the Order type to Quotes
- Retrieve list based on User Id
- Scroll to the templates section. In the List field choose the CustomerQuotesList.cshtml template and in the Detail field choose the QuoteDetails.cshtml template