
Service Pages
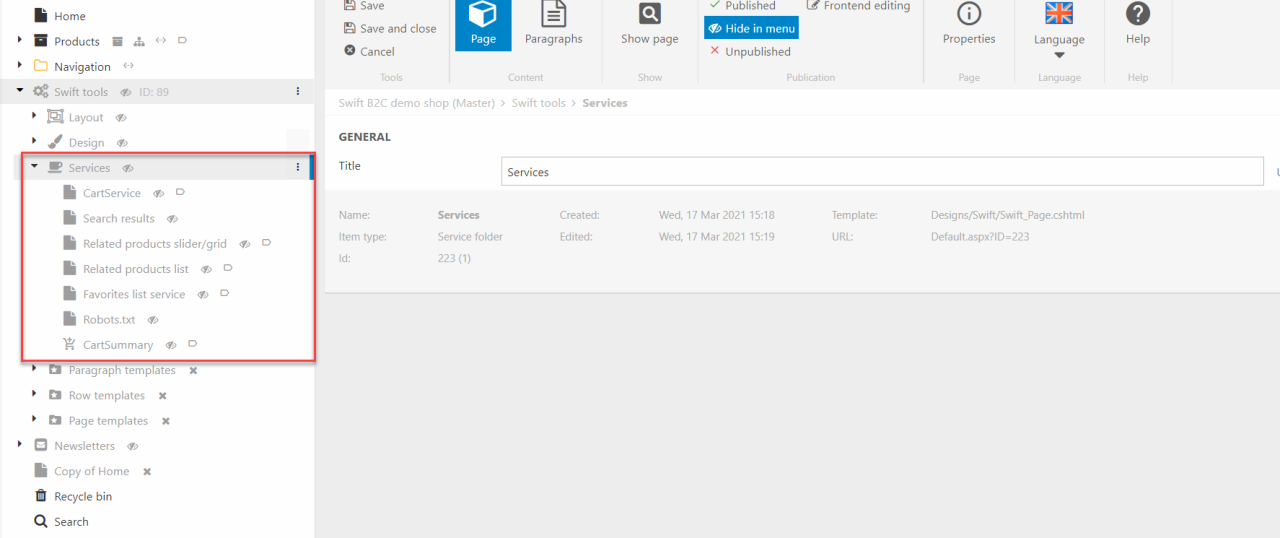
For some columns to work on your pages, you’ll need to create a service page with apps, which the columns will then link to. We recommend grouping the service pages in the same folder in the content tree as shown on Figure 1.1 These guides will help you with the setup of the service pages. You can also use them to check if your service pages are correctly configured.
On this page you’ll find guides for the following service pages:
- Favorite list service
- Product list – list/compact view
- Related product list
- Related product slider/grid
- Search results
Favorites lists service
For the Favorites lists to work properly, you’ll need to configure a service page and link it to the column afterwards.
- In the content tree, navigate to the folder called "Services" located in "Swift tools"
- Add an empty page in the folder and name it “Favorites list service”. Make sure to toggle “Hide in menu” and hit OK
- On the new page, click “New paragraph”. Scroll to the bottom and choose “App”
- Name it “Favorites list” and hit OK
Now you need to enter the App part of the paragraph and choose “Product catalog for ViewModel” in the ECOMMERCE section. To configure the App you need to:
- Choose a query on your products (Product.query) in the dropdown menu.
- Scroll down to the Templates section. In the product field select the “Favorites.cshtml” file.
- Click Save and Close
Then you only need to add the FavoriteServicePage navigation tag. To do this:
- Enter the properties on your Favorite service page.
- Click on options in the top menu
- Click navigation and write "FavoriteServicePage" in the empty Navigation tag field
- Hit OK and Save And Close
With that done the customer favorites lists page is ready to be made.
Product list – list/compact view
Unlike the Product list - grid view both product list alternatives (Product list – list view and Product list - compact view) requires a service page to handle product variants. For these two columns you can use the related products list service page and add another file. If you haven’t created that service page yet, please check that guide before starting on this one.
For the product list – list/compact view column to work, you don’t have to create a new service page, as you can use the service page created for the related product list column.
- Navigate to the related products list service page
- Click on the App column and enter the App part of the column
- Scroll down to the Templates section.
- Choose the “VariantSelector.cshtml” file in the Product field
- Hit Save and Close
Now the service page is done. If you’ve given the related list service page the “RelatedProductsListService” tag the column should link to the service page by default. If you want to link the column to the service page manually you need to:
- Enter the Visual Editor and edit the Product list – list view or Compact view column
- Scroll down to the Advanced section.
- In the Variant selector service page field link to the service page
- Hit OK
Now your column should, either by default or manually, link to the service page.
Related products list
This service page is used for the related products list column. It is also the foundation for the service page used for the Product list – list view and Product list – compact view Ecommerce columns. To keep the guides easy to read, we’ve separated the two service page guides. The guide for the service page for the two product list columns can be found here.
To setup the related products list service page, you need first to create a new page:
- Navigate to your service pages folder in the content tree
- Create a new page and call it “Related products list”. Make sure to check “Hide in menu” and hit OK
- Add a new paragraph to the page
- Scroll to the bottom, select App and name it “Related products list”
When you’ve added the App column, you’ll need to configure it. Enter the app part of the paragraph. From the ECOMMERCE section choose “Product catalog for ViewModel”.
- Choose a query on your products (Product.query) in the dropdown menu.
- In the Facet groups move “Products.facets” to the Selected facets group by using the arrows
- Scroll down to the Templates section.
- Choose the “VariantProducts.cshtml” file in the List field
- Hit Save and Close
Now the service page is done. You’ll still need to link your related product list column with the service page. You can either link it manually in the advanced section in the column settings in the Visual Editor or give the service page a tag. It’s easier to use a tag, as this will let the column link to your service page by default. To do that:
- Navigate to the related products list service page
- Enter the properties of the page and go to options
- Click “Navigation” and write “RelatedProductsListService” in the Navigation tag field
- Hit OK on the modal
- Hit Save and Close on the page settings.
When this is done, your related products list service page is done.
Related product slider/grid
For the product slider/grid to work, you’ll need to setup a service page for it.
- Start by navigating to your service page folder
- Create a new empty page in the folder and call it “Related product slider/grid”. Make sure to toggle “Hide in menu” and hit OK
- Add a new paragraph to the page
- Scroll to the bottom, select App and name it “Related products slider/list”
When you’ve added the App column, you’ll need to configure it. Enter the app part of the paragraph. From the ECOMMERCE section choose “Product catalog for ViewModel”. To configure the app, you:
- Start by selecting a query on your products in the dropdown menu (Products.query)
- In the "Override default parameters" make sure that the default value of isVariant is empty
- Scroll down to the Templates section.
- Choose the “ProductSlider.cshtml” file in the List field
- Hit Save and Close
You'll have to one last change before the service page configuration is done.
- Go to the product list
- Click on the Product catalog app and enter the app settings
- In the Index section in the "Override default parameters" menu make sure that the default value of isVariant is False
- Remember to hit Save and close
Now the service page is done. To make the product slider work, you’ll either have to link your column with the page or set a “ProductSliderService” tag on the service page. If you want to use more than one product slider you probably want to go with the tag, but we’ll show both ways.
To link the column with the service page, you have to:
- Enter the Visual Editor and edit the product slider column
- Scroll down to the Advanced section.
- In the Product slider service page field link to the service page
- Hit OK
As written on the settings description if you use a “ProductSliderService” tag, this field will by default be linked with your service page. To create the tag:
- Navigate to the product slider service page
- Enter the properties of the page and go to options
- Click “Navigation” and write “ProductSliderService” in the Navigation tag field
- Hit OK on the modal
- Hit Save and Close on the page settings
Now by default your product sliders will link to the service page.
Search results
The search results service page is used for the search field column. This page is needed for the dropdown and type ahead function to work. Follow this guide to create the search field service page or check if the settings are properly configured.
- Locate the service page folder in the content tree
- Create a new page and call it “Search results”. Make sure to keep it hidden in menu
- Create a new paragraph by clicking “new paragraph” in the toolbar
- Scroll to the bottom and choose App. Call it “Search results” and hit OK
- Enter the app settings in the toolbar and click Product catalog for ViewModel in the Ecommerce section
Now you’ll have to configure the app. There are a few things that needs to be done:
- In the Index section
- Choose a query on your products (Products.query) in the Query field.
- Select Type ahead as facet group in the Facet Groups field.
- In the Spell Check section
- Choose "Free text search" in the Field To Check field
- Choose “eq” in the query parameter field.
- In the Templates section
- Choose “ProductSearchDropdownResponse.cshtml” in the List field.
- Choose “Nothing selected” for all other templates fields.
- When this is done, remember to hit Save and Close.
You have now created the service page for the search field columns. You will need to link to this page to make the columns work properly.
Product and/or content search
These service pages are used for the column called search field. The search field column can be used both as a content and/or a product search. We have written some documentation about the setting up a content and product search here.
Content search
To create a content search service page you need to locate the service page folder called Services. This is located in the folder called “Swift tools”.
- Create a new page and call it “Content search results”. Make sure it is hidden in menu
Here you need to make sure, that the properties of the page is configured correctly.
- On the service page click on properties.
- In the top menu bar in the Accessibility section uncheck “Show in searches”.
- Click on the Layout pane. Click on the Template dropdown menu.
- Choose the “Swift: Swift_PageClean.csthml” template.
- Hit Save and close
Now that the page properties are configured correctly it is time to setup the app column.
- Add a new paragraph to the page
- Add an App column. Name it something like “Content search results”.
- Go to the app part of the column. Choose a Query publisher as the app type.
- In the Queries section
- In the query dropdown choose “Content search.query”.
- In the Items per page field set it to 5
- Scroll to the bottom. In the Template dropdown in the Template section choose the “ContentDropdownResponse.cshtml” file.
- Hit Save and close
Now you should have successfully configured the content search. Should you want to search for both content and products in the same search column, you will have to create a combined service page. This is shown in the guide below.
Product search
- Go to the service pages folder: Swift tools -> Services.
- Create a new page and call it something like “Product search”. Make sure it is hidden in menu.
Again you should make sure that the properties of the page are configured correctly.
- On the service page click on properties.
- In the top menu bar in the Accessibility section uncheck “Show in searches”.
- Click on the Layout pane. Click on the Template dropdown menu.
- Choose the “Swift: Swift_PageClean.csthml” template.
- Hit Save and close
Next is to add the Product catalog for ViewmModel app.
- Click New paragraph and choose the app as the paragraph
- Name it “Product search” and hit OK
- Enter the app part of the column and choose the Product catalog for ViewModel
- In the Query dropdown choose “Products.query”.
- In the Templates section in the List dropdownmenu choose the “ProductSearchDropdownRespone.cshtml”
As this will be the service page for product search, we will setup the app to show product results.
- In the Query dropdown choose “Products.query”.
- In the Templates section in the List dropdownmenu choose the “ProductSearchDropdownRespone.cshtml”
- In the other dropdowns, Product, Compare, and Feed, choose “Noting Selected”.
- Hit Save and close
That is it for the products search service page. If you want a search field to only search for products, link it to this service page.
Product and Content search
If you want a search column to search for both products and content, you need to combine the two service pages in one. You could base this combined page on one of the individual pages, but ideally you should create three separate pages.
- Create a new page in the services folder in the Swift tools folder. Call it “Product and content search results”. Make sure it is hidden in menu
You now need to make sure that the page properties are configured correctly.
- On the Service page click on properties
- In the top menu bar in the Accessibility section uncheck “Show in searches”.
- Click on the Layout pane. Click on the Template dropdown menu.
- Choose the “Swift: Swift_PageClean.csthml” template.
- Hit Save and close
Now you need to create two paragraphs. One for the product search and one for the content search. We will start with the product search.
- Click New paragraph and choose the app as the paragraph
- Name it “Product search” and hit OK
- Enter the app part of the column and choose the Product catalog for ViewModel
- In the Query dropdown choose “Products.query”.
- In the Templates section in the List dropdownmenu choose the “ProductSearchDropdownRespone.cshtml”
- In the other dropdowns, Product, Compare, and Feed, choose “Noting Selected”.
- Hit Save and close
Now add a new paragraph by clicking New paragraph. This will be the content search results paragraph.
- Add an App column. Name it something like “Content search results”.
- Go to the app part of the column. Choose a Query publisher as the app type.
- In the Queries section
- In the query dropdown choose “Content search.query”.
- In the Items per page field set it to 5
- Scroll to the bottom. In the Template dropdown in the Template section choose the “ContentDropdownResponse.cshtml” file.
- Hit Save and close
Linking the search column to this service page will give both products and content as results.