Leads
A visitor which is highly active on your website could constitute a valuable business opportunity. Perhaps you should call them and set up a meeting, or maybe send them an email with an offer?
The Leads-tool is designed to support and enhance such marketing operations by monitoring visitor engagement, and flagging the most engaged visitors as potential leads. Engagement is measured by assigning an Engagement Index value to various actions, and collecting visitor statistics based on that.
The Leads interface
To access the Leads tool, go to Marketing > Leads – this opens the Leads interface (Figure 2.1). As you can see in the Marketing tree, this default view shows the leads in the Potential leads category. This means that all leads in this list have neither been marked as confirmed leads or not leads.
The interface consists of:
- A ribbon bar (1), where you can do bulk actions on the leads
- An advanced filtering section (2) for the leads
- The three management windows below – Potential leads, Leads, and Not leads
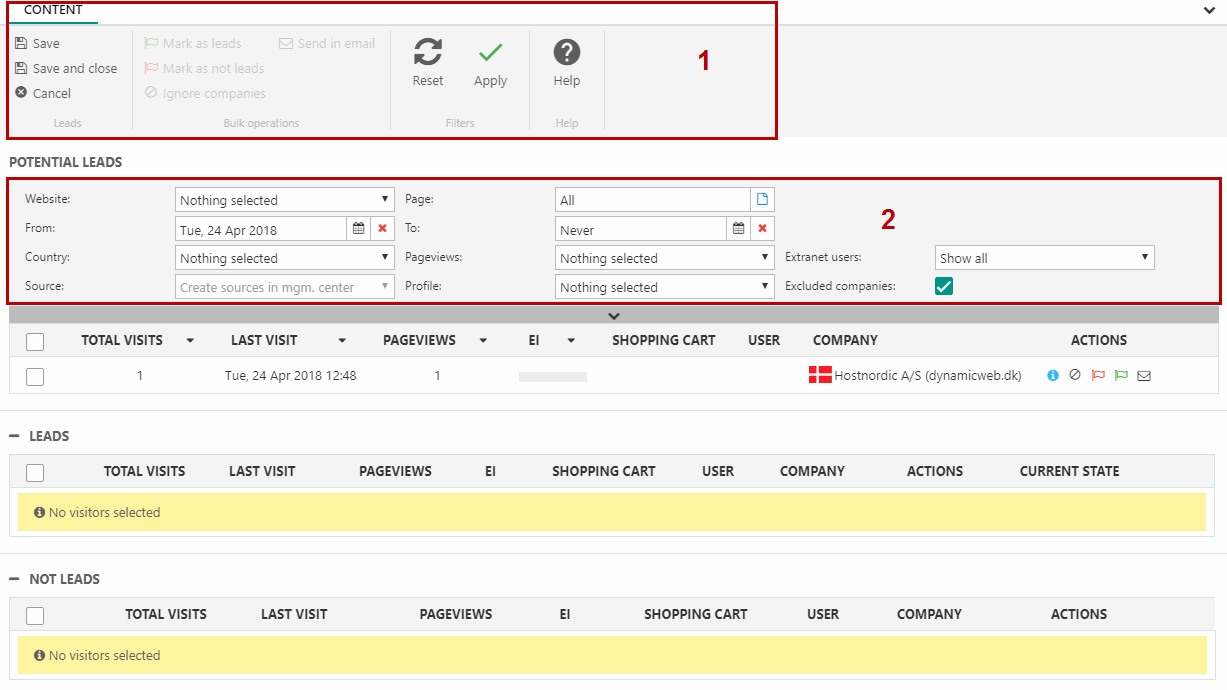
From the ribbon bar (Figure 2.2), you can:
- Mark your selected potential leads as leads
- Mark your selected potential leads as not leads
- Add the selected companies to the Excluded companies list
- Send the selected potential leads to someone in an email
- Reset or apply the filtering to the leads
- Save (or discard) any changes you make with leads before exiting the tool

With the advanced filtering system (Figure 2.3), you can filter leads on:
- Website – if your solution has more than one website
- Page – if you are only interested in visitors visiting a specific page on your website
- Date period – if you want to see potential leads from a longer period than a single day
- Country – if users of a single nationality is of particular interest to you
- Page views – if you want to exclude potential leads with only a few page views
- Extranet users – if you want to show or exclude registered users from your list
- Source – if you want to see potential leads from a particular source. You can create or modify custom sources under the Lead Settings.
- Profile – if you want to show only potential leads falling under one of your visitor profiles. Learn more about personalization.
By default, the Excluded companies checkbox is checked – this filters out the potential leads from your list of excluded companies.
To either apply or reset the filtering, use the buttons in the ribbon bar.

Lead categories
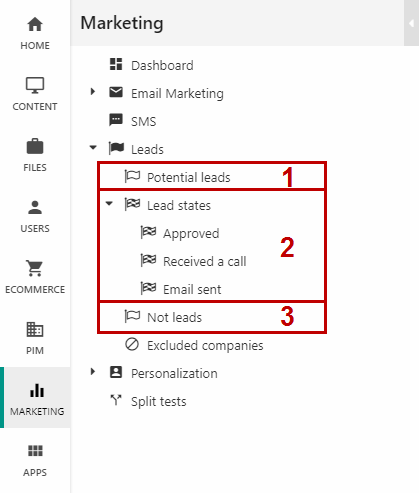
When managing leads, potential leads are marked as either leads or not leads. When you save these changes, these potential leads that have been marked as Leads or Not leads will be removed from the Potential leads category in the Marketing tree and are now accessible from the other categories (Figure 3.1).
In the Marketing tree:
- All leads/visitors to your site that have not been marked as a lead or not lead are placed in Potential leads (1)
- Potential leads marked as Leads go to their particular Lead state as confirmed leads (2)
- Potential leads marked as Not leads go to Not leads (3)
Confirmed leads
Click any lead state under Lead states in the Marketing tree to get an overview of the visitors you have marked as leads (Figure 4.1). They will be admitted to the Approved state by default.
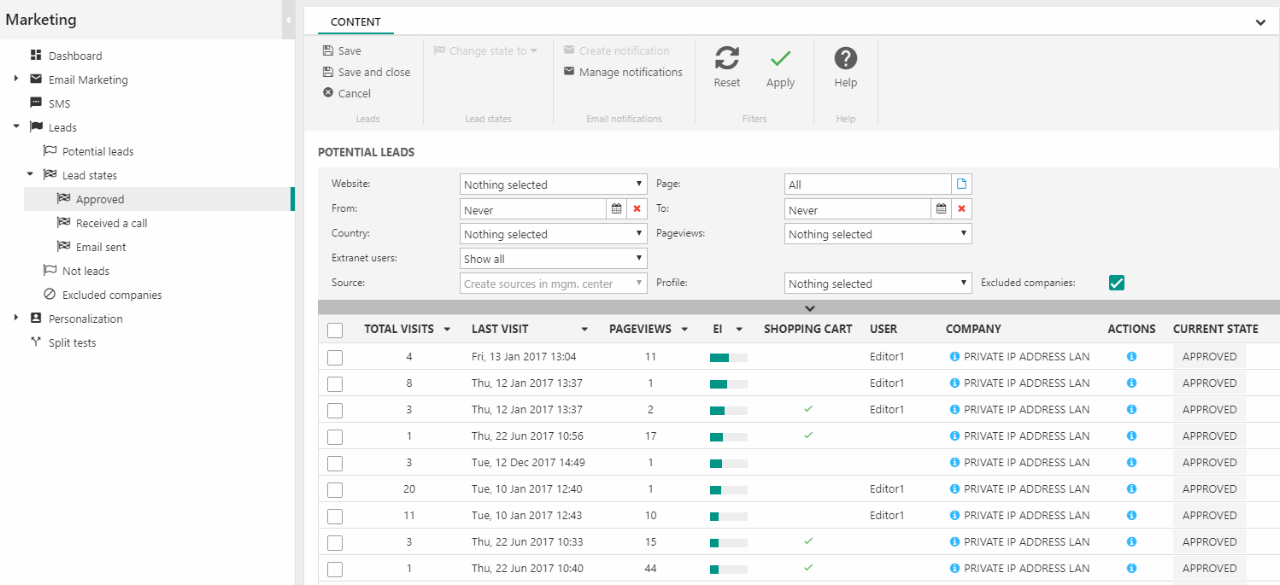
For each lead, you can change or clear the lead state by clicking the current state and selecting a new state (Figure 4.2) or using the Change state to button in the ribbon bar.
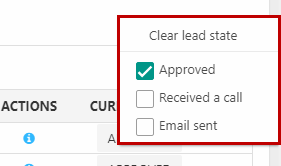
Clearing the lead state for a lead will remove it from confirmed leads and move it back to the Potential leads category.
Email notifications
You can set up email notifications, to notify someone whenever one or more leads revisit your website.
Select you confirmed lead(s) in your Lead states category (Figure 5.1):
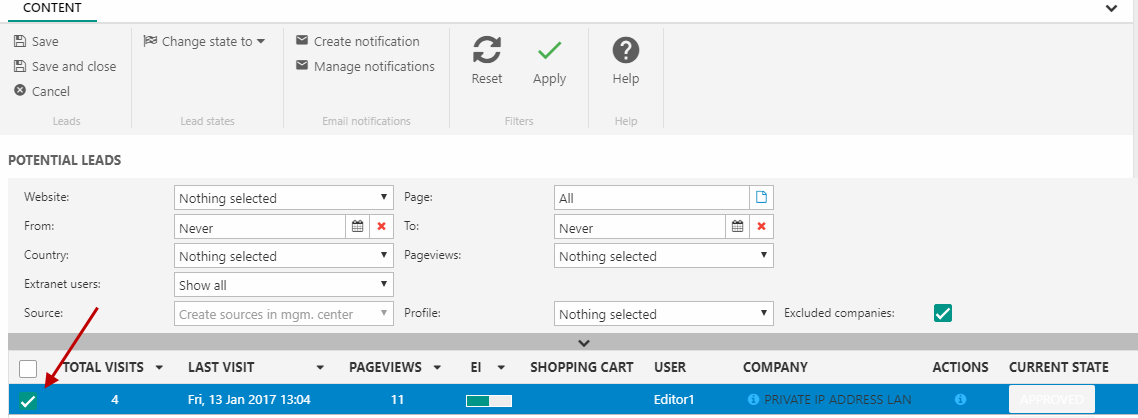
Then, click Create or Manage Notification(s) in the ribbon bar (Figure 5.2)

For Manage notifications, you must select the appropriate email notification profile.
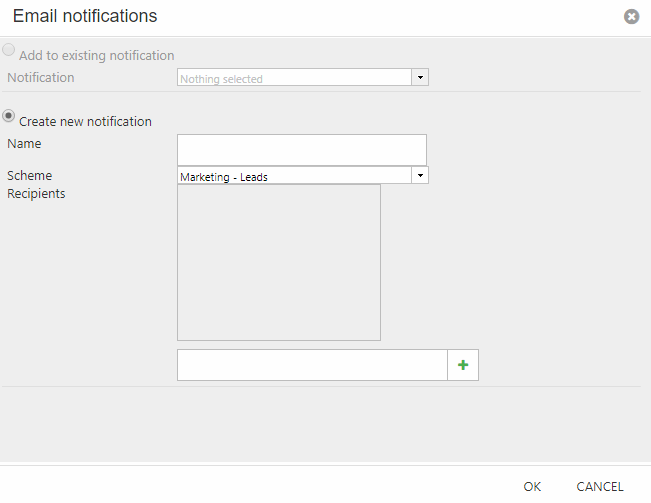
If you selected Create notification, you will see the Create new notification-window (Figure 5.3).
You must:
- Name the notification profile
- Select the Marketing – Leads scheme
- Fill in any number of recipients (email addresses of people to notify)
- Click OK
- Don’t forget to save your changes in the leads interface
Once set up, an email will be sent to the recipients once a day if the lead returns to your website.
You can customize the email notification frequency using the Lead settings in Advanced configuration.
Not leads
Click Not leads in the Marketing tree to get an overview of the visitors you have marked as not leads (Figure 6.1).
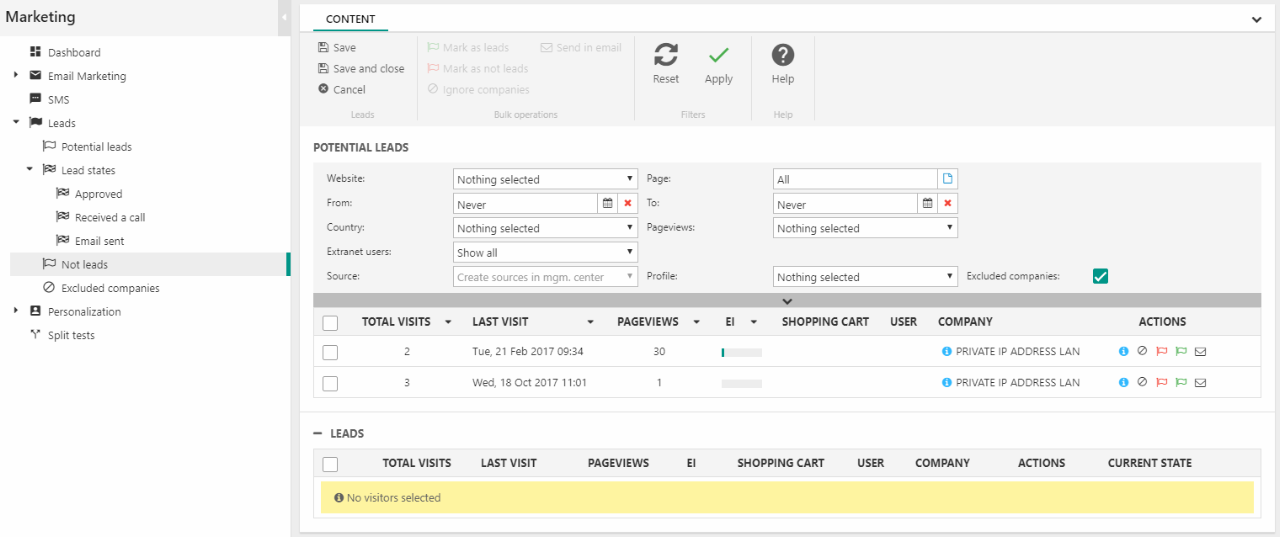
The Not leads list also includes visitors from companies in the Excluded companies list.
For each lead, you can:
- Mark as lead – moves the selected leads to the Leads management window and, upon Save, to the Lead states category under the default lead state
- Mark as not lead
- Ignore companies – adds them to the Excluded companies list
Excluded companies
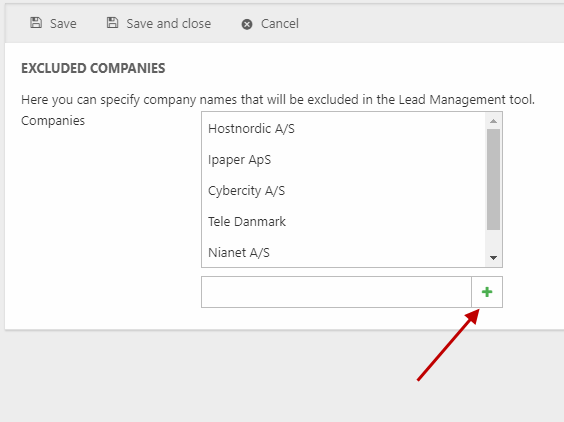
To exclude certain companies from showing up as potential leads, go to the Excluded companies area (Figure 7.1).
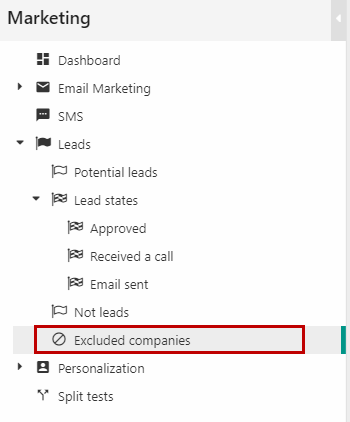
To add a company to your Excluded companies list, simply add their company name to the list (Figure 7.2).
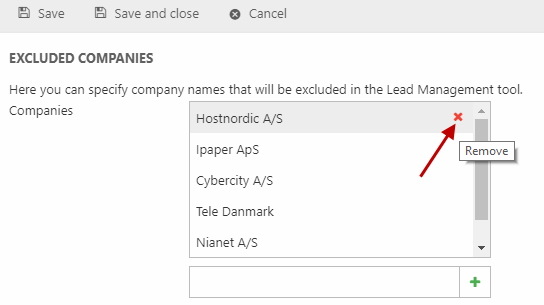
You can always delete companies from this list and make their leads count as potential leads again (Figure 7.3).
Managing leads
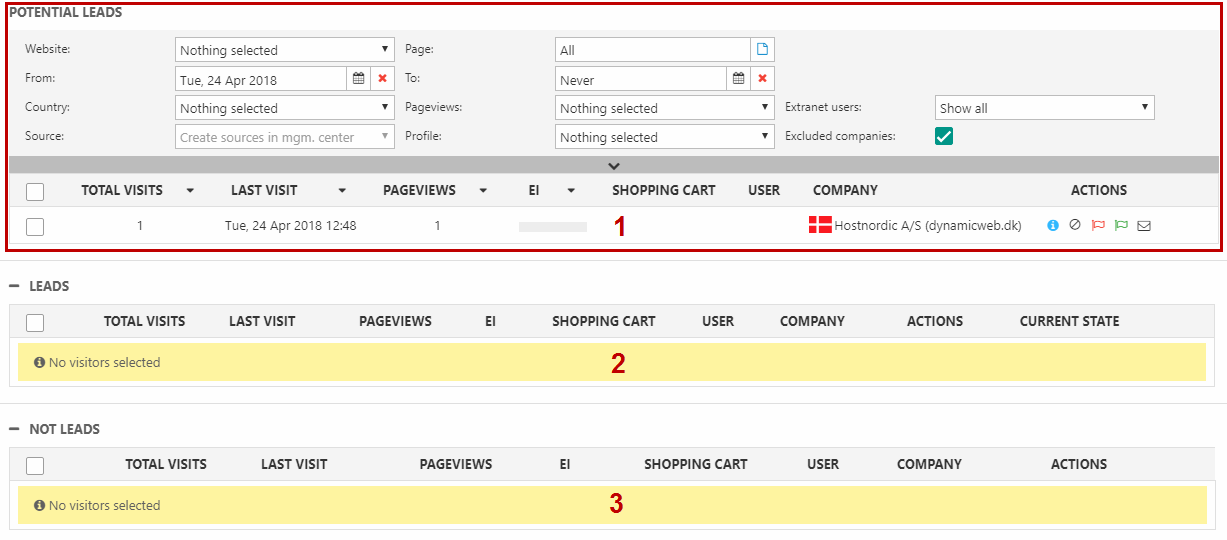
For both the Potential leads and the Not leads categories in the Marketing tree, you can manage the leads using three management windows (Figure 8.1):
- Potential leads (1) – all leads in your chosen category is shown here
- Leads (2) – selecting a lead in the Potential leads window and clicking Mark as leads in the ribbon bar, will move the lead to this window
- Not leads (3) – selecting a lead in the Potential leads window and clicking Mark as not leads in the ribbon bar, will move the lead to this window
When you’re done marking your potential leads as either leads or not leads, click Save.
When you click save, potential leads that have been marked as either Leads or Not leads will be removed from the overall Potential leads category and are now accessible from the other categories in the Marketing tree (Leads go to their particular Lead state, and Not leads go to Not leads).
The Potential leads window
At the most basic level, everyone who visits your website is a potential lead.
The Potential leads management window (Figure 9.1) presents you with an overview of the highest ranked visitors for the day, based on their Engagement Index (EI) score.
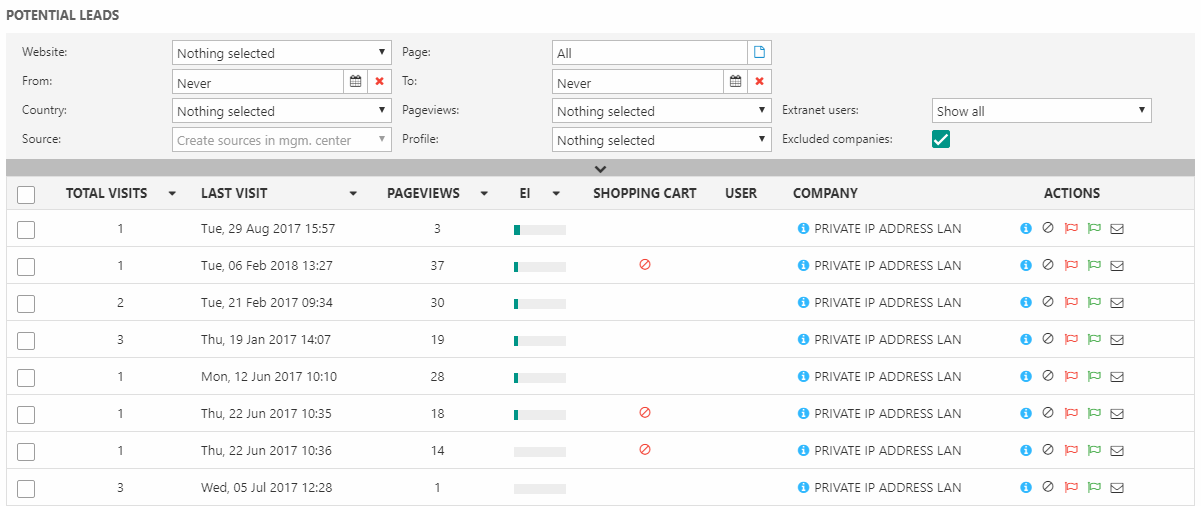
For any potential lead, you can see:
- The total number of visits registered
- Their last visit
- The number of page views on their last visit
- Their Engagement Index (EI) score
- If they have completed an order or abandoned a shopping cart
- Their username if they are logged in as a registered user
- Which company the visitor visits from (based on an IP lookup, so not fool proof)
Click the company to view the location details.
Actions
To the right of each potential leads, you have a row of icons (Figure 10.1) representing available actions.

You can:
- Click the (i) icon to show the visitor details
- Click the ignore icon to exclude the company and put them on the Excluded companies list
- Click the red flag to mark as Not lead
- Click the green flag to mark as Lead
- Click the envelope to send an email with the lead information to someone (e.g. your sales department)
- You can create a default sender name, email and subject, and automatically change the lead state of a lead under the lead settings
The Visitor Details
If you want to know more about a potential lead before taking any action, click the (i) icon to access the Visitor Details:
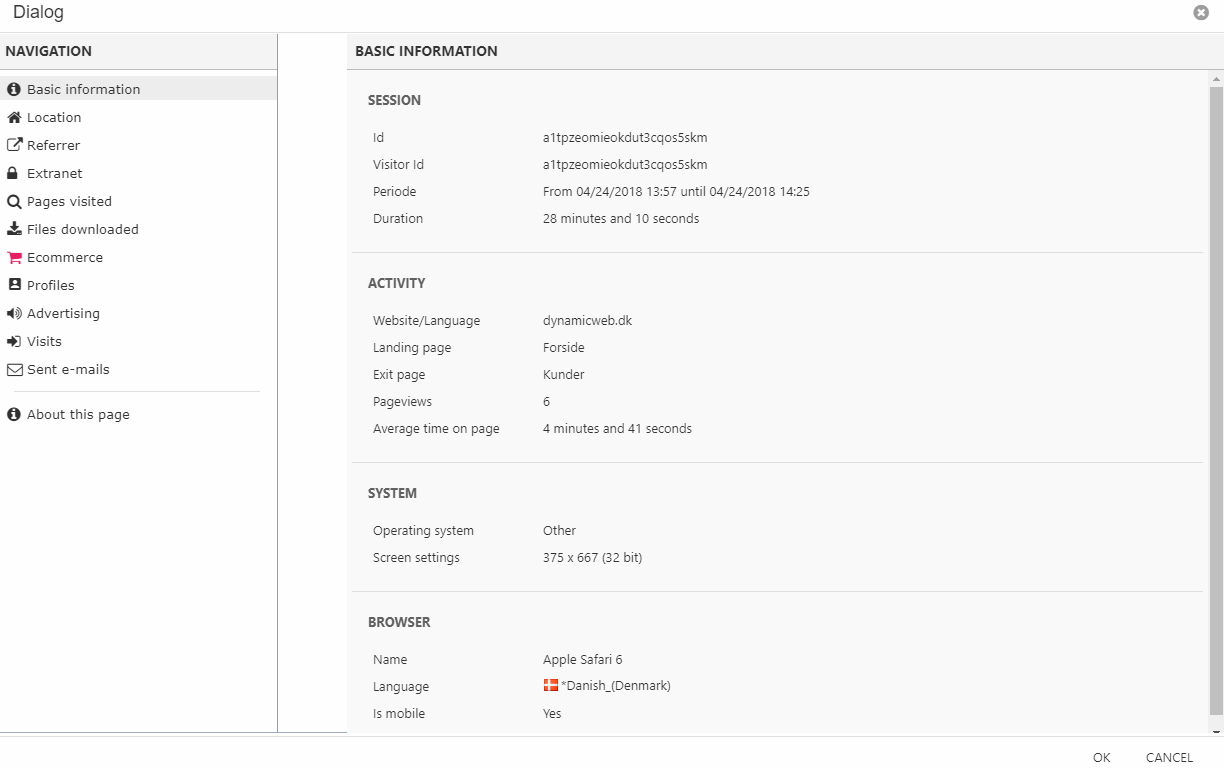
This gives you access to all the information available for that particular lead, such as:
- Basic information about the session, such as duration, average time on page, operating system and browser info, etc.
- Location info, such as IP-address, ISP, domain and company name, etc.
- You can rename a lead by clicking the page icon to the right of the looking glass. If you need an overview of all the leads you have renamed, you have access to them from your lead settings.
- Referrer information, including search keywords and your rank in the search if a search engine was used
- Extranet information, i.e. the user account registered for the visitor (provided they are a logged in, registered user)
- Pages visited info, providing you with a detailed view of the pages visited by the visitor
- Files downloaded, if your visitor downloaded any files during the visit
- Ecommerce info, providing you with info on any items added to the visitors shopping cart
- Profiles info, showing you the total visitor profile points generated by the visitor. Read more about personalization.
- Advertising – if a visitor was referred to your website through e.g. a Google AdWords campaign, you can see more here.
- Visits – providing information about any recurring visits by the visitor.
- Sent emails – a log of all the mails you have sent about this lead (e.g. to your sales department)
- About this page – provides you with a link to the visitor details, which you can send to people (e.g. your sales department)
The Leads window
Potential leads marked as leads are moved to the Leads management window (Figure 12.1). Until you click Save, they will be shown in this “temporary confirmed leads” list and they will still be in the Potential leads window, just greyed out. After you click Save, they will be removed from the Potential leads category and are accessible from the Marketing tree under their specific Lead state.

From here, you have a convenient overview of the information available for the lead – it’s the same information which was available when it was a potential lead – as well as a current state tab, where the lead state of the lead is shown.
You can change or clear the state of a lead by clicking the current state and selecting a new state (Figure 12.2).

The Not leads window
Potential leads marked as not leads are moved to the Not leads management window (Figure 13.1). Until you click Save, they will be shown in this “temporary not leads” list and they will still be in the Potential leads window, just greyed out. After you click Save, they will be removed from the Potential leads category and are accessible from the Not leads category in the Marketing tree.

The available information is the same from when it was a potential lead.
Lead states
Lead states are steps defined by you, which help you work with leads.
Dynamicweb comes with just a single state by default – approved – but it’s easy to define custom lead states.
You can change or clear the state of a lead by clicking the current state and selecting a different state (Figure 14.1).

You can add lead states in Settings > Marketing > Leads > Lead states. Read more about these settings here.
Lead settings
The advanced settings for the Leads tool let you control various aspects of the tool's behaviour. This includes the Engagement Index configuration for your website and Lead emails (emails containing a lead).
Read more about these settings here.

