
Split Tests
Split testing is a method for doing controlled experiments with for instance content or layout, to see which versions performs the best. In other words, it is a way to test ideas and optimize value generation, without taking unnecessary risks.
With split test, you can:
- Test different versions of your content and design
- Improve conversion rates by testing different calls to action
- Test on 10 different conversion metrics
- Compare conversions of original and variation
- Pick the winner manually – or based on statistical significance.
In short, split tests are a useful way for you to improve your conversion rate with a minimum of risk.
You can conduct split tests on newsletters and marketing emails as well - read more about how to do that under the documentation for Email Marketing.

Creating Split Tests
With split tests, you create variation on a content or layout level, direct a portion of your visitors through the variation, and measure the conversion achieved for each version over time.
Before setting up a split test, you must:
- Identify an area of your website where a split test could be useful
- Define a specific conversion goal (such as ‘more visitors must place an order’ or ‘more customers should sign up for the newsletter’)
- Create a variant of your original content containing a change in content or layout.
Split tests are set up on a page level:
- Navigate to the page where you want to do a split test.
- Click the Marketing tab
- Click Setup split test (Figure 3.1)

You will then be presented with the split test wizard (Figure 3.2)
Following the wizard will take you through the basic setup of a split test .
Here's a rundown of your options, and what they mean.
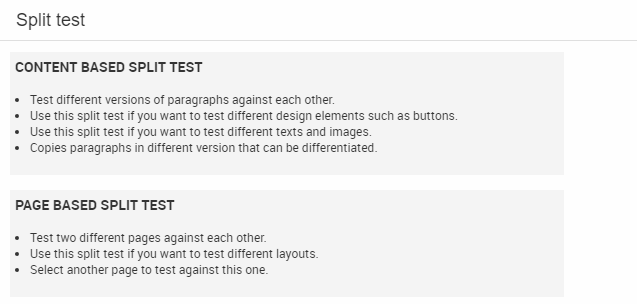
Content based or page based split test?
You can choose between content-based and a page-based split test.
A content based split test:
- Tests paragraphs against each other
- Is useful for testing variation on design elements, such as buttons
- Is useful for testing variation on text and images
A page based split test:
- Tests pages against each other
- Is useful for testing different layouts
In summary, choose content based split testing if you want to test content like buttons, images or texts, and page based split testing if you want to test a new layout or design.
Conversion goals
To be effective, a split test needs a clearly defined goal.
The conversion goals available to you are:
|
Name of goal |
Tests which version.. |
|
Choose another page as conversion page |
..will make more visitors go to a page you specify – for instance the cart |
|
Create an item |
..will make more people create a specified item |
|
Submitting a form from the forms app |
..will make more visitors submit a form |
|
Adding products to cart |
..will make more visitors add products to the cart |
|
Placing an order |
..will make more visitors place an order |
|
Downloading a file |
..will make more visitors to download a specific file |
|
Signing up for newsletter |
..will make more visitors sign up for your newsletter |
|
Maximizing time spent on page |
..will make visitors stay in your website longer |
|
Highest average order value (only content based) |
..will increase the average value of placed order |
|
Highest average order markup (only content based) |
..will increase the average markup of placed orders. (Markup is the difference between cost and selling price of a product) |
|
Minimize bounce rate |
..will lower the amount of people who only view one page before leaving your website |
|
Maximize page view |
..will make visitors view more pages |
You should design your split test variant around a single goal, to minimize variables and get better result. For the same reason, you can only choose one type of conversion goal for each split test.
In order to use the 'Highest average order markup'-goal, you must enable "Product Cost Field".
To do so:
- Go to Settings > Ecommerce > Fields
- Enable "Product Cost Field" for Across all languages and Across all variants
- Save
Don't forget to set the Price and Cost field of your products to the correct values.
Split test settings
After choosing your conversion goal, you will be presented with the settings window (Figure 6.1).
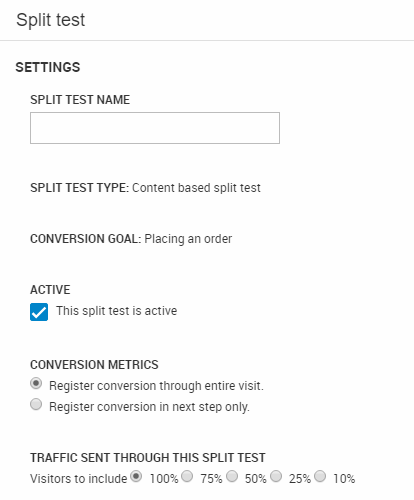
From here you must:
- Name the split test
- Decide if the split test is active immediately or not
- Choose between registering conversion metrics only on the next step, or through the entire visit
- Specify the amount of traffic directed through the experiment
- Note: If you choose 10%, 5% of visitors will be shown the variant and 5% the original, and conversion metrics measured based on those 10%. The remaining 90% of the traffic will not be part of the test.
After having made your selection, you will be asked to select a setting for ending the split test.
Your options are:
- Manually
- At given time
- After x views
- When result is significant
If you select one of the last three automatic options, you can define an action to take when the split test has run its course (Figure 6.2)
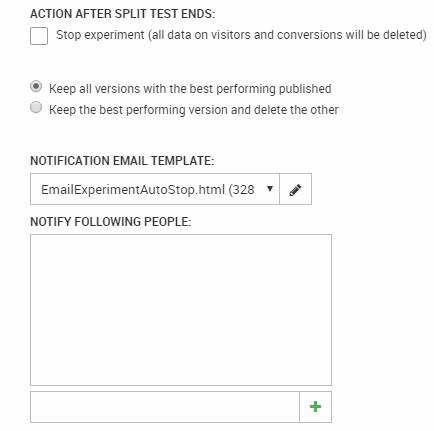
With these settings, you can:
- Decide if you want to delete visitor and conversion data or not
- Keep all versions or only keep the best performing version
- Notify people of the split test results (and specify an email notification template or create your own)
You can also end a split test manually.
Starting and stopping split tests
Starting and stopping split tests can be done in a number of ways, depending on the type of split test, and what your settings are.
Page based split tests start automatically when you finish the split test wizard, if you checked the This split test is active checkbox under the split test settings.
If you did not, simply
- Navigate to the page you are testing
- Click the Marketing tab
- Click start (Figure 7.1)

Before starting a content based split test, you must select one or more paragraphs on a page and create variants (Figure 7.2).
This will create duplicates, called variations, of the selected paragraphs.
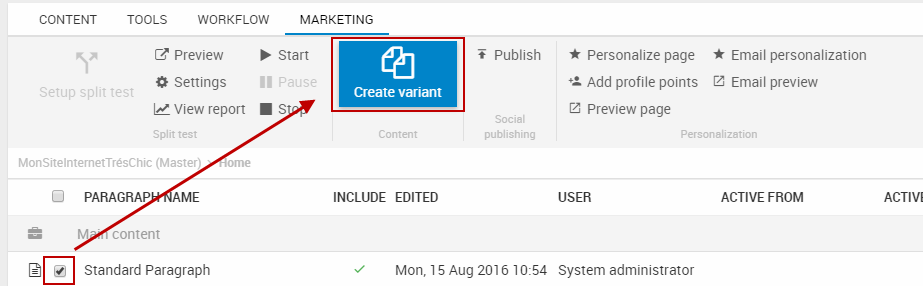
Then simply:
- Open the variant paragraph
- Make the change you want to test
Half the visitors sent through the split test will see the variation paragraph, the other half the original.
Click the start button to activate the test on your site and begin collecting conversion data.
You can preview the frontend differences between the variant and the original with the preview button.
Stopping or pausing a split test manually
Split tests may be stopped automatically when certain conditions are fulfilled, but you can also pause or stop them manually using the stop and pause buttons.
When stopping a split test manually, you will be prompted for a decision on the what to do with the split test variation.
You must:
- Confirm your choice by checking the Yes, stop this experiment box
- Select what to do with test variations:
- Keep all versions, with the original published
- Keep the original and delete the variation
- Keep the variation and delete the original
- Keep the best performing version and delete the other
The Split test overview
If you have many split tests running, you may find the split test overview useful.
To access the split test overview:
- Click Marketing on your accordion
- Click on Split tests
This takes you to the split test overview (Figure 9.1).

From the split test overview, you can:
- See the name, page, type, goal, and state of each split test
- Access the report of each split test
- By right clicking a split test get the following options:
- Pause a split test
- Stop a split test
- View the split test report
- Click the page icon to the left of the split test name to go to the page where the split test is running
The Split Test report
The split test report is a visual representation of the data collected by your split test.
The split test report is a valuable tool for optimizing value generation, because it:
- Gives you access to the data collected
- Helps you determine if the data is good enough to base a decision on.
The report compares the conversion rate of the variant and original content (Figure 10.1).
Access the split test report from either the page you are split testing, or from the split test overview.
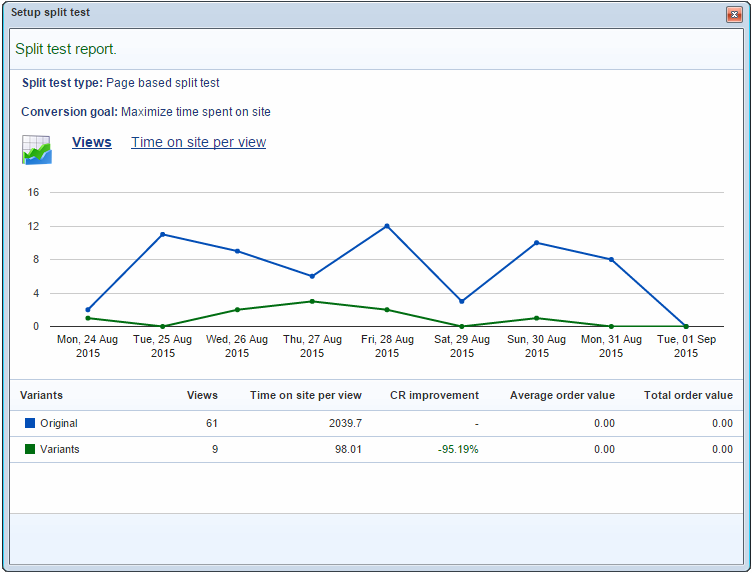
Let’s break the report down:
- At the top, you can see the type of test and the conversion goal.
- You then have a graph of the data collected during the split test. The data you can see will depend on the conversion goal. In the screenshot above, the goal is to maximize the time spent on your site, and consequently you can see the maximum time on site per view per variant.
- The table at the bottom provides an overview of the data gathered so far - depending on the conversion goal.
- The number of views per variant will always be shown
- The Conversion Rate (CR) improvement calculation measures how a variant performs compared to the original, and will always be shown.
Other data columns may or may not be present, depending on the conversion goal of the split test:
- Conversion goal specific parameters (e.g. time spent on site per view) - or average/total order value.
- For conversion goals which are of the do/donot type, you will see a probability calculation, which indicates whether the calculated improvement is statistically significant or not. Values close to 100% indicate a high level of statistical significance, whereas values close to 0% indicates that the improvement can be ascribed to randomness. (Gathering more data will result in higher statistical significance.)
With these data at your disposal, it is easy to determine the best variant for your split tests.
Create variants directly in a template
You can modify your template to create variants dynamically, depending on the session.
Use the template tag Global:OMC.Experiment.Variation.SOMEVARIATION to check if it’s an original or variant session, and change what happens on the frontend.
SOMEVARIATION will be replaced with ‘Original’ for the original and ‘2’ for the variant.
For example:
You still need to setup and start a split test on the page or paragraph – the tag merely enables you to create your variations directly in the template.

OMCExperiment
Contains setup data for split tests (OMCExperimentId, OMCExperimentName) for page (OMCExperimentPageId) as listed in backend Marketing -> Split tests.
| Field name | Data type | Length | |
|---|---|---|---|
| OMCExperimentId | int | 4 | |
| OMCExperimentPageId | int | 4 | |
| OMCExperimentName | nvarchar | 255 | |
| OMCExperimentCreatedDate | datetime | 8 | |
| OMCExperimentEditedDate | datetime | 8 | |
| OMCExperimentUserCreate | int | 4 | |
| OMCExperimentUserEdit | int | 4 | |
| OMCExperimentType | int | 4 | |
| OMCExperimentActive | bit | 1 | |
| OMCExperimentAlternatePage | nvarchar | 100 | |
| OMCExperimentGoalType | nvarchar | 50 | |
| OMCExperimentGoalValue | nvarchar | 3500 | |
| OMCExperimentCombinations | int | 4 | |
| OMCExperimentIncludes | int | 4 | |
| OMCExperimentPattern | int | 4 | |
| OMCExperimentConversionMetric | int | 4 | |
| OMCExperimentShowToBots | int | 4 | |
| OMCExperimentIsCustomProvider | bit | 1 | |
| OMCExperimentEndingType | int | 4 | |
| OMCExperimentEndingValue | int | 4 | |
| OMCExperimentEndingDate | datetime | 8 | |
| OMCExperimentEndingDateTimeZoneId | nvarchar | 255 | |
| OMCExperimentEndingAction | int | 4 | |
| OMCExperimentEndingNotifyEmails | nvarchar | Max | |
| OMCExperimentEndingIsNeedToStop | bit | 1 | |
| OMCExperimentEmailTemplate | nvarchar | 255 |
OMCExperimentView
Tracks which variation (OMCExperimentViewCombinationId) was used in views (OMCExperimentViewTime, OMCExperimentViewVisitorId) of split tests (OMCExperimentViewExperimentId).
| Field name | Data type | Length | |
|---|---|---|---|
| OMCExperimentViewId | int | 4 | |
| OMCExperimentViewExperimentId | int | 4 | |
| OMCExperimentViewTime | datetime | 8 | |
| OMCExperimentViewVisitorId | nvarchar | 255 | |
| OMCExperimentViewCombinationId | int | 4 | |
| OMCExperimentViewGoalTime | datetime | 8 | |
| OMCExperimentViewGoalType | nvarchar | 50 | |
| OMCExperimentViewGoalValue | nvarchar | 50 |
EmailMarketingSplitTest
Contains setup data for email marketing split tests. Specific email is defined by SplitTestEmailId.
| Field name | Data type | Length | |
|---|---|---|---|
| SplitTestId | int | 4 | |
| SplitTestEmailId | int | 4 | |
| SplitTestName | nvarchar | 255 | |
| SplitTestIncludes | int | 4 | |
| SplitTestIncludesUnits | int | 4 | |
| SplitTestGoalType | nvarchar | 50 | |
| SplitTestActive | bit | 1 | |
| SplitTestStartDate | datetime | 8 | |
| SplitTestEndDate | datetime | 8 | |
| SplitTestEndType | int | 4 | |
| SplitTestOpenedEmails | int | 4 | |
| SplitTestOpenedEmailsUnits | int | 4 | |
| SplitTestHoursTillEnd | int | 4 | |
| SplitTestAfterEndSendBest | bit | 1 | |
| SplitTestAfterEndNotify | bit | 1 | |
| SplitTestAfterEndActionEmail | nvarchar | 255 | |
| SplitTestStartDateTimeZoneId | nvarchar | 256 | |
| SplitTestEndDateTimeZoneId | nvarchar | 256 | |
| SplitTestScheduledSendActive | bit | 1 | |
| SplitTestScheduledSendTime | datetime | 8 | |
| SplitTestScheduledPickWinnerActive | bit | 1 | |
| SplitTestScheduledPickWinnerTime | datetime | 8 | |
| SplitTestWinnerEndDate | datetime | 8 |