Batch Integration
A batch integration is a files-based integration between a Dynamicweb solution and a remote system – typically an ERP system.
A batch integration typically consists of:
- One or more scheduled tasks which connect to the remote system, requests data, and saves it to disk as a file
- One or more data integration jobs which move the data from the files into the Dynamicweb database
Each scheduled task uses a scheduled task add-in which handles various tasks – e.g. authentication, email notifications – in addition to the main task which is to request data from a remote system. The scheduled task add-in typically also allows you to select a data integration job which is then run whenever the scheduled task is executed.
In this article we will take a closer look at:
- Data integration jobs – what they do and how
- Batch integration scheduled tasks
- Batch integration scheduled task add-ins
Before starting work on the Dynamicweb side of an integration project, you must mock, retrieve, or receive an XML file with data per feature included in the integration. We recommend you retrieve the data using the Dynamicweb Connector TestTool.
When importing data to Dynamicweb, and you in your import set Id's (primary keys, like ProductId) of tables explicitly, please ensure that Id's conform to Aa-Zz and/or 0-9 ONLY. Using any other characters may cause for the application to fail.
Scheduled tasks
A batch integration scheduled task is a task that does three things upon execution:
- Connects to a remote system – directly or via the DynamicwebConnector service – and submits requests for data using a scheduled task add-in
- Receives a response in XML from the remote system and saves it to disk
- Triggers an integration job, which processes the XML file and places the data in the Dynamicweb database
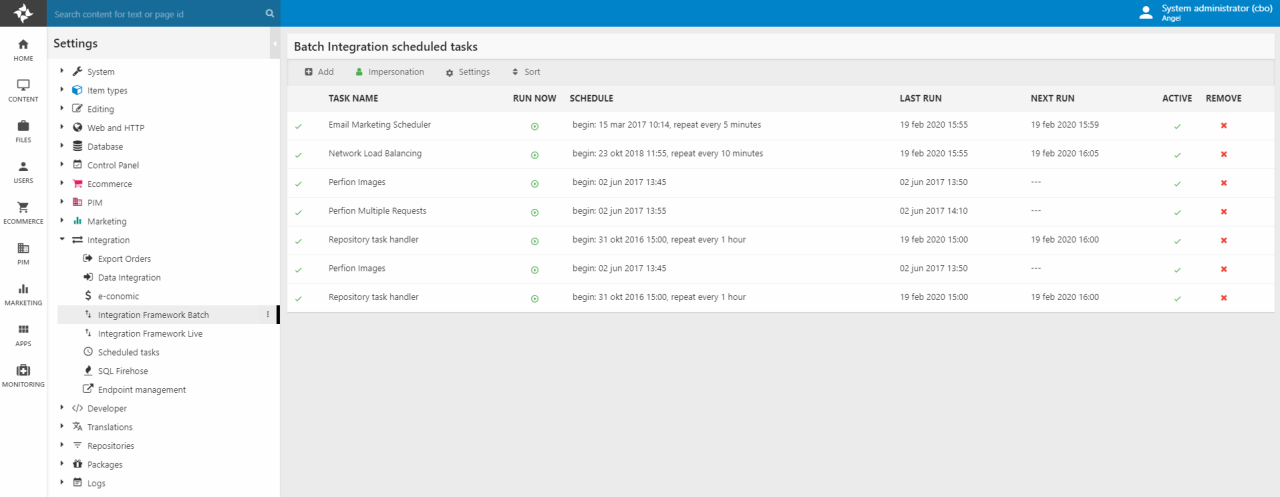
Scheduled tasks are also used outside the integration framework – to clean up logs, send scheduled emails, place recurring orders, etc. This is a separate class of scheduled tasks, and you cannot create integration-related scheduled tasks from the regular scheduled task nodes – you must go to Settings > Integration > Integration Framework Batch instead (Figure 2.1).

To create a batch integration activity:
- Go to Settings > Integration > Integration Framework Batch
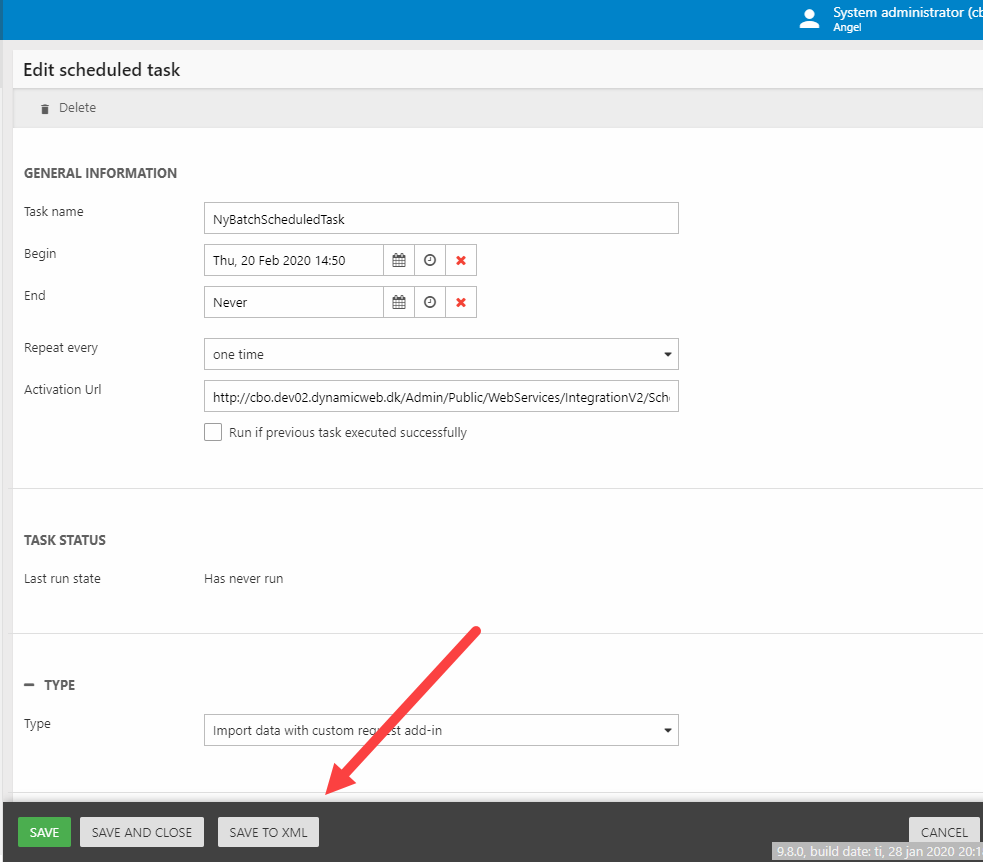
- Click Add in the toolbar and fill in the general information (Figure 2.2)

You must:
- Name the task
- Select a begin and end time
- Specify an interval – once, hourly, weekly, etc.
- Use the Type dropdown to select and configure an appropriate scheduled task add-in
As of DW 9.8, scheduled tasks may be saved as XML-files by clicking Save to XML in the save-bar (Figure 2.3). They are then placed in /Files/Integration/ScheduledTasks and may be placed under source control & deployed - see section on config files for more deployment-related goodness.
Scheduled task add-ins
A scheduled task add-in is a piece of software which can be attached to a scheduled task - it then does something whenever that scheduled task is run.
Under the integration area, scheduled task add-ins typically connect to a remote system and submits a request for data, then receives a response and saves it to disk. Each add-in comes with a set of parameters which are required by the remote system and/or Dynamicweb.
Out of the box, we supply the following scheduled task add-ins:
|
Name |
Use with |
Notes |
|
Microsoft Active Directory |
Used to import users and validate user credentials |
|
|
Any remote system |
Used to export order or user data - consider using Export data with custom request add-in instead |
|
| Export data with custom request add-in | Any remote system | Used to export data to a remote system, remote system must be able to receive said data - this is not standard functionality |
|
Any remote system |
Basic add-in for users & data (products, prices). Used with Integration Framework v.1 |
|
|
Any remote system |
Used to request data from a ConnectorService Add-in with multiple end-points. For custom integrations. |
|
|
Any remote system |
Used to submit custom request against e.g. a modified remote system plugin. Otherwise very basic. |
|
|
Any remote system |
Used to connect to remote systems with a plugin that can react to paging requests, reimport requests, etc.
This is true for our AX2012R2 and D365 plugins. |
|
|
Perfion |
Retrieves image data from a Perfion solution by querying the Perfion API Service |
|
|
Sync queued orders using Live Integration |
Any remote system with Live Integration and queued orders enabled |
This add-in is used to sync queued Live Integration orders with the remote system, for scenarios where the connection has been unavailable for a while |
In general, system-specific add-ins connect to remote systems which are passive, and where the returned data must be transformed on the Dynamicweb-side of the integration.
For the Integration Framework v2 code units, we recommend that you use the Import data with paging add-in as it has been specifically developed for this purpose.
Data integration jobs
A data integration job is a set of instructions for taking data and putting it somewhere, either in the solution database (import) or in a file (export).
It has two components:
- A source provider which matches the data source – usually an XML file (import) or the Dynamicweb database (export)
- A destination provider matching the data destination - also usually an XML file (export) or the Dynamicweb database (import)
Each provider can also be configured, tweaking the behavior and e.g. deleting data which is nor part of the source file, and so on. You can read more about data integration jobs and providers in the Data Integration Activity documentation.
In typical scenarios, you will create a number of separate jobs - often one per feature - and schedule them at intervals which make sense for the feature and the solution. For instance, currencies are typically not updated very often, whereas prices and stock levels are updated frequently.
When starting an integration project, you likely won’t have any ‘real’ data in the system to begin with. So, for each feature you must do an initial data import to populate the database with data from the remote system – we recommend using the Dynamicweb Connector TestTool to produce XML files with the correct data.
Once you have retrieved or received that data do the following:
- Upload the appropriate XML file to the /Files/System/Integration folder on the solution
- Create a new integration job matching the feature
- Select the XML Provider as source provider
- Select the appropriate XML file as the source file
- Click Next and select the appropriate destination provider
- Check any relevant checkboxes – see the Integration Provider articles for details
- Click Next
- Select which source tables to import
- Map them to an appropriate target table (this usually happens automatically)
- Click Next
- Name the job
- Review the column mappings for each table in the job
- Save
- Run the job
For each job, review the results thoroughly. Any custom data on the remote side must be handled on the Dynamicweb side as well, and placed in either standard field or a custom field of the appropriate data type.
Remember, you have access to a number of useful standard features such as context-sensitive values, conditionals, scripting, etc.
Deployment
At some point you're going to want to deploy an integration setup – move it from development to staging, and then hopefully from staging to production. Recent Dynamicweb versions have made this a lot easier:
- Integration jobs are now saved as XML in the /Files/Integration/Jobs
- Scheduled tasks may also be saved as XML – they are then placed under /Files/Integration/ScheduledTasks
This makes it trivial to add these files to source control and deploy them to staging and production.
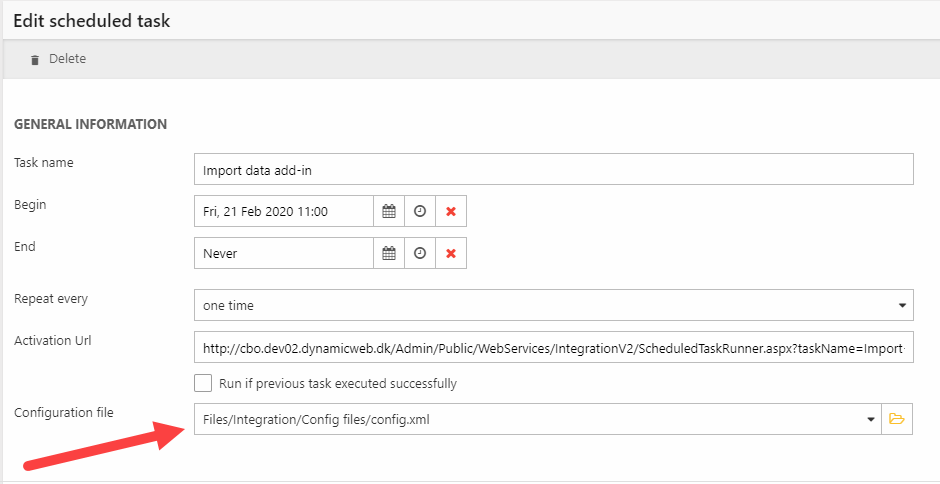
When you deploy batch tasks & integration jobs you typically want them to use different parameters than on development & staging environments. The easiest way to automate this is to create config files and place it on each solution – an XML-based batch scheduled task which references a config file will draw all parameters from that file saving you from needing to manually edit all tasks as they are deployed.
Config files must be saved as XML and could look like this:
Please note that you can only select a config file on a batch scheduled task after it has been saved as XML (Figure 5.2).