Configuring Batch and Live Integration Framework with a cloud hosted Business Central
By utilizing Endpoint Management in Dynamicweb, you can configure Live and Batch integrations with a cloud hosted Business Central through the Dynamicweb Web Service exposed in Business Central. This article will take you through the necesarry steps of such a configuration.
Once you have installed Dynamicweb connector service in BC, the Dynamicweb web service will be available in your Business Central application. Go to Web Services and search for "DWWebService" to locate it's URL.

Authenticating access
Before we can specify a set of endpoints for the purpose, we must first ensure that we have a suitable authentication method defined.
Cloud hosted Business Central applications require the use of the OAuth 2.0 protocol to authenticate web services. You can read a guide on establising an OAuth 2.0 authentication between Dynamicweb and Business Central here.
Specifying the endpoint for product synchronization
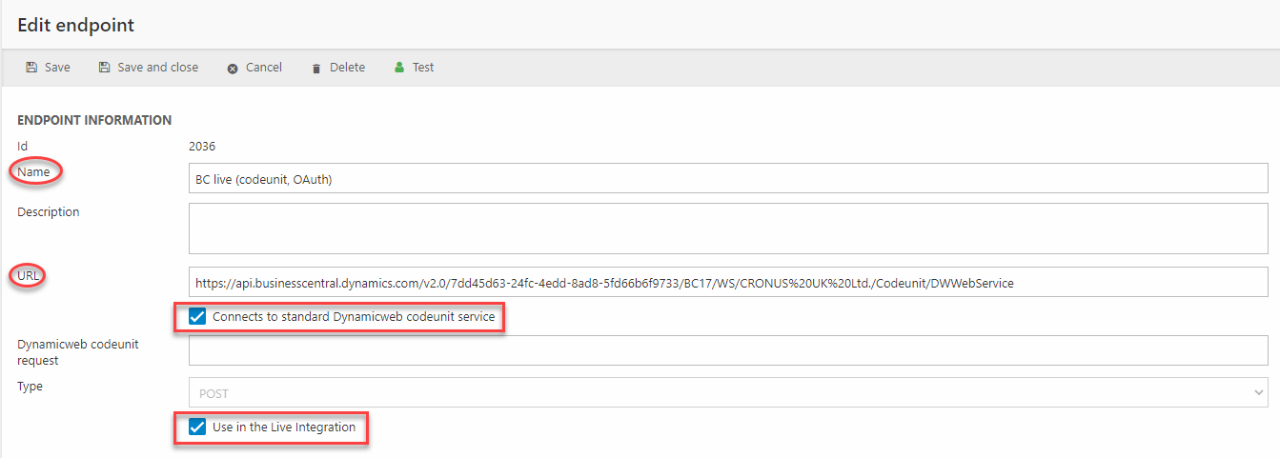
- Go to Settings > integration > endpoint management
- Click Add Endpoint
- Fill in a name for the endpoint
- Paste in the URL for the DW Webservice located in Business Central
- Check the “Connects to standard Dynamicweb codeunit service” checkbox
- Specify the data you wish to recieve in XML*
- Select your authentication method at the bottom of the page
- Save and close
*The XML code below in an example where Products, Currencies, Units of Measure, Manufactures, ProductGroups, Languages and Related Products are requested. Please refer to the the Request and Responses article for a full list of synchronization features.
Specifying the endpoint for customer synchronization
The configuration of the customer sync endpoint follows the same steps as the product sync endpoint with the only differences of the naming and the value in Dynamicweb codeunit request, where you should specify the following XML-code.
Configure scheduled tasks
When you added the Turnkey files (step 4), you automatically added some scheduled tasks, which are the components that orchestrate the integration. This means, they submit the request to Business Central, save the returned XML to a file and initiate the import activity which saves the data to the database. The added scheduled tasks are by default prepared for the Dynamicweb Connector in an on-prem environment, so they need to be reconfigured to adapt to a cloud hosted enviroment:
- Navigate to Settings -> Integration -> Integration Framework Batch
- Open the “Fetch Shop Data from Business Central” scheduled task
- In the Parameters section, select the endpoint that you previously configured for Business Central shop data from the Preconfigured endpoint dropdown.
- Click Save and close
- Repeat the procedure for the "Fetch Customer Data from Business Central” scheduled task.
Specify the endpoint for Live integration
To setup the live integration, we need to add a third endpoint for the purpose. The endpoint for the live integration uses the same Web Service URL as the previous two.
When configuring the endpoint, you should check both the "Use in the Live Integration" and "Connects to standard Dynamicweb codeunit service" boxes. The Dynamicweb codeunit request field should be left empty.
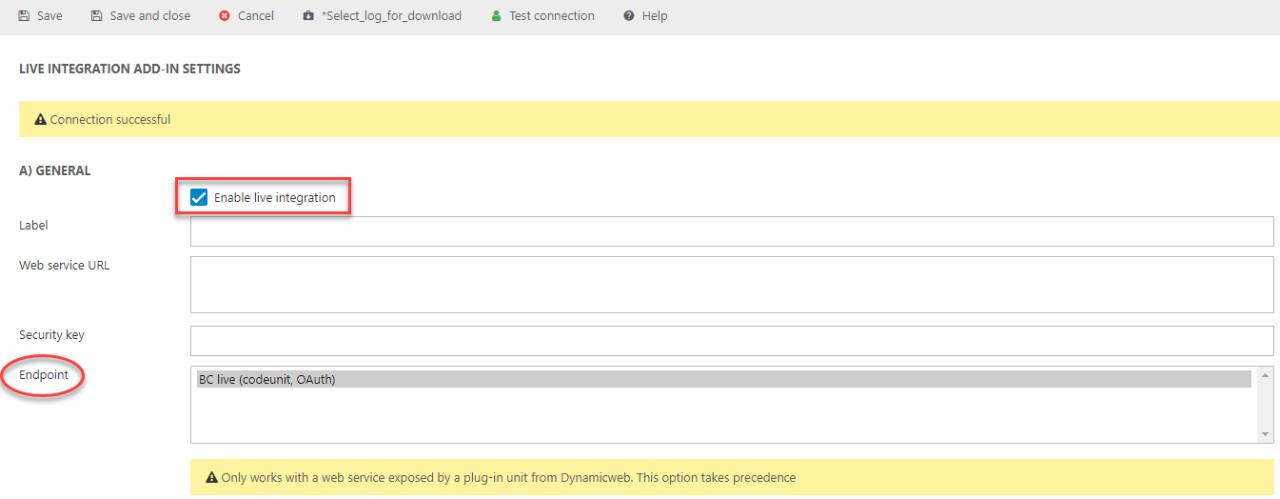
Configure Live integration add-in
To initiate the live integration we need to create an instance of the Live Integration Add-in that makes use of the preconfigured endpoint.
- Go to Settings > Integration > Integration Framework Live and click "Create instance" in the DynamicwebLiveIntegrationAddIn row.

In the Live Integration Add-in Settings menu:
- Check the "Enable live integration" box
- Select the preconfigured endpoint from the Endpoint list
- Optionally, you can define custom settings for your live integration such as notification or order settings, but you can also leave them at default and return later to make changes
- Click "Save and close"
Your solution should now be configured to connect to a Business Central hosted in the Azure cloud.
Running the Batch Integrations
You can now run the batch integrations one by one. Return to Integration Framework Batch overvied and click the Run icon on the following tasks:
- Fetch Shop Data from BC
- Fetch Customer Data from BC
If you set up a Windows Scheduled Task during the installation, they will also run automatically.
Running the batches should do the following:
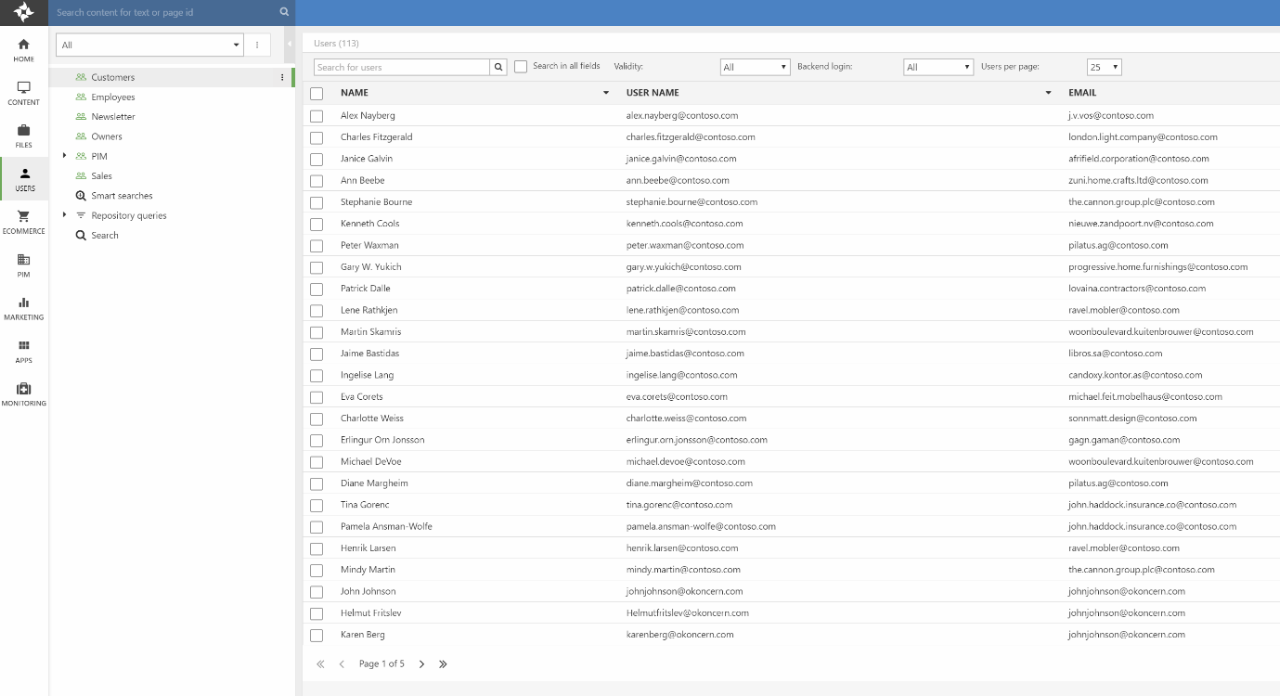
Import contact person and addresses to the Users section:
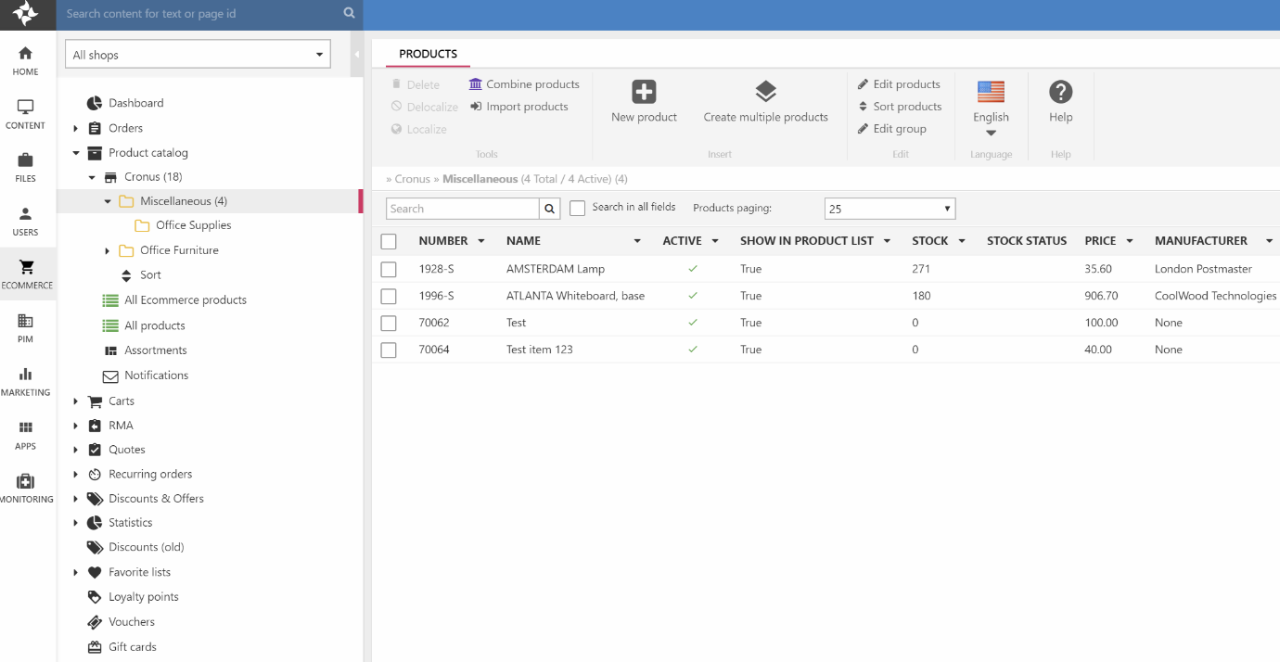
Import product data to Dynamicweb Ecommerce:
There is a lot more configuration data such as currencies, countries, units also added in the product shop data import, which you will use in the next article.
Background Information
Data from the Dynamicweb Plug-In Unit is laid out in a proprietary XML format structured format with tables, items and columns equivalent to a database table:
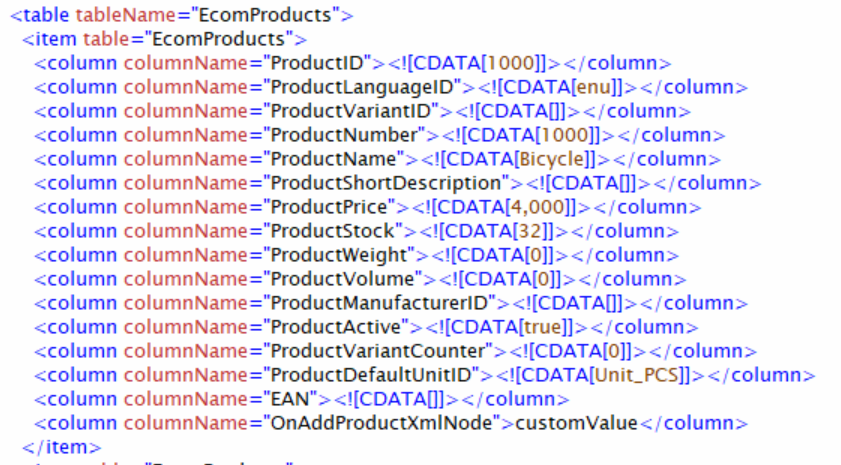
A format like this is in fact interpreted by Dynamicweb as a database table containing rows and columns of data, and when there is a match between a table name and column names in source and destination, Dynamicweb is able to map them automatically.
Clicking on Import Product Data opens the mapping page, which is divided into two sections. The top section contains mapping of all the tables extracted from Business Central:
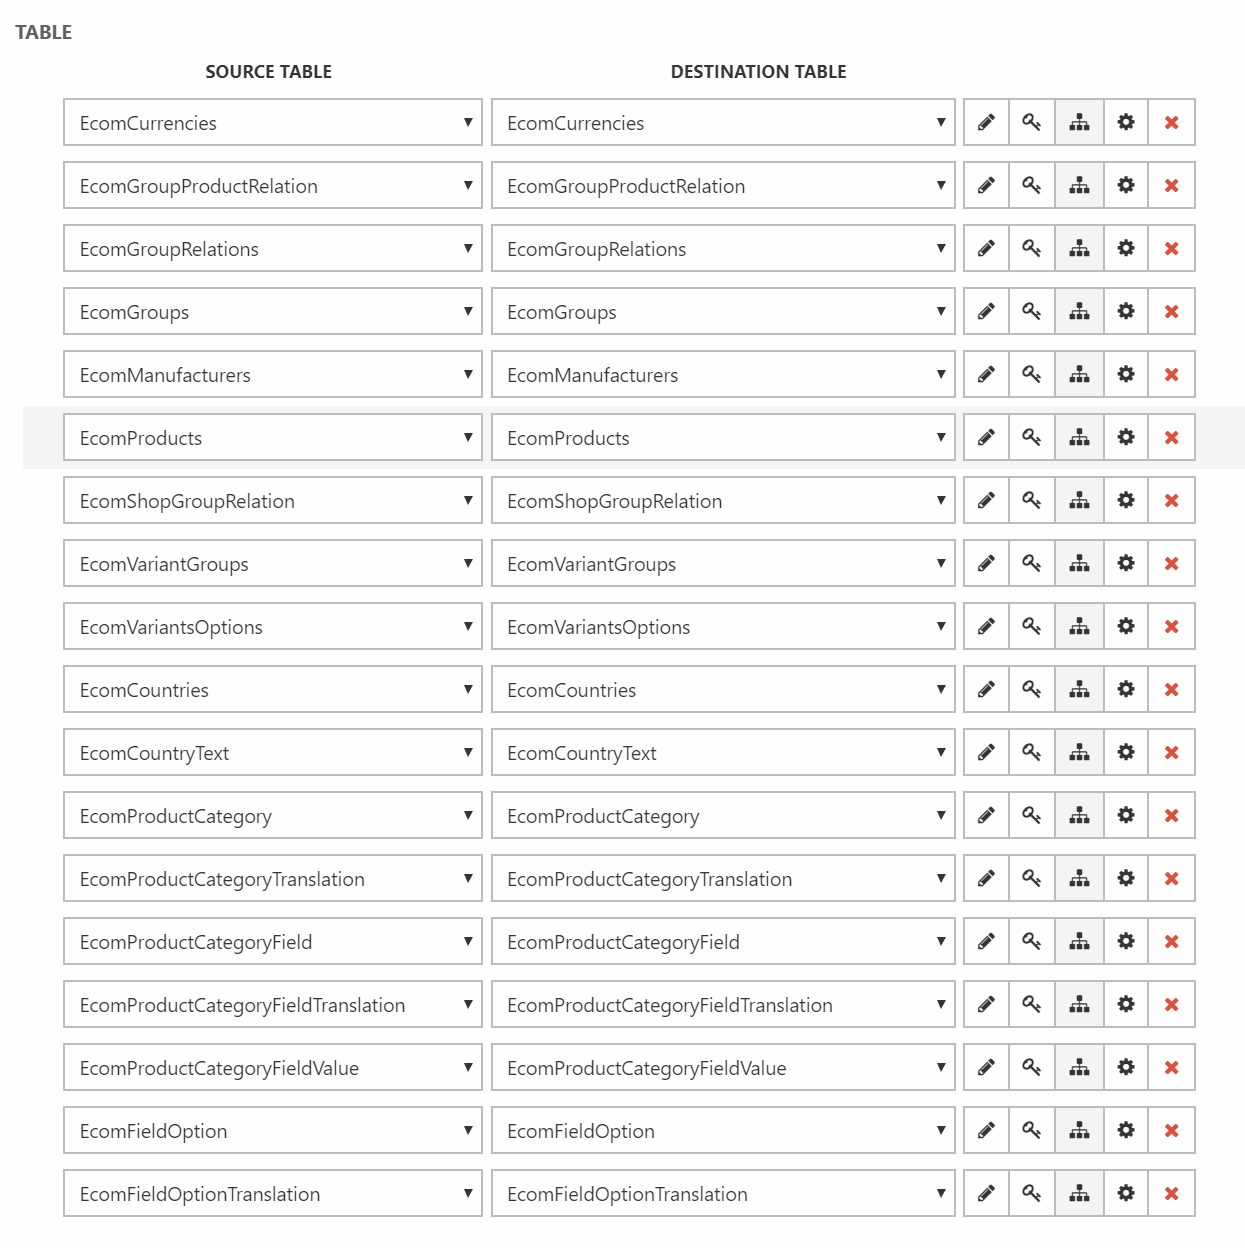
Clicking on a row displays the column mappings of that table.
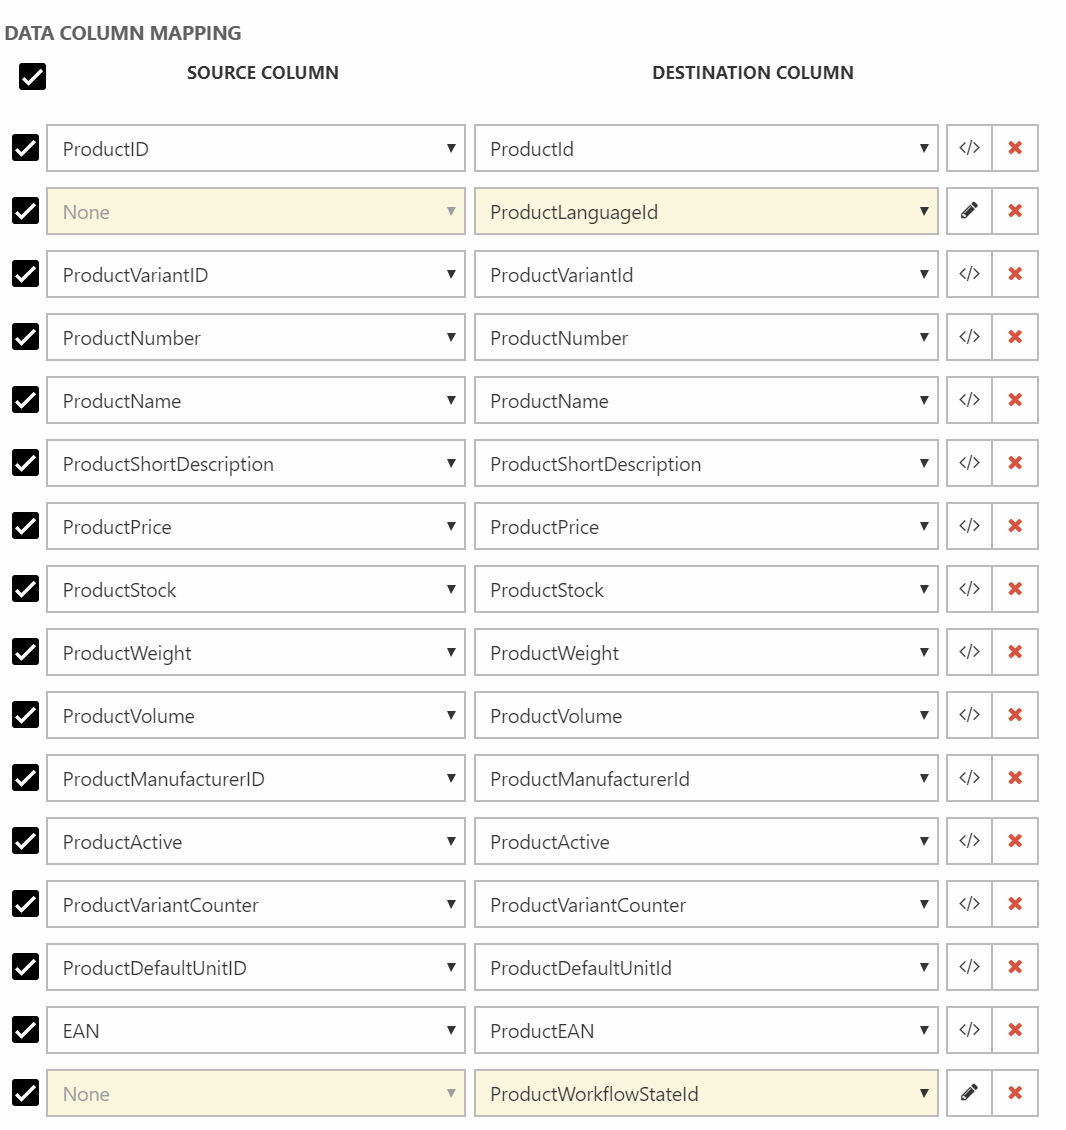
These are mappings between the column nodes in the XML format and the database table columns. The yellow columns are columns, where we add information not available in Business Central constants in our mapping. For further information, the Data Integration app is described in great detail on this page.