
Email Marketing
Email Marketing is an integrated tool for targeting, improving and measuring the effect of your email marketing and newsletter efforts.
With Email Marketing, you can:
- Send out user group-specific emails and newsletters
- Track how users interact with your emails and newsletters
- Test the effect of changes with split tests
In Dynamicweb, emails are actually pages. The Email Marketing tool allows you to send an html or item-based page to different kinds of users. This means that email marketing in Dynamicweb is very customizable – provided that you know what you’re doing. This is where this documentation comes in.
Here's a short video introduction to the Email Marketing tool:
Note: Many countries legislate against sending marketing e-mails without any form of consent from the recipients (spam legislation). Such legislation often applies to private recipients, while the rules regarding corporate recipients can be more lenient. It is your own responsibility to familiarize yourself with any relevant spam legislation in the countries you operate in.
In Dynamicweb, you can only send emails to registered users, who have given their consent to receiving emails from you. You can read more about registering users under the documentation for the Extranet module, and in the Implementing section of this documentation page.

Basic Concepts
In this section you will learn about:
- Creating and sending emails
- Creating and configuring email folders, controlling the default behavior of your emails
- Split testing emails, to measure the conversion rate if variant versions
- The statistical information available to you regarding your email marketing efforts
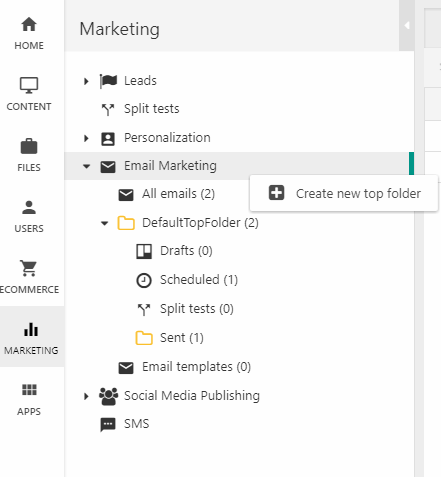
Navigating to the Email Marketing tool
To get started with Email Marketing:
- Click Marketing on your Accordion
- Notice Email Marketing on your tool tree
- Click the plus-sign to fold out your email marketing folder structure (Figure 3.1)
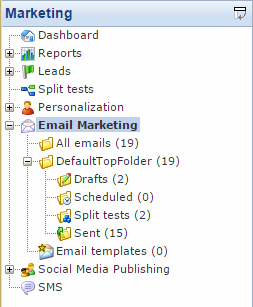
From here, you create and manage your email marketing efforts.
Creating an email
Note: In Dynamicweb, emails are actually pages. In order to be able to create and send an email to your users, you need to create a page with your email content first. Read more about creating pages.
When creating an email page, you can use a number of email placeholder tags, for personalizing the email content. Read more about the email placeholder tags available to you here.
To create a new email:
- Rick click on an email top folder (Figure 4.2)
- Click Create new email
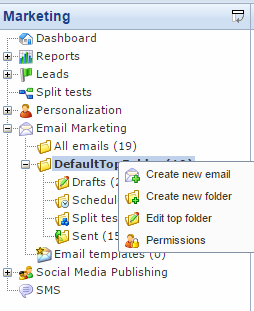
You will be asked to select an email type:
- Click Blank email (or select an email template) – you can create email templates using the advanced email settings
- Specify a subject (or leave blank)
- Click OK
This takes you to the email settings, where you finalize the email before sending it.
Adding content to an email
It’s generally a really bad business idea to send an empty email to no one at all.
Rather than doing that, you should:
- Create a subject for your email
- Choose someone to send it to
- Choose something to send to them
The email settings (Figure 5.1) allow you to do just that!
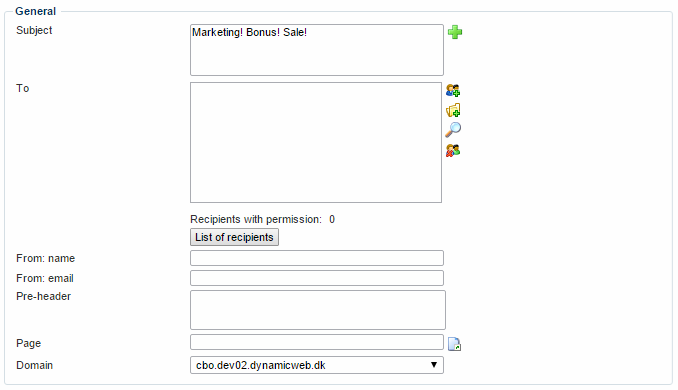
From the edit email view you can:
- Specify a subject for your email - the green plus sign allows you to personalize the subject using tags.
- Specify who to send the email to ( your recipients)
- Specify a custom from-name and from-email for your email
- Specify a pre-header text (keep below 100 characters, which is what most email clients display)
- Select a page to use as the body of an email – supports both standard html-based and item-based pages
- Select a domain to use for dynamic links in the email
Once you are happy with your settings, you can save the email, or you can send it immediately (or schedule it for future delivery).
Dynamicweb enables you to send out emails to registered Dynamicweb users, users with an abandoned cart, and unresponsive users, who are users that have not opened a specific email.
- Dynamicweb Users can be selected individually, by user group, or by a smart search – or any combination thereof. By default, Dynamicweb filters out any users which are added twice, or who haven’t given their consent to receiving emails from you.
- Abandoned Cart users are users, who have added products to a cart, but have not finalized their purchase. You can customize when a cart is regarded as abandoned, how old a cart should be for the system to ignore it, and so forth.
- Unresponsive users are users who have not opened a mail. The mail is specified by you.
You can change which recipients to send to by default in your top folder settings, or on the specific email by changing the recipient provider under your advanced email settings. Read more below.
Sending an email
To send an email, click Send or Scheduled send (Figure 6.1):
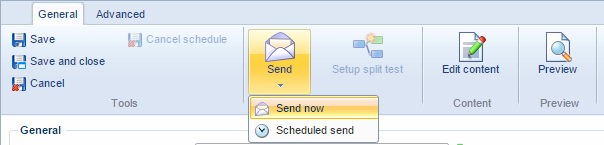
Once sent, your email is moved from the drafts folder to the sent folder under the top folder you are working in.
Resending an email to unresponsive recipients
From the sent folder, you can right click and choose resend to unresponsive recipients (Figure 7.1):
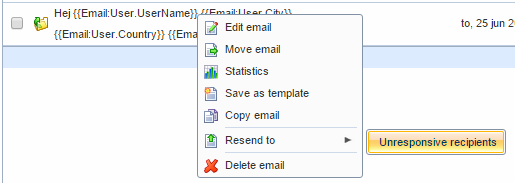
This allows you to quickly and effortlessly send out an email to people who did not open it in the first place.
Our marketing guys inform me that this is a really neat feature, so you might want to give it a spin :)
Scheduling emails for future or recurring delivery
You may want to send out the same email weekly, e.g. if you have users who have added products to their cart but not finalized their purchase, or you may want to schedule an email to be sent out at a time where no one is in the office.
Fear not! Email Marketing enables you to do precisely that.
By clicking Scheduled Send, you can setup scheduling to send out emails periodically, or at a specified time (Figure 8.1).
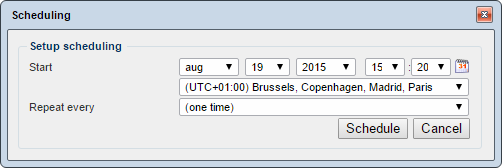
From the scheduling window, you can specify a start date and time and an end date and time, your time zone, and the frequency with which you want to send out this particular email.
Advanced email settings
When creating or editing an email, clicking the advanced tab on your toolbar gives you access to the advanced email settings (Figure 9.1).
Many of these settings are inherited from the top folder settings – so you don’t need to change them unless you want to override those. Read more about top folders in the implementing section.

The advanced settings are divided into several areas. Let’s run through them individually.
General (advanced) options
With the general advanced options:
- You can attach one or more files to your email
- You can select the encoding format for the text within the email
- You can save the email as a template. Remember to provide a name and a description.
- You can customize the text on your unsubscribe link, and select a custom page to redirect unsubscribers to.
- For legal reasons, Dynamicweb will automatically add an (ugly) unsubscribe link to your emails, unless you add one to the template you use to render your emails. We strongly advise you to create something beautiful to replace it.
- You can customize your content settings:
- If you are sending out user-specific content, you can render the email-content for each recipient
- You can send a plain text version of your email, along with the html version. The plain text can be generated automatically from content, or it can be provided by you.
- You can customize the recipient settings to allow you to deliver the same email to the same recipient more than once
- If you uncheck the ensure unique recipients checkbox, you must specify a quarantine period, during which the same user cannot receive the same email.
Unique recipients and quantine periods
With Dynamicweb Email Marketing, you can never send out the same email to a single address more than once per delivery.
And by default, Dynamicweb blocks sending out the same email to the a single address over several deliveries too due to spam legislation concerns.
If, however, you have a scheduled task sending out the same (uniquely rendered) email with information on an abandoned cart, you can disable the built in block on sending the same email-ID to the same email address.
You cannot, however, bypass the block on sending the same email to a single address more than once per single delivery.
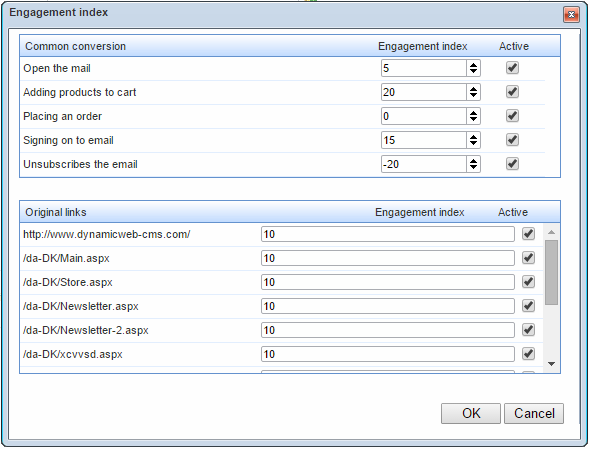
Measuring options
With the measuring options, you can:
- Customize the Engagement Index point values of users taking actions or opening links in the email.
- The points values are defined in the top folder settings by default, but you can further customize them for this particular email here, or disable points entirely for some actions or links (Figure 11.1)
- Select a tracking provider other than the one selected as default in the top folder, and fill out any associated parameters.
- Dynamicweb supports using Google Analytics out of the box – but you can create your own tracking providers.
Distribution options
With the distribution options, you can:
- Change your default recipient provider settings. Read more about your options – Dynamicweb users, abandoned cart recipients and unresponsive recipients – here.
- You can change your delivery provider settings. By default, Dynamicweb comes with the Dynamicweb Send Provider, but you can create your own delivery provider.
Validation options
Click Validate emails to check the format of the current list of recipient emails.
- The validation process is as follows:
- Is the email address format correct (i.e. "does it follow the something@somthing.suffix format")?
- Does the domain exist?
- Does the domain have an MX (mail server) record?
You will be presented with a list of invalid emails, which you can then correct or clear manually.
Email Personalization
With email personalization, you can tailor your email marketing efforts to the needs, interests and behavioral patterns of your users.
You do so by selecting which paragraphs to send to which smart search based segments.
If, for example, you want to kick off an international campaign by organizing a flash mob in major European cities, you can easily do so. In the following section, I will be using this as an example of how email personalization works.
Here's a short video introduction:
Creating personalized content
To create personalized content, simply create an email with variant city-specific information (Figure 15.1)
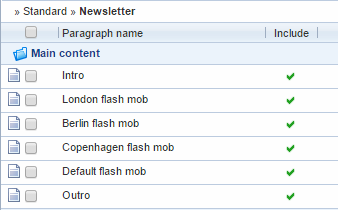
In this case, I have three paragraphs targeting my users in three major cities – containing information on how to join the flash mob in their country – and a paragraph containing information on how to see videos of the flash mobs, targeting users who don’t have a chance to join the flash mob themselves.
Creating and adding segments
Next, go to the Marketing tab (Figure 16.1) and click Email personalization.
You will be presented with a view of your paragraphs, and a list of your segments (Figure 16.2)
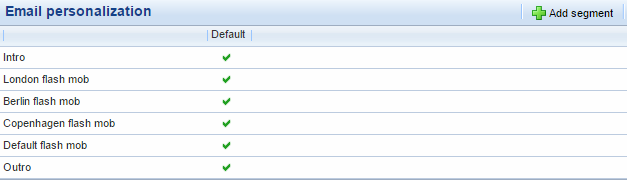
So far, there are no segments except ‘default’, which covers everyone who is not in one of the other segments.
You need to add segments matching your personalized content. To do so, click Add segment.
You are presented with the standard smart search window (Figure 16.3).
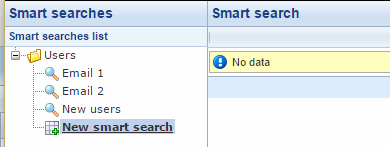
Select or create smart searches fitting your segmentation criteria.
In this scenario, you are interested in users who live in the United Kingdom, users who live in Germany, and users who live in Denmark.
Create those, and add them to your email personalization window (Figure 17.1).
For a full list of the many cool options you have when building smart searches, check out the smart search documentation.
Configuring personalized content for segments
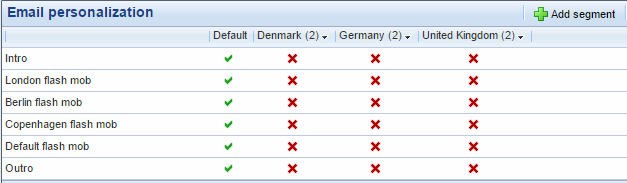
Now, in order to ensure that your users get the right content, it is useful to go through each segment individually.
Start by looking at the default users, i.e. those who are not covered by the other segments – in this case, users in the US and in Japan.
- Should the default users receive the intro? Yes
- Should they receive the paragraphs targeting UK-, Germany- or Denmark-based users? No
- Should they receive the default flash mob paragraph? Yes
- Should they receive the outro? Yes
Click the green checkmarks/red crosses to change their state, and go through the other segments in the same manner. You should end up with the following configuration (Figure 18.1)
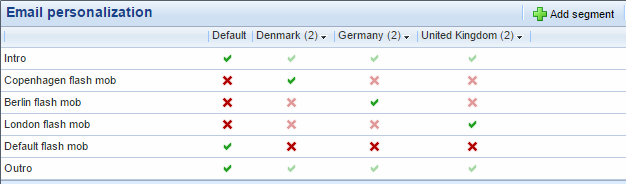
With this setup:
- Users who live in the UK will receive the intro, the London flash mob, and the outro paragraphs.
- Users who live in Germany will receive the intro, the Berlin flash mob, and the outro paragraphs.
- Users who live in Denmark will receive the intro, the Copenhagen flash mob, and the outro paragraphs.
- Users who do not live in the UK, Germany or Denmark will receive the intro, the default flash mob, and the outro paragraphs
If you are a little confused, don't worry.
You can preview your email as each segment, and catch any errors early!
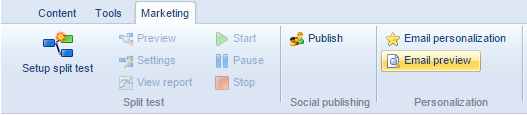
Previewing (personalized) emails
From the marketing tab of a page (your email), click the email preview button (Figure 19.1) to get a preview of your email.
You will see a preview of your page, along with a dropdown menu listing your segments (Figure 19.2).
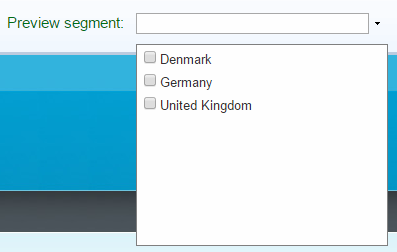
You can preview the page as a user belonging to one or more of your segments.
A user cannot have both e.g. Denmark and Germany as their registered country, of course – but it’s very possible for a user to belong to more segments than one, and this lets you test these complex scenarios in an easy manner.
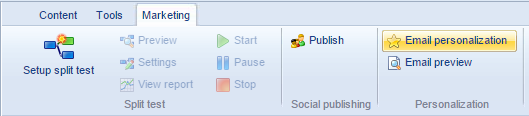
Split testing emails
Split testing is a method for doing controlled experiments with for instance content or layout, to see which versions performs the best. With split testing, you can send out two versions of a newsletter or an email to a subset of recipients, and test which version produces the highest conversion rate – and then send out that version to the rest of your recipients.
To do a split test on an email, you must:
- Create (or edit) an email with split test variation
- Set up a split test
Creating a split test variant
To create a split test variant of an email, you must:
- Create or edit an email
- Check the Create split test variation checkbox (Figure 21.1)
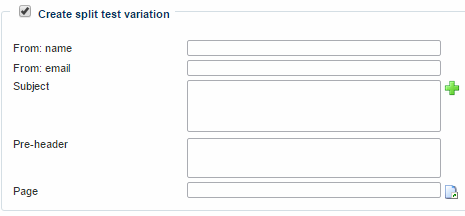
This enables you to select or create variant values for:
- From: Name
- From: Email
- Subject
- Pre-header
- Page
By changing these values, you can test two version of a newsletter in an easy manner – with changes ranging from subtle to drastic.
It is generally advisable to only change one or very few parameters at a time, to make it easier to measure if a particular change has any effect. You can read more about split tests in general here.
Setting up a split test on an email
When you have create a variant of an email, click Setup split test on your email toolbar (Figure 22.1).

This takes you to the split test setup window (Figure 22.2).
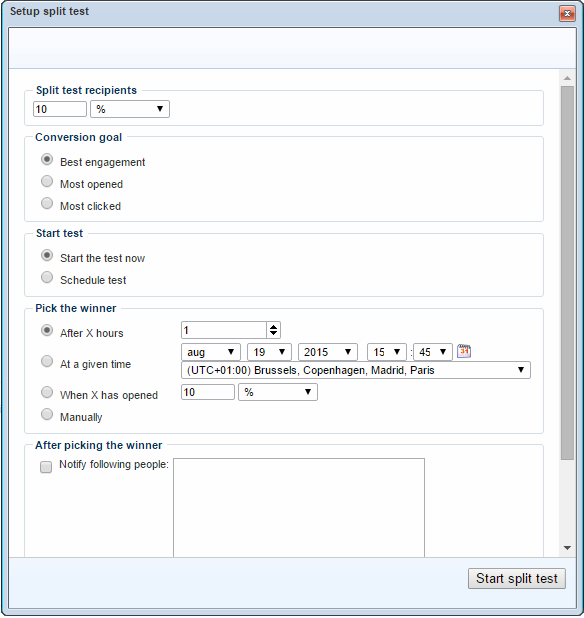
From here, you must:
- Specify how many per cent of email recipients should be involved in the split test – the remaining percentage will receive the best performing version after the split test has found a winner.
- If you choose 10%, 5% of your total recipients will receive the original and 5% will receive the variant. The conversion rate will be measured on those 10%. The remaining 90% will receive the best performing version.
- Choose a conversion goal
- Best engagement compares the Engagement Index (EI) points awarded overall. The EI-point value settings are configured on your top folder, read more here
- Most opened compares the number of opened emails
- Most clicked compares the number of links clicked from within the email
- Choose between starting the test now or scheduling it for later
- Specifying how to pick the winner
- After X hours picks a winner after a set number of hours
- At a given time picks a winner at a specific date and time
- When X has opened picks a winner after a specified percentage of split test users have opened their email
- Manually allows you to pick a winner when you decide results are significant
- Specify who to notify when a winner has been picked automatically
When you are happy with your settings, click Start split test to start (or schedule) your split test
Your email is then moved to the split test folder, located under the top folder you are working in.
Email Statistics
Dynamicweb collects statistical information about the performance of your email marketing efforts, and how your users interact with your emails. This information is, of course, available to you.
To access the statistical information for an email:
- Go to the sent folder and locate the email
- Click the email
This opens the statistics window for that email.
General email statistics
In the top part of your statistics window, you have access to the general statistics (Figure 24.1).
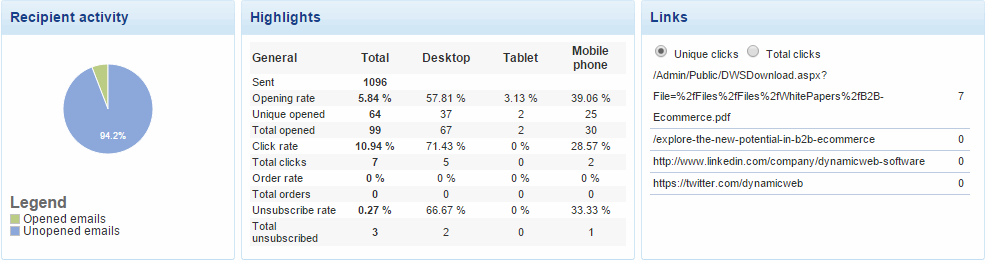
The general statistics provide information on the opening rate, the click rate, and the links followed by your recipients.
The highlights area also conveniently show you statistics for desktop, tablet and mobile phone users, so you can see how well your marketing efforts are doing on each type of device.
Recipient statistics
Below the general statistics, you have the recipient statistics (Figure 25.1).
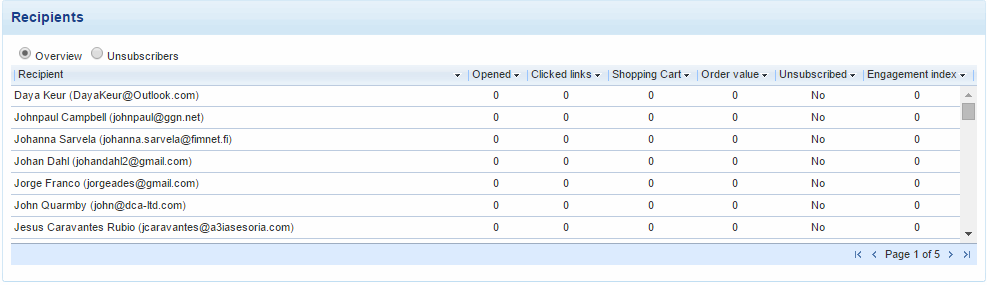
Here, you can see how each individual recipient has reacted to your email – how many times they have opened it, clicked links, added a product to their cart, what their total order value is, whether they have unsubscribed or not, and finally, the total engagement index score of their actions.
Clicking the arrow to the right of each tab to sort it in an ascending or descending order.
Individual recipient statistics
You can click on an individual recipient to see statistics for that user only (Figure 26.1).
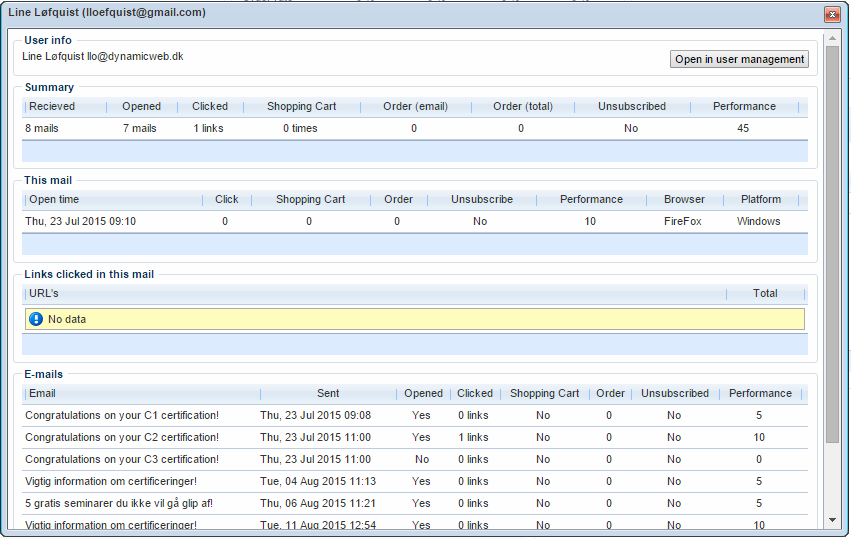
From the individual view, you can see:
- A summary of the total marketing efforts and their effect for that particular user
- Their actions for this email
- Which links (if any) they have clicked in this email
- A list of other emails sent to this user, and the actions taken in relation to that
Click the Open in user management button on the top right to open that user in the user management center.
Engagement statistics
The engagement statistics provide you with details on the engagement index point values of this email, for various parameters (Figure 27.1).
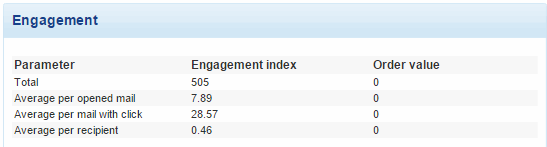
Read more about the engagement index in general, or read about how to assign point values for email actions.
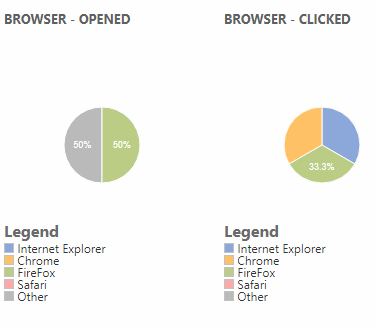
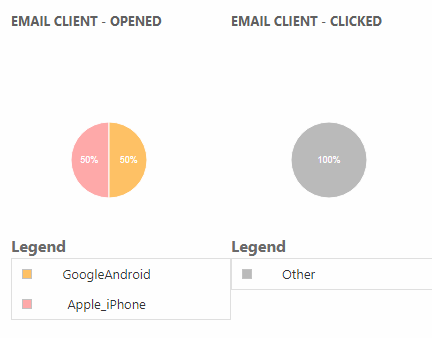
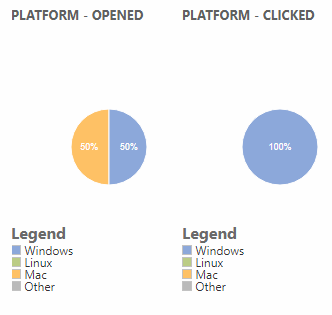
Browser, email client and platform statistics
You also have access to statistics on the opening and click rate of different browsers (Figure 28.1)
Email clients (Figure 28.2)
And platforms (Figure 28.3)
Exporting statistics
You can export email statistics by clicking the export button above the statistics window (Figure 29.1)

Click the export button in order to choose which statistics to export (Figure 29.2)
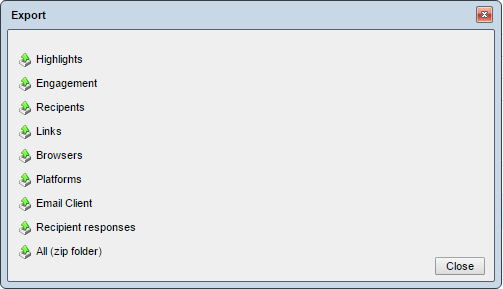
Click either one of these to download a .csv file with the statistical information.
Email Failures
Occasionally, your email marketing efforts will fail in the technical sense - this can happen for a number of reasons.
Click the Failures button (Figure 30.1) on the email statistics ribbon.

This opens a list of, well, your failures and the reasons behind them.
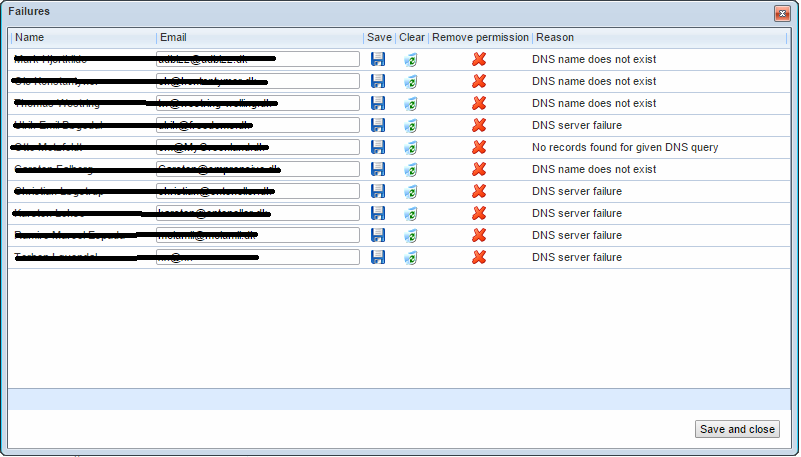
From the failures window, you can:
- See the name and email of the recipients you failed to deliver the email to
- See the reason for the failed delivery
- Save, clear the email , and/or clear the email permission setting from any of the recipients you failed to deliver an email to
In this manner, you can take immediate action to ensure you will not fail again!

Implementing
In this section you will learn about:
- Creating and customizing email top folders and top folder settings
- Using placeholder tags in Emails
- Signing users up to receive emails
Email (top) folders
All your emails are created and organized in folders.
When you have selected a folder - any folder - you have access to a number of actions from the email folder ribbon (Figure 32.1).

From the action ribbon, you can:
- Copy, move or delete the selected emails (from the All emails-folder, only delete)
- Search you emails
- Specify how many emails you want to see on screen
- Filter on email send-state, i.e. draft, scheduled, split test, and sent
Your top folder is very important, because all emails created in a top folder inherit the default behavior configured on that folder.
To override this behavior for a single email, use the advanced settings.
A top folder contains the subfolders drafts, scheduled, split test and sent. They are used to automatically sort emails based on their current state.
Creating a top folder
To create a top folder:
- Right click on Email Marketing
- Click Create new top folder
You will then see the top folder settings window.
- Fill out a name for the folder
- Configure any settings you need to – you can see a rundown of the different settings in the next section. You can also edit the settings later on.
- Click save
Regular folders can be used to organize your email marketing efforts even further.
To create a regular folder, right click on a top folder, click create folder, name it, and press enter. Voilà!
Top folder settings
A top folder can be configured, allowing you to control the default behavior of emails created in that folder.
All emails created in a top folder inherit the top folder settings – although most of the settings can be changed on the instance by using the advanced email settings.
You access your top folder settings by right-clicking it and selecting edit top folder, or when creating a new top folder.
Here’s a rundown of the top folder settings.
Top folder general settings
The top folder general settings set the default values of the most basic settings when working with email (Figure 35.1).
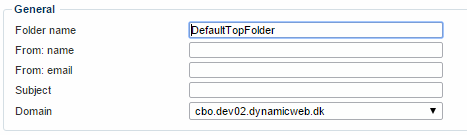
With the top folder general settings, you can:
- Specify the name of the folder (required)
- Specify the name of the default sender of emails created within this folder
- Specify the email of the default sender of emails created within this folder
- Specify a default subject for new emails created within this folder
- Select a default domain for new emails created within this folder.
- Dynamic links in the emails created within this folder will point to this domain. This is useful if you have multiple domains on one solution, but want to point users to a specific one.
Top folder content settings
If you use this top folder for emails with personalized content, you should check the Render content for each recipient box, to make sure the personalized content is correctly rendered.

If you render content for each recipient, your email will be moved to the scheduled folder – don’t worry, it will be send as soon as the system has had a bit of time to think.
Rendering content for each recipient is equal to rendering and sending a unique page to every recipient, and may take a little while, depending on how many recipients you are working with.
Top folder unsubscribe settings
For legal reasons, Dynamicweb will automatically add an (ugly) unsubscribe link to your emails, unless you add one to the template you use to render your emails. We strongly advise you to create something beautiful to replace it.
With the unsubscribe settings, you can:
- Customize the text of your unsubscribe link
- Redirect users to a specific page after they unsubscribe
Top folder Engagement Index settings
The engagement index (EI) is a sophisticated way of measuring how effective your marketing efforts are for a specific user – how interested they are in your services, so to speak.
For your email marketing efforts, the engagement index settings control how significant various interactions with your email are to the engagement index.
The engagement index is used when working with potential leads. Read more about leads and the engagement index.
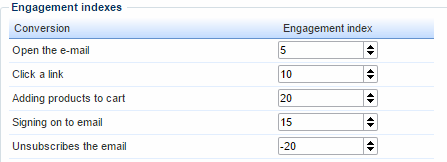
From here you can specify the EI-value of conversion goals such as:
- A user opening the email
- A user clicking a link
- A user adding a product to a cart
- A user signing up to receive more emails
- A user unsubscribing from the email
By specifying the Engagement Index value of these (and other) actions, you can get valuable information, which can heltp you determine which users are interested in your services and which are not.
Top folder tracking provider settings
A tracking provider enables you to track the sources of traffic on your solution.
Email Marketing supports Google Analytics by default, but you can create custom tracking providers.
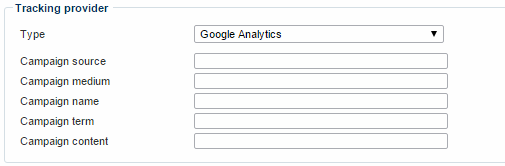
With the tracking provider settings, you can:
- Specify a default tracking provider for new emails created within this folder
- Fill in default values for any parameters associated with the tracking provider
The tracking provider settings support using the tags {{SendDate}}, {{Domain}}, {{From}} and {{Subject}} as default values - which will be replaced with dynamic values when a new email is created. This makes it easier to ensure, that tracking does not fail because of human error.
The job of the tracking provider is to provide the tracking codes which should be added to all links in an email - for Google Analytics, the codes available are:
- utm_source
- utm_medium
- utm_campaign
- utm_term
- utm_content
These codes map directly to the fields Google Analytics field above.
You can use dynamic values by using placeholder tags, making e.g. source based on the subject, and so forth. Read more about email placeholder tags.
Top folder delivery provider settings
A delivery provider manages the technical details of delivering emails, so you don’t have to worry about email servers, infrastructure, scaling, etc.

By default, Dynamicweb uses the Dynamicweb Send Provider, but you can create your own delivery providers (e.g. for SendGrid).
Top folder recipient provider settings
By default, Dynamicweb enables you to send out emails to registered Dynamicweb users, users with an abandoned cart, and unresponsive users, who are users who have not opened a specific email.
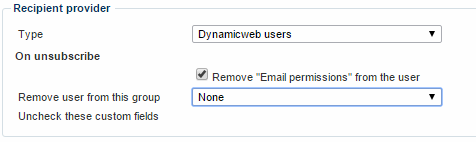
These settings control the default recipients for emails created within this top folder, as well as the behavior associated with that particular recipient group.
Pay particular attention to On unsubscribe settings - these should be configured on the top folder always, unless you like to battle angry unsubscribers.
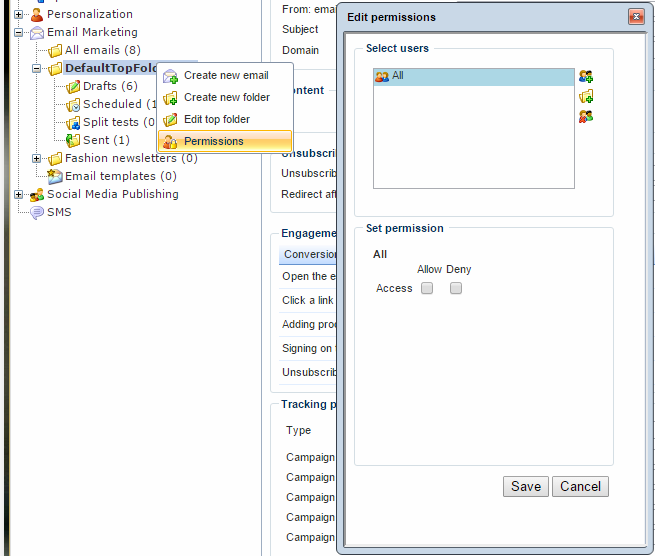
Top folder permissions
You can set permissions on your email top folders, in order to control which users and user groups can use which folders.
To do so:
- Right click on your email top folder
- Click permissions
- Set permissions in the standard manner
Email placeholder tags
A placeholder tag is a piece of text formatted in a specific format, which is then processed and replaced by a dynamic value.
For Email Marketing, this means that you can personalize email content to a large degree.
The placeholder tag format is {{PlaceholderName||”fallback value”}}, and tags can be used in:
- Email bodies (on pages) - including in links, for example <a href="/UserInfo.aspx?UserName={{Email:User.UserName}}">Click here to see your profile</a>
- Subject fields (when creating emails)
- Tracking provider fields
If you do not provide a fallback value for the placeholder tag, and the user does not have a value to replace the placeholder tag with, it will simply print the placeholder tag.
So, to avoid addressing your users as Dear {{Email:User.Name}}, always provide a fallback value.
You cannot currently use placeholders with abandoned cart emails.
The following email placeholder tags are available to you:
|
Placeholder name |
Description |
|
EmailMessaging:Recipient.Id |
The recipient id. This is not related to the user id. |
|
EmailMessaging:Recipient.Key |
The recipient key. When using the "Dynamicweb users" recipient provider, this is the user id. |
|
EmailMessaging:Recipient.Name |
The name of the recipient. |
|
EmailMessaging:Recipient.Email |
The email address of the recipient. |
|
EmailMessaging:Message.Id |
The message id. This identifier is not the email id. If split test is used, there will be one message id for both the original and the variation. |
|
EmailMessaging:Message.SenderName |
The sender name. |
|
EmailMessaging:Message.SenderEmail |
The sender email address, or the reply-to email address. |
|
EmailMessaging:Message.Subject |
The subject. If split test is used, this will contain the subject for the given version (original or variation). |
|
EmailMessaging:Message.DomainUrl |
The domain url. This url is the domain used for the links in the content. |
|
EmailMessaging:Message.SendDate |
The send date/time. This is the time when the message was sent. If the email is recurring, this value updated each time the email is sent. |
|
EmailMessaging:Recipient.Secret |
The recipient secret used for recipient-specific actions like unsubscribing. |
|
EmailMarketing:Email.PreHeader |
The pre-header span. This contains the pre-header text wrapped in a span-tag. |
|
EmailMarketing:Email.PreHeader.Clean |
The pre-header text. This contains the pre-header text. |
|
EmailMarketing:Email.ContentLink.Clean |
The link to the content page. This contains the link (not in a tag) to the page that provided the content for the email. |
|
EmailMarketing:Email.UnsubscribeLink1 |
The unsubscribe link in a tag. This contains the unsubscribe link wrapped in an a-tag using the "Unsubscribe text" as the link text. |
|
EmailMarketing:Email.UnsubscribeLink.Clean1 |
The unsubscribe link. This contains the unsubscribe link (not in a tag). |
|
EmailMarketing:Email.UnsubscribeAllLink.Clean |
The link to completely unsubscribe the recipient using the EmailAllowed property of the User. This tag exists in addition to the regular customizable unsubscribe link to allow for more flexibility. The unsubscribe link is not wrapped in an html anchor (<a>) tag. This value is only available when using the |
|
EmailMarketing:Email.TrackingImage |
The tracking image for the email. This can be place independently of the pre-header (available from 8.4.1.0). |
|
Email:User.UserName2 |
The username. |
|
Email:User.Name2 |
The name of the user. |
|
Email:User.Address2 |
The address of the user. |
|
Email:User.Address22 |
The address2 of the user. |
|
Email:User.ZipCode2 |
The zip code of the user. |
|
Email:User.City2 |
The city of the user. |
|
Email:User.Country2 |
The country of the user. |
|
Email:User.Phone2 |
The phone of the user. |
|
Email:User.PhonePrivate2 |
The private phone of the user. |
|
Email:User.PhoneMobile2 |
The mobile phone of the user. |
|
Email:User.Fax2 |
The fax of the user. |
|
Email:User.CustomerNumber2 |
The customer number of the user. |
|
Email:User.Currency2 |
The default currency for the user. |
|
Email:User.Image2 |
The link to the image of the user. This link is not handled by the internal link management. |
|
Email:User.Company2 |
The company of the user. |
|
Email:User.Department2 |
The department of the user. |
|
Email:User.JobTitle2 |
The job title of the user. |
|
Email:User.PhoneBusiness2 |
The business phone of the user. |
|
Email:User.LoginToken |
The login token for logging the specified User in automatically. (Available from 8.4.1.0). |
|
Email:User.SYSTEMNAME_OF_CUSTOM_FIELD |
It is possible to get custom fields on users out in the email (available from 8.6.1.0). Use the system name of the custom field that should be used, not the name. Example: {{Email:User.AccessUser_CustomTextField}} will get the CustomTextField content out in the mail. |
Adding a placeholder tag to a rich text editor
You can add a dropdown menu with placeholder tags to the rich text editor used when editing and creating paragraph content.
You do so by changing the editor configuration file.
To do so:
- Go to the Management center > Editing > Editor Configuration (Figure 45.1)
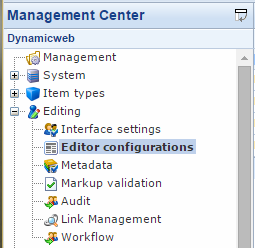
- Create a new configuration - or edit an existing one by clicking it
- Select the email.js configuration file (Figure 45.2)
- Save and close

This adds a dropdown menu to your editor with the Email.User fields available to you, plus any custom fields you have defined under Management center > Control panel > Modules > User Management.
If your custom fields do not appear on the dropdown menu, try deleting your browser cache.
Signing users up to receive emails
In order to be able to send emails to a user, you need to obtain consent from them.
User creation and registration is handled by the Extranet module - and to ask them, on creation, if they would like to receive emails, simply add the <!--@UserManagement:User.EmailAllowed.Input--> tag to the template used for profile creation.
For example:
For further information, please refer to the Extranet module documentation.


