Tutorial 4: Items
In classic Dynamicweb we use pages to build our navigation structure, paragraphs on pages to contain content, and we add apps to paragraphs when we need extended functionality.
This is still possible, but with Items we have a tool set which allows you to both build our structure, define content types, mimic module functionality and even extend built-in object types.
Basically, items allow you to define our own content types, specify which input fields should be available, where they appear and how to validate them.
In addition, we can decide how they can be used:
- As pages or paragraphs
- To extend website and page properties
- To extend users and user groups
- In item lists/item buckets to be rendered on an ad-hoc basis using an item publisher
And also where they may be used – which websites an item type is available for, and which parent- and child-items they can have.
Item types can be created in three ways.
- Model First – create the item type manually from the Settings > Item Types node using the administration interface. All settings are stored in an XML file in the /Files/System/Items directory of the solution, and that XML file can be deployed to other solutions.
- Metadata First – skip the GUI and just create an XML file and deploy that on the server. When items are updated, the XML will be registered and the relevant tables will be created.
- Code First – define your item type using C# code. This is done by creating a public .NET class that inherits from the ItemEntry base class and populates its properties. The class is decorated with an attribute specifying the name of the item type, which it will be identified by in the administration.
So, as you see, there is a great deal of flexibility when it comes to items – both regarding the use of items and the creation of items.
In this tutorial we will be covering the following item-related topics:
- How to extend website- and page properties with item fields
- How to create an item code first
- How to interact with items at runtime
Extending Page & Website properties
One of the most useful uses for items is the ability to extend website or page properties with item fields, then access the field values in your templates.
As there a plenty of field types available for item types, this means that you can do all sorts of interesting stuff – e.g. create color palette selectors for a website, font selectors, or any other type of switch you can think of.
To extend website or page properties with item fields:
- Create an item type containing the fields you want to use
- In the item type settings check the website- and page properties checkbox
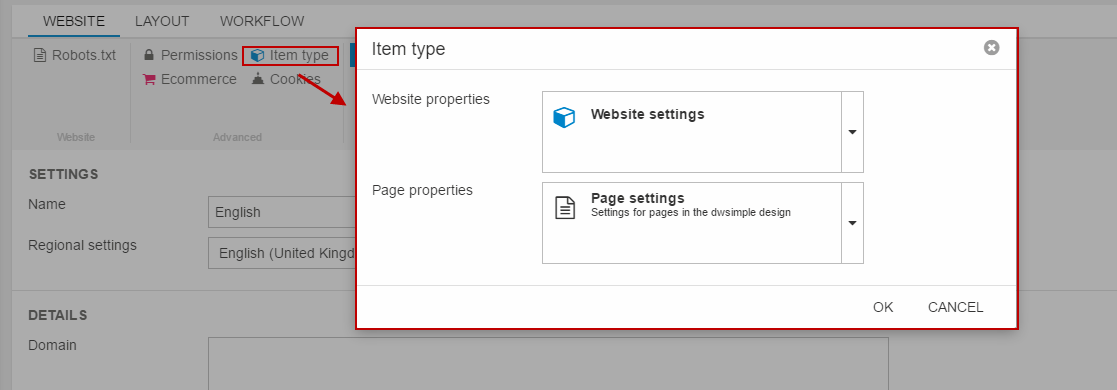
- Go to the Websites app and open the website settings of the solution you want to extend
- Click the Item type button, then select your item type as appropriate (Figure 2.1)
- Click OK, then Save

You will now have access to the item fields from the website- and page properties screens, and the saved field values in your master and layout templates through the Item.Area.* tags for website properties and the Item.Page.* tags for page properties.
Code First Items
As mentioned in the introduction to this tutorial, you can create items code first. This is done by inheriting from the ItemEntry base class.
To apply the Save() and Delete() methods, use the public override methods:
So that’s an empty code first item – now you need to add some of the fundamental item type settings to it.
Item settings
To decorate the class with item type settings, add them above the class declaration:
You can see a list of all the attributes available to you in the Dynamicweb.Content.Items.Annotations namespace – but note that only some of the attributes are relevant at the class-level, while most are relevant as attributes to item type fields.
In the example above, the following attributes have been added:
- AreaRule sets the ‘Allow in websites’ checkbox to All
- ModuleAttachmentRule defines whether this item type can have an app attached when used as a paragraph
- StructureRule defines what the item may be used for – in this cases as a paragraph and a page
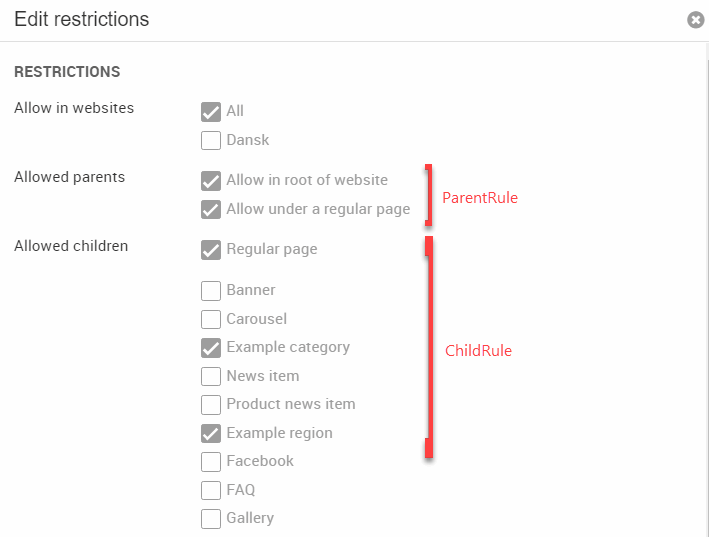
- ParentRule and ChildRule defines which parents and children the item type allows
- Category defines the category of the item (categories are basically folders in the item types tree)
- CustomizedUrls activates customized URLs for this item type
- Icon defines an icon for the item type in the content tree and paragraph list
- TitleField defines which of the item fields should be used as the item title
The AreaRule, ParentRule and ChildRule attributes from the example above will be presented like (Figure 4.2), when viewing the item settings in the administration:

Adding input fields
After defining the basic item settings, you should add fields to the item type.
An item type field consists of a datatype – like string, int or DateTime – with one of more of the properties of the FieldAttribute Class , and a number of other attributes depending on the type of item field.
A simple title field, for instance, is created in the following manner:
The Title property sets the system name for the field, and the accessors get and set allow you to read and write the field value, respectively.
Fields may be added to a field group, and can have a number of properties depending on the data type:
In this case, the field has been added to a field group called “StandardFields”, has been made Required, and uses a RichText editor.
For a list of the editors available to you, please see the Dynamicweb.Content.Items.Editors namespace – and for a list of other available attributes, please see the Dynamicweb.Content.Items.Annotations namespace. Keep in mind that not all data types and editors support all annotations – common sense and the Items API is advised.
An Example
In the example below, we have added many of the properties available when creating item types.
Interact with items at runtime
As a very useful feature, Items offer developers an API to interact with Items at runtime. There are several ways of doing this, and in its most basic shape it is done by querying the repository:
This returns a loosely type Item instance which is basically a key/value pair, where the keys are field names and values are field values.
If you created the item code first, Dynamicweb can construct an instance of our type and return a strongly typed object instead:
The item manager offers a range of methods for querying items, all of them offering generic overload methods making it very easy to work with code first items:
Since items can be used to define settings on pages and websites, it is very convenient to be able to read these settings at runtime if they affect the layout or behavior of the current view.
To read a setting on a website, use the following code:
To read a setting on a page, use the following code:
You can even manipulate item values at runtime– e.g. save a new value to an item field:
You can also interact with items using the new ViewModel approach (Model.Area.Item & Model.Page.Item) – see more in the ViewModel documentation.
What you’ve learned – and what’s next
In this tutorial we’ve covered the following:
- How to extend page and website settings with item fields – and how to interact with them at runtime
- How to create items code-first
In the next tutorial, we will get back to extensibility – this time we will be extending the search framework we colloquially refer to as New Indexing.
