
ERP: New Projects
Integration Framework v1 has been phased out. This documentation is no longer maintained - we recommend using Integration Framework v2 instead.
The Dynamicweb Integration Framework is a collection of components for transferring data and maintaining data consistency between a Dynamicweb solution and a remote system.
Out of the box the Integration Framework has the following features:
- Price/Inventory lookup (live)
- Calculate order (live)
- Product synchronization (batch)
- Debtor/User synchronization (batch)
- Language synchronization (batch)
- Currency synchronization (batch)
- Manufacturer synchronization (batch)
- Unit synchronization (batch)
There are two main components to developing an integration with Dynamicweb:
- A batch integration is a file-based approach, which uses scheduled tasks to import and export data at intervals (hourly, daily, weekly, etc.).
- A live integration submits real-time requests from a Dynamicweb frontend to the remote system, then uses the data returned to show e.g. live prices or stock
However, from your point of view both types of integration do the same thing; submit requests for data, which must then be wrapped in the XML format accepted by Dynamicweb and returned (Figure 1.1).
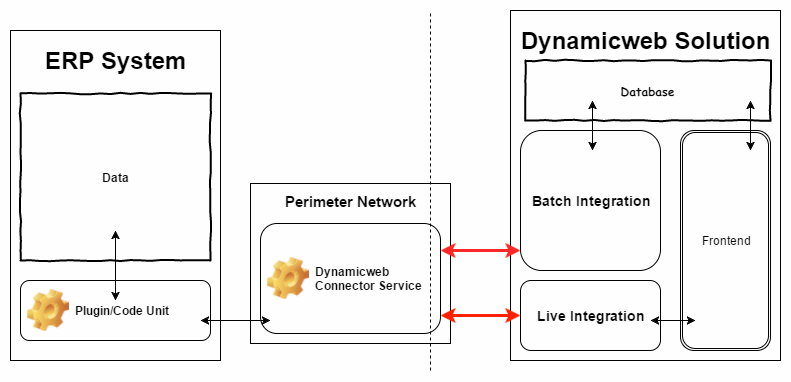
To make that happen you must:
- Install and configure a web service called DynamicwebConnectorService on your DMZ/Perimeter network
- Install and configure a plugin/code unit in your ERP System, which will act as a translator between the ERP data and the XML format required by Dynamicweb
- Test the connection and the data flow
You should also dedicate significant time to tweaking, modifying and possibly extending the components on your side of the integration, until everything is set – this involves a lot of back-and-forth communication with the Dynamicweb partner for the project.
Installation
As mentioned above, the remote environment – your environment – must have three key components installed:
- A system-dependent plugin or code unit must be installed in your ERP system
- The DynamicwebConnectorService and the DynamicwebConnectorServiceTestApp must be installed on your DMZ/Perimeter network
Installing the DynamicwebConnectorService and test app is system-independent, while the procedure for installing the ERP plugin is not.
ERP plugin installation
All data entering and exiting a Dynamicweb solution must be wrapped in an XML format understood by our software. This means that your ERP system is expected to return data in that format.
To make that happen, we supply a set of ERP plugins/code units which:
- Receive requests in XML format from Dynamicweb
- React to the requests by extracting data from your ERP
- Wrap the data in an appropriate XML format
- Return the XML to Dynamicweb
The default plugins supplied by us handle the following types of data:
- Products
- Product Groups
- Units
- Ecommerce languages
- Currencies
- Manufacturers
- Users
- Price/Inventory lookup
- Order calculation
The install process varies depending on your system – please select the appropriate setup guide below:

DynamicwebConnectorService
The DynamicwebConnectorService is a web service, which functions as the bridge between the Dynamicweb solution and the ERP system. It must be installed on the DMZ/Perimeter network of your environment.
The install process will likely require a user that has permission to install the service. If you are on a domain, the user should include the domain. If you are using a user on the local machine, the username should be prefixed with a period and a slash: “./Username”.
To install the DynamicwebConnectorService:
- Download the DynamicwebConnectorService files from our downloads area – you must be logged in to access the files
- Extract the DynamicwebConnectorService files to an appropriate location – e.g. C:\Program Files\DynamicwebConnectorService
- Locate the installUtil.exe file – it is usually found in the c:\Windows\Microsoft.NET\Framework\vX.X.XXXXX folder, where vX.X.XXXX is the latest version of .NET you have installed. This should be .NET 4.5 or greater
- Right click on the DynamicwebConnectorService.exe file, then select properties > unblock
- Install the service from the command prompt using installUtil.exe, with the following command:
- Go to Control Panel > Administrative tools > Services and start the service called DynamicwebService
This exposes the web service to the internet.
Once the service has been installed, you must open and edit the DynamicwebConnectorService.exe.config file located inside the DynamicwebConnectorService folder:
In the relevant section – <NavConnector> or <AxConnector> – you must:
- Change the username, password, and domain sections to match a user which has access to the ERP web service
- Edit the NavEndPoint/AxEndPoint section to the NAV/AX web service exposed by your ERP plugin/code unit
- For NAV, the URL should point to a specific shop. For the Danish Cronus demo database, the URL would look like http://NavServer.url:7047/DynamicsNAV/WS/CRONUS%20Danmark%20A/S/Codeunit/DWWebService
In appSettings section you can:
- Point the ErpConnectorType to the correct add-in file & method in the DynamicwebConnectorService library (AXConnectorAddIn.AxConnector, NavConnectorAddInn.NavConnector, etc.)
- Set testMode to True – this will make any call to the connecter service read and return the contents of the file specified in TestOutputFile. This is useful for debugging purposes.
- Specify a secret which is used to encrypt traffic between the Dynamicweb solution and the connector service. It will be used on the Dynamicweb-side of the integration as well.
If your ERP system is on another server/network than your Dynamicweb installation – and it usually is – you must make sure that the network and firewall settings allow connections from the Dynamicweb server to the web service exposed by the Dynamicweb Connector.
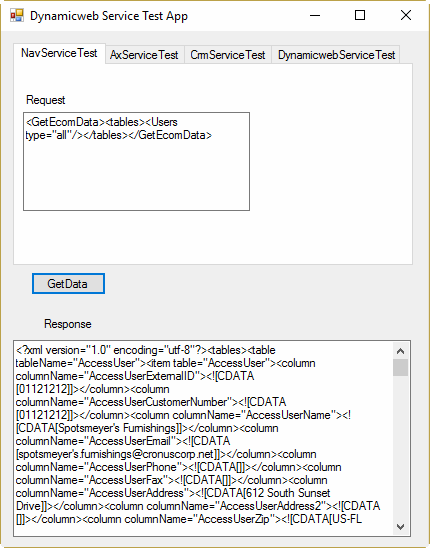
The DynamicwebConnectorService test app
The DynamicwebConnectorServiceTestApp (Figure 6.1) is a small tool for testing the connections between the various components in the integration. Like the DynamicwebConnectorService, it is installed on your DMZ/Perimeter network.
It consists of an interface for submitting requests and reviewing responses, and a configuration file similar the one for the DynamicwebConnectorService.
On your end of an integration, it is used to test two things:
- Initially, that the user account used to query your system has the correct permissions
- Later, that the plugin/code unit returns the correct XML in relation to the requests
To install the test app:
- Download the DynamicwebConnectorServiceTestApp files from our downloads area – you must be logged in to access the files
- Extract the DynamicwebConnectorService files to an appropriate location – e.g. C:\Program Files\DynamicwebConnectorServiceTestApp
After installing the test app, open the configuration file (TestServiceApp.exe.config) and edit the relevant sections - <NavConnector> or <AxConnector> and <appSettings> - to match the DynamicwebConnectorService configuration, then open the app (TestServiceApp.exe) and check if you have an active connection.
Once you do, copy the relevant settings from the TestApp config file to the ConnectorService config file.
What the DW-side expect to get from you
At this point in time, the people working on the Dynamicweb side of an integration expect two things from you:
- The secret (encryption key) from the DynamicwebConnectorService configuration file
- The endpoint of the DynamicwebConnectorService web service
This will allow them to create import jobs and import data from your system.
On your end of the integration, you should set aside significant resources to tweaking the integration – unless you are creating a very simple integration indeed, you will need to modify or extend the plugin/code unit installed on your ERP system.
This phase can be time consuming, and it’s important to establish effective communication channels with the Dynamicweb side of the integration to reduce downtime.
Features
Out of the box the Integration Framework has the following features:
- Price/Inventory lookup (live)
- Calculate order (live)
- Product synchronization (batch)
- Debtor/User synchronization (batch)
- Language synchronization (batch)
- Currency synchronization (batch)
- Manufacturer synchronization (batch)
- Unit synchronization (batch)
Both batch and live features work in the same general manner:
- The Dynamicweb solution makes a request for data in XML format
- The ERP plugin/code unit reacts by extracting data from the ERP
- The data is wrapped in XML format understood by Dynamicweb
- The XML is returned to the Dynamicweb solution as a response
While the request XML varies slightly depending on the type of integration, the response XML always follows the same general structure:
Additionally, the Dynamicweb database expects data to be delivered in specific data type formats, so if you price column suddenly contains string values you’re gonna have a bad time.
Sit down with the Dynamicweb side of the integration and iron out these issues as early as possible. Depending on the state of the data in the ERP system, you may have to devote some time to cleaning everything up. The guiding principle is that data should be created and maintained in the ERP system.
See below for examples of standard requests and standard replies for the integration features.
Price/Inventory lookup
The price/inventory lookup feature makes it possible to render user-specific prices and updated stock information in frontend when a particular user visits a page where products are listed.
By default, the following request is sent to the ERP plugin/code unit:
The following response is expected:
If the Live Integration is set up to allow anonymous access, and no user is logged in, the ExternalUserID will contain the string “Anonymous”.
Strictly speaking, only the ProductID, ProductVariantID, price and stock info is used when updating the products in memory.
The ProductName and ProductNumber make it easier when debugging, along with info on currency.
Calculate order
The calculate order feature makes it possible to have the ERP system handle order calculations, with everything that entails.
By default, the following request is sent to the ERP plugin/code unit:
If the Live Integration is set for anonymous users, the OrderCustomerAccessUserExternalId node will be set to ‘anonymous’ rather than a user ID.
The following response is expected:
These columns are mandatory:
- EcomOrderlines: OrderLineID (must be unique)
- EcomOrders: OrderID (must be unique)
The OrderLineType node is used to differentiate between regular order lines and discounts, and can contain the following values:
- 0 is a regular product order line
- 1 is an Order Discount
- 3 is a Product Discount
Any other values are ignored. To associate a product discount with the correct product order line, simply provide it with the same OrderLineProductNumber.
As long as the order is merely being calculated – for instance in a mini-cart or a shopping cart – the CreateOrder node in the request will be set to false, and the response should return the OrderCreated node with false as well. When an order is completed and paid CreateOrder will be set to true, and OrderCreated should also be set to true and then returned.
Product synchronization
The product synchronization feature makes it possible for you to manage your product catalog in your ERP system, and sync it to the Dynamicweb solution.
For product synchronization, the product request looks like this:
The default response contains product data in the following format:
Debtor/User synchronization
The Debtor/User synchronization feature makes it possible for you to manage your debtors/users in your ERP, and sync them to the Dynamicweb solution.
For debtor/user synchronization, the request looks like this:
The default response returns data in the following format:
Please note that users are imported in one big undifferentiated pile here - if you want to import user segments/groups, check the extensibility section below.
Language synchronization
In Dynamicweb, (Ecommerce) languages are the languages which a product exists in – so where one product may exist in English, in Danish and in German, others may exist only in English and Danish.
When synchronizing Ecommerce languages the request looks like this:
The default response contains data in the following format:
Currency synchronization
Companies which conduct their business in multiple territories often allow customers to pay in their local currency. The currency synchronization feature allows you to synchronize currencies and update exchange rates at appropriate intervals.
For currency synchronization, the request looks like this:
The default response contains data in the following format:
The only mandatory column is CurrencyCode (EUR, DKK, etc.).
Units synchronization
Product units – e.g. pieces, boxes or boatloads – can also be imported and synchronized between the ERP and the Dynamicweb solution.
For product unit synchronization, the request looks like this:
The default response contains data in the following format:
You may notice that two of the tables are called EcomVariantGroups and EcomVariantOptions. This is technically not an error. Just pretend they are called UnitGroups and UnitOptions.
Manufacturers synchronization
All products in Dynamicweb have a standard manufacturer field for linking the product to information about the manufacturer of the product. To use that feature, the Dynamicweb solution must contain a manufacturer record.
The manufacturer request for synchronizing manufacturers between the ERP and Dynamicweb looks like this:
The default response returns data in the following format:
The default request
There are differences across code units, but generally speaking the default request from Dynamicweb contains the following:
The default response generally looks similar to this (with a lot more items, of course):
Extending or adding features
The features included in our plugins/code units out of the box are fairly limited – by design, we import only the standard fields from your ERP which are directly relevant for a Dynamicweb solution.
But you can easily extend existing features or add new features to an integration.
Broadly speaking, extending or adding a feature requires you to:
- Modify the ERP plugin/code unit code to extract the correct data from your system when receiving a request
- Wrap it in the appropriate XML format
- Return it to Dynamicweb
Here are some of the most common scenarios explained.
Products & Users Synchronization
To extend product or user synchronization with additional information, simply add more columns to the response and return them with the appropriate data.
There are two possible scenarios when extending product and users sync:
- The data is appropriate for a standard field in Dynamicweb
If the data fits seamlessly into the standard Dynamicweb fields, e.g. if it’s a product description or a tax code, the column name should be named after the system name of the field is in Dynamicweb. If the Dynamicweb side of the integration uses automatic mapping in their integration activities, everything will be linked up automatically. - Dynamicweb does not contain an appropriate standard field
If Dynamicweb does not contain an appropriate standard field, the Dynamicweb side of the integration must create a custom field for the data to be stored in. The column should be named after the system name of the custom field. Both sides of the integration – your side and the Dynamicweb side – must keep the data type in mind when deciding on the type of custom field needed.
You can read more about creating custom fields using a <config> node in the response XML in the XML Provider documentation.
Variants
If you want to import variants using the Dynamicweb Provider, you need to add data to the following tables:
- EcomVariantGroups must contain one row for each language version of each variantGroup you are importing.
- EcomVariantsOptions must contain one row for each language version of each option for each group.
So, if you have color and size as variant groups, and color options are red and blue, size options are small and large, this table must contain 4 rows. The VariantOptionId can be any string, as long as it is unique for each variant option, when combined with the languageID.
Naturally, you must also add data to the EcomProducts table – and there are several things you need to be aware of:
- Add one row to the EcomProducts table for each variant and a “base” row for the product. This means that if you have a product “shoe”, which is available in colors red and blue, sizes large and small, you will add 5 rows to the database – one for “shoe” and one for each variant.
- Add values to the ProductVariantCounter. The ProductVariantCounter must contain the total number of variants for this product, so each of the mentioned 5 rows should contain the value 4, since there are a total of 4 variants of the product.
- Add values to the ProductVariantGroupCounter. The ProductVariantGroupCounter must contain the total number of variants for this product, so each of the mentioned 5 rows should contain the value 2, since there are two variant groups, color and size.
- The VariantID column must contain a concatenation of the variantIDs for the variant options a given row fall under, combined by a period. So assuming “red” has variantID V01 and “small” has variantID “V05”, the small red variant row must have variantID “V01.V05”. The order of the variant IDs is not important.
Then you need to associate a product with a variant group, in order to determine which variants are available for the product:
The mandatory fields are:
- VariantgroupProductRelationID
- VariantgroupProductRelationProductID
- VariantgroupProductRelationVariantGroupID
Finally, you need to import the active variants for a product:
User segmentation/user groups
To extend user synchronization with user segments (groups), you must add the following tables and columns to the user import response:
The AccessUserGroup table contains user groups, and has a column called AccessGroupParentGroupName. This column can contain either the name of the parent group (AccessGroupName) or a groupID. Group names are used if importing from an external source – please note that if you have more than one group with the same name, your product will be added to one of them at random.
To relate users to groups, add the name of the group to the column AccessUserGroups in the AccessUser table. This column can contain a comma separated list of the groups that the user should be added to:
Impersonation
To extend user synchronization with impersonation information, you must add data to the AccessUserSecondaryRelation table.
It has two relevant columns:
- AccessUserSecondaryRelationUserID
- AccessUserSecondaryRelationSecondaryUserId
Both columns may contain either an AccessUserID (if known) or the AccessUserUserName for both the impersonator and the user being impersonated.
When importing data to these columns, Dynamicweb first checks if a user exists with the included UserID. If that’s not the case, we check if a user exists with an ExternalUserID that matches the included ID.
If not, the row will be ignored.
The AccessUserSecondaryRelationSecondaryUserId column can also contain a customer number - AccessUser.AccessCustomerNumber - which does not have to be a unique number, so several users can share the same customer number.
The following code imports all customers with customer number 1234 to be impersonated by user 321654987 - so if 10 users have the customer number 1234, 10 records will be generated in the AccessUserSecondaryRelation table matching the impersonator and the impersonatees.
Assortments
Assortments are subsets of a product catalog, which are accessible to only specific users or user segments.
When importing assortments, the target data format is as follows:
The following tables and fields are mandatory:
- EcomAssortments
- AssortmentID
- AssortmentActive
- EcomAssortmentPermissions
- AssortmentPermissionAssortmentID (ID of assortment)
- AssortmentPermissionCustomerNumber (customer number the assortment is for)
At least one of these tables and its mandatory fields is also required:
- EcomAssortmentProductRelations
- AssortmentProductRelationAssortmentID (id of assortment)
- AssortmentProductRelationProductID (id of product in the assortment)
- EcomAssortmentShopRelations
- AssortmentShopRelationAssortmentID
- AssortmentShopRelationShopID
- EcomAssortmentGroupRelations
- AssortmentGroupRelationAssortmentID (ID of assortment)
- AssortmentGroupRelationGroupID (ID of product group)
My ERP times out when generating XML
If you are looking to sync large amounts of data, you may run into a situation where the ERP system times out while generating XML responses.
If so, you can transfer the data in batches instead - and transfer e.g. 10 times 100.000 products rather than 1.000.000 products in one file.
To make that happen, add the property ExportIsDone="false" to each of the initial responses from your remote system:
This will cause Dynamicweb to submit an identical request, until it recieves a file with ExportIsDone="true" or where the ExportIsDone property is not set.
You must implement a way for your ERP to return data in smaller batches. Please make sure that all table mappings are present or built in the first file - Dynamicweb builds the table structure and temp tables based on that, and the following files are only used to update them with more data.
Please note, that this is only implemented for the Dynamicweb batch integration task add-ins importDataAddin and importDataWithCustomRequestAddin.
Please verify with the Dynamicweb side of the integration that they use one of those add-ins.