
How to: Business Central & OData v4
Important notice: As of OData provider v. 0.2.25 automappings for OData v4 object types are no longer supported. Use an older version of the OData provider to setup activities with automappings. Activites defined before upgrading to 0.2.25 will maintain all mappings and functionality.
Dynamicweb allows for data integration with Dynamics365 Business Central through dedicated OData V4 endpoints.
The following guide explains how to set up OData V4 integration between Business Central and Dynamicweb.
What is OData V4 and why use it?
An OData V4 integration utilizes Business Central web services that expose singular Business Central pages (i.e. items, contacts etc.)
This means that unlike the API where multiple entities are exposed in a single web service, the OData V4-way of working revolves around having a web service for each object type (or page in Business Central).
This practice is considered anti-pattern by Microsoft though, and pulling data from the API is much faster in terms of perfomance, so why use it?
The short answer is that the Business Central API has some gaps in terms of missing entities and custom fields, and that it is currently not possible to make up for these gaps for instance with custom extensions af the API. Having each page exposed as an OData v4 web service makes up for this by allowing exposure of custom fields.
Another aspect of the OData v4 approach is that it allows Dynamicweb users to configure an ERP integration that requires no logic on the external system. Essentially, the OData v4 concept of Dynamicweb is designed to have zero footprint on the ERP and require no AL-developer expertise.
Exposing Business Central pages as OData v4 web services
First and foremost, an OData v4 import to Dynamicweb requires that the relevant data is exposed through a Business Central web service. To so, follow these steps:
- Open the Web Services list in Business Central and click New
- Set the object type field to Page
- Select the relevant Object ID to expose - please refer to the Order of imports table below for the full list of supported Object IDs.
- Give the web service a suitable name
- Check the published checkbox
Importing data from Business Central with OData v4 endpoints
The first step required in OData integration is setting up the relevant endpoints in Settings > Integration > Endpoint Management > Add endpoint.
Specific endpoints for each object type must be set up, but for the sake of simplicity, this guide continues with the endpoint for importing products as an example.
For a more detailed guide on importing each specific object type, click here.
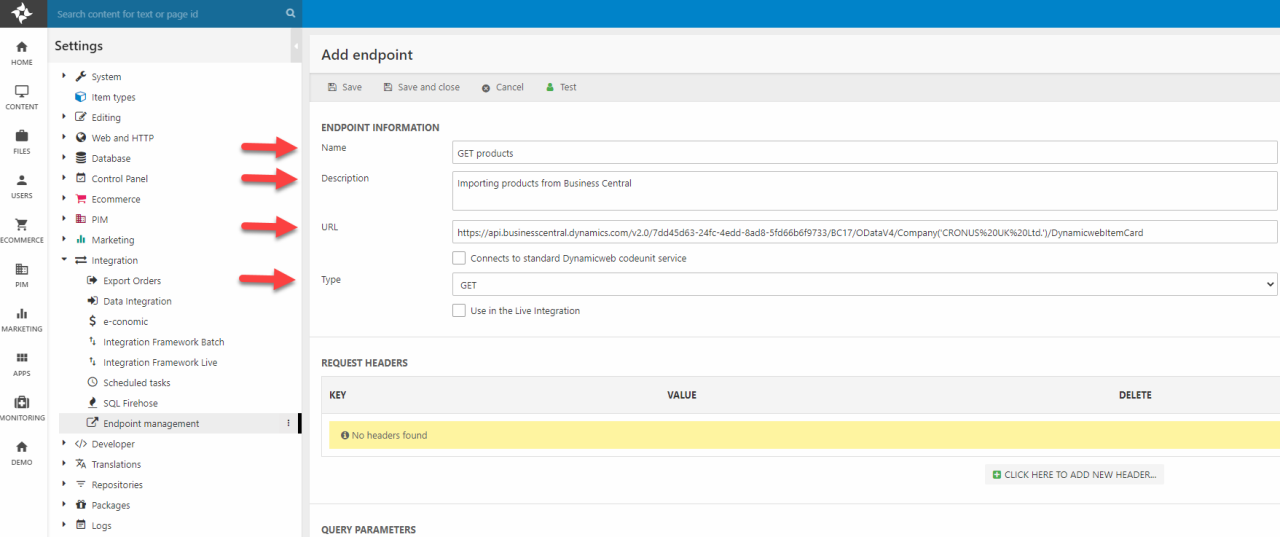
To add an endpoint, follow these steps:
- Provide the endpoint with a Name and an optional Description
- Insert OData v4 URL from Business Central Web Services
- Set Type to GET
- Choose Endpoint Authentication at the bottom of the page (see next section)
- Save and close
Scroll to the bottom of the page to choose the endpoint authentication.

Endpoint authentication
Please notice that cloud instances of Business Central requires the use of OAuth 2.0 to authenticate endpoint interactions.
If you are establishing an integration activity between a locally hosted Business Central environment or a sandbox environment you can make do with a simpler authentication such as a WebServiceAccesKey.
Endpoint authentications can be managed in Settings > Integration > Endpoint Management.
FIltering endpoints
When using OData integration, you might not be interested in importing every record of a given object type.
To filter in the imported data, you can add one or more query parameters to the endpoint.
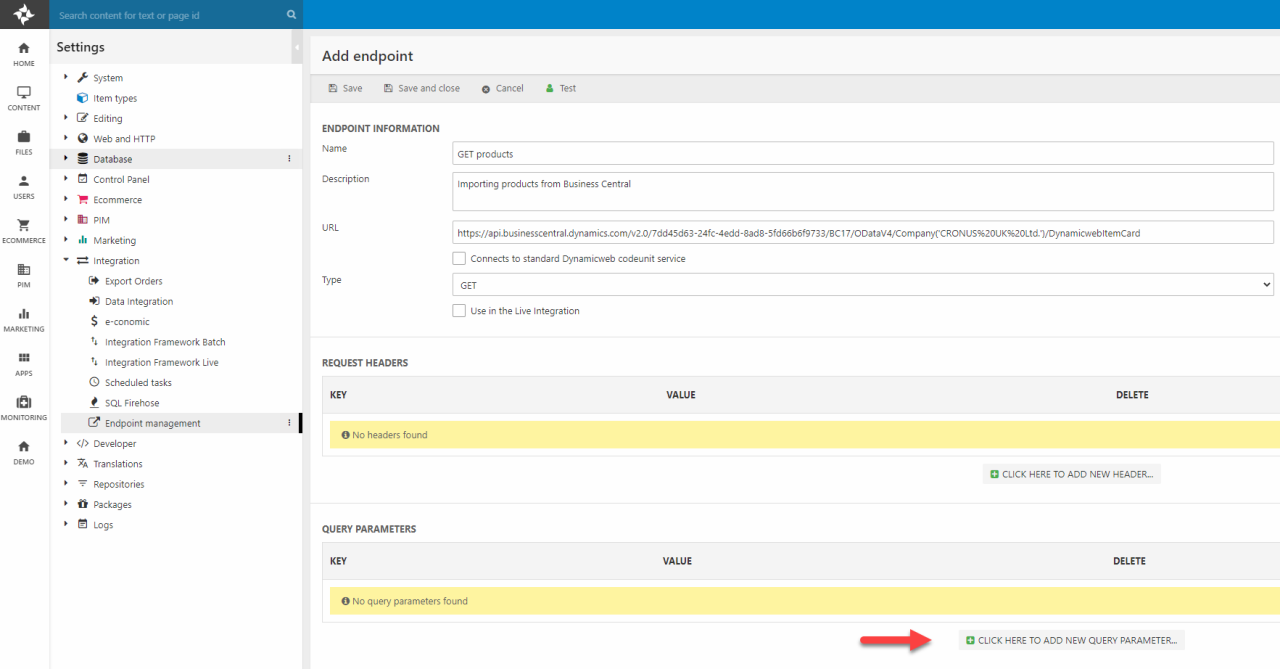
A query parameter consists of a key and a value such as the examples in the table below.
|
Key |
Value |
Description |
|
$filter |
Startswith(Item_No,’IN1’) |
Filters the data provided by the endpoint, so that only records where the Item_No attribute starts with the string IN1 is included. |
|
$top |
10 |
Only selects the first 10 records of the object type. |
Once a query parameter has been added to the endpoint and the endpoint itself has been saved, the full URL (including the added query parameter) will be visible in the endpoint editor.
There are many more ways to filter the OData provided by the endpoint. A complete documentation for OData filter expressions can be found here:
Setting up a data integration activity for imports
When the endpoint has been set up, the next step is to add an integration activity in Settings > Integration > Data Integration > New Activity.
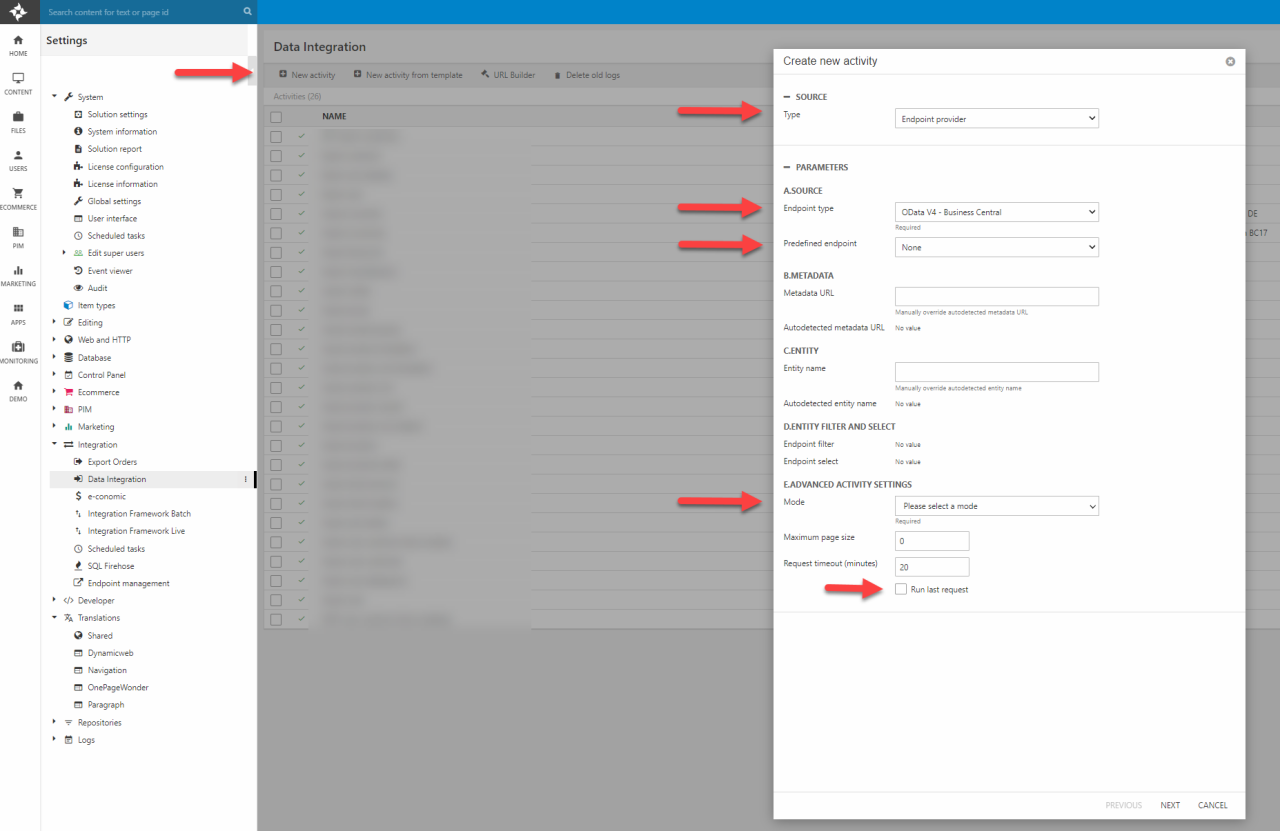
- For the Source setting choose Type: “Endpoint provider”.
- Select the "OData v4 - Business Central" as the Endpoint Type.
- Select the predefined endpoint from the dropdown menu.
- Select the desired Mode under Advanced activity settings. Please refer to the endpoint provider article for an elaboration on the modes.
- Click next.
- For the Target setting choose Type: “OData provider”.
- Select the desired Object Type from the dropdown menu in Parameters > destination > object type.
- Depending on the chosen object type more specific Object type settings may be available. For a more detailed documentation on the required settings for the specific object type imports. Click here.
- Click next.
- Select the source table to import from. The mapping to the target table will be auto selected by Dynamicweb.
- Click finish.
- Finally, provide the activity with a name and an optional description and click OK.
When the activity has been added, the settings menu for the activity depicted below will be visible. This menu can be accessed at any time by clicking the activity in Settings > Integration > Data Integration.
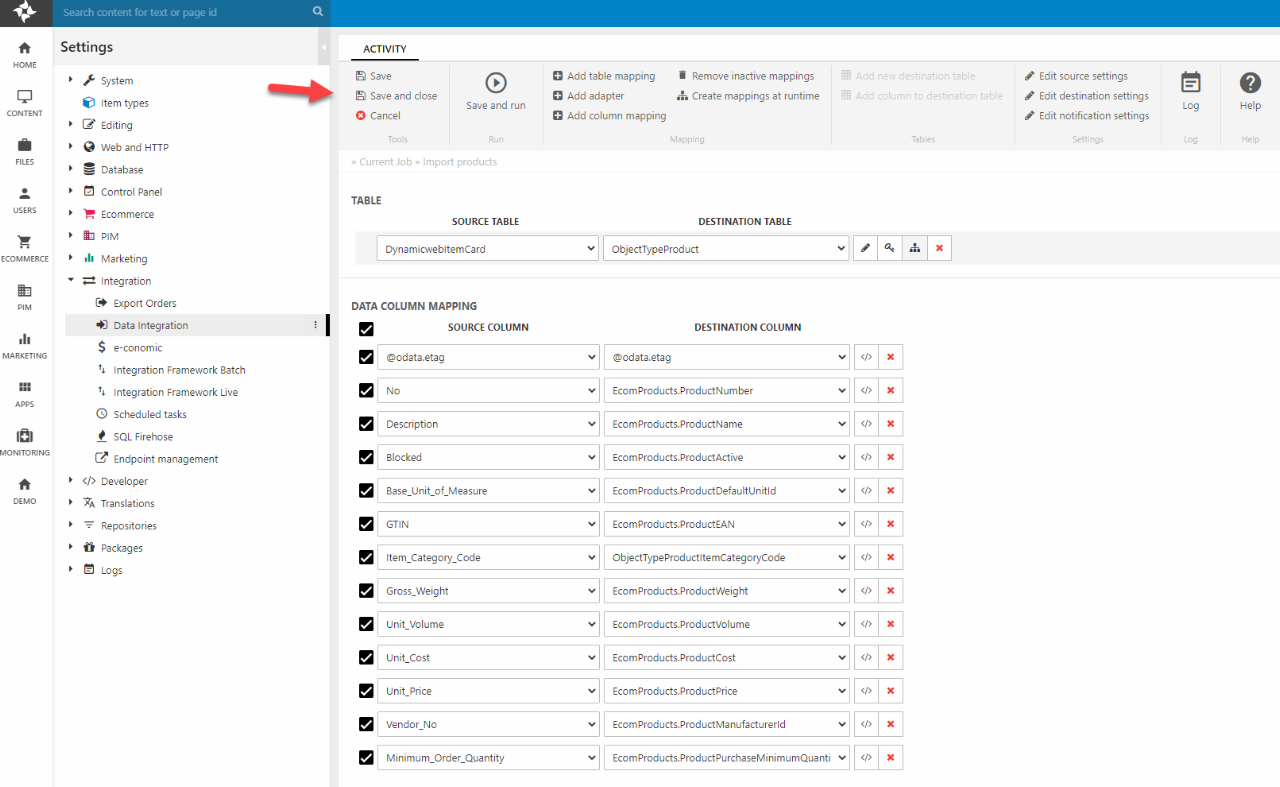
In this view the table mappings of the activity can be managed. The mappings are auto selected for all non-custom activities in Dynamicweb.
For a detailed overview of the many features of integration activities please refer to the documentation of the data integration module.
To finish the activity setup, press save and close or save and run to perform the import job immediately.
Order of imports
To make sure all imported data is stored with the correct relations in the Dynamicweb database, the import activities should be run in the following order:
You can click each object type to acces specific documentation on each of them.
| Import order |
Dynamicweb object type |
Business Central object name |
Business Central object ID |
| 1 |
Countries/Regions |
10 |
|
| 2 |
Currencies |
5 |
|
| 3 |
Salesperson/Purchaser Card |
5116 |
|
| 4 |
Contact Card |
5050 |
|
| 5 |
Customer Card |
21 |
|
| 6 |
Contact Alt. Address Card |
5056 |
|
| 7 |
Ship-to Address |
300 |
|
| 8 |
Vendor Card |
26 |
|
| 9 |
Locations |
15 |
|
| 10 |
Item Category Card |
5733 |
|
| 11 |
Item Card |
30 |
|
| 12 |
Item Variants |
5401 |
|
| 13 |
Units of Measure |
209 |
|
| 14 |
Item Units of Measure |
5404 |
|
| 15 |
Item Translations |
35 |
|
| 16 |
Unit of Measure Translation |
5402 |
|
| 17 |
Stockkeeping Unit Card |
5700 |
|
| 18 |
Sales Order |
42 |
|
| 19 |
Discount (Old price logic) |
Sales Line Discounts |
7004 |
| 20 | Price (Old price logic) | Sales Prices | 7002 |
| 21 | Price and Discount (New price logic) | Sales Price List | 7016 |
| 22 | Custom |
Please note that while the object types of country and currency do appear first in the order list, it might not be necesarry to run them as actual OData import jobs. Simply adding them manually in Dynamicweb may suffice while also preventing unnecessary country records of the ERP from being imported.
Exporting data to Business Central with OData v4 endpoints
The first step in exporting data with the OData provider is setting up the endpoint in:
Settings > Integration > Endpoint management > Add Endpoint.
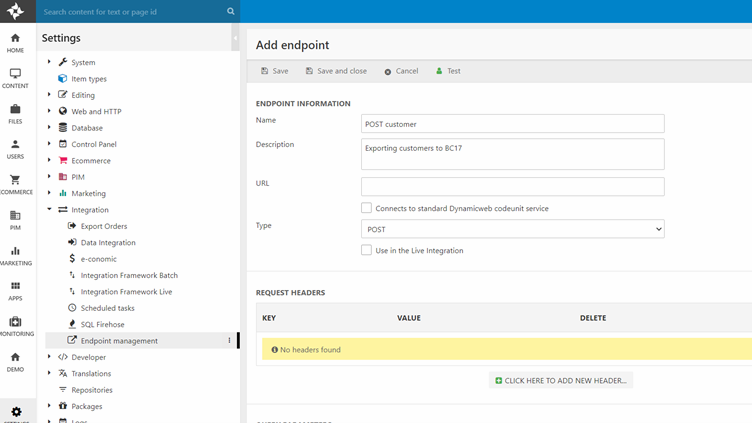
Specific endpoints for each object type must be set up, but for the sake of simplicity, this guide continues with the endpoint for exporting customers as an example.
For a more detailed guide on importing each specific object type, click here.
- Provide the endpoint with a Name and an optional Description.
- Insert OData v4 URL from Business Central Web Services
- Set Type to POST
- Choose Endpoint Authentication at the bottom of the page.*
- Save and close
*An endpoint authentication can either be a WebServiceAccesKey or OAuth. Endpoint authentications can be managed in Settings > Integration > Endpoint Management.
Order of exports
To make sure all exported data is stored with the correct relations in Business Central, the export activities should be run in the following order:
|
Export order |
Dynamicweb object type |
Business Central object name |
Business Central object ID |
|
1 |
Customer Card |
21 |
|
|
2 |
Contact Card |
5050 |
|
|
3 |
Contact Alt. Address Card |
5056 |
|
|
4 |
Ship-to Address |
300 |
|
|
5 |
Sales Order |
42 |
Setting up a data integration activity for exports
When the endpoint has been set up, the next step is to add an integration activity in Settings > Integration > Data Integration > New Activity.
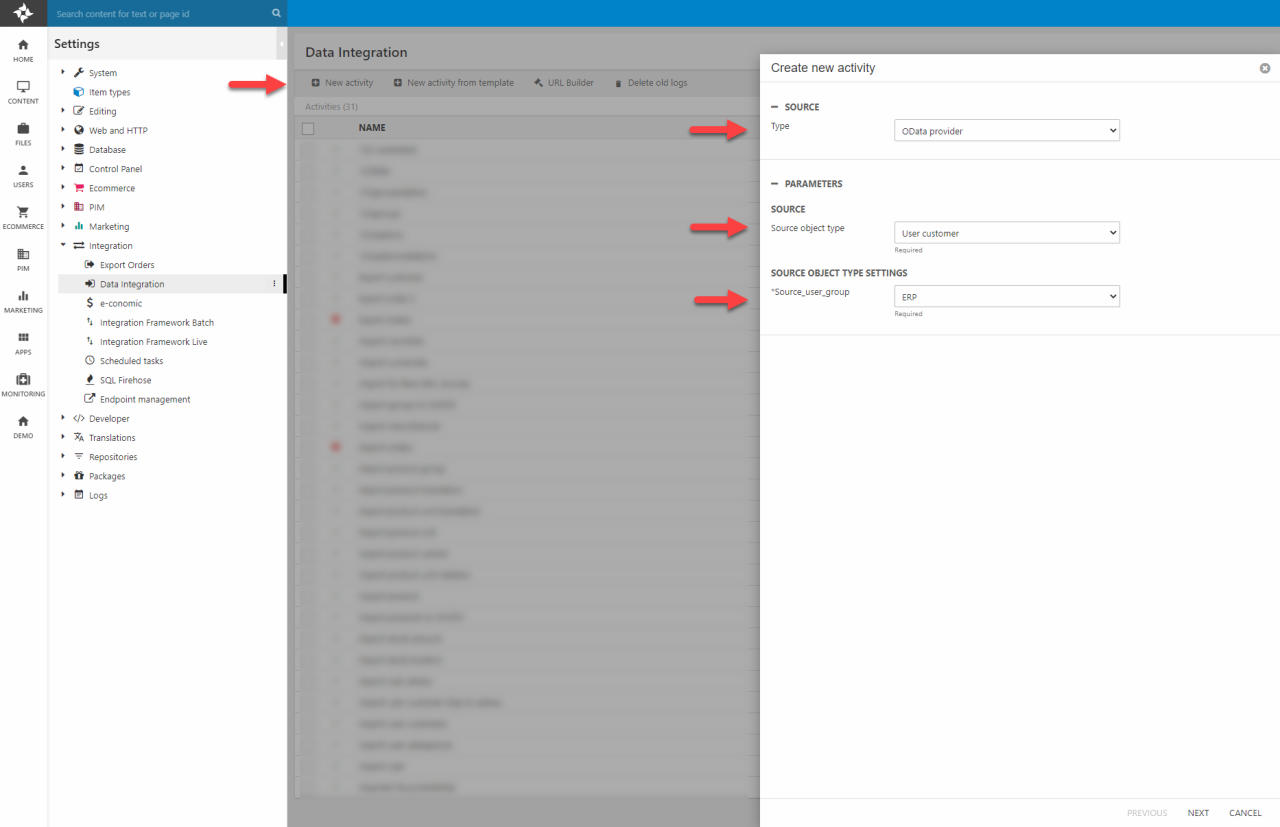
- For the Source setting choose Type: “OData provider”.
- Select the relevant object type under parameters > source object type.
- Depending on the chosen object type more specific Object type settings may be available. For a more detailed documentation on the required settings for the specific object type imports. Click here.
- For the Target setting choose Type: “Endpoint provider”.
- Select the destination endpoint from the dropdown menu.
- Click next.
- Select the source table to export. The mapping to the target table will be auto selected by Dynamicweb.
- Click finish.
- Finally, provide the activity with an optional description and click OK.
When the activity has been added, the settings menu for the activity depicted below will be visible. This menu can be accessed at any time by clicking the activity in Settings > Integration > Data Integration.
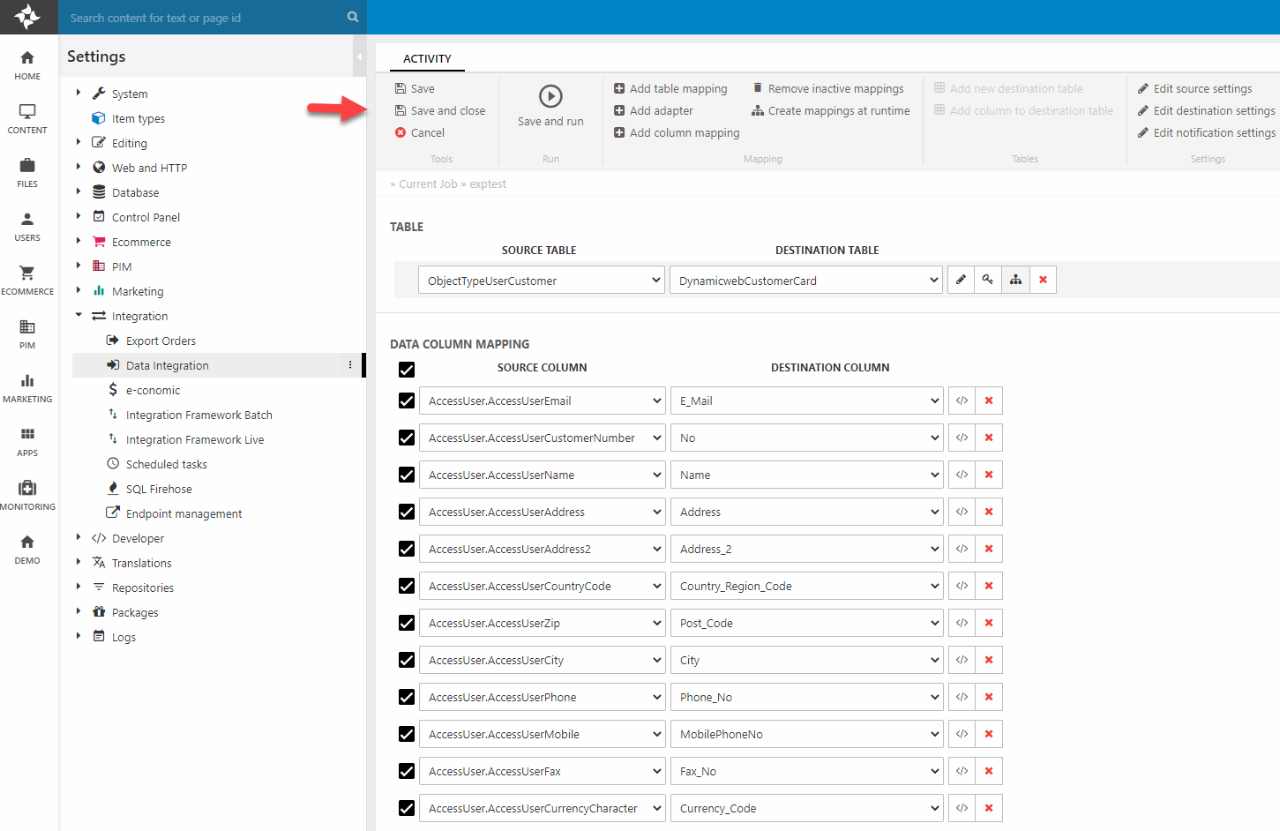
In this view the table mappings of the activity can be managed. The mappings are auto selected for all non-custom activities in Dynamicweb.
To finish the activity setup, press save and close or save and run to perform the import job immediately.