
OData V4 object types - Import and export
Important notice: As of OData provider v. 0.2.25 automappings through the object types described below are no longer supported. Use an older version of the OData provider to setup activities with automappings. Activites defined before upgrading to 0.2.25 will maintain all mappings and functionality.
This page contains documentation on how the OData provider of Dynamicweb handles each specific object type and how to set up integration activities for them.
Navigate to a specific object type by clicking it in the tabel of contents in the right side of the page.
Import Country
To import countries from Business Central to Dynamicweb, the endpoint for the purpose must first be added in settings > integration > endpoint management > add endpoint.
To add the endpoint, follow these steps:
- Locate and copy the OData v4 URL in Business Central Web Services (see below)
- Provide the endpoint with a Name and an optional Description.
- Insert OData v4 URL from Business Central Web Services.
- Set Type to GET
- Choose Endpoint Authentication at the bottom of the page.
- Save and close.
Location of the Business Central Web service:
|
Dynamicweb object type |
Business Central object type |
Business Central Object ID |
|
Country |
Countries/Regions |
10 |

Filtering countries
When importing countries, it is likely that Business Central has more records of the entity than you wish to import. To avoid importing unwanted countries to Dynamicweb, a filter can be applied to the endpoint by adding a query parameter.
A query parameter consists of a key value pair and could look like the following example:
|
Key |
Value |
|
$filter |
Code eq 'DK' or Code eq 'DE' or Code eq 'GB' |
This example filters the OData so that it only includes records where the value of the code attribute is equal to either ‘DK’, ‘DE’ or ‘GB’.
For a full documentation on Business Central OData filters click here.
Setting up a data integration activity for importing countries
When the endpoint has been set up, the next step is to add an integration activity in Settings > Integration > Data Integration > New Activity.
- For the Source setting choose Type: “Endpoint provider”.
- Select "OData V4 - Business Central" as Endpoint_Type
- Select the predefined endpoint (GET Countries) from the dropdown menu.
- Select the desired activity Mode at Advanced activity settings.
- Click next.
- For the Target setting choose Type: “OData provider”.
- Select the desired Object Type (Country) from the dropdown menu in Parameters > destination > object type.
- Select the destination language in Dynamicweb.
- Click next.
- Check the Source checkbox to choose the target tables. The Business Central tables will be automatically mapped to the corresponding tables in Dynamicweb.
- Click finish.
- Finally, provide the activity with an optional description and click OK.
When the activity has been added, the settings menu for the activity will be visible. This menu can be accessed at any time by clicking the activity in Settings > Integration > Data Integration.
Country object type mappings
In the activity settings view, the table mappings of the activity can be managed. The mappings are auto selected for all non-custom activities in Dynamicweb.
For the object type of countries, the mappings should look like this:
|
Entity Property |
Dynamicweb Destination |
|
Code |
EcomCountries.CountryCode2 |
|
Name |
EcomCountryText.CountryTextName |
|
ISO_Numeric_Code |
EcomCountries.CountryNumber |
|
Address_Format |
Handled by ObjectTypeCountry* |
*Manipulates the attribute by replacing the following values:
| "post code" | is replaced with | "zip" |
| "country" | is replaced with | "regioncode" |
| "+" | is replaced with | "}{" |
The updated value is then added to both EcomCountries.CountryAddressDisplayFormat and EcomCountries.CountryAddressEditFormat.
To finish the activity setup, press save and close or save and run to perform the import job immediately.
Import Currencies
To import currencies from Business Central to Dynamicweb, the endpoint for the purpose must first be added in settings > integration > endpoint management > add endpoint.
To add the endpoint, follow these steps:
- Locate and copy the OData v4 URL in Business Central Web Services (see below)
- Provide the endpoint with a Name and an optional Description.
- Insert OData v4 URL from Business Central Web Services.
- Set Type to GET
- Choose Endpoint Authentication at the bottom of the page.
- Save and close.
Location of the Business Central Web service:
|
Dynamicweb object type |
Business Central object type |
Business Central Object ID |
|
Currency |
Currencies |
5 |

Filtering currencies
When importing countries, it is likely that Business Central has more records of the entity than you wish to import. To avoid importing unwanted countries to Dynamicweb, a filter can be applied to the endpoint by adding a query parameter.
A query parameter consists of a key value pair and could look like the following example:
|
Key |
Value |
|
$filter |
Code eq 'DKK' or Code eq 'EUR' or Code eq 'USD' |
This example filters the OData so that it only includes records where the value of the code attribute is equal to either ‘DKK’, ‘EUR’ or ‘USD’. Resulting in only Euro, Danish krone and US dollar being imported.
For a full documentation on Business Central API filters click here.
Setting up a data integration activity for importing currencies
When the endpoint has been set up, the next step is to add an integration activity in Settings > Integration > Data Integration > New Activity.
- For the Source setting choose Type: “Endpoint provider”.
- Select "OData V4 - Business Central" as Endpoint_Type
- Select the predefined endpoint from the dropdown menu.
- Select the desired activity Mode at Advanced activity settings.
- Click next.
- For the Target setting choose Type: “OData provider”.
- Select the desired Object Type (currency) from the dropdown menu in Parameters > destination > object type.
- Select the destination language in Dynamicweb.
- Choose the default currency of Dynamicweb. Please notice that the base currency of Business Central has to match the default currency of Dynamicweb.
- Click next.
- Check the Source checkbox to choose the target tables. The Business Central tables will be automatically mapped to the corresponding tables in Dynamicweb.
- Click finish.
- Finally, provide the activity with an optional description and click OK.
When the activity has been added, the settings menu for the activity will be visible. This menu can be accessed at any time by clicking the activity in Settings > Integration > Data Integration.
Currencies object type mappings
In this view the table mappings of the activity can be managed. The mappings are auto selected for all non-custom activities in Dynamicweb.
For the object type of currencies, the mappings should look like this:
|
Entity Property |
Dynamicweb Destination |
|
Code |
EcomCurrencies.CurrencyCode |
|
Description |
EcomCurrencies.CurrencyName |
|
ISO_Numeric_Code |
EcomCurrencies.CurrencyPayGatewayCode |
|
ExchangeRateAmt |
EcomCurrencies.CurrencyRate |
To finish the activity setup, press save and close or save and run to perform the import job immediately.
Import User salesperson
To import user salespersons from Business Central to Dynamicweb, the endpoint for the purpose must first be added in settings > integration > endpoint management > add endpoint.
To add the endpoint, follow these steps:
- Locate and copy the Odata v4 URL in Business Central Web Services
- Provide the endpoint with a Name and an optional Description.
- Insert Odata v4 URL from Business Central Web Services.
- Set Type to GET
- Choose Endpoint Authentication at the bottom of the page.
- Save and close.
Location of the Business Central Web service:
|
Dynamicweb object type |
Business Central object type |
Business Central Object ID |
|
User Salesperson |
Salesperson/Purchaser card |
5116 |

Setting up a data integration activity for importing user salesperson
When the endpoint has been set up, the next step is to add an integration activity in Settings > Integration > Data Integration > New Activity.
- For the Source setting choose Type: “Endpoint provider”.
- Select "OData V4 - Business Central" as Endpoint_Type
- Select the predefined endpoint from the dropdown menu.
- Select the desired activity Mode at Advanced activity settings.
- Click next.
- For the Target setting choose Type: “OData provider”.
- Select the desired Object Type (User salesperson) from the dropdown menu in Parameters > destination > object type.
- Select the User group you want the imported records to be added to. The selected group will function as a parent group for the user salesperson, user and user customer object types. These will be automatically added as children to the selected parent group by Dynamicweb.
- Click next.
- Check the Source checkbox to choose the target tables. The Business Central tables will be automatically mapped to the corresponding tables in Dynamicweb.
- Click finish.
- Finally, provide the activity with an optional description and click OK.
When the activity has been added, the settings menu for the activity will be visible. This menu can be accessed at any time by clicking the activity in Settings > Integration > Data Integration.
The relation between customer and sales person in D365BC will be replicated in Dynamicweb so the sales person-based user account can impersonate each customer or contact-based user account in Dynamicweb.
User salesperson object type mappings
In this view the table mappings of the activity can be managed. The mappings are auto selected for all non-custom activities in Dynamicweb.
For the object type of user salesperson, the mappings should look like this:
|
Entity Property |
Dynamicweb Destination |
|
Code |
AccessUser.AccessUserExternalId |
|
Name |
AccessUser.AccessUserName |
|
Job_Title |
AccessUser.AccessUserJobTitle |
|
Phone_No |
AccessUser.AccessUserPhone |
|
E_Mail |
Handled by ObjectTypeUserSalesperson* |
*The E_Mail value is added to both AccessUser.AccessUserUserName and AccessUser.AccessUserEmail.
To finish the activity setup, press save and close or save and run to perform the import job immediately.
Import User
To import users from Business Central to Dynamicweb, the endpoint for the purpose must first be added in settings > integration > endpoint management > add endpoint.
To add the endpoint, follow these steps:
- Locate and copy the Odata v4 URL in Business Central Web Services
- Provide the endpoint with a Name and an optional Description.
- Insert Odata v4 URL from Business Central Web Services.
- Set Type to GET
- Choose Endpoint Authentication at the bottom of the page.
- Save and close.
Location of the Business Central Web service:
|
Dynamicweb object type |
Business Central object type |
Business Central Object ID |
|
User |
Contact Card |
5050 |

Filtering users
When importing users, you might not wish to import all existing users/contacts in the ERP. To avoid importing unwanted users to Dynamicweb, a filter can be applied to the endpoint by adding a query parameter.
A query parameter consists of a key value pair and could look like the following example:
|
Key |
Value |
|
$filter |
Startswith(No,’E01’) |
|
$top |
20 |
The first example filters the OData so that it only includes records where the value of the contact no. of Business Central starts with the string ‘E01’.
The second example restricts the endpoint to only importing the first 20 records.
For a full documentation on Business Central API filters click here.
Setting up a data integration activity for importing user
When the endpoint has been set up, the next step is to add an integration activity in Settings > Integration > Data Integration > New Activity.
- For the Source setting choose Type: “Endpoint provider”.
- Select "OData V4 - Business Central" as Endpoint_Type
- Select the predefined endpoint from the dropdown menu.
- Select the desired activity Mode at Advanced activity settings.
- Click next.
- For the Target setting choose Type: “OData provider”.
- Select the desired Object Type (User) from the dropdown menu in Parameters > destination > object type.
- Select the User group you want the imported records to be added to. The selected group will function as a parent group for the user salesperson, user and user customer object types. These will be automatically added as children to the selected parent group by Dynamicweb.
- Click next.
- Check the Source checkbox to choose the target tables. The Business Central tables will be automatically mapped to the corresponding tables in Dynamicweb.
- Click finish.
- Finally, provide the activity with an optional description and click OK.
When the activity has been added, the settings menu for the activity will be visible. This menu can be accessed at any time by clicking the activity in Settings > Integration > Data Integration.
Each contact imported will get a user account where the customer number matches the customer number of the company which each contact is associated to.
User object type mappings
In the activity settings menu view the table mappings of the activity can be managed. The mappings are auto selected for all non-custom activities in Dynamicweb.
For the object type of user, the mappings should look like this:
|
Entity Property |
Dynamicweb Destination |
|
No |
AccessUser.AccessUserExternalId |
|
Name |
AccessUser.AccessUserName |
|
Company_Name |
AccessUser.AccessUserCompany |
|
IntegrationCustomerNo |
AccessUser.AccessUserCustomerNumber |
|
Salesperson_Code |
Handled by ObjectTypeUserSalespersonCode* |
|
Address |
AccessUser.AccessUserAdress |
|
Address_2 |
AccessUser.AccessUserAdress2 |
|
Country_Region_Code |
AccessUser.AccessUserCountryCode |
|
Post_Code |
AccessUser.AccessUserZip |
|
City |
AccessUser.AccessUserCity |
|
Phone_No |
AccessUser.AccessUserPhone |
|
Mobile_Phone_No |
AccessUser.AccessUserMobilePhone |
|
E_Mail |
Handled by ObjectTypeUserEMail** |
|
Fax_No |
AccessUser.AccessUserFax |
|
Currency_Code |
AccessUser.AccessUserCurrencyCharacter |
*Since Dynamicweb uses the Salesperson_code key of the User object type for the purpose of impersonation. The endpoint provider checks if there are any user salespersons in the database with this ID. If so, the User Salesperson can then act on behalf of the User.
**The E_Mail value is added to both AccessUser.AccessUserUserName and AccessUser.AccessUserEmail.
To finish the activity setup, press save and close or save and run to perform the import job immediately.
Import User customer
To import user customers from Business Central to Dynamicweb, the endpoint for the purpose must first be added in settings > integration > endpoint management > add endpoint.
To add the endpoint, follow these steps:
- Locate and copy the Odata v4 URL in Business Central Web Services
- Provide the endpoint with a Name and an optional Description.
- Insert Odata v4 URL from Business Central Web Services.
- Set Type to GET
- Choose Endpoint Authentication at the bottom of the page.
- Save and close.
Location of the Business Central Web service:
|
Dynamicweb object type |
Business Central object type |
Business Central Object ID |
|
User customer |
Customer Card |
21 |

Filtering user customers
When importing users, it is likely that Business Central has more records of the entity than you wish to import. To avoid importing unwanted user customers to Dynamicweb, a filter can be applied to the endpoint by adding a query parameter.
A query parameter consists of a key value pair and could look like the following example:
|
Key |
Value |
|
$filter |
Startswith(No,’E01’) |
|
$top |
20 |
The first example filters the OData so that it only includes records where the value of the customer no. of Business Central starts with the string ‘E01’.
The second example restricts the endpoint to only importing the first 20 records.
For a full documentation on Business Central API filters click here.
Setting up a data integration activity for importing user customer
When the endpoint has been set up, the next step is to add an integration activity in Settings > Integration > Data Integration > New Activity.
- For the Source setting choose Type: “Endpoint provider”.
- Select the predefined endpoint from the dropdown menu.
- Click next.
- For the Target setting choose Type: “OData provider”.
- Select the desired Object Type (User Customer) from the dropdown menu in Parameters > destination > object type.
- Select the User group you want the imported records to be added to. The selected group will function as a parent group for the user salesperson, user and user customer object types. These will be automatically added as children to the selected parent group by Dynamicweb.
- Click next.
- Check the Source checkbox to choose the target tables. The Business Central tables will be automatically mapped to the corresponding tables in Dynamicweb.
- Click finish.
- Finally, provide the activity with an optional description and click OK.
When the activity has been added, the settings menu for the activity will be visible. This menu can be accessed at any time by clicking the activity in Settings > Integration > Data Integration.
Each customer imported will get a user account. These accounts could be used for frontend access to the customer center. This way one B2B customer gets one B2B user account. It is, however, best practice to use the contact-based user accounts. This way one B2B customer can have multiple B2B user accounts.
The company address of the B2B customer is also mapped to the contact-based B2B user accounts.
User customer object type mappings
In this view the table mappings of the activity can be managed. The mappings are auto selected for all non-custom activities in Dynamicweb.
For the object type of user customer, the mappings should look like this:
|
Entity Property |
Dynamicweb Destination |
|
No |
Handled by ObjectTypeUserCustomer* |
|
Name |
AccessUser.AccessUserName |
|
Address |
AccessUser.AccessUserAddress |
|
Address_2 |
AccessUser.AccessUserAddress2 |
|
Country_Region_Code |
AccessUser.AccessUserCountryCode |
|
CIty |
AccessUser.AccessUserCity |
|
Post_Code |
AccessUser.AccessUserZip |
|
Phone_No |
AccessUser.AccessUserPhone |
|
MobilePhoneNo |
AccessUser.AccessUserMobile |
|
E_Mail |
Handled by ObjectTypeUserCustomer** |
|
Fax_No |
AccessUser.AccessUserFax |
|
Currency_Code |
AccessUser.AccessUserCurrencyCharacter |
*The No attribute value is added to both AccessUser.AccessUserCustomerNumber and AccessUser.AccessUserExternalId
**The E_Mail value is added to both AccessUser.AccessUserUserName and AccessUser.AccessUserEmail.
To finish the activity setup, press save and close or save and run to perform the import job immediately.
Price and Discount groups added by User Customer import
When importing User Customers the OData provider will look for any values in either the Customer_Price_Group or Customer_Discount_Group fields.
If the imported records contain any values in these fields, the groups will be added as subgroups to their relevant User Groups in Dynamicweb.
Any subgroup is added with the name of either "Price_" or "Discount_" + the name of the group.
For example, an imported User Customer with a value of "Favorites" in the Customer_Discount_Group field will add a subgroup with the name of "Disc_Favorites" in Dynamicweb Users.
Import User address
To import user addresses from Business Central to Dynamicweb, the endpoint for the purpose must first be added in settings > integration > endpoint management > add endpoint.
To add the endpoint, follow these steps:
- Locate and copy the Odata v4 URL in Business Central Web Services
- Provide the endpoint with a Name and an optional Description.
- Insert Odata v4 URL from Business Central Web Services.
- Set Type to GET
- Choose Endpoint Authentication at the bottom of the page.
- Save and close.
Location of the User Address OData V4 URL:
|
Dynamicweb object type |
Business Central object type |
Business Central Object ID |
|
User address |
Contact Alt. Address Card |
5056 |

Setting up a data integration activity for importing user adresses
When the endpoint has been set up, the next step is to add an integration activity in Settings > Integration > Data Integration > New Activity.
- For the Source setting choose Type: “Endpoint provider”.
- Select "OData V4 - Business Central" as Endpoint_Type
- Select the predefined endpoint from the dropdown menu.
- Select the desired activity Mode at Advanced activity settings.
- Click next.
- For the Target setting choose Type: “OData provider”.
- Select the desired Object Type (User address) from the dropdown menu in Parameters > destination > object type.
- Click next.
- Check the Source checkbox to choose the target tables. The Business Central tables will be automatically mapped to the corresponding tables in Dynamicweb.
- Click finish.
- Finally, provide the activity with an optional description and click OK.
When the activity has been added, the settings menu for the activity will be visible. This menu can be accessed at any time by clicking the activity in Settings > Integration > Data Integration.
User address object type mappings
In this view the table mappings of the activity can be managed. The mappings are auto selected for all non-custom activities in Dynamicweb.
For the object type of user address, the mappings should look like this:
|
Entity Property |
Dynamicweb Destination |
|
Code |
Handled by ObjectTypeUserAddressCode* |
|
Company_Name |
AccessUserAddress.AccessUserAddressCompany |
|
Address |
AccessUserAddress.AccessUserAddressAddress |
|
Address_2 |
AccessUserAddress.AccessUserAddressAddress2 |
|
City |
AccessUserAddress.AccessUserAddressCity |
|
Post_Code |
AccessUserAddress.AccessUserAddressZip |
|
Country_Region_Code |
AccessUserAddress.AccessUserAddressCountryCode |
|
Phone_No |
AccessUserAddress.AccessUserAddressPhone |
|
Mobile_Phone_No |
AccessUserAddress.AccessUserAddressCell |
|
Fax_No |
AccessUserAddress.AccessUserAddressFax |
|
E_Mail |
AccessUserAddress.AccessUserAddressEmail |
*The value of code is added to both AccessUserAddress.AccessUserAddressName and AccessUserAddress.AccessUserAddressCallName.
Import User customer ship-to address
To import user customer ship-to addresses from Business Central to Dynamicweb, the endpoint for the purpose must first be added in settings > integration > endpoint management > add endpoint.
To add the endpoint, follow these steps:
- Locate and copy the Odata v4 URL in Business Central Web Services
- Provide the endpoint with a Name and an optional Description.
- Insert Odata v4 URL from Business Central Web Services.
- Set Type to GET
- Choose Endpoint Authentication at the bottom of the page.
- Save and close.
Location of the User customer ship-to address OData V4 URL:
|
Dynamicweb object type |
Business Central object type |
Business Central Object ID |
|
User customer ship-to address |
Ship-to address |
300 |

Setting up a data integration activity for importing user customer ship-to address
When the endpoint has been set up, the next step is to add an integration activity in Settings > Integration > Data Integration > New Activity.
- For the Source setting choose Type: “Endpoint provider”.
- Select "OData V4 - Business Central" as Endpoint_Type
- Select the predefined endpoint from the dropdown menu.
- Select the desired activity Mode at Advanced activity settings.
- Click next.
- For the Target setting choose Type: “OData provider”.
- Select the desired Object Type (User customer ship-to address) from the dropdown menu in Parameters > destination > object type.
- Click next.
- Check the Source checkbox to choose the target tables. The Business Central tables will be automatically mapped to the corresponding tables in Dynamicweb.
- Click finish.
- Finally, provide the activity with an optional description and click OK.
When the activity has been added, the settings menu for the activity will be visible. This menu can be accessed at any time by clicking the activity in Settings > Integration > Data Integration.
User customer ship-to address object type mappings
In this view the table mappings of the activity can be managed. The mappings are auto selected for all non-custom activities in Dynamicweb.
For the object type of user, the mappings should look like this:
|
Entity Property |
Dynamicweb Destination |
|
Code |
AccessUserAddress.AccessUserAddressName |
|
Name |
AccessUserAddress.AccessUserAddressCompany |
|
Address |
AccessUserAddress.AccessUserAddressAddress |
|
Address_2 |
AccessUserAddress.AccessUserAddressAddress2 |
|
City |
AccessUserAddress.AccessUserAddressCity |
|
Post_code |
AccessUserAddress.AccessUserAddressZip |
|
Country_Region_Code |
AccessUserAddress.AccessUserAddressCountryCode |
|
Phone_No |
AccessUserAddress.AccessUserAddressPhone |
|
Fax_No |
AccessUserAddress.AccessUserAddressFax |
|
E_Mail |
AccessUserAddress.AccessUserAddressEmail |
To finish the activity setup, press save and close or save and run to perform the import job immediately.
Import Manufacturer
To import manufacturer from Business Central to Dynamicweb, the endpoint for the purpose must first be added in settings > integration > endpoint management > add endpoint.
To add the endpoint, follow these steps:
- Locate and copy the Odata v4 URL in Business Central Web Services
- Provide the endpoint with a Name and an optional Description.
- Insert Odata v4 URL from Business Central Web Services.
- Set Type to GET
- Choose Endpoint Authentication at the bottom of the page.
- Save and close.
Location of the OData V4 URL for manufacturers:
|
Dynamicweb object type |
Business Central object type |
Business Central Object ID |
|
Manufacturer |
Vendor Card |
26 |

Setting up a data integration activity for importing manufacturer
When the endpoint has been set up, the next step is to add an integration activity in Settings > Integration > Data Integration > New Activity.
- For the Source setting choose Type: “Endpoint provider”.
- Select "OData V4 - Business Central" as Endpoint_Type
- Select the predefined endpoint from the dropdown menu.
- Select the desired activity Mode at Advanced activity settings.
- Click next.
- For the Target setting choose Type: “OData provider”.
- Select the desired Object Type (Manufacturer) from the dropdown menu in Parameters > destination > object type.
- Click next.
- Check the Source checkbox to choose the target tables. The Business Central tables will be automatically mapped to the corresponding tables in Dynamicweb.
- Click finish.
- Finally, provide the activity with an optional description and click OK.
When the activity has been added, the settings menu for the activity will be visible. This menu can be accessed at any time by clicking the activity in Settings > Integration > Data Integration.
Manufacturer object type mappings
In this view the table mappings of the activity can be managed. The mappings are auto selected for all non-custom activities in Dynamicweb.
For the object type of manufacturer, the mappings should look like this:
|
Entity Property |
Dynamicweb Destination |
|
No |
EcomManufacturers.ManufacturerId |
|
Name |
EcomManufacturers.ManufacturerName |
|
Address |
EcomManufacturers.ManufacturerAddress |
|
Address_2 |
EcomManufacturers.ManufacturerAddress2 |
|
Country_Region_Code |
EcomManufacturers.ManufacturerCountry |
|
City |
EcomManufacturers.ManufacturerCity |
|
Post_Code |
EcomManufacturers.ManufacturerZipCode |
|
Phone_No |
EcomManufacturers.ManufacturerPhone |
|
E_Mail |
EcomManufacturers.ManufacturerEmail |
|
Fax_No |
EcomManufacturers.ManufacturerFax |
|
Home_Page |
EcomManufacturers.ManufacturerWeb |
To finish the activity setup, press save and close or save and run to perform the import job immediately.
Import Stock location
To import stock locations from Business Central to Dynamicweb, the endpoint for the purpose must first be added in settings > integration > endpoint management > add endpoint.
To add the endpoint, follow these steps:
- Locate and copy the Odata v4 URL in Business Central Web Services
- Provide the endpoint with a Name and an optional Description.
- Insert Odata v4 URL from Business Central Web Services.
- Set Type to GET
- Choose Endpoint Authentication at the bottom of the page.
- Save and close.
Location of the OData v4 URL:
|
Dynamicweb object type |
Business Central object type |
Business Central Object ID |
|
Stock location |
Locations |
15 |

Filtering Stock locations
When importing stock locations, you might not be interested in importing all locations available in the ERP. To avoid importing unwanted locations to Dynamicweb, a filter can be applied to the endpoint by adding a query parameter.
A query parameter consists of a key value pair and could look like the following example:
|
Key |
Value |
|
$filter |
Code eq 'Location A' or Code eq 'Location B' |
The first example filters the OData so that it only includes records where the value of the code attribute is equal to either ‘Location A’ or ‘Location B’.
For a full documentation on Business Central API filters click here.
Setting up a data integration activity for importing Stock location
When the endpoint has been set up, the next step is to add an integration activity in Settings > Integration > Data Integration > New Activity.
- For the Source setting choose Type: “Endpoint provider”.
- Select "OData V4 - Business Central" as Endpoint_Type
- Select the predefined endpoint from the dropdown menu.
- Select the desired activity Mode at Advanced activity settings.
- Click next.
- For the Target setting choose Type: “OData provider”.
- Select the desired Object Type (Stock location) from the dropdown menu in Parameters > destination > object type.
- Click next.
- Check the Source checkbox to choose the target tables. The Business Central tables will be automatically mapped to the corresponding tables in Dynamicweb.
- Click finish.
- Finally, provide the activity with an optional description and click OK.
When the activity has been added, the settings menu for the activity will be visible. This menu can be accessed at any time by clicking the activity in Settings > Integration > Data Integration.
Stock location object type mappings
In this view the table mappings of the activity can be managed. The mappings are auto selected for all non-custom activities in Dynamicweb.
For the object type of stock location, the mappings should look like this:
|
Entity Property |
Dynamicweb Destination |
|
Code |
EcomStockLocation.StockLocationName |
|
Name |
EcomStockLocation.StockLocationDescription |
To finish the activity setup, press save and close or save and run to perform the import job immediately.
Import Product group
To product groups from Business Central to Dynamicweb, the endpoint for the purpose must first be added in settings > integration > endpoint management > add endpoint.
To add the endpoint, follow these steps:
- Locate and copy the Odata v4 URL in Business Central Web Services
- Provide the endpoint with a Name and an optional Description.
- Insert Odata v4 URL from Business Central Web Services.
- Set Type to GET
- Choose Endpoint Authentication at the bottom of the page.
- Save and close.
Location of the OData v4 URL:
|
Dynamicweb object type |
Business Central object type |
Business Central Object ID |
|
Product group |
Item category card |
5733 |

Setting up a data integration activity for importing Product group
When the endpoint has been set up, the next step is to add an integration activity in Settings > Integration > Data Integration > New Activity.
- For the Source setting choose Type: “Endpoint provider”.
- Select "OData V4 - Business Central" as Endpoint_Type
- Select the predefined endpoint from the dropdown menu.
- Select the desired activity Mode at Advanced activity settings.
- Click next.
- For the Target setting choose Type: “OData provider”.
- Select the desired Object Type (Product group) from the dropdown menu in Parameters > destination > object type.
- Click next.
- Check the Source checkbox to choose the target tables. The Business Central tables will be automatically mapped to the corresponding tables in Dynamicweb.
- Click finish.
- Finally, provide the activity with an optional description and click OK.
When the activity has been added, the settings menu for the activity will be visible. This menu can be accessed at any time by clicking the activity in Settings > Integration > Data Integration.
Product group object type mappings
In this view the table mappings of the activity can be managed. The mappings are auto selected for all non-custom activities in Dynamicweb.
For the object type of product group, the mappings should look like this:
|
Entity Property |
Dynamicweb Destination |
|
Code |
EcomGroups.GroupId |
|
Description |
EcomGroups.GroupName |
|
Parent_Category |
Handled by ObjectType ProductGroup* |
*The Parent_Category value is used to create relations between product groups and product group parents. If the parent category already exists in the database, the imported product group will be added as a child to this parent group. If the parent group does not already exist, it will be added to the database.
To finish the activity setup, press save and close or save and run to perform the import job immediately.
Import Product
To import products from Business Central to Dynamicweb, the endpoint for the purpose must first be added in settings > integration > endpoint management > add endpoint.
To add the endpoint, follow these steps:
- Locate and copy the Odata v4 URL in Business Central Web Services
- Provide the endpoint with a Name and an optional Description.
- Insert Odata v4 URL from Business Central Web Services.
- Set Type to GET
- Choose Endpoint Authentication at the bottom of the page.
- Save and close.
Location of the OData v4 URL:
|
Dynamicweb object type |
Business Central object type |
Business Central Object ID |
|
Product |
Item card |
30 |

Filtering products
When importing products, you might not be interested in importing all listed products in the ERP. To avoid importing unwanted products to Dynamicweb, a filter can be applied to the endpoint by adding a query parameter.
A query parameter consists of a key value pair and could look like the following example:
|
Key |
Value |
|
$filter |
startswith(No,'OFS-') |
This example filters the OData so that it only includes records where the value of the No attribute starts with the string ‘OFS-‘.
For a full documentation on Business Central API filters click here.
Setting up a data integration activity for importing Products
When the endpoint has been set up, the next step is to add an integration activity in Settings > Integration > Data Integration > New Activity.
- For the Source setting choose Type: “Endpoint provider”.
- Select "OData V4 - Business Central" as Endpoint_Type
- Select the predefined endpoint from the dropdown menu.
- Select the desired activity Mode at Advanced activity settings.
- Click next.
- For the Target setting choose Type: “OData provider”.
- Select the desired Object Type (Product) from the dropdown menu in Parameters > destination > object type.
- Choose the desired shop to import products into.
- Click next.
- Check the Source checkbox to choose the target tables. The Business Central tables will be automatically mapped to the corresponding tables in Dynamicweb.
- Click finish.
- Finally, provide the activity with an optional description and click OK.
When the activity has been added, the settings menu for the activity will be visible. This menu can be accessed at any time by clicking the activity in Settings > Integration > Data Integration.
Product object type mappings
In this view the table mappings of the activity can be managed. The mappings are auto selected for all non-custom activities in Dynamicweb.
For the object type of product, the mappings should look like this:
|
Entity Property |
Dynamicweb Destination |
|
No |
EcomProducts.ProductNumber |
|
Description |
EcomProducts.ProductName |
|
Blocked |
EcomProducts.ProductActive |
|
Base_Unit_of_Measure |
EcomProducts.ProductDefaultUnitId |
|
GTIN |
EcomProducts.ProductEAN |
|
Item_Category_Code |
Handled by ObjectType Product* |
|
Gross_Weight |
EcomProducts.ProductWeight |
|
Unit_Volume |
EcomProducts.ProductVolume |
|
Unit_Cost |
EcomProducts.ProductCost |
|
Unit_Price |
EcomProducts.ProductPrice |
|
Vendor_No |
EcomProducts.ProductManufacturerId |
|
Minimum_Order_Quantity |
EcomProducts.ProductPurchaseMinimumQuantity |
*If no product group destination is manually selected in the integration activity settings, the import job will refer to this attribute to detemine in which group the product is placed. If the group does not already exist in the database, it will be added upon running the activity.
To finish the activity setup, press save and close or save and run to perform the import job immediately.
Import Product variant
To import product variants from Business Central to Dynamicweb, the endpoint for the purpose must first be added in settings > integration > endpoint management > add endpoint.
To add the endpoint, follow these steps:
- Locate and copy the Odata v4 URL in Business Central Web Services
- Provide the endpoint with a Name and an optional Description.
- Insert Odata v4 URL from Business Central Web Services.
- Set Type to GET
- Choose Endpoint Authentication at the bottom of the page.
- Save and close.
Location of the OData v4 URL:
|
Dynamicweb object type |
Business Central object type |
Business Central Object ID |
|
Product variant |
Item variants |
5401 |

Filtering products variants
When importing product variants, you might not be interested in importing all listed variants in the ERP. To avoid importing unwanted product variants (such as those corrensponding to products not listed in Dynamicweb), a filter can be applied to the endpoint by adding a query parameter.
A query parameter consists of a key value pair and could look like the following example:
|
Key |
Value |
|
$filter |
startswith(Item_No,'OFS-') |
This example filters the OData so that it only includes records where the value of the Item_No attribute starts with the string ‘OFS-‘.
For a full documentation on Business Central API filters click here.
Setting up a data integration activity for importing Product variants
When the endpoint has been set up, the next step is to add an integration activity in Settings > Integration > Data Integration > New Activity.
- For the Source setting choose Type: “Endpoint provider”.
- Select "OData V4 - Business Central" as Endpoint_Type
- Select the predefined endpoint from the dropdown menu.
- Select the desired activity Mode at Advanced activity settings.
- Click next.
- For the Target setting choose Type: “OData provider”.
- Select the desired Object Type (Product variant) from the dropdown menu in Parameters > destination > object type.
- Click next.
- Check the Source checkbox to choose the target tables. The Business Central tables will be automatically mapped to the corresponding tables in Dynamicweb.
- Click finish.
- Finally, provide the activity with an optional description and click OK.
When the activity has been added, the settings menu for the activity will be visible. This menu can be accessed at any time by clicking the activity in Settings > Integration > Data Integration.
Product variant object type mappings
In this view the table mappings of the activity can be managed. The mappings are auto selected for all non-custom activities in Dynamicweb.
For the object type of product variant, the mappings should look like this:
|
Entity Property |
Dynamicweb Destination |
|
Item_No |
Handled by ObjectType ProductVariant* |
|
Code |
Handled by ObjectType ProductVariant* |
|
Description |
Handled by ObjectType ProductVariant** |
*The value of Item_No is used to identify the master product that the variant belongs to. To do this, the OData provider establishes an ExtentedVariant attribute for the object. The Item_No and Code attributes are then used in combination as the value in EcomProducts.ProductVariantId and Item_Code is also used as the value in EcomProducts.ProductNumber.
**Description is used as value for the EcomProducts.ProductName column.
To finish the activity setup, press save and close or save and run to perform the import job immediately.
Import Product unit
To import product units from Business Central to Dynamicweb, the endpoint for the purpose must first be added in settings > integration > endpoint management > add endpoint.
To add the endpoint, follow these steps:
- Locate and copy the Odata v4 URL in Business Central Web Services
- Provide the endpoint with a Name and an optional Description.
- Insert Odata v4 URL from Business Central Web Services.
- Set Type to GET
- Choose Endpoint Authentication at the bottom of the page.
- Save and close.
Location of the OData v4 URL:
|
Dynamicweb object type |
Business Central object type |
Business Central Object ID |
|
Product unit |
Units of measure |
209 |

Setting up a data integration activity for importing Product units
When the endpoint has been set up, the next step is to add an integration activity in Settings > Integration > Data Integration > New Activity.
- For the Source setting choose Type: “Endpoint provider”.
- Select "OData V4 - Business Central" as Endpoint_Type
- Select the predefined endpoint from the dropdown menu.
- Select the desired activity Mode at Advanced activity settings.
- Click next.
- For the Target setting choose Type: “OData provider”.
- Select the desired Object Type (Product unit) from the dropdown menu in Parameters > destination > object type.
- Click next.
- Check the Source checkbox to choose the target tables. The Business Central tables will be automatically mapped to the corresponding tables in Dynamicweb.
- Click finish.
- Finally, provide the activity with an optional description and click OK.
When the activity has been added, the settings menu for the activity will be visible. This menu can be accessed at any time by clicking the activity in Settings > Integration > Data Integration.
Product unit object type mappings
In this view the table mappings of the activity can be managed. The mappings are auto selected for all non-custom activities in Dynamicweb.
For the object type of product unit, the mappings should look like this:
|
Entity Property |
Dynamicweb Destination |
|
Code |
EcomVariantsOptions.VariantOptionId |
|
Description |
EcomVariantsOptions.VariantOptionName |
To finish the activity setup, press save and close or save and run to perform the import job immediately.
Import Product-unit relation
To import product-unit relations from Business Central to Dynamicweb, the endpoint for the purpose must first be added in settings > integration > endpoint management > add endpoint.
To add the endpoint, follow these steps:
- Locate and copy the Odata v4 URL in Business Central Web Services
- Provide the endpoint with a Name and an optional Description.
- Insert Odata v4 URL from Business Central Web Services.
- Set Type to GET
- Choose Endpoint Authentication at the bottom of the page.
- Save and close.
Location of the OData v4 URL:
|
Dynamicweb object type |
Business Central object type |
Business Central Object ID |
|
Product-unit relation |
Item units of measure |
5404 |

Setting up a data integration activity for importing Product-unit relations
When the endpoint has been set up, the next step is to add an integration activity in Settings > Integration > Data Integration > New Activity.
- For the Source setting choose Type: “Endpoint provider”.
- Select "OData V4 - Business Central" as Endpoint_Type
- Select the predefined endpoint from the dropdown menu.
- Select the desired activity Mode at Advanced activity settings.
- Click next.
- For the Target setting choose Type: “OData provider”.
- Select the desired Object Type (Product-unit relation) from the dropdown menu in Parameters > destination > object type.
- Click next.
- Check the Source checkbox to choose the target tables. The Business Central tables will be automatically mapped to the corresponding tables in Dynamicweb.
- Click finish.
- Finally, provide the activity with an optional description and click OK.
When the activity has been added, the settings menu for the activity will be visible. This menu can be accessed at any time by clicking the activity in Settings > Integration > Data Integration.
Product-unit relation object type mappings
In this view the table mappings of the activity can be managed. The mappings are auto selected for all non-custom activities in Dynamicweb.
For the object type of product-unit relation, the mappings should look like this:
|
Entity Property |
Dynamicweb Destination |
|
Item_No |
EcomStockUnit.StockUnitProductId |
|
Code |
EcomStockUnit.StockUnitDescription |
|
Qty_per_Unit_of_Measure |
EcomStockUnit.StockUnitQuantity |
|
Weight |
EcomStockUnit.StockUnitWeight |
To finish the activity setup, press save and close or save and run to perform the import job immediately.
Import Product translation
Product translations can be imported with the OData provider and Endpoint provider one language at a time.
If you want to import multiple translations for each product, you will therefore need to set up an endpoint and an integration activity for each of them.
Follow the step by step guide for each language:
To import product translations from Business Central to Dynamicweb, the endpoint for the purpose must first be added in settings > integration > endpoint management > add endpoint.
To add the endpoint, follow these steps:
- Locate and copy the Odata v4 URL in Business Central Web Services
- Provide the endpoint with a Name and an optional Description. Ideally, the name and description should fit the nature of the import. i.e. "GET German product translations from BC"
- Insert Odata v4 URL from Business Central Web Services.
- Set Type to GET
- Choose Endpoint Authentication at the bottom of the page.
- Save and close.
Location of the OData v4 URL:
|
Dynamicweb object type |
Business Central object type |
Business Central Object ID |
|
Product translation |
Item translations |
35 |

Setting up a data integration activity for importing Product translations
When the endpoint has been set up, the next step is to add an integration activity in Settings > Integration > Data Integration > New Activity.
- For the Source setting choose Type: “Endpoint provider”.
- Select "OData V4 - Business Central" as Endpoint_Type
- Select the predefined endpoint from the dropdown menu.
- Select the desired activity Mode at Advanced activity settings.
- Click next.
- For the Target setting choose Type: “OData provider”.
- Select the desired Object Type (Product translation) from the dropdown menu in Parameters > destination > object type.
- Choose the destination language of the imported translations.
- Provide the Source Language Code. This has to match the language code of the ERP. For example, if you want to import german translations for Business Central, the Source Language Code is "DEU".
- Click next.
- Check the Source checkbox to choose the target tables. The Business Central tables will be automatically mapped to the corresponding tables in Dynamicweb.
- Click finish.
- Finally, provide the activity with an optional description and click OK.
When the activity has been added, the settings menu for the activity will be visible. This menu can be accessed at any time by clicking the activity in Settings > Integration > Data Integration.
Product translation object type mappings
In this view the table mappings of the activity can be managed. The mappings are auto selected for all non-custom activities in Dynamicweb.
For the object type of product translation, the mappings should look like this:
|
Entity Property |
Dynamicweb Destination |
|
Item_No |
Handled by ObjectType ProductTranslation* |
|
Variant_Code |
Handled by ObjectType ProductTranslation* |
|
Language_Code |
Handled by ObjectType ProductTranslation* |
|
Description |
Handled by ObjectType ProductTranslation* |
*) Item translations endpoint in Business Central contains translations for both items and variants. The same endpoint also contains translations in many language codes. For those reasons, the source data needs to be filtered and transformed. The OData Provider handles this and ensures the expected translations in the expected language codes are placed in the correct Dynamicweb tables.
To finish the activity setup, press save and close or save and run to perform the import job immediately.
Import Product unit translation
Product unit translations can be imported with the OData provider and Endpoint provider one language at a time.
If you want to import multiple translations for each product, you will therefore need to set up an endpoint and an integration activity for each of them.
Follow the step by step guide for each language:
To import product unit translations from Business Central to Dynamicweb, the endpoint for the purpose must first be added in settings > integration > endpoint management > add endpoint.
To add the endpoint, follow these steps:
- Locate and copy the Odata v4 URL in Business Central Web Services
- Provide the endpoint with a Name and an optional Description. Ideally, the name and description should fit the nature of the import. i.e. "GET German product unit translations from BC"
- Insert Odata v4 URL from Business Central Web Services.
- Set Type to GET
- Choose Endpoint Authentication at the bottom of the page.
- Save and close.
Location of the OData v4 URL:
|
Dynamicweb object type |
Business Central object type |
Business Central Object ID |
|
Product unit translation |
Unit of Measure Translation |
5402 |

Setting up a data integration activity for importing Product unit translation
When the endpoint has been set up, the next step is to add an integration activity in Settings > Integration > Data Integration > New Activity.
- For the Source setting choose Type: “Endpoint provider”.
- Select "OData V4 - Business Central" as Endpoint_Type
- Select the predefined endpoint from the dropdown menu.
- Select the desired activity Mode at Advanced activity settings.
- Click next.
- For the Target setting choose Type: “OData provider”.
- Select the desired Object Type (Product unit translation) from the dropdown menu in Parameters > destination > object type.
- Choose the destination language of the imported prodcut unit translations.
- Provide the Source Language Code. This has to match the language code of the ERP. For example, if you want to import german translations for Business Central, the Source Language Code is "DEU".
- Click next.
- Check the Source checkbox to choose the target tables. The Business Central tables will be automatically mapped to the corresponding tables in Dynamicweb.
- Click finish.
- Finally, provide the activity with an optional description and click OK.
When the activity has been added, the settings menu for the activity will be visible. This menu can be accessed at any time by clicking the activity in Settings > Integration > Data Integration.
Product unit translation object type mappings
In this view the table mappings of the activity can be managed. The mappings are auto selected for all non-custom activities in Dynamicweb.
For the object type of product unit translation, the mappings should look like this:
|
Entity Property |
Dynamicweb Destination |
|
Code |
EcomVariantsOptions.VariantOptionId |
|
Language_Code |
EcomVariantsOptions.VariantOptionLanguageId |
|
Description |
EcomVariantsOptions.VariantOptionName |
To finish the activity setup, press save and close or save and run to perform the import job immediately.
Import Stock amount
To import stock amounts from Business Central to Dynamicweb, the endpoint for the purpose must first be added in settings > integration > endpoint management > add endpoint.
To add the endpoint, follow these steps:
- Locate and copy the Odata v4 URL in Business Central Web Services
- Provide the endpoint with a Name and an optional Description.
- Insert Odata v4 URL from Business Central Web Services.
- Set Type to GET
- Choose Endpoint Authentication at the bottom of the page.
- Save and close.
Location of the OData v4 URL:
|
Dynamicweb object type |
Business Central object type |
Business Central Object ID |
|
Stock amount |
Stockkeeping Unit Card |
5700 |

Setting up a data integration activity for importing Stock amount
When the endpoint has been set up, the next step is to add an integration activity in Settings > Integration > Data Integration > New Activity.
- For the Source setting choose Type: “Endpoint provider”.
- Select "OData V4 - Business Central" as Endpoint_Type
- Select the predefined endpoint from the dropdown menu.
- Select the desired activity Mode at Advanced activity settings.
- Click next.
- For the Target setting choose Type: “OData provider”.
- Select the desired Object Type (Stock amount) from the dropdown menu in Parameters > destination > object type.
- Click next.
- Check the Source checkbox to choose the target tables. The Business Central tables will be automatically mapped to the corresponding tables in Dynamicweb.
- Click finish.
- Finally, provide the activity with an optional description and click OK.
When the activity has been added, the settings menu for the activity will be visible. This menu can be accessed at any time by clicking the activity in Settings > Integration > Data Integration.
Stock amount object type mappings
In this view the table mappings of the activity can be managed. The mappings are auto selected for all non-custom activities in Dynamicweb.
For the object type of stock amount, the mappings should look like this:
|
Entity Property |
Dynamicweb Destination |
|
Location_Code |
Handled by ObjectType StockAmount* |
|
Item_No |
Handled by ObjectType StockAmount* |
|
Variant_Code |
Handled by ObjectType StockAmount* |
|
Inventory |
Handled by ObjectType StockAmount* |
*) The OData Provider ensures that stock amount per location per variant per product in the base unit of measure is added to the stock matrix of a Dynamicweb product or master product.
To finish the activity setup, press save and close or save and run to perform the import job immediately.
Import Order
To import orders from Business Central to Dynamicweb, the endpoint for the purpose must first be added in settings > integration > endpoint management > add endpoint.
To add the endpoint, follow these steps:
- Locate and copy the Odata v4 URL in Business Central Web Services
- Provide the endpoint with a Name and an optional Description.
- Insert Odata v4 URL from Business Central Web Services.
- Set Type to GET
- Choose Endpoint Authentication at the bottom of the page.
- Save and close.
Location of the OData v4 URL:
|
Dynamicweb object type |
Business Central object type |
Business Central Object ID |
|
Order |
Sales Order |
42 |

Filtering orders
When importing orders, you might not be interested in importing all listed orders in the ERP. To avoid importing unwanted records, a filter can be applied to the endpoint by adding a query parameter.
A query parameter consists of a key value pair and could look like the following example:
|
Key |
Value |
|
$filter |
Sell_to_Country_Region_Code eq ‘GB’ |
|
$top |
20 |
The first example filters the OData so that it only includes records where the value of the sell_to_Country_Region_Code is equal to the string ‘GB’. Resulting in the endpoint only exposing orders made to customers in Great Britain.
The second example restricts the endpoint to only importing the first 20 records of the entity.
For a full documentation on Business Central API filters click here.
Setting up a data integration activity for importing Order
When the endpoint has been set up, the next step is to add an integration activity in Settings > Integration > Data Integration > New Activity.
- For the Source setting choose Type: “Endpoint provider”.
- Select "OData V4 - Business Central" as Endpoint_Type
- Select the predefined endpoint from the dropdown menu.
- Select the desired activity Mode at Advanced activity settings.
- Click next.
- For the Target setting choose Type: “OData provider”.
- Select the desired Object Type (Stock amount) from the dropdown menu in Parameters > destination > object type.
- Click next.
- Check the Source checkbox to choose the target tables. The Business Central tables will be automatically mapped to the corresponding tables in Dynamicweb. Notice that there are two tables available: DynamicwebSalesOrder and DynamicwebSalesOrderSalesLines. The DynamicwebSalesOrderSalesLines table must be targeted to ObjectTypeOrderLines.
- Click finish.
- Finally, provide the activity with a name and an optional description and click OK.
When the activity has been added, the settings menu for the activity will be visible. This menu can be accessed at any time by clicking the activity in Settings > Integration > Data Integration.
Order object type mappings
In this view the table mappings of the activity can be managed. The mappings are auto selected for all non-custom activities in Dynamicweb.
The order object type and underlying logic is more complex relative to the others. It can consume two overall entities: Sales orders and posted (invoiced) sales orders. It detects which endpoint it is automatically. No matter which entity, it is only the endpoint containing the order headers which is needed. From the header endpoint, the order object type logic automatically navigates to the underlying endpoint containing order lines.
Apart from this complexity, the order object type logic also maps entity properties in more than one table in Dynamicweb and combines multiple fields. This is visible in the mapping tables below where the Dynamicweb Destination column lists many “Handled by ObjectTypeOrder” and “Handled by ObjectTypeSalesLine”.
|
Entity Property |
Dynamicweb Destination |
|
No |
Handled by ObjectTypeOrder* |
|
Sell_to_Customer_Name |
EcomOrders.OrderCustomerName |
|
Sell_to_Address |
EcomOrders.OrderDeliveryAddress |
|
Sell_to_Address_2 |
EcomOrders.OrderDeliveryAddress2 |
|
Sell_to_City |
EcomOrders.OrderDeliveryCity |
|
Sell_to_Post_Code |
EcomOrders.OrderDeliveryZip |
|
Sell_to_Country_Region_Code |
EcomOrders.OrderCustomerCountryCode |
|
Sell_to_Phone_No |
Handled by ObjectTypeOrder (EcomOrders.OrderCustomerPhone) |
|
Sell_to_E_Mail |
Handled by ObjectTypeOrder (EcomOrders.OrderCustomerEmail) |
|
Posting_date |
Handled by ObjectTypeOrder** |
|
Order_Date |
Handled by ObjectTypeOrder** |
|
External_Document_No |
EcomOrders.OrderId |
|
Currency_Code |
EcomOrders.OrderCurrencyCode |
|
Payment_Discount_Percent |
EcomOrders.OrderDiscountPercentage |
|
Bill_to_Address |
EcomOrders.OrderCustomerAddress |
|
Bill_to_Address_2 |
EcomOrders.OrderCustomerAddress2 |
|
Bill_to_City |
EcomOrders.OrderCustomerCity |
|
Bill_to_Post_Code |
EcomOrders.OrderCustomerZip |
Mappings for DynamicwebSalesOrderSalesLines entity:
|
Entity Property |
Dynamicweb Destination |
|
No |
Handled by ObjectType Sales Lines*** |
|
Variant_Code |
Handled by ObjectType Sales Lines*** |
|
Description |
Handled by ObjectType Sales Lines*** |
|
Location_Code |
EcomOrderLines.OrderLineStockLocationId |
|
Quantity |
Handled by ObjectType Sales Lines*** |
|
Unit_of_Measure_Code |
EcomOrderLinesQuantity |
|
Unit_Price |
Handled by ObjectType Sales Lines*** |
|
Line_Discount_Percent |
Handled by ObjectType Sales Lines*** |
|
Line_Amount |
Handled by ObjectType Sales Lines*** |
|
Line_Discount_Amount |
Handled by ObjectType Sales Lines*** |
|
Total_VAT_Amount |
Handled by ObjectType Sales Lines*** |
*No is used to fetch Order lines from BC.
**Posting_Date and Order_Date are fetched from two different entities in BC (PostedSalesInvoice and SalesOrder). They are used collectively in EcomOrders.OrderCompletedDate and EcomOrders.OrderDate).
***From the DynamicwebSalesOrderSalesLines entity the attributes of No, Variant_code, description, Quantity, Unit_price, Line_Discount_percent, Line_Amount, Line_Discount_Amount, and Total_VAT_Amount are all used to calculate prices, VAT and discounts and post them to the order in Dynamicweb.
To finish the activity setup, press save and close or save and run to perform the import job immediately.
Import Discount
Important notice on importing prices and discounts from Business Central:
With the "New sales pricing experience" (Q2 2023 release) prices and discounts are merged into a single Business Central page, and cannot be imported seperately. If your Business Central instance uses the new price logic, please refer to the "Import Price and Discount" section below.
To import discounts from Business Central to Dynamicweb, the endpoint for the purpose must first be added in settings > integration > endpoint management > add endpoint.
To add the endpoint, follow these steps:
- Locate and copy the Odata v4 URL in Business Central Web Services
- Provide the endpoint with a Name and an optional Description.
- Insert Odata v4 URL from Business Central Web Services.
- Set Type to GET
- Choose Endpoint Authentication at the bottom of the page.
- Save and close.
Location of the OData V4 URL:
|
Dynamicweb object type |
Business Central object type |
Business Central Object ID |
|
Discount |
Sales Line Discounts |
7004 |

Setting up a data integration activity for importing discounts
When the endpoint has been set up, the next step is to add an integration activity in Settings > Integration > Data Integration > New Activity.
- For the Source setting choose Type: “Endpoint provider”.
- Select the Endpoint type
- Select the predefined endpoint from the dropdown menu.
- Choose an integration activity mode.
- Click next.
- For the Target setting choose Type: “OData provider”.
- Select the desired Object Type (Discount) from the dropdown menu in Parameters > destination > object type.
- Choose the desired destination language and shop.
- Provide the activity with a discount Prefix. A prefix is a mandatory addition to the name of the discount and will appear on all discounts imported to Dynamicweb. Ideally, it should reflect the context of the imported discounts (E.G. “Summer sale 2021”).
- Select whether or not you want Dynamicweb to merge discounts if they are evaluated to be identical.*
- Select the Sales Types you wish to import.**
- Click next.
- Check the Source checkbox to choose the target tables. The Business Central tables will be automatically mapped to the corresponding tables in Dynamicweb.
- Click finish.
- Finally, provide the activity with an optional description and click OK.
When the activity has been added, the settings menu for the activity will be visible. This menu can be accessed at any time by clicking the activity in Settings > Integration > Data Integration.
*Business Central keeps discount records as individual records for every product with an applied discount. By allowing Dynamicweb to merge discounts it will store a discount as a single record with a list of all included products. It does so by checking the database for existing discount records that match the following attributes: UserId, ValidFrom, ValidTo, ShopId, LanguageId, Percentage, ProductQuantity, CurrencyCode. If a matching discount is found, the [code,code+variant_code] or [code,] value (depending on wether the product has a specified variant) is added to the list of products in EcomDiscount.DiscountProductsAndGroups.
**The OData provider supports import of three distinct types of discounts: Customer (discounts defined for individual customers), Customer discount groups (discounts specific for a defined group of customers) and discounts for All Customers. Check the boxes next to the types you wish to import. Multiple types can be imported simultaneously and at least one of the check boxes must be checked.
Discount object type mappings
In the activity settings view the table mappings of the activity can be managed. The mappings are auto selected for all non-custom activities in Dynamicweb.
For the object type of discount, the mappings should look like this:
|
Entity Property |
|
Dynamicweb Destination |
|
Code |
» |
Handled by ObjectTypeDiscount1 |
|
SalesCode |
» |
Handled by ObjectTypeDiscount2 |
|
Starting_Date |
» |
EcomDiscount.DiscountValidFrom |
|
Currency_Code |
» |
EcomDiscount.DiscountCurrencyCode |
|
Variant_Code |
» |
Handled by ObjectTypeDiscount1 |
|
Unit_of_Measure_Code |
» |
Handled by ObjectTypeDiscount3 |
|
Minimum_Quantity |
» |
Handled by ObjectTypeDiscount3 |
|
Line_Discount_Percent |
» |
EcomDiscount.DiscountPercentage |
|
Ending_Date |
» |
EcomDiscount.DiscountValidTo |
1Code and Variant_Code is used in combination in the EcomDiscount.DiscountProductsAndGroups column. The combined code+variant_code attribute is only added to the endpoint if Variant_Code has a value in the endpoint.
2The external ID of SalesCode is used to locate AcessUsers in the Dynamicweb database. The located value in AccessUser.AccessUserId is used in EcomDiscount.DiscountAccessUserId.
3The attributes of Unit_of_Measure_Code and Minimum_Quantity are used to calculate the ratio between the two. The ratio is stored in EcomDiscount.DiscountProductQuantity.
To finish the activity setup, press save and close or save and run to perform the import job immediately.
Import Price
Important notice on importing prices and discounts from Business Central:
With the "New sales pricing experience" (Q2 2023 release) prices and discounts are merged into a single Business Central page, and cannot be imported seperately. If your Business Central instance uses the new price logic, please refer to the "Import Price and Discount" section below.
To import prices from Business Central to Dynamicweb, the endpoint for the purpose must first be added in settings > integration > endpoint management > add endpoint.
To add the endpoint, follow these steps:
- Locate and copy the Odata v4 URL in Business Central Web Services
- Provide the endpoint with a Name and an optional Description.
- Insert Odata v4 URL from Business Central Web Services.
- Set Type to GET
- Choose Endpoint Authentication at the bottom of the page.
- Save and close.
Locating the OData V4 URL:
|
Dynamicweb object type |
Business Central object type |
Business Central Object ID |
|
Price |
Sales Prices |
7002 |

Setting up a data integration activity for importing prices
When the endpoint has been set up, the next step is to add an integration activity in Settings > Integration > Data Integration > New Activity.
- For the Source setting choose Type: “Endpoint provider”.
- Select the Endpoint type
- Select the predefined endpoint from the dropdown menu.
- Choose an integration activity mode.
- Click next.
- For the Target setting choose Type: “OData provider”.
- Select the desired Object Type (Price) from the dropdown menu in Parameters > destination > object type.
- Choose the desired destination language and shop.
- Select the Sales Types you wish to import.*
- Click next.
- Check the Source checkbox to choose the target tables. The Business Central tables will be automatically mapped to the corresponding tables in Dynamicweb.
- Click finish.
- Finally, provide the activity with an optional description and click OK.
When the activity has been added, the settings menu for the activity will be visible. This menu can be accessed at any time by clicking the activity in Settings > Integration > Data Integration.
*The OData provider supports import of three distinct types of prices: Customer (prices defined for individual customers), Customer groups (prices specific for a defined group of customers) and prices for All Customers. Check the boxes next to the types you wish to import. Multiple types can be imported simultaneously and at least one of the check boxes must be checked.
Price object type mappings
In the activity settings view the table mappings of the activity can be managed. The mappings are auto selected for all non-custom activities in Dynamicweb.
For the object type of price, the mappings should look like this:
|
Entity Property |
|
Dynamicweb Destination |
|
Item_No |
» |
EcomPrices.PriceProductId |
|
SalesCode |
» |
EcomPrices.PriceUserCustomerNumber |
|
Starting_Date |
» |
EcomPrices.PriceValidFrom |
|
Currency_Code |
» |
EcomPrices.PriceCurrency |
|
Variant_Code |
» |
Handled by ObjectTypePrice* |
|
Unit_of_Measure_Code |
» |
EcomPrices.PriceUnitId |
|
Minimum_Quantity |
» |
EcomPrices.PriceQuantity |
|
Unit_Price |
» |
EcomPrices.PriceAmount |
|
Ending_Date |
» |
EcomPrices.PriceValidTo |
|
Price_Includes_VAT |
» |
EcomPrices.PriceIsWithVat |
*Variant_Code is used in EcomPrices.PriceProductVariantID.
To finish the activity setup, press save and close or save and run to perform the import job immediately.
Import Price and Discount (New price logic)
Important notice on importing prices and discounts from Business Central:
With the "New sales pricing experience" (Q2 2023 release) prices and discounts are merged into a single Business Central page, and cannot be imported seperately. If your Business Central instance uses the old price logic, please refer to the "Import Price" and "Import Discount" sections above.
To import prices and discounts from Business Central to Dynamicweb, the endpoint for the purpose must first be added in settings > integration > endpoint management > add endpoint.
To add the endpoint, follow these steps:
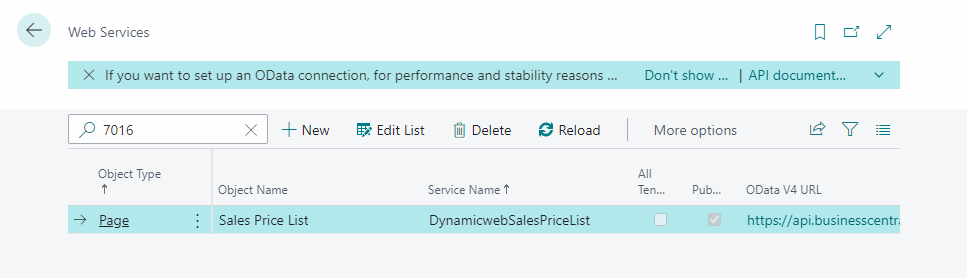
- Locate and copy the Odata v4 URL in Business Central Web Services
- Provide the endpoint with a Name and an optional Description.
- Insert Odata v4 URL from Business Central Web Services.
- Append "Lines" to the located URL - for example, if your Business Central web service is called MySalesPriceList the URL inserted should end with MySalesPriceListLines
- Choose Endpoint Authentication at the bottom of the page.
- Save and close.
Locating the OData V4 URL:
|
Dynamicweb object type |
Business Central object type |
Business Central Object ID |
|
Price and Discount |
Sales Price List |
7016 |
Setting up a data integration activity for importing prices and discounts
When the endpoint has been set up, the next step is to add an integration activity in Settings > Integration > Data Integration > New Activity.
- For the Source setting choose Type: “Endpoint provider”.
- Select the Endpoint type
- Select the predefined endpoint from the dropdown menu.
- Choose an integration activity mode.
- Click next.
- For the Target setting choose Type: “OData provider”.
- Select the desired Object Type (Price and Discount) from the dropdown menu in Parameters > destination > object type.
- Choose the desired destination language and shop.
- Optionally, you can add a prefix to all imported discounts
- Select if you want to merge compared discounts*
- Click next.
- Check the Source checkbox to choose the target tables. The Business Central tables will be automatically mapped to the corresponding tables in Dynamicweb.
- Click finish.
- Finally, provide the activity with an optional description and click OK.
*When merging compared discounts is enabled, DiscountProductAndGroups are added as a list of ID's in a single record instead of as individual records.
When the activity has been added, the settings menu for the activity will be visible. This menu can be accessed at any time by clicking the activity in Settings > Integration > Data Integration.
Price and discount object type mappings (not documented correctly)
In the activity settings view the table mappings of the activity can be managed. The mappings are auto selected for all non-custom activities in Dynamicweb.
For the object type of price, the mappings should look like this:
|
Entity Property |
|
Dynamicweb Destination |
|
Product_No |
» |
Handled by ObjectTypePriceAndDiscountProductNo* |
| Amount |
» |
EcomPrices.PriceAmount |
|
Starting_Date |
» |
Handled by ObjectTypePriceAndDiscountStartingDate** |
|
Currency_Code |
» |
EcomPrices.PriceCurrency*** |
|
Unit_of_Measure_Code |
» |
EcomPrices.PriceUnitId |
|
Minimum_Quantity |
» |
EcomPrices.PriceQuantity |
|
Ending_Date |
» |
Handled by ObjectTypePriceAndDiscountEndingDate**** |
|
Price_Includes_VAT |
» |
EcomPrices.PriceIsWithVat |
*Product_No is used in combination with the variant_no requested from Business Central to PriceProductId og DiscountProductId
**Starting_date is mapped to either EcomPrices.PriceValidFrom or EcomDiscount.DiscountValidFrom depending on the source
*** If the source object doesn't contain a Currency_Code, the destination column defaults to the default currency of the DynamicWeb solution.
****Ending_date is mapped to either EcomPrices.PriceValidTo or EcomDiscount.DiscountValidTo depending on the source
To finish the activity setup, press save and close or save and run to perform the import job immediately.
Import custom object type
By choosing the Custom object type in the OData provider, you can expose any ODataV4 Web service and create your own mapping in Dynamicweb OData Provider. In this case the OData Provider will delegate to Dynamicweb Provider.
To import custom object types to Dynamicweb, the endpoint for the purpose must first be added in settings > integration > endpoint management > add endpoint.
To add the endpoint, follow these steps:
- Provide the endpoint with a Name and an optional Description.
- Insert Odata v4 URL of the desired web service.
- Set Type to GET
- Choose Endpoint Authentication at the bottom of the page.
- Save and close.
Setting up a data integration activity for a custom object type
When the endpoint has been set up, the next step is to add an integration activity in Settings > Integration > Data Integration > New Activity.
- For the Source setting choose Type: “Endpoint provider”.
- Select the predefined endpoint from the dropdown menu.
- Click next.
- For the Target setting choose Type: “OData provider”.
- Select the desired Object Type (Custom) from the dropdown menu in Parameters > destination > object type.
- Click next.
- Check the Source checkbox to choose the destination entities. The entities exposed by the web service will be visible.
- Choose the target entity in Dynamicweb for each exposed source entity. Since no auto-mappings are made for custom OData v4 web services and the OData provider delegates to the Dynamicweb provider, you can choose between all the entities of Dynamicweb.
- Click finish.
- Finally, provide the activity with a name and an optional description and click OK.
When the activity has been added, the settings menu for the activity will be visible. This menu can be accessed at any time by clicking the activity in Settings > Integration > Data Integration.
Export User Customer
To export user customers from Dynamicweb to Business Central the endpoint for the purpose must first be added in settings > integration > endpoint management > add endpoint.
To add the endpoint, follow these steps:
- Provide the endpoint with a Name and an optional Description.
- Insert Odata v4 URL from Business Central (see below).
- Set Type to POST.
- Choose Endpoint Authentication at the bottom of the page.
- Save and close.
Location of the Business Central Web service URL:
|
Dynamicweb object type |
Business Central object type |
Business Central Object ID |
|
User customer |
Customer Card |
21 |
Setting up the data integration activity for exporting user customers
When the endpoint has been set up, the next step is to add an integration activity in Settings > Integration > Data Integration > New Activity.
- For the Source setting choose Type: “OData”.
- Choose the source object type (User customer) from the dropdown menu.
- Select the Source user group you want to export records from.
- Click next.
- For the Target setting choose Type: “Endpoint provider”.
- Select the desired predefined Destination Endpoint from the dropdown menu at "parameters"
- Click next.
- Check the Source checkbox to choose the target tables. The Dynamicweb tables will be automatically mapped to the corresponding tables in Business Central.
- Click finish.
- Finally, provide the activity with an optional description and click OK.
When the activity has been added, the settings menu for the activity will be visible. This menu can be accessed at any time by clicking the activity in Settings > Integration > Data Integration.
User customer object type mappings (export)
In the activity settings view the table mappings of the activity can be managed. The mappings are auto selected for all non-custom activities in Dynamicweb.
For the object type of User customer, the mappings should look like this:
|
Dynamicweb Column |
Business Central Destination |
|
AccessUser.AccessUserEmail |
E_Mail |
|
AccessUser.AccessUserCustomerNumber |
No |
|
AccessUser.AccessUserName |
Name |
|
AccessUser.AccessUserAddress |
Address |
|
AccessUser.AccessUserAddress2 |
Address_2 |
|
AccessUser.AccessUserCountryCode |
Country_Region_Code |
|
AccessUser.AccessUserZip |
Post_Code |
|
AccessUser.AccessUserCity |
City |
|
AccessUser.AccessUserPhone |
Phone_No |
|
AccessUser.AccessUserMobile |
MobilePhone_No |
|
AccessUser.AccessUserFax |
Fax_No |
|
AccessUser.AccessUserCurrencyCharacter |
Currency_Code |
To finish the activity setup, press save and close or save and run to perform the import job immediately.
Export User
To export users from Dynamicweb to Business Central the endpoint for the purpose must first be added in settings > integration > endpoint management > add endpoint.
To add the endpoint, follow these steps:
- Provide the endpoint with a Name and an optional Description.
- Insert Odata v4 URL from Business Central (see below).
- Set Type to POST.
- Choose Endpoint Authentication at the bottom of the page.
- Save and close.
Location of the Business Central Web service URL:
|
Dynamicweb object type |
Business Central object type |
Business Central Object ID |
|
User |
Contact Card |
5050 |
Setting up the data integration activity for exporting users
When the endpoint has been set up, the next step is to add an integration activity in Settings > Integration > Data Integration > New Activity.
- For the Source setting choose Type: “OData”.
- Choose the source object type (User) from the dropdown menu.
- Select the Source user group you want to export records from.
- Click next.
- For the Target setting choose Type: “Endpoint provider”.
- Select the desired predefined Destination endpoint from the dropdown menu at “parameters”.
- Click next.
- Check the Source checkbox to choose the target tables. The Dynamicweb tables will be automatically mapped to the corresponding tables in Business Central.
- Click finish.
- Finally, provide the activity with an optional description and click OK.
When the activity has been added, the settings menu for the activity will be visible. This menu can be accessed at any time by clicking the activity in Settings > Integration > Data Integration
User object type mappings (export)
In the activity settings view the table mappings of the activity can be managed. The mappings are auto selected for all non-custom activities in Dynamicweb.
For the object type of User, the mappings should look like this:
|
Dynamicweb Column |
Business Central Destination |
|
AccessUser.AccessUserEmail |
E_Mail |
|
AccessUser.AccessUserExternalId |
No |
|
AccessUser.AccessUserCustomerNumber |
IntegrationCustomerNo |
|
AccessUser.AccessUserCompany |
Company_Name |
|
AccessUser.AccessUserName |
Name |
|
AccessUser.AccessUserAddress |
Address |
|
AccessUser.AccessUserAddress2 |
Address_2 |
|
AccessUser.AccessUserCountryCode |
Country_Region_Code |
|
AccessUser.AccessUserZip |
Post_Code |
|
AccessUser.AccessUserCity |
City |
|
AccessUser.AccessUserPhone |
Phone_No |
|
AccessUser.AccessUserMobile |
Mobile_Phone_No |
|
AccessUser.AccessUserFax |
Fax_No |
|
AccessUser.AccessUserCurrencyCharacter |
Currency_Code |
To finish the activity setup, press save and close or save and run to perform the import job immediately.
Export User address
To export user addresses from Dynamicweb to Business Central the endpoint for the purpose must first be added in settings > integration > endpoint management > add endpoint.
To add the endpoint, follow these steps:
- Provide the endpoint with a Name and an optional Description.
- Insert Odata v4 URL from Business Central (see below).
- Set Type to POST.
- Choose Endpoint Authentication at the bottom of the page.
- Save and close.
Location of the Business Central Web service URL:
|
Dynamicweb object type |
Business Central object type |
Business Central Object ID |
|
User Address |
Contact Alt. Address Card |
5056 |
Setting up the data integration activity for exporting user addresses
When the endpoint has been set up, the next step is to add an integration activity in Settings > Integration > Data Integration > New Activity.
- For the Source setting choose Type: “OData”.
- Choose the source object type (User address) from the dropdown menu.
- Select the Source user group you want to export records from.
- Click next.
- For the Target setting choose Type: “Endpoint provider”.
- Select the desired predefined Destination endpoint from the dropdown menu at “parameters”.
- Click next.
- Check the Source checkbox to choose the target tables. The Dynamicweb tables will be automatically mapped to the corresponding tables in Business Central.
- Click finish.
- Finally, provide the activity with an optional description and click OK.
When the activity has been added, the settings menu for the activity will be visible. This menu can be accessed at any time by clicking the activity in Settings > Integration > Data Integration.
User address object type mappings (export)
In the activity settings view the table mappings of the activity can be managed. The mappings are auto selected for all non-custom activities in Dynamicweb.
For the object type of User, the mappings should look like this:
|
Dynamicweb column |
Business Central destination |
|
ObjectTypeUserAddressCode* |
Code |
|
AccessUserAddress.AccessUserAddressCompany |
Company_Name |
|
AccessUserAddress.AccessUserAddressAddress |
Address |
|
AccessUserAddress.AccessUserAddressAddress2 |
Address_2 |
|
AccessUserAddress.AccessUserAddressCity |
City |
|
AccessUserAddress.AccessUserAddressZip |
Post_Code |
|
AccessUserAddress.AccessUserAddressCountryCode |
Country_Region_Code |
|
AccessUserAddress.AccessUserAddressPhone |
Phone_No |
|
AccessUserAddress.AccessUserAddressCell |
Mobile_Phone_No |
|
AccessUserAddress.AccessUserAddressFax |
Fax_No |
|
AccessUserAddress.AccessUserAddressEmail |
E_Mail |
To finish the activity setup, press save and close or save and run to perform the import job immediately.
Export User customer ship-to address
To export user addresses from Dynamicweb to Business Central the endpoint for the purpose must first be added in settings > integration > endpoint management > add endpoint.
To add the endpoint, follow these steps:
- Provide the endpoint with a Name and an optional Description.
- Insert Odata v4 URL from Business Central (see below).
- Set Type to POST.
- Choose Endpoint Authentication at the bottom of the page.
- Save and close.
Location of the Business Central Web service URL:
|
Dynamicweb object type |
Business Central object type |
Business Central Object ID |
|
User customer ship-to Address |
Ship-to Address |
300 |
Setting up the data integration activity for exporting user customer ship-to addresses
When the endpoint has been set up, the next step is to add an integration activity in Settings > Integration > Data Integration > New Activity.
- For the Source setting choose Type: “OData”.
- Choose the source object type (User customer ship-to address) from the dropdown menu.
- Select the Source user group you want to export records from.
- Click next.
- For the Target setting choose Type: “Endpoint provider”.
- Select the desired predefined Destination endpoint from the dropdown menu at “parameters”.
- Click next.
- Check the Source checkbox to choose the target tables. The Dynamicweb tables will be automatically mapped to the corresponding tables in Business Central.
- Click finish.
- Finally, provide the activity with an optional description and click OK.
When the activity has been added, the settings menu for the activity will be visible. This menu can be accessed at any time by clicking the activity in Settings > Integration > Data Integration.
User customer ship-to address object type mappings (export)
In the activity settings view the table mappings of the activity can be managed. The mappings are auto selected for all non-custom activities in Dynamicweb.
For the object type of User customer ship-to address, the mappings should look like this:
|
Dynamicweb column |
Business Central destination |
|
AccessUserAddress.AccessUserAddressName |
Code |
|
AccessUserAddress.AccessUserAddressCompany |
Name |
|
AccessUserAddress.AccessUserAddressAddress |
Address |
|
AccessUserAddress.AccessUserAddressAddress2 |
Address_2 |
|
AccessUserAddress.AccessUserAddressCity |
City |
|
AccessUserAddress.AccessUserAddressZip |
Post_code |
|
AccessUserAddress.AccessUserAddressCountryCode |
Country_Region_Code |
|
AccessUserAddress.AccessUserAddressPhone |
Phone_No |
|
AccessUserAddress.AccessUserAddressFax |
Fax_No |
|
AccessUserAddress.AccessUserAddressEmail |
E_Mail |
To finish the activity setup, press save and close or save and run to perform the import job immediately.
Export Order
To export orders from Dynamicweb to Business Central the endpoint for the purpose must first be added in settings > integration > endpoint management > add endpoint.
To add the endpoint, follow these steps:
- Provide the endpoint with a Name and an optional Description.
- Insert Odata v4 URL from Business Central (see below).
- Set Type to POST.
- Choose Endpoint Authentication at the bottom of the page.
- Save and close.
Location of the Business Central Web service URL:
|
Dynamicweb object type |
Business Central object type |
Business Central Object ID |
|
Order |
Sales Order |
42 |
Setting up the data integration activity for exporting Order
When the endpoint has been set up, the next step is to add an integration activity in Settings > Integration > Data Integration > New Activity.
- For the Source setting choose Type: “OData”.
- Choose the source object type (Order) from the dropdown menu.
- Click next.
- For the Target setting choose Type: “Endpoint provider”.
- Select the desired predefined Destination endpoint from the dropdown menu at “parameters”.
- Select the desired shop to export orders from.
- Select the destination API company at the bottom of the menu. This setting is for choosing the company in which the order has been placed in the case that multiple companies exist in the ERP.
- Click next.
- Check the Source checkbox to choose the target tables. Notice that there are two source tables to exposed from Dynamicweb: ObjectTypeOrder and ObjectTypeOrderLines. Make sure they each map to the corresponding target entity.
- Click finish.
- Finally, provide the activity with an optional description and click OK.
When the activity has been added, the settings menu for the activity will be visible. This menu can be accessed at any time by clicking the activity in Settings > Integration > Data Integration.
Order object type mappings (export)
In the activity settings view the table mappings of the activity can be managed. The mappings are auto selected for all non-custom activities in Dynamicweb.
The order object type and underlying logic is more complex relative to the others. It can consume two overall entities: Sales orders and posted (invoiced) sales orders. It detects which endpoint it is automatically. No matter which entity, it is only the endpoint containing the order headers which is needed. From the header endpoint, the order object type logic automatically navigates to the underlying endpoint containing order lines.
Apart from this complexity, the order object type logic also maps entity properties in more than one table in Dynamicweb and combines multiple fields. This is visible in the mapping tables below where the Dynamicweb Destination column lists many “Handled by ObjectTypeOrder” and “Handled by ObjectTypeSalesLine”.
Mappings for ObjectTypeOrder entity:
|
Dynamicweb column |
Business Central destination |
|
Handled by ObjectTypeOrder* |
No |
|
EcomOrders.OrderCustomerName |
Sell_to_Customer_Name |
|
EcomOrders.OrderDeliveryAddress |
Sell_to_Address |
|
EcomOrders.OrderDeliveryAddress2 |
Sell_to_Address_2 |
|
EcomOrders.OrderDeliveryCity |
Sell_to_City |
|
EcomOrders.OrderDeliveryZip |
Sell_to_Post_Code |
|
EcomOrders.OrderCustomerCountryCode |
Sell_to_Country_Region_Code |
|
Handled by ObjectTypeOrder* |
Sell_to_Phone_No |
|
Handled by ObjectTypeOrder* |
Sell_to_E_Mail |
|
Handled by ObjectTypeOrder* |
Posting_date |
|
Handled by ObjectTypeOrder* |
Order_Date |
|
EcomOrders.OrderId |
External_Document_No |
|
EcomOrders.OrderCurrencyCode |
Currency_Code |
|
EcomOrders.OrderDiscountPercentage |
Payment_Discount_Percent |
|
EcomOrders.OrderCustomerAddress |
Bill_to_Address |
|
EcomOrders.OrderCustomerAddress2 |
Bill_to_Address_2 |
|
EcomOrders.OrderCustomerCity |
Bill_to_City |
|
EcomOrders.OrderCustomerZip |
Bill_to_Post_Code |
Mappings for ObjectTypeOrderSalesLines entity:
|
Dynamicweb column |
Business Central destination |
|
Handled by ObjectType Sales Lines* |
No |
|
Handled by ObjectType Sales Lines* |
Variant_Code |
|
Handled by ObjectType Sales Lines* |
Description |
|
EcomOrderLines.OrderLineStockLocationId |
Location_Code |
|
Handled by ObjectType Sales Lines* |
Quantity |
|
EcomOrderLinesQuantity |
Unit_of_Measure_Code |
|
Handled by ObjectType Sales Lines* |
Unit_Price |
|
Handled by ObjectType Sales Lines* |
Line_Discount_Percent |
|
Handled by ObjectType Sales Lines* |
Line_Amount |
|
Handled by ObjectType Sales Lines* |
Line_Discount_Amount |
|
Handled by ObjectType Sales Lines* |
Total_VAT_Amount |
To finish the activity setup, press save and close or save and run to perform the import job immediately.