
Data integration activities
The Data Integration module is a tool for importing and exporting data to and from a Dynamicweb solution.
Using the module you create integration activities which accomplish a particular task, e.g.:
- Exporting users to XML
- Importing users from CRM
- Exporting orders to Business Central via the OData protocol
- Etc.
An integration activity consists of:
- A source provider matching the data source - either the Dynamicweb solution (export) or a file (import)
- A destination provider matching the data destination - either the Dynamicweb solution (import) or a file (export)
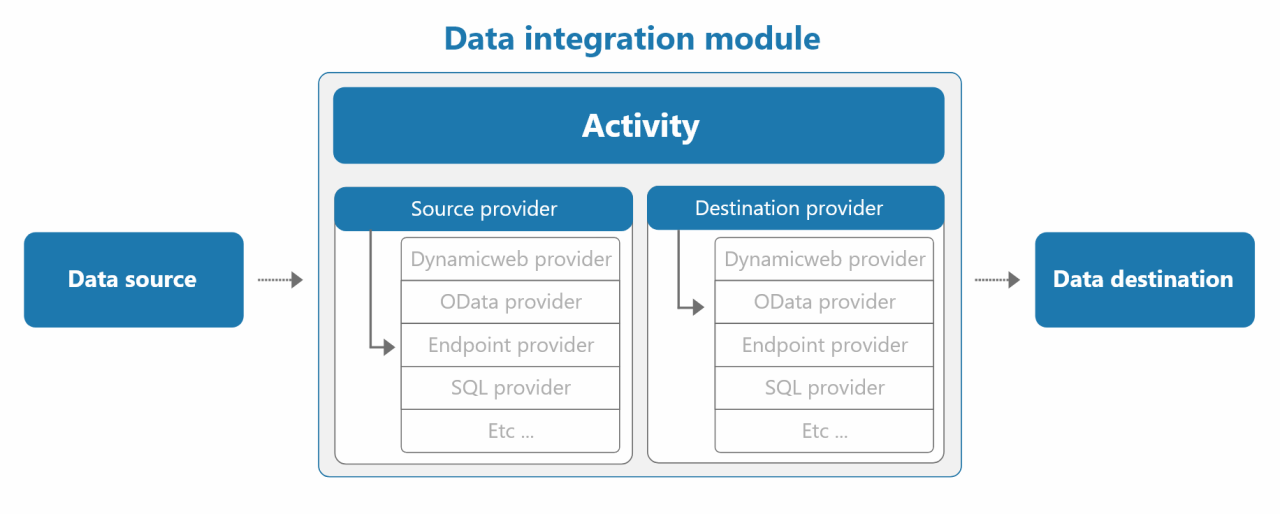
Dynamicweb ships with a set of built-in providers, all of which can function as both source and destination providers.This gives you a lot of freedom when it comes to integration - and if that's not enough you can create custom providers.
Integration activities are created and managed from the Data Integration node (Figure 2.1) – which can be accessed by navigating to Settings > Integration > Data Integration.
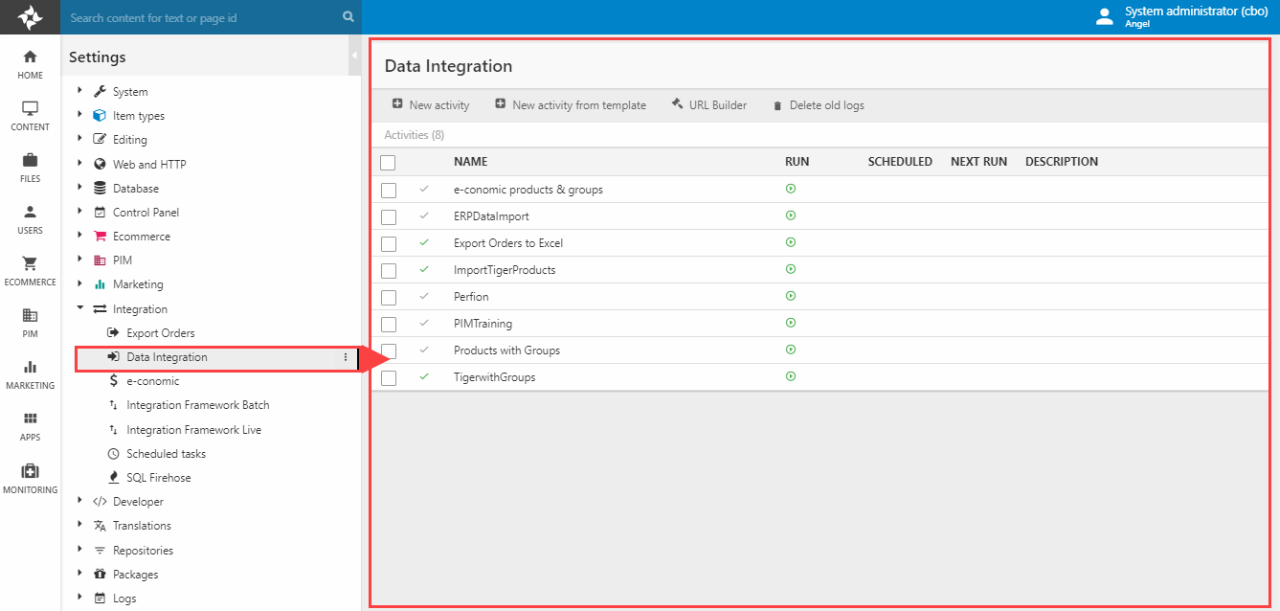
From the Data Integration area you can:
- Create new activities
- Create new activities from a template
- Open the URL builder
- Delete old logs
- View and edit existing activities – and run them!
Requirements
The Data Integration module requires an underlying database running on Microsoft SQL Server 2008 or later.
Additionally, your webserver must be able to resolve its own name from DNS; after calling jobrunner.aspx a new thread is created to another .aspx, where the job is actually executed. So if you have http://website.com, the IIS-server should be able to resolve website.com, as it will be calling ‘http://website.com/JobRunnerBackground.aspx?’.
Creating an integration activity
To create a new integration activity, simply click New activity in the toolbar (Figure 3.1).
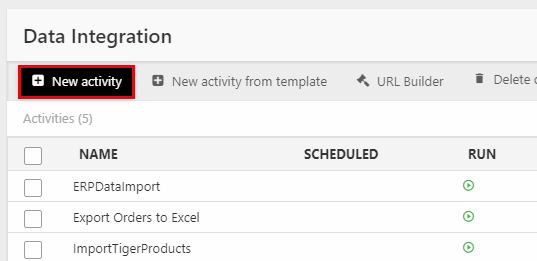
This will open a wizard which will take you through all the steps involved:
- Selecting the source provider
- Selecting the destination provider
- Selecting tables to import or export data from
- Naming the activity
- Checking the column mappings
- Saving and running the activity
Read more about providers, tables and column mappings below.
Integration Providers
An integration provider is a piece of software for moving data between Dynamicweb and an external data source, like an XML file, a CSV file or an SQL database.
Integration providers are used in integration activities, which are jobs which accomplish something every time they are run, e.g. 'import products from a file' og 'export users to a file'.
An integration activity consists of:
- A source provider matching the data source - either the Dynamicweb solution (export) or a file (import)
- A destination provider matching the data destination - either the Dynamicweb solution (import) or a file (export)
Here's an overview of the built-in providers supplied by Dynamicweb:
|
Provider |
Description |
|
Can access the full Dynamicweb database. High performance, but complex. Supports SQL Views. |
|
| Endpoint Provider | Import and export data by reading and writing to predefined endpoints |
| OData Provider (deprecated, pre v. 0.2.25) | Purpose-built for data integration between D365 Business Central and Dynamicweb through dedicated OData v4 web services. |
| OData Provider (v. 0.2.25 and later) |
Import and export data from any OData endpoint. |
|
Import and export data directly to and from a Microsoft SQL server database. Supports SQL Views. |
|
|
Import and export user and user group data in a more straightforward manner than the Dynamicweb provider. |
|
|
Import and export data to and from Microsoft Excel. |
|
|
Import and export data from and to CSV files. |
|
|
Import and export data from and to XML files. |
|
|
Import and export ‘incomplete’ data to and from the Dynamicweb database. Able to e.g. auto-assign IDs to imported products. |
|
|
Import and export items (content). |
|
|
Import and export order and orderline data. |
|
| JSON Provider | Import and export data in the popular JSON format. |
Click the links in the table to read in-depth information about each provider – or read about creating custom providers.
When importing data to Dynamicweb, and you import and set the Id's (primary key) of tables explicitly, it is important that you use Id's that conform to Aa-Zz and 0-9 ONLY. Using space, comma, dot and/or any special characters may cause for the application to fail.
Mapping Tables
The entire import/export tool is built around the concept of mapping tables to tables, and between those tables, mapping columns to columns. This approach is modeled closely on the approach taken by the Microsoft SQL Server Import and Export Data Tool.
After selecting a source and destination provider you will be asked to select source tables (Figure 6.1) and map them to destination tables.
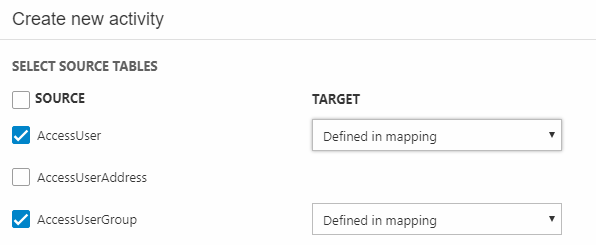
In this case, I export data to an XML file, and so I cannot select a target table (as the destination file does not exist yet). However, if your destination is a database you will be able to select a target table here. If your destination table has the same name as the source table, it will be automatically selected in the dropdown.
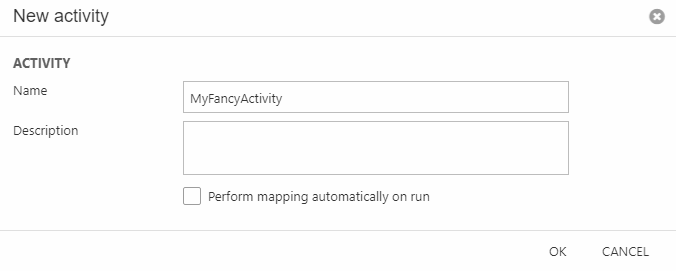
Once you’re happy with your table selection and mapping click finish – you will be prompted to name the activity (Figure 6.2). Do so.
Automatic mapping on run will be explained in the next section.
Mapping columns
After naming the activity, you can create or review the column mappings for each table in your import/export (Figure 7.1).
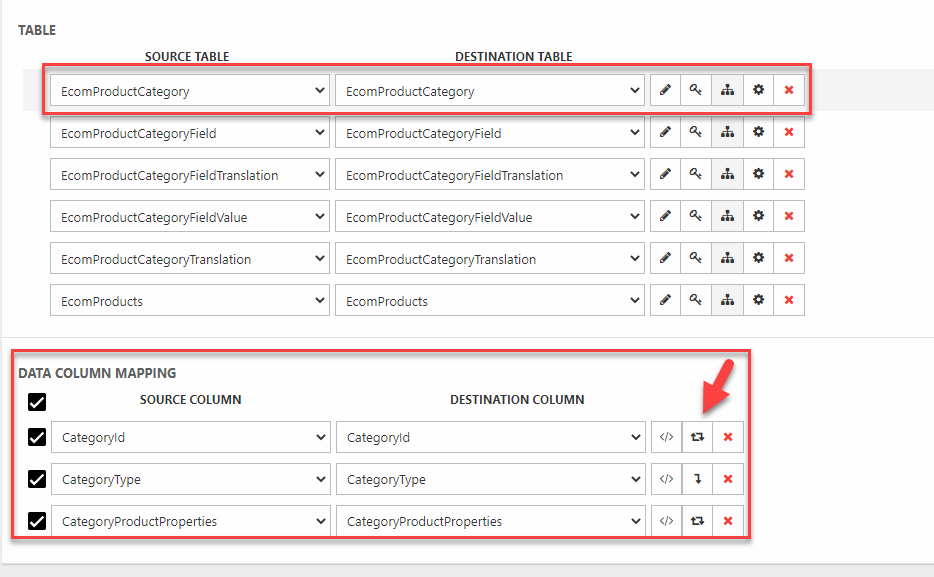
As with source and destination tables, if the column names in the destination table matches those in the source table the mappings will be created automatically.
From the column mapping overview, you have access to a number of advanced options for handling and modifying your import/export activity.
For instance, you can:
- Remove columns (e.g. AccessUserPassword and other sensitive data) which should not be imported or exported
- Add/edit a conditional filter to a table mapping to e.g. export only products with a stock value below 10
- Customize key settings (see important note on key/id recognition related to products here)
- Use scripting to prepend or append something to column data, or replace the source data with a constant
- Choose if a column should be applied on create only. By default the column is always applied but this can be changed by clicking the icon marked on figure 6.1
- On some providers (Xml, SQL, Ecom & Dynamicweb) you can set destination intructions at the table level:
- Remove missing rows after import
- Update only existing records
- Deactivate missing products
- Discard duplicate key rows
Read more about scripting and conditionals below.
Create mappings at runtime/Perform mapping automatically on run
During the creation of a new activity you have the option (during the naming-step) to check a perform mapping automatically on run checkbox, and from the ribbon bar of the activity details view you have access to a create mappings at runtime button (Figure 7.3).
If either of these are active, Dynamicweb will automatically generate mappings between source and destination columns with the same name every time an activity is run.
This makes it less cumbersome to add custom fields and import data to them – as long as the names match, it will be done automatically.

Running an activity
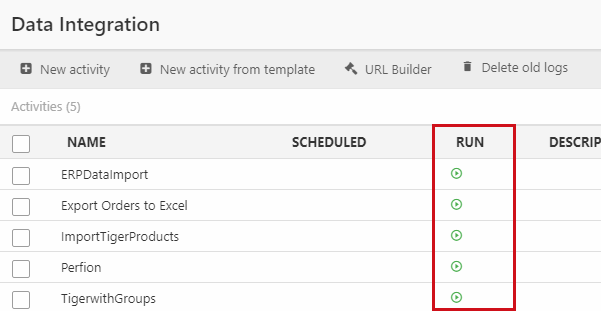
Activities may be run by clicking the icon in the run-column of the data integration overview (Figure 8.1).
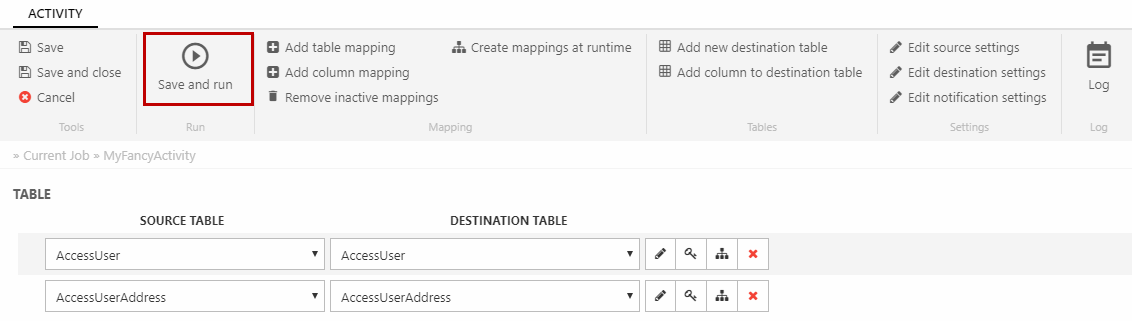
You can also run an activity by clicking the Save & Run button from activity details view (Figure 8.2), either during creation or when viewing or editing the activity details.
Scheduling an activity
In some cases, it makes sense to schedule an activity to be run at a predefined interval. This is done using the standard Scheduled task functionality in Dynamicweb.
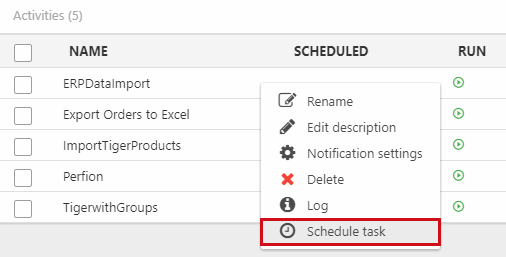
To set up a schedule for an activity, right click the activity in the Data Integration area view and click Schedule task (Figure 9.1).
Create a scheduled task by selecting a start date and interval in the standard manner.
Scheduled integration activities are run by accessing an auto-generated activation URL – you can access the URL when editing a scheduled task for an integration activity.
The same type of URL can be generated manually and used to run an activity remotely – read more below.
On scheduled tasks
The Scheduled Task function in Dynamicweb relies on Windows scheduled task, which should be configured on the server by your hosting partner. If you are hosting the solution, make sure you have Windows scheduled task configured - read more here.
Activity log
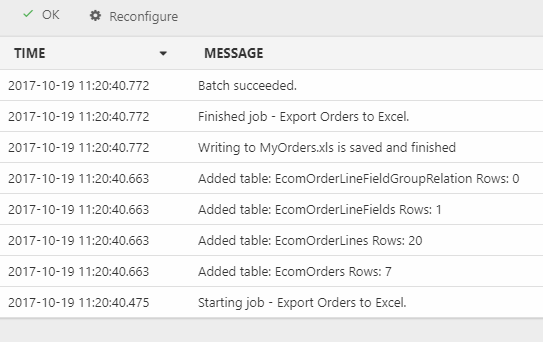
Once an activity has been run you will be presented with a log of how everything went (Figure 10.1).
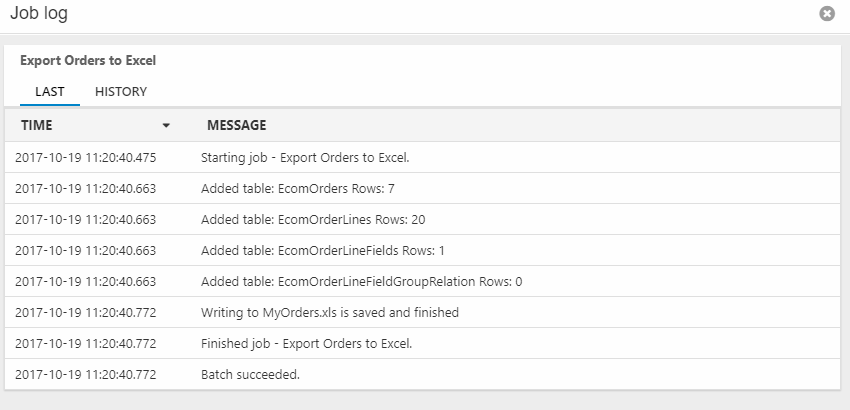
You can access both the latest log and historical logs from the activity details view by using the log button to bring up the log overview (Figure 10.2).
Physically, logs can be found in the /System/Log/DataIntegration folder.
Notification settings
Often, it may be useful to email key people the result of an activity after it’s been run – especially if it fails!
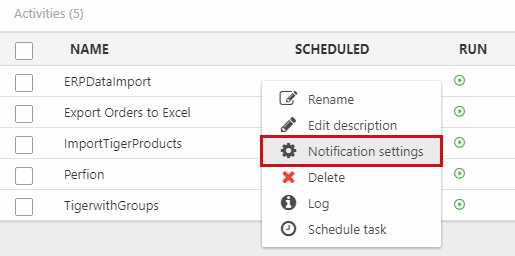
To set up email notifications right-click on the activity in the Data Integration area overview and click Notification setting (Figure 11.1).
This opens the notification settings for the activity (Figure 11.2).
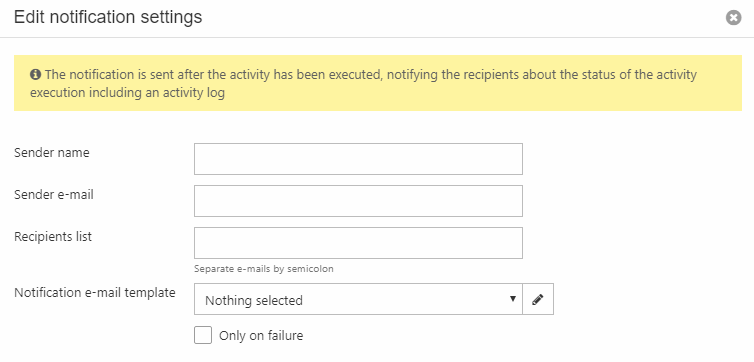
To set up email notifications for the activity:
- Specify a sender name and sender email
- Add the emails of the intended recipients – separate emails by semicolon if more than one
- Select (or edit/create) a notification email template
If you want to limit email notification to only failed activities, check the only on failure checkbox.
Remote execution (URL Builder)
Import/Export activities may be executed remotely by calling a job runner via an url generated from the URL Builder tool. This can be useful if you need to trigger a particular job from e.g. a remote system like Dynamics NAV or AX.
The URL is generated with the following parameters:
|
Parameter |
Values |
Comment |
|
jobsToRun |
A comma-separated list of activity names |
|
|
token |
checksum |
Security measure |
|
SourceFile |
filename |
Used with an XML provider to ensure that only the named file is included in the import, and only the named file is deleted (if the delete source file option is set to true on the job). |
URLs are generated using the URL Builder tool (Figure 12.1) in the Data Integration Module toolbar.
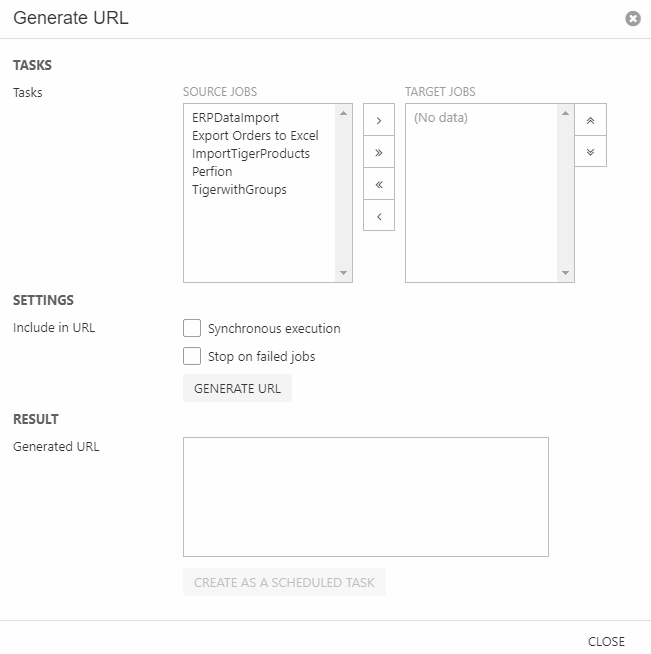
To use the tool:
- Select one or more tasks (activities) to include
- Click generate URL. The installation checksum will be added to the token parameter.
The generated URL can be used immediately as is. You can also generate a scheduled task for it, which may be useful if you want a single task for executing several activities sequentially.
To settings are available:
- Stop on failed jobs causes the execution to stop if an activity is not completed correctly. Already completed activities will not be reversed – i.e. the data from activity 1 is still imported/exported, even if job 2 fails.
- Synchronous execution causes all included activities to be executed simultaneously instead of sequentially. Please note that this may potentially lead to HTTP Request timeouts. If executed successfully in browser you'll get a content of "See log file: yourjob[date]-[timestamp].log.". If a job succeeds you get a HTTP 200 in return, it it fails a HTTP 500 is returned.
Editing & modifying an activity
By clicking an existing activity in the Data Integration area, you can open (and edit) the activity details and settings.
For that purpose, you have access to a ribbon bar (1) and table/column mappings area (2) (Figure 13.1)
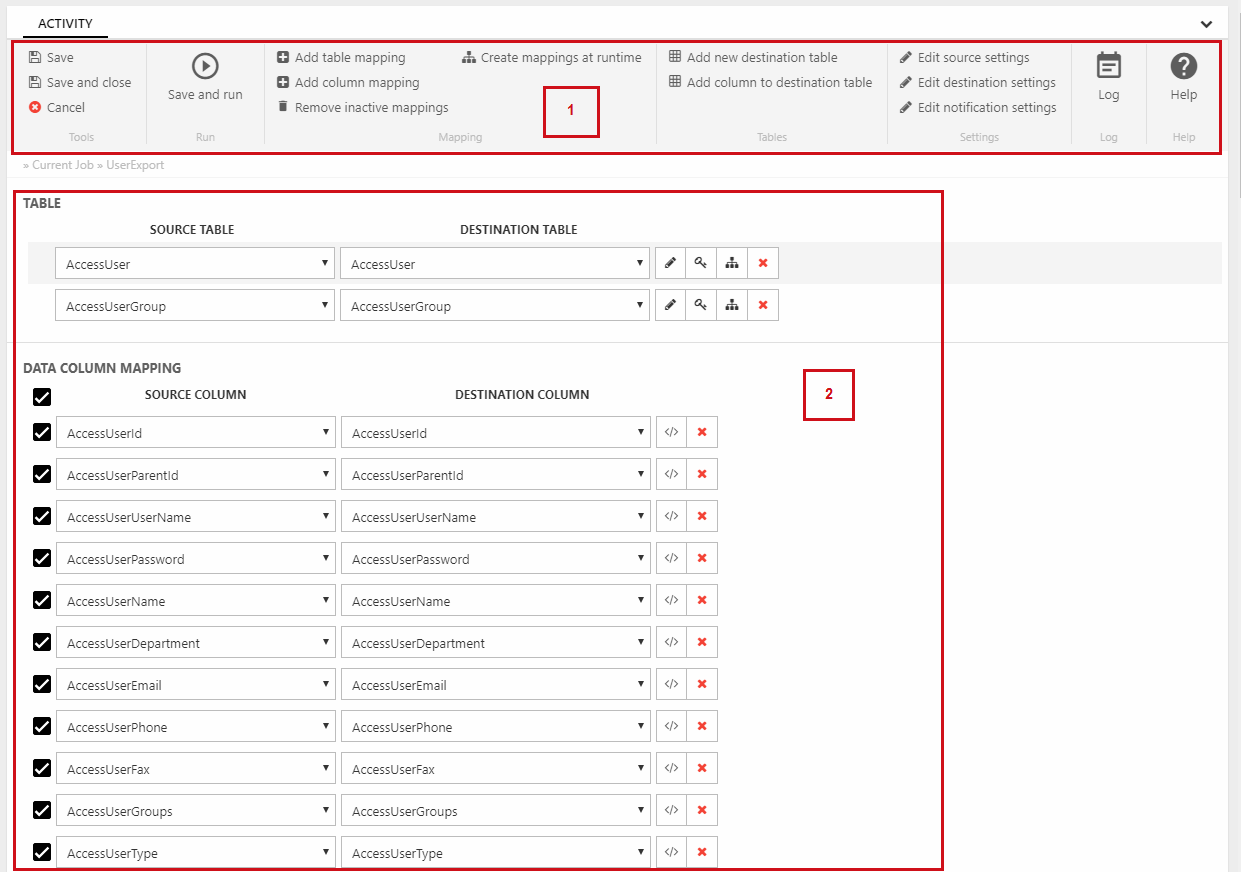
Using the ribbon bar you can:
- Save and run and activity
- Add table and column mappings, remove inactive mappings – or activate the create mappings at runtime option
- Add a new destination table and add columns to a destination table
- Edit the source provider and destination provider settings
- Edit or configure email notification settings
- Access the most recent log file – or review old log files
From the table & column mappings view, you can:
- Use conditionals to filter rows during import/export
- Use scripting to append or prepend something to an input value, or to replace input with a constant
- Customize key values
Read more below.
Context-sensitive values
You can use values from the context when using conditionals and scripting on an integration activity.
To do so:
@Code() – evaluate C# code
Examples:
@Code(System.DateTime.Now.AddDays(1)) – get tomorrow’s date
@Code(1+2) – get 3 (possible, but stupid, granted)
Conditionals
When mapping tables, you can use conditionals to filter which rows should be affected during import/export – e.g. if you want to export all products with a stock value lower than 10.
NOTICE if using CSV as source: The values of columns are converted to the destination data type AFTER conditionals have been applied.
As a column data type cannot be explicitly determined when having a CSV file, all source columns are initially treated as alphanumerical.
Hence, conditionals are always applied as such. This means that you cannot successfully put a conditional on a column that is of a numeric data type.
If you need conditional on numeric column, consider using XML or Excel as source instead.
To set conditionals, click the conditional icon next to a table mapping in your activity overview (Figure 14.1).
Please note that conditionals only work as filters when the column is part of the import.
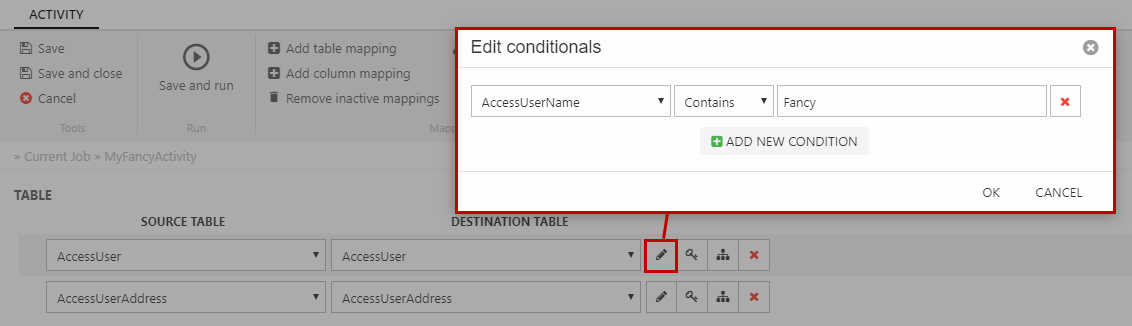
In addition to comparing simple values, you use @NULL to match on true DbNull (isNull = “true” in the XML) and @NULLOREMPTY to match null and empty strings (e.g. “” or <! [CDATA[]]> in the XML).
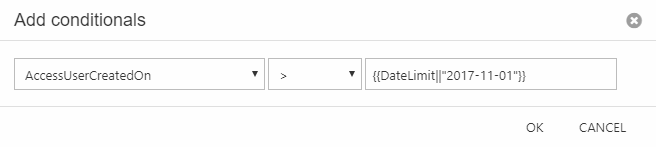
Applying conditions dynamically
In some cases it may be useful to run an activity with dynamic parameters. For instance, you may want to retrieve orders within a particular date interval, a particular order state, or with a specific order total.
To do so add a conditional using the following syntax:
- {{ParameterName||”value”}}
Where ParameterName is the name you want to give the parameter which is passed to URL and “value” is the default value you want to pass on (Figure 14.3).
You may also use this functionality by adding filter= to the URL querystring dynamically.
An example of exporting users only from group Dealers:
... ?jobsToRun=ImportUsers&filter={{Groups|=|Dealers}}
An example of exporting orders with two sets of parameters (separated by a colon):
.. ?jobsToRun=myJob&filter={{OrderDate|>|2014-09-01;OrderCompleted|=|1}}
When using the UI:
Scripting
During column mapping, you can use scripting to append, prepend, set constants or auto generate GUIDs when the activity is run.
Click the scripting button to the right of a column mapping and define your script (Figure 15.1).
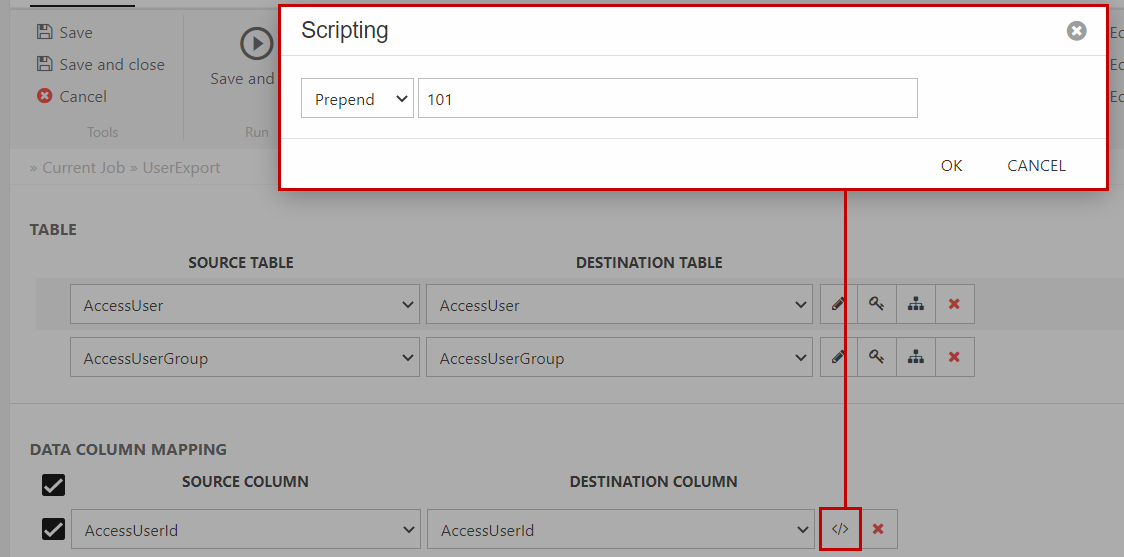
Simply select append, prepend or set constant as appropriate – and enter the value you want to append/prepend/create.
Set Constant is mainly used if you want to replace all source values with the constant, or (more likely) to create a destination column with no source column available, e.g. if your ERP system has no language context column and you want to import these products into a LANG1 or LANG2 context in Dynamicweb Ecommerce.
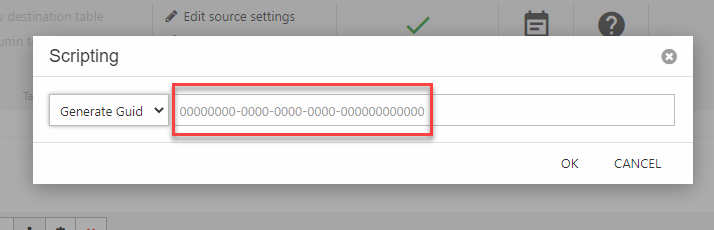
If the data table you wish to import lacks a unique primary key, you can use Generate Guid to auto generate one. The GUID (Globally unique identifier) will be in the format shown in the scripting dialoue (Figure 15.2). The GUID will overwrite what's in the source column when inserting it to the destination. Make sure to select a destination column that functions as a primary key in Dynamicweb or to set it as a custom key (see next section).
Custom keys
Keys in data integration are similar to Primary Keys in databases. These are used to determine when a new row should be added, and when an existing row should be updated.
Clicking the "Set keys" icon (Figure 16.1) will pop up a window where you can choose the key settings that should be considered upon import
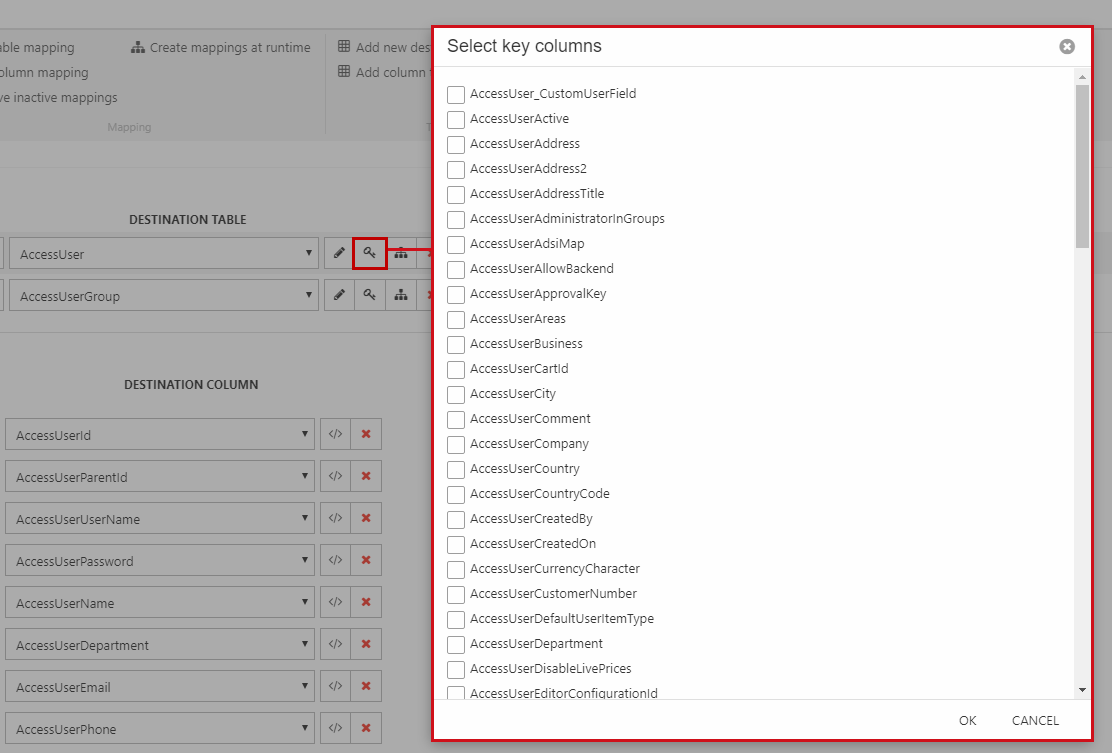
Default will be the actual key(s) of the column. For instance, the default key settings for table EcomProducts is the composite key ProductID + ProductLanguageID + ProductVariantID. However, in some cases you may want to set the unique identifier to ProductNumber.
Moving activities to other solutions
Data Integration activities are store as XML files on a solution, and can be accessed through the file manager.
To move an activity to a different solution, simply move the activity from /Integration/Jobs on one solution to /Integration/Jobs on the target solution (Figure 17.1).
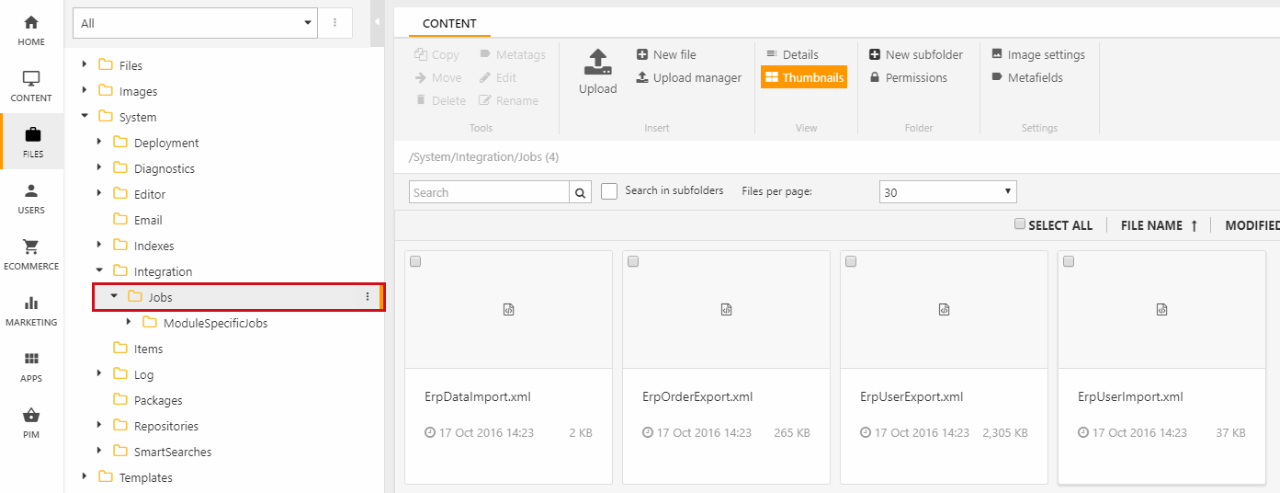
Please note that all paths to source files (CSV or XML) are static in the activity file and must be manually adjusted if they differ on the destination solution.
Notifications
Data Integration notifications contains only one JobFinished notification which is raised after the Data Integration job execution is finished.
The JobFinished notification allows access to information about the job execution, log file and the tables present in the job, and is located in the Dynamicweb.DataIntegration.Integration.Notifications namespace.
The following example shows how to create a JobFinished notification subscriber:
Request timeout
A global request timeout can be configured to data integration jobs in Settings > System > Global Settings.
To configure the timeout insert a value (of milliseconds) in /GlobalSettings/Modules/DataIntegration/Job/TimeoutInMilliseconds. The default timeout occurs after 20 minutes.
Please notice that this global setting is currently only supported in the Endpoint Provider.