
Installing Dynamicweb
In this guide we will go through the process of installing a Dynamicweb solution:
- Installing the Dynamicweb application
- Creating the solution in IIS Manager
- Installing a database and files folder using either the Dynamicweb installer or manually
- Setting up a virtual /Files folder
Before following this guide please ensure that the hosting environment is prepared for installing Dynamicweb.
When everything is in order you can install the Dynamicweb application – there are basically two ways:
- Download a zipped application and extract it to the Applications folder
- Use Visual Studio or an equivalent application to install a local solution using our package feed
In almost all scenarios you want to use option 1 – the exception is if you’re looking to develop a heavily customized solution with e.g. custom price providers, notification subscribers, and so on.
Installing the application from ZIP
To install the application the classic way:
- Download an application from the Downloads section – you need to login
- Extract it to the Applications folder – it should end up looking like Figure 2.1
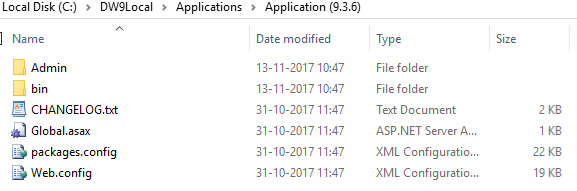
This should take care of the folders, files and permissions – you can now create a new website on your IIS manager
Installing the application via NuGet
If you're a developer installing a local solution for the express purpose of developing custom features, it may make sense to install the application using Visual Studio and the NuGet Packages extension.
To do so:
- Create a new solution of the type ASP .NET web application for .NET 4.6 (From DW9.7+ use .NET 4.7.2 )
- When prompted, select the Empty template
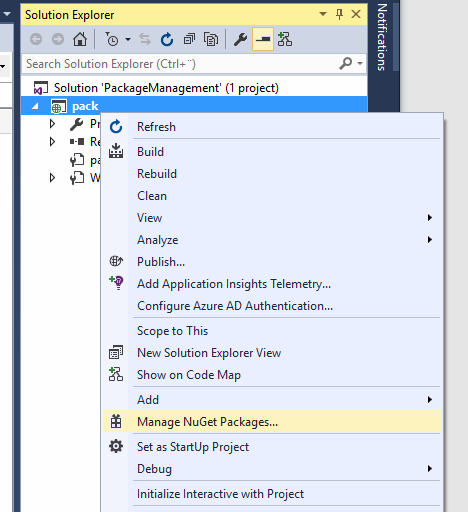
- Right-click the project and go to Manage NuGet Packages (Figure 3.1)
- Check Include prerelease (for DW9.6+)
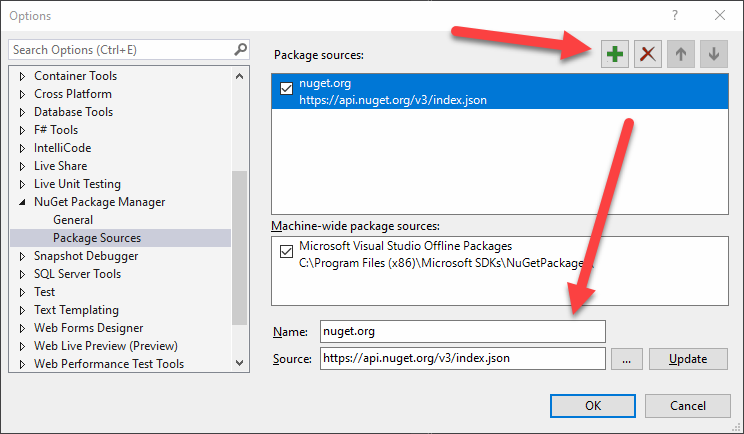
- Open the NuGet Package Manager settings and add https://api.nuget.org/v3/index.json as a package feed (Figure 3.2)
- Set package source to All and browse for the Dynamicweb.Admin package - select it
- Under Options:
- Set Dependency behavior to lowest
- Set File conflict action to overwrite all
- Click Install
After a while you will be prompted to review and accept the changes - do so, then accept the License terms.
Now go get coffee or something - the install procedure takes a while.
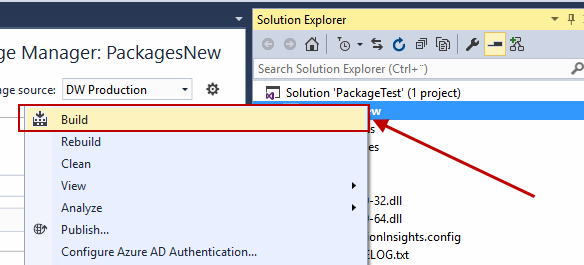
Once the installation is complete, right click the solution and build it (Figure 3.3). Then copy/merge the contents of the dynamicweb.web.config file into the web.config file for the solution. You now have a local solution installed, and it's time to create it in IIS Manager.
Unable to resolve dependency 'RazorEngine.Roslyn'
As of version 9.6+, a bug in NuGet requires you to install Dynamicweb.Admin with a prerelease package included before you can run the normal package install procedure:
- Open the Package Manager console window: Tools > NuGet Package Manager > Console Window
- Type Install-Package Dynamicweb.Admin -Version 9.X.X –IncludePrerelease
- Press Enter
Creating the solution in IIS Manager
Now that you have an application installed it’s time to create a website running on the application – this is done using IIS Manager:
- Open the IIS Manager
- In the left side menu, right-click Sites > Add website
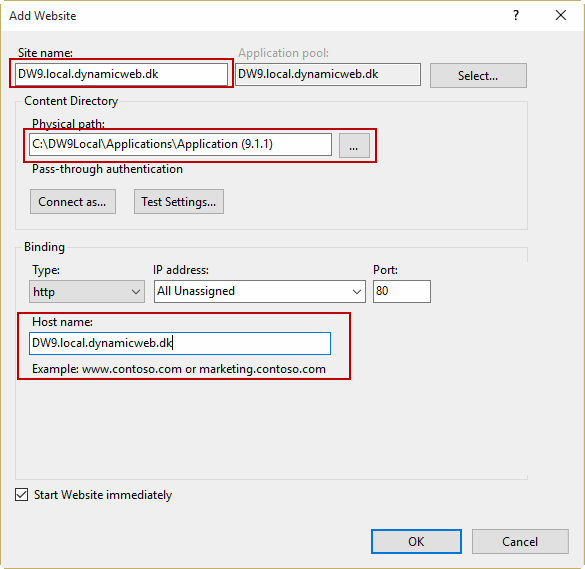
- Configure it (Figure 5.1):
- Enter a site name
- Point the physical path to the folder containing the application you extracted earlier
- Give it a host name – (Local installations: yoursitename.local.dynamicweb.dk, or add a record to the hosts file and use that)
- Click OK
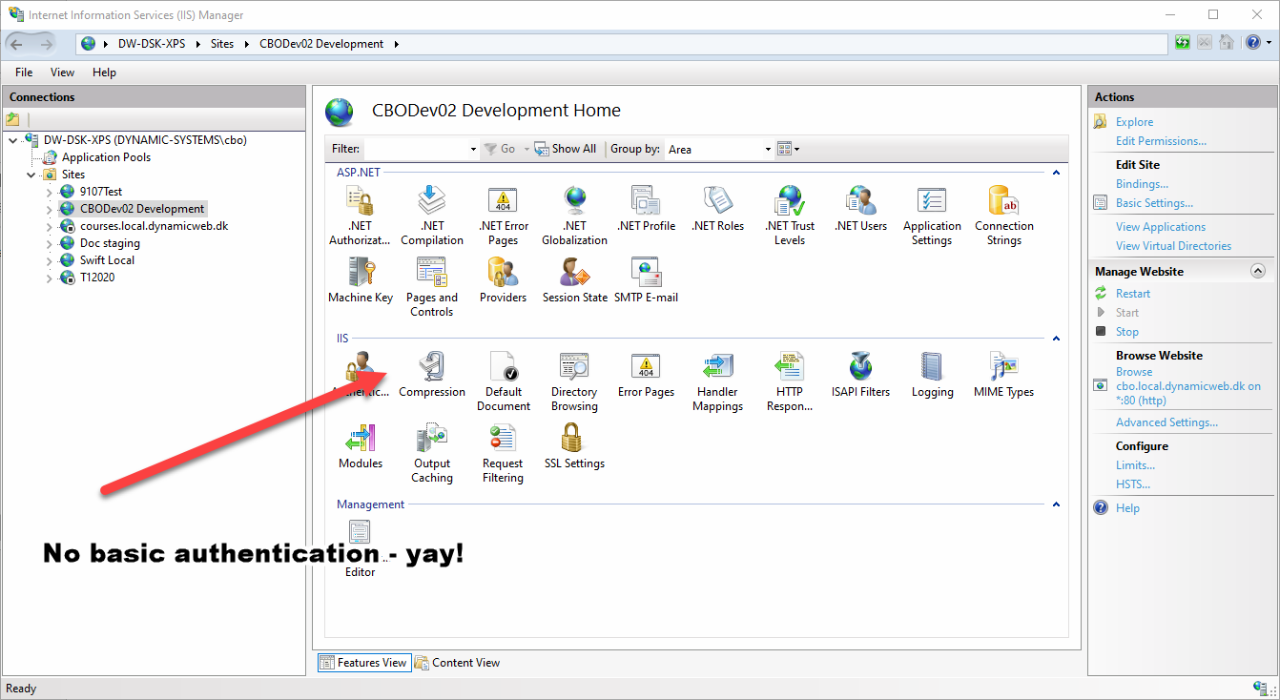
Please also make sure that Basic Authentication is not installed or if it is, then that it is disabled for the website (Figure 5.2).
Database & Files
While a solution has now been created it doesn’t yet have:
- A database for storing data such as pages, orders, products, etc.
- A Files folder containing solution-specific content such as design templates, system files, images, etc.
There are several ways to obtain these:
- You can run the Dynamicweb Installer and either generate an empty database and a Files folder with a simple design, or map to en existing database and files folder
- You can manually connect to an existing database and /Files folder
After either option you should open IIS Manager and set up a virtual files folder – more on that in the next section.
The Dynamicweb Installer
The Dynamicweb Installer is a wizard which is run the first time you access a solution with no /Files-folder and database.
It takes you through some basic steps, e.g.
- Creating or connecting to a /Files-folder
- Creating or connecting to a database
- Creating an administrator user
To run the installer, access the solution URL you created during the last step - e.g. yoursolution.local.dynamicweb.dk.
On step 2 (Figure 7.1) you configure the /Files-folder:
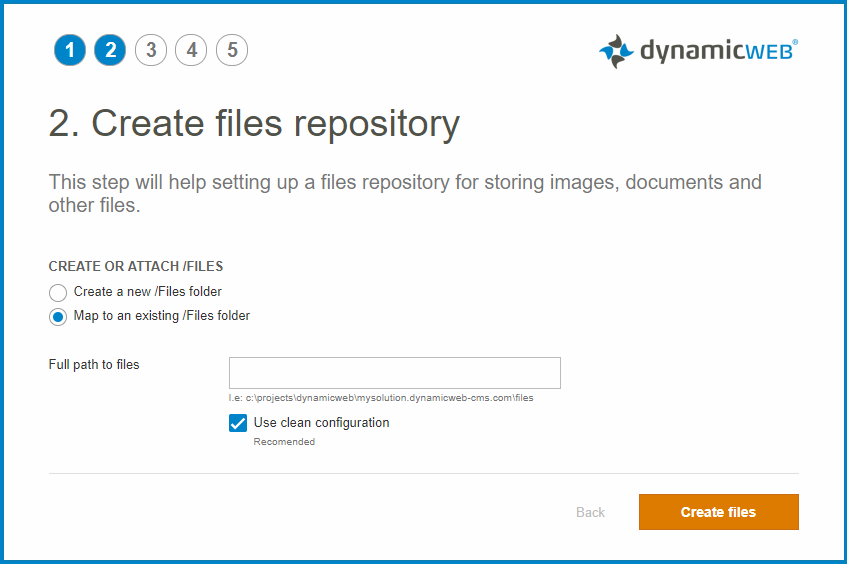
Select either:
- Create a new /Files folder
- Map to an existing /Files folder.
If mapping to an existing files folder, the checkbox Use clean configuration creates a clean GlobalSettings.aspx configuration file for the solution, this is recommended.
On step 3 (Figure 7.2) you setup the database.
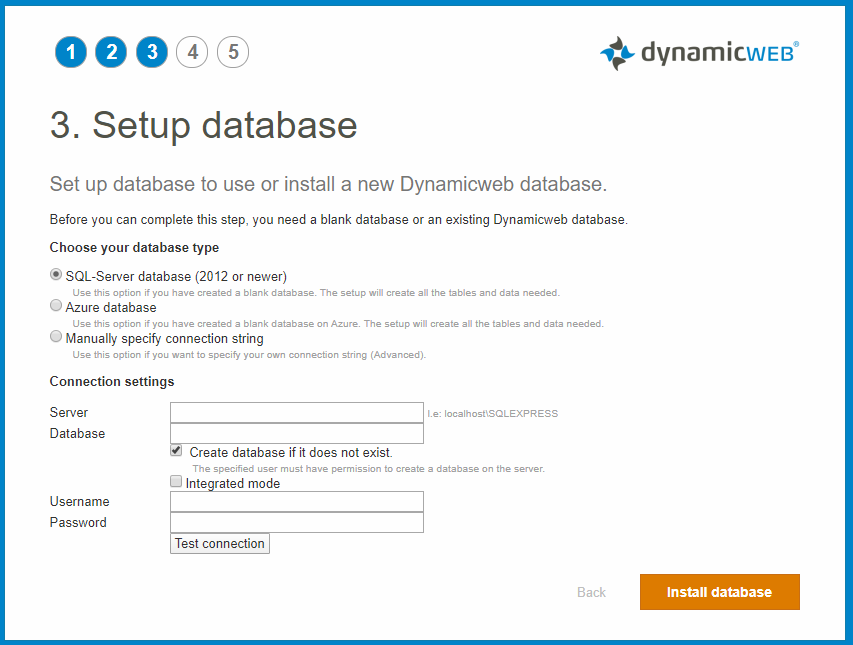
You must:
- Choose a database type – SQL Server, Azure, or Manually specify a connection string
- Specify a server to connect or create to – for local solutions you can use localhost
- Specify a database – the create database if it does not exist checkbox does what it says on the tin
- Enter the username and password of an SQL Server user with permission to create databases on the server
You can verify the connection by clicking Test connection – if you can connect click Install database.
On step 4 (Figure 7.3) you configure an administrator user.

You must:
- Produce a name and an email
- Specify a username – or use administrator
- Supply a password
After creating the administrator user you will be redirected to the /admin login screen where you can login using the new administrator user. You may have to restart before logging in.
Manual installation
If you don't want to use the Dynamicweb Installer you can always do a manual install of a database and files folder. This is typically used when you're creating a copy of an existing solution for testing or development purposes, or when installing a Rapido solution.
In broad strokes the process is:
- Download the database & files folder
- Create a virtual /Files directory for the solution in IIS manager and point it to the downloaded /Files folder
- Import the database and edit the globalsettings.aspx file and point it to the extracted database
For a more in-depth guide to the process please see the this guide.
Using a virtual /files folder
The Dynamicweb application expects a /Files folder with various system files, design files, and other static ressources to be located inside the application folder. But in most cases you actually want to keep solutions separate from applications, as this practice makes it much easier to upgrade a solution to a new folder; you simply open IIS Manager and point the solution to the new application and voila.
To make this possible we recommend that you always create a virtual /Files folder for the website and point it to a solution-specific /Files folder located elsewhere. If you installed a clean solution using the Dynamicweb installer you can simply copy-paste the /Files folder to a location of your choice, e.g. a dedicated /Solutions folder.
To create a virtual directory:
- Open IIS Manager
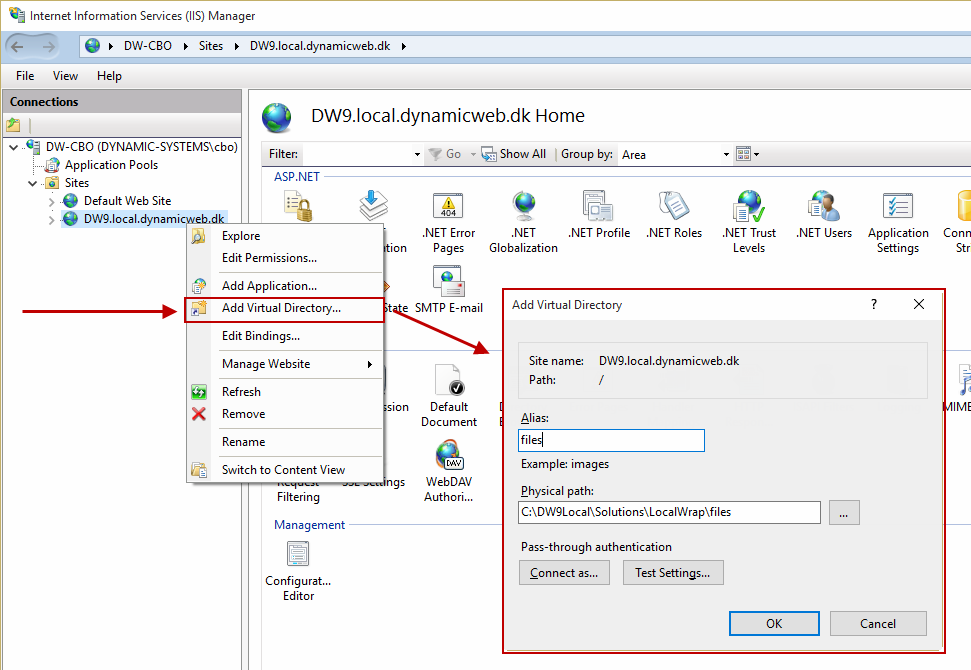
- Right-click on the website and click Add Virtual Directory (Figure 10.1)
- Write files in the Alias field
- Enter the physical path to the files folder in the Solutions folder
- Click OK
To upgrade a solution using a virtual files folder simply:
- Download the new application and extract it to e.g. an /Applications folder
- Open IIS Manager and navigate to the solution
- Edit the basic settings and point the physical path to the new application
Advanced Configuration
You may find some of the advanced configuration options below useful. Most will improve performance and quality of life, but none are obligatory.
Application Pool
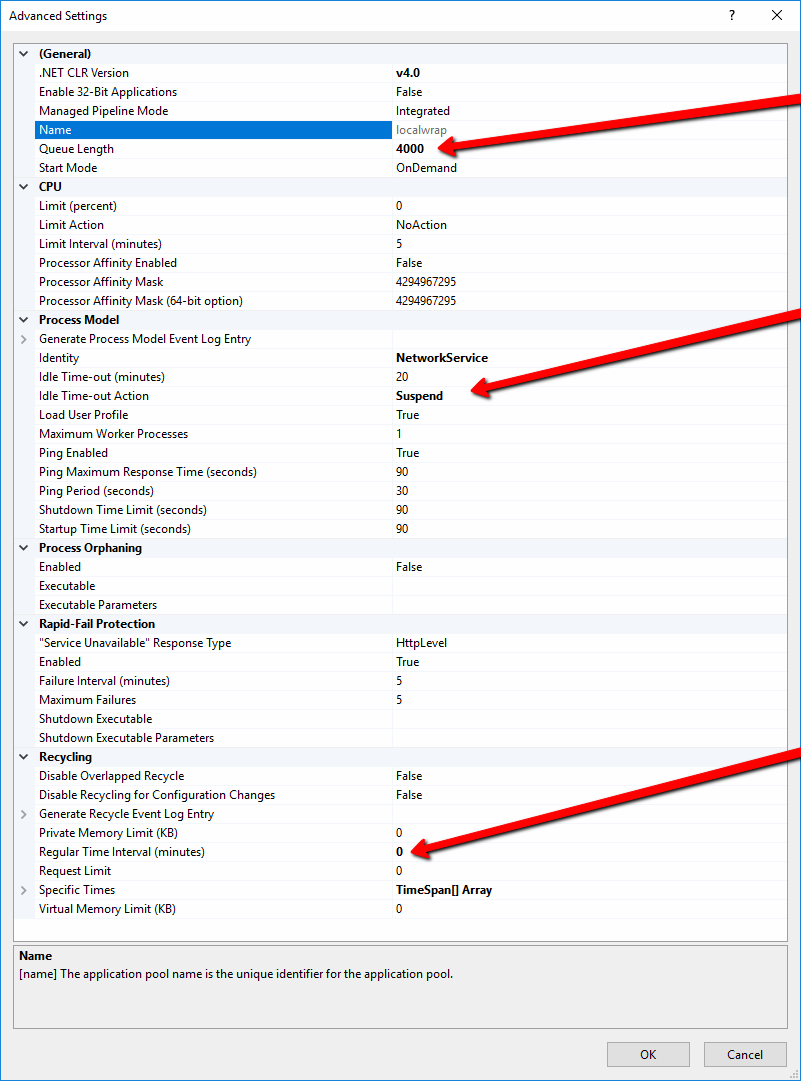
Some of the default application pool settings are less than ideal, and you may want to change them to improve performance or your user experience:
- Up the queue length to 4000
- Set the Idle Time-out Action to Suspend to prevent your website from shutting down completely after Time-out. This will save you some frustration in the morning and coming back from lunch
- Set the Regular Time Interval to 0 to prevent the application pool from automatically recycling at regular intervals (which is always at an inconvenient time)
Pipelines and other advanced options
Application pools with both Classic and Integrated pipelines are supported but Integrated is recommended. Furthermore it’s recommended to run your application pool in 64 bit mode and to use the NetworkService identity. Should you choose to use the ApplicationPoolIdentity you need to set “Load User Profile” to True.
If you intend to use ActiveDirectory integration the application pool is required to run as the NetworkService identity
Scheduled Tasks
Technically, a scheduled tasks is just some settings in the database – to actually execute a scheduled task, Dynamicweb depends on a central scheduled task on the server executing the tasks in the DW database.
The central scheduled task will send a request (using curl.exe) to the solution every 5 minutes, and the solution will then check if any of the scheduled tasks should be executed. As of 9.5, curl.exe has been replaced by powershell, which must be installed on the solution.
If the solution is hosted by Dynamicweb, everything should work out of the box as soon as you create a scheduled task in Dynamicweb. But if it doesn’t…
- Go to Settings > System > Scheduled Tasks
- Click Impersonation and select Custom Credentials
- Enter the credentials of an administrator on the server – this is necessary to create tasks on the server. The credentials are not stored anywhere. Don’t forget the domain – the windows scheduled task will NOT be created without it.
- Create a scheduled task
You will then either see a small error message – failed to handle windows scheduled task – or a short Completed message.
This is a one-time thing only, as all subsequent scheduled tasks will use the server task created using the procedure above.
If you can’t get the above procedure to work, and you have remote access to the server, you can set the server task up manually instead.
- Access the server in question
- Open the Task Scheduler/Scheduled Task program
- Create a new task
- Select the Start a program action and select powershell.exe (version 3.0 required)
- Add an argument pointing to TaskExecute.aspx: “Invoke-WebRequest -UseBasicParsing -Uri
http://www.mydomain.com/admin/public/taskexecute.aspx -Method GET“. - Schedule the task to run every 5 minutes, and make sure it uses the SYSTEM user account.
Alternative method:
- Access the server in question
- Open a CMD prompt (run as administrator)
- Run the following command:
IIS Security Recommendations
When using IIS 8 on Windows 8 / 2012 Server, the following permissions should be used for the root folder, under which the Dynamicweb application is installed:
Folders
- \(root folder, e.g. E:\)
| User | Permissions |
| NETWORK SERVICE | List folder content |
The following permissions should be used for the Dynamicweb solution folders:
Folders
- Application\ (e.g. E:\Dynamicweb.net\Application\)
- Database\ (e.g. E:\...\my-site.dynamicweb-cms.com\Database\)
- Files\ (e.g. E:\...\my-site.dynamicweb-cms.com\Files\)
| User | Permissions |
| NETWORK SERVICE |
|
|
MACHINE\ASPNET MACHINE\IUSR_MACHINE |
|
Setting up a secure folder
As per the HTML protocol, all files in the Files folder are accessible from outside the network unless you configure a secure folder in the IIS. This potentially includes files containing sensitive information, e.g. data integration source files.
It is your responsibility as solution partner to secure this data - this can be done by placing the data in a folder which has been made secure on the server.
To set up a secure folder in the IIS:
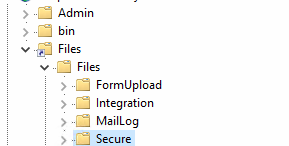
- Create a folder under /Files/Files called e.g. Secure
- Open IIS and navigate to the folder, then select it (Figure 17.1)
- Select & open Authentication under IIS features (Figure 17.2)
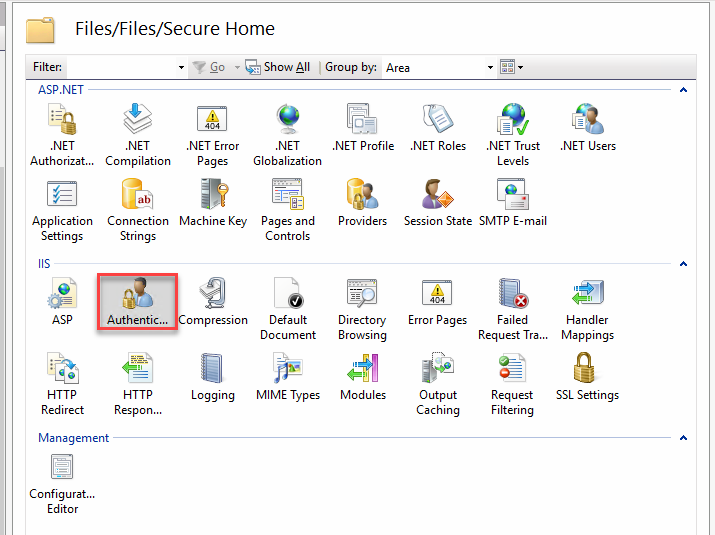
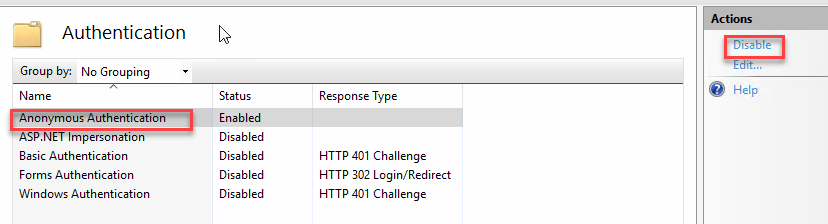
- In the Authentication menu, select Anonymous Authentication and click Disable (Figure 17.3)
Increase the default SQL connect timeout
If a solution contains millions of products the default SQL connect timeout may not be adequate. In that case, open the GlobalSettings.aspx file and add the following connection string to the <Datbase><ConnectionString> node: