
ERP: Developing a custom integration
Integration Framework v1 has been phased out. This documentation is no longer maintained - we recommend using Integration Framework v2 instead.
The Dynamicweb Integration Framework is a collection of components for transferring data and maintaining data consistency between a Dynamicweb solution and a remote system.
There are two main approaches to developing an integration with Dynamicweb:
- A batch integration is a file-based approach, which uses scheduled tasks to import and export data at intervals (hourly, daily, weekly, etc.).
- A live integration submits real-time requests from a Dynamicweb frontend to the remote system, then uses the data returned to show e.g. live prices or stock
However, from your point of view both types of integration do the same thing; submit requests for data to a service - the DynamicwebConnectorService - which is installed on the remote environment (Figure 1.2).
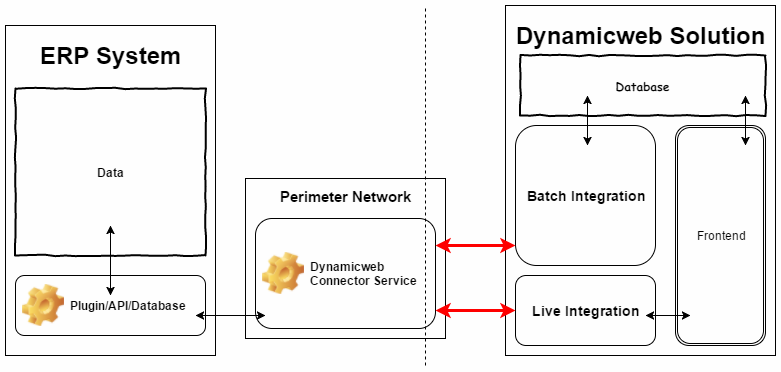
Basically, the DynamicwebConnectorService receives XML requests from Dynamicweb and relays them to the remote system – then receives a response from the remote system and returns it to Dynamicweb. It uses a system-specific piece of code – called a DynamicwebConnectorService add-in – to analyze and transmit requests for data to the remote system, and to receive and relay the responses to Dynamicweb.
- For Dynamics NAV and Dynamics AX it connects to a plugin/code unit installed on the ERP, which then extracts the data requested, wraps it in XML and returns it to the DynamicwebConnectorService.
- For Perfion it queries a public API, which extracts data and returns it in XML to Dynamicweb, where it’s processed via XSLT into the XML format used in Dynamicweb.
So when developing a custom ERP integration you must:
- Create a custom DynamicwebConnectorService add-in which receives, analyzes and relays requests to the remote system in a manner it understands – and returns the response to Dynamicweb
- Make sure you convert the extracted data to the XML format accepted by Dynamicweb somewhere along the way – on the ERP side, inside the add-in, or on the Dynamicweb side (using e.g. XSLT or TableScript)
How you go about it depends on several things – e.g. the tools you have access to on the ERP side, which side of the integration is best equipped for handling the extra load, and whether you need to enrich the extracted data with e.g. auto-IDs that must be looked up on the Dynamicweb-side, etc.
Custom DynamicwebConnectorService Add-ins
First, download and install the Visual Studio templates for Dynamicweb 9 from the downloads section (you must be logged in to access the download).
You can now get down to business:
- Create a new project inside Visual Studio and select Class Library as the project template
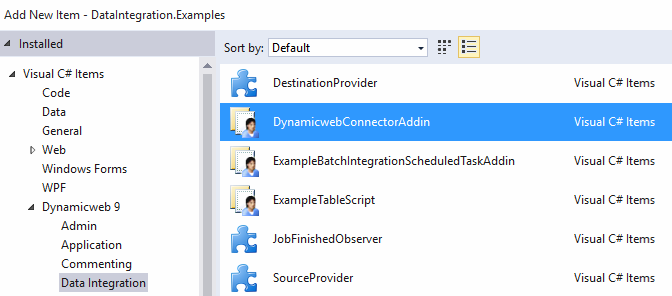
- Add a new item to the project by the right clicking on the project and selecting Add > New Item
- Select the Dynamicweb 9 > Data Integration > DynamicwebConnectorAddin template (Figure 2.1)
Add references to:
- System.Configuration
- DynamicwebServiceClass.dll – which can be found in the DynamicwebConnectorService folder which can be downloaded here.
In the ProcessRequest method, write your code for handling the XML requests from Dynamicweb to the remote system. If you plan on also using a custom batch integration scheduled task add-in – as shown earlier in this article – you can write/use your own XML requests and handle them yourself inside the ProcessRequest method.
On Requests & Responses
Requests are sent to the DynamicwebConnectorService from either batch integration scheduled tasks or via the live integration.
For a list of standard requests & expected responses when using the most commonly used scheduled task add-ins (the Export data add-in and the import data add-in) and the standard live integration dll see here.
You can also use the import data with custom request add-in to relay and react to custom XML requests – or even create a custom batch integration scheduled task add in.
Whichever route you choose, you must create a DynamicwebConnectorService add-in which should be able to receive and handle the requests and return the responses.
Handling requests
Once the DynamicwebConnectorService receives one of the requests – standard or custom – it must be handled, relayed to the remote system, and the response must be wrapped in the XML format accepted by Dynamicweb data integration.
Keep in mind that you can always export a part of the database to XML using the Dynamicweb provider as source and the XML provider as destination to view a concrete example of the XML format Dynamicweb understands.
In the example add-in, the ProcessRequest method breaks down the request XML..
…and translates it into an SQL statement, which is then used to query the SQL database specified in a connectionString parameter from the settings in the DynamicwebConnectorService config file:
As you can see, this implementation connector add-in retrieves all users from the [Users] table of an SQL server database, then runs the response through the WrapInXml method to wrap the data in the format understood by Dynamicweb:
Using the custom add-in
To use the custom DynamicwebConnectorService add-in, save and build your project – then copy the .dll to the DynamicwebConnectorService folder.
Open the DynamicwebConnectorService config file and make the necessary changes:
You must:
- In the configSection specify the name of your custom add-in
- Create a settings section – here the <DynamicwebConnecorAdin> – with the appropriate nodes, here the connectionString parameter used to connect to an SQL database
- Use the ErpConnectorType parameter in the appSettings to specify that the connector service should use your custom add-in
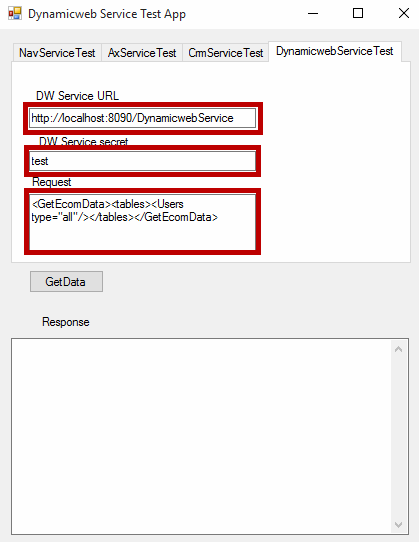
Next you should start the Dynamicweb service and check your connector is working using the DynamicwebConnectorService test app (Figure 5.2).
Example: Dynamicweb & AdventureWorks
Below you will find an example – a proof of concept – of a custom integration to the Microsoft AdventureWorks database.
It implements the following features:
- Importing users to Dynamicweb
- Exporting users to AdventureWorks
- Importing products to Dynamicweb
- Exporting orders to AdventureWorks
- Order/cart calculation
Download a zip of the DynamicwebConnectorService files with the custom AdventureWorks add-in here.