
Tutorial 2: Shopping Cart & Checkout
In tutorial 1 we covered shops, product groups and products and how to render them in frontend.
In this tutorial we are going to:
- Create a shopping cart
- Customize how you add products to the cart
- Modify the checkout flow
Creating a shopping cart
A shopping cart in Dynamicweb is a module which:
- Displays details about the products added to cart
- Lets the customer select a payment & shipping method
- Calculates a total order price including fees, discounts, etc.
And so on – depending on the order steps you define. You can define as many steps as you want and display them in any order you like, but the Checkout step (which completes the order) must always be present.
Creating a shopping cart is straight forward:
- Create a new page in your content tree and call it e.g. Shopping Cart
- Create a paragraph, name it Shopping Cart, and attach the Shopping Cart app to it
This will open the Shopping Cart app settings – at present only the basic settings and the steps section are of interest to us (Figure 2.1).
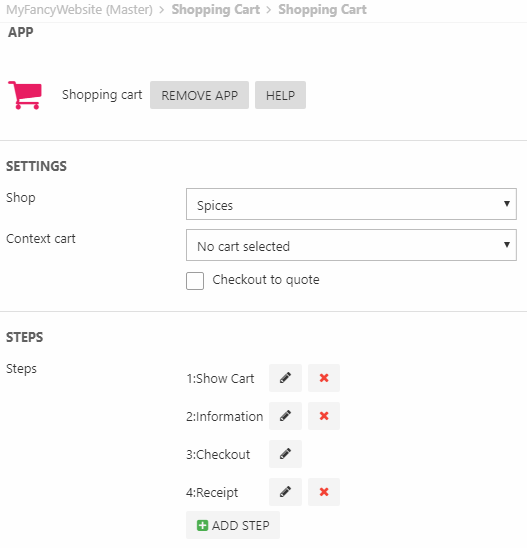
Select your shop using the Shop dropdown – and take a quick look at the Steps.
A checkout step is basically just a name (‘Show Cart’) and a template – click the pencil icon to access the template selector for one of the steps, then check the templates available:
- For the Show Cart step select the ShowCart.cshtml template
- For the Information step select the Information.cshtml template
- For the Receipt step select the Receipt.cshtml template
You can now add products to the cart and proceed through the checkout flow. Try it out.
Your product prices will be displayed in the default currency, but no payment and shipping providers are available for selection – these topics are covered in tutorial 4.
Since a payment method is first introduced and created in tutorial 4, you won't be able to actually place the order.
Adding products to the cart
Well, you’ve already added products to the cart so we know it works – but why?
Products are added to cart by using a parameter called CartCmd in a request. For normal add-to-cart operations the value must be “Add” – and you must also specify the ProductID of the product you are adding to cart.
Open the List.cshtml template you use to render your products in frontend and locate the Add to cart button section:
As you can see, you simply post a form containing a product ID value retrieved from context, using a button with name=”CartCmd” and value=”add”. This particular template also checks of the product is a variant, and if it is sends a VariantID to the cart – but we will work with variants in a future tutorial.
Adding multiple products to cart
In many cases (e.g. B2B shops) it makes sense to add more than one product to the cart at the same time – and making that possible is a good opportunity for getting some templating done.
First create a copy of the List.cshtml template and use it in the product catalog app – call it ListMulti.cshtml or equivalent.
Then:
- Insert a <form> tag around the entire products loop and add a submit button inside the <form>
- Add a hidden field to act as a cart command when the form is submitted: <input type="hidden" name="CartCmd" id="CartCmd" value="addMulti" />
- Use @TemplateTags() to find the tag with hidden fields for multi-add – render it in your template once for each product: tip: @product.GetValue(“”)
- At the beginning of your products loop, declare a local variable concatenating the string “Quantity” with the value from the Ecom:Product.LoopCounter tag:
- Add an input field where you can specify how many products you want to add, and call the local variable to name it Quantity1, Quantity2, etc. depending on the product rendered:
If everything is done correctly, you should now be able to enter various values in the input fields – and then click your submit button to add all the various products to cart.
Go try it now :)
Modifying the Checkout procedure
When you created the shopping cart above, you selected templates for the default steps – Show Cart, Information & Receipt – and you’ve seen these templates in action.
However, these days B2C businesses try to cut down on the number of steps a customer has to go through before placing their order – and one obvious way to do that would be to merge the Show Cart and Information steps.
- Open the ShowCart.cshtml and Information.cshtml templates
- Merge the two templates in a way which makes sense and looks decent – save the new template as CartAndInformation.cshtml
- Remove one of the now superfluous steps in the app and use the merged template on the remaining step
- Go through the checkout flow and make sure everything still works
What you’ve learned – and what’s next
During this tutorial you’ve learned how to:
- Create a shopping cart
- Add products to the cart – and add multiple products to cart with a single click
- Modify the checkout procedure
In the next tutorial you will be introduced to the powerful New Indexing engine – and use it to create a free-text search in the product catalog.
Extra exercises
If you have extra time, or you’re extra curious, consider doing one or more of the extra exercises below.
Quotes
Dynamicweb features a dedicated system for handling inquiries and quotations.
Inquiries are created from frontend by customers, who add products to and submit a quotes cart – the inquiry can then be processed from the backend by sales staff.
To implement quotes, you must:
- Create an order context and a quotes cart
- Render an add to quote cart
- Set up a Customer Center app on the My Profile page – this will allow the customer to accept or reject a quote after sales staff has processed the inquiry
Go to the manual page for quotes and follow the steps to implement quotes on your solution.
Abandoned Carts
A lot of potential sales are lost because users add products to the cart and then – for various reasons – don’t complete an order. Some of these users may complete an order if only they are reminded that they forgot to check out.
Follow the guide for setting up an abandoned shopping cart campaign to try it out.