
Live Integration
A Live Integration is an extension of a batch integration which makes it possible to show e.g. live or customer-specific prices, live stock levels, or to have the remote system handle order, discount, and/or shipping fee calculations in real time.
The data flow is somewhat dependent on the feature(s) implemented:
- When a page with live prices and stock is rendered:
- A list of product IDs or product numbers is sent to the remote system along with the ID of the current user
- The plugin on the remote system then extracts prices and stock states for that user, and returns them
- The products in memory are rendered with the returned prices – no data is saved in the database
- When an order/shopping cart is calculated in the remote system:
- Cart information (products IDs, quantities, user information) is sent to the remote system
- The remote system calculates the cart with live prices, discounts, etc.
- The updated cart is returned to Dynamicweb and saved to the database, then shown to the user
- If an order is created in the remote system, the remote ID is also returned and saved, to ensure data consistency between the two systems
As such, a live integration requires that a functioning batch integration is in place – you can’t request real-time information from nothing, so you need e.g. a ProductID and a UserID to request a customer-specific price, and the product must exist in the database before it can be shown in frontend.
To work with live integration, you must add it to your solution manually:
- Download the Integration v2 LiveIntegration dll from the Downloads area
- Place it in the bin-folder of the solution – like all bin-folder modifications, this causes an IIS reset
- Log in again
Check out the live integration request and responses article for an overview of the the available parameters for each type of request and examples of the expected the response.
Configuration
Once it has been installed, the Live Integration add-in is available from Settings > Integration > Integration Framework Live.
It consists of 6 sections, which are used to configure different aspects of a live integration:
- General – contains connectivity and other overall settings
- Products – contains settings related to synchronizing product related information
- Orders – contains settings that define how carts and orders are handled
- Users – contains settings related to synchronizing users
- Notifications – define how notifications are sent and when
- Logs – configures the logging behavior of the connector
These are described in more detail below.
General
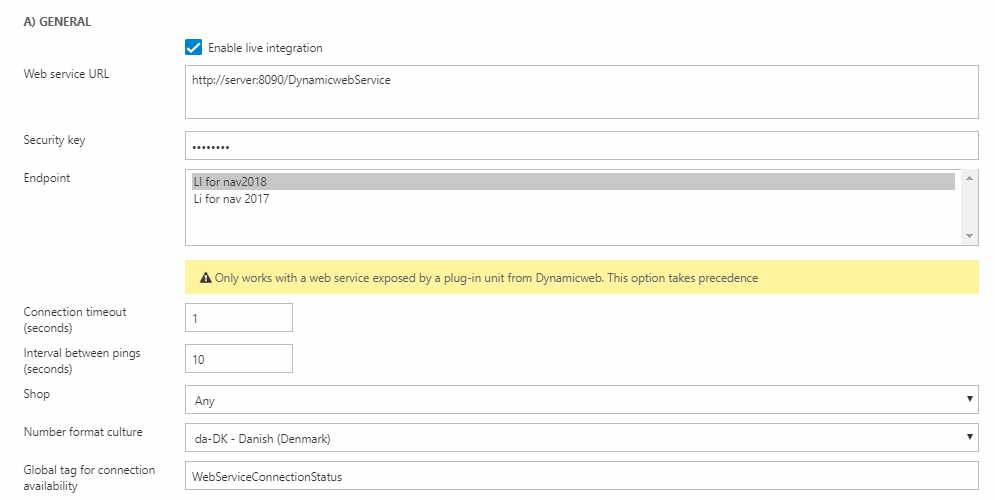
The General section (Figure 3.1) contains settings related to connectivity and other overall settings.
|
Setting |
Notes |
|
Web Service URL |
Enter the URL to the web service exposed by the Dynamicweb Connector |
|
Security key |
Enter the security key/secret you received from the Dynamicweb Connector service config file. Please notice that if you are using a cloud instance of D365 Business Central you should disregard the Security key field. Instead you should add an authentication to the endpoint. Please refer to the Endpoint management documentation to read about adding authentications. |
| Endpoint |
Select one or more endpoints - if both an endpoint and a web service URL is selected the endpoint is used. This setting is typically used when you cannot install a connector service on the remote system, e.g. because the ERP is cloud-hosted. |
|
Connection timeout (seconds) |
|
|
Interval between pings (seconds) |
Select the interval between pings in case of a connection error i.e. the frequency of attempts to reconnect. The shortest interval possible is 30 seconds. The timer stops when the connection is restored. |
|
Shop |
Select a shop for which the live integration is active – or set to Any to use it on all shops |
|
Number format culture |
Select a number format culture to use when parsing information from the remote system |
|
Global tag for connection availability |
Use this tag in frontend to notify customers when the connection to the ERP is down, and live features are unavailable. Format: @GetGlobalValue("WebServiceConnectionStatus"). |
The live integration supports multiple endpoints, with each endpoint requiring a unique URL and a matching connector service – 2 endpoints = 2 connectors.
The URL syntax is [URL];[Field];[Value] - with the Field property retrieving data from either of these fields:
- User.Company – AccessUserCompany column of table AccessUser
- User.Department – AccessUserDepartment column of table AccessUser
- User.[Any custom field] – System name(!) of any custom field column of table AccessUser
- Order.[Any custom field] – Any custom field column of table EcomOrder
- Session.Shop – ShopID of the shop in current http context
Edit the link directly (web service URL) or double-click an endpoint and add the parameters (endpoints).
Products
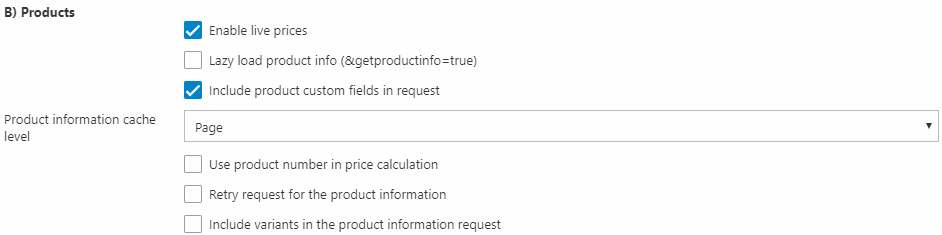
The Products section (Figure 4.1) contains settings related to retrieving live product information.
|
Setting |
Notes |
|
Enable live prices |
When enabled, prices are looked up in the remote system when shown in the frontend |
|
Lazy load product info |
Skips loading prices and other product info from the remote system unless getproductinfo=true is in the request. This can be used for lazy loading scenarios using AJAX. |
|
Include product custom fields in request |
Whether to send the custom fields for a product to the ERP when request price and product information. If the ERP doesn’t need this information to determine the correct return values, leave this off for performance reasons. |
|
Product information cache level |
Sets caching to either page or session, depending on how important it is to continually update the information |
|
Use product number in price calculation |
When checked, the product number is sent to the remote system in place of the product Id. This is typically used on solutions where the PIM Combine feature is used. |
|
Retry request for the product information |
Whether or not the connector should retry the request for product information in case of a failure. |
|
Include variants in the product information request |
|
Note on live products and Swift solutions
Please note that using the live integration to load products on a Dynamicweb Swift solution currently does not support loading stock amounts.
Orders
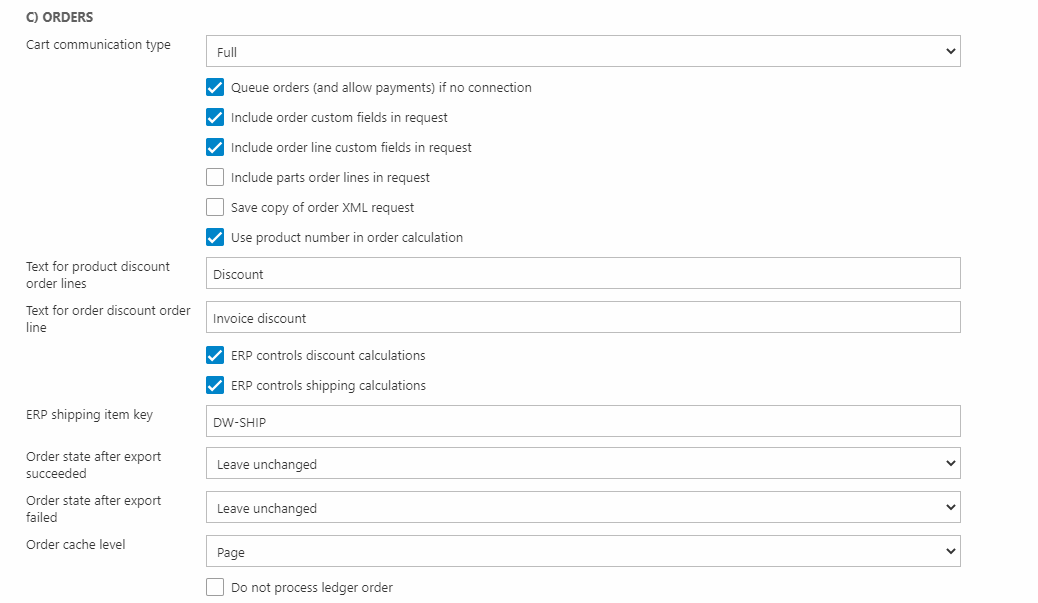
The Orders section (Figure 6.1) contains settings that define how carts and orders are handled.
|
Setting |
Notes |
|
Cart communication type |
Defines if and how the connector communicates with the ERP. The available options are:
|
|
Queue orders and allow payments if no connection |
Queues orders if no connection – they will be processed once the connection is re-established, provided that the appropriate batch job is created - see previous section. |
|
Include order custom fields in request |
Includes order fields in the request |
|
Include order line custom fields in request |
Includes order line fields in the request |
|
Include parts order lines in request |
Includes Parts List order lines in the request. |
|
Save copy of order XML request |
Saves a copy of the original order XML request before any modifications – this is useful for debugging purposes if the order request is modified by e.g. a notification subscriber before being relayed to the remote system. |
| Use product number in order calculation | When checked, the product number is sent to the remote system in place of the product id. This is typically used on solutions where the PIM Combine feature is used. Should be combined with the Use product number in price calculation being set in the Products section. |
|
Text for product discount order lines |
Product discounts returned by a remote system do not contain a description for showing in the cart and on an order – this allows you to define one manually. This key is translatable. |
| Text for order discount order lines | Order discounts returned by a remote system do not contain a description for showing in the cart and on an order – this allows you to define one manually. This key is translatable. |
|
ERP controls discount calculations |
Check this to have your ERP control discount calculations – only for D365 BC /NAV. |
|
Order state after export succeeded |
Set an order state to apply to the order after a successful export |
|
ERP controls shipping calculations |
Check this to have your ERP control shipping fee calculations – only for D365 BC/NAV. If unchecked, shipping fees are calculated by Dynamicweb and pushed to the D365 BC sales order under the ERP shipping item key defined in the field below. |
|
ERP shipping item key |
If shipping fees are calculated by Dynamicweb, they are pushed to D365 BC/NAV item charge under the item key defined here. Defaults to DW-SHIP, but you can supply your own. |
|
Order state after export failed |
Set an order state to apply to the order after a failed export |
|
Order cache level |
Sets caching to either page or session, depending on how important it is to continually update the information |
|
Do not process ledger order |
If using the Ledger functionality, this prevents ledger order from being processed by the live integration |
Users
The Users section (Figure 7.1) contains settings related to how anonymous users are handled.

|
Setting |
Notes |
|
Live product info for anonymous users |
Activates live product info for anonymous users |
|
Carts and orders for anonymous users |
Activates cart and order calculation for anonymous users |
|
ERP Anonymous user key |
Supply the name of the default customer in the remote system designated for B2C customers. |
Notifications
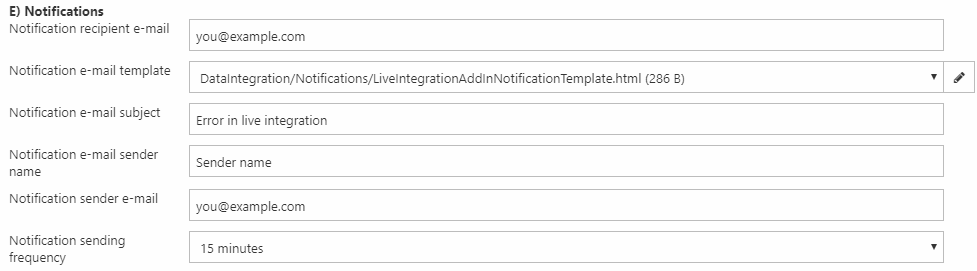
The Notifications section (Figure 8.1) defines how and when email notifications are sent when the live integration cannot connect to the remote system.
|
Setting |
Description |
|
Notification recipient e-mail |
Enter an email address |
|
Notification e-mail template |
Select an email template |
|
Notification e-mail subject |
Enter an email subject |
|
Notification e-mail sender name |
Specify a sender name |
|
Notification e-mail sender e-mail |
Specify a sender email |
|
Notification sending frequency |
Set a frequency – how often do you want to receive these emails? |
Logs
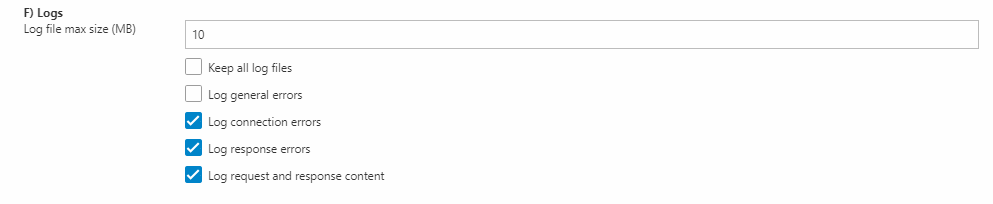
The Logs section (Figure 9.1) allows you to configure the logging behavior of the live integration – this is particularly useful for debugging purposes, but can also be used for production.
|
Setting |
Description |
|
Log file max size |
Set a max size in MB for the log file |
|
Keep all log files |
|
|
Log general errors |
|
|
Log connection errors |
|
|
Log response errors |
|
|
Log request and response content |
|
Testing connectivity
Once the Live Integration add-in has been configured, you can click the Test Connection button on the Live Integration add-in toolbar to access to a (barebones) version of the DynamicwebConnector TestTool (Figure 10.1).
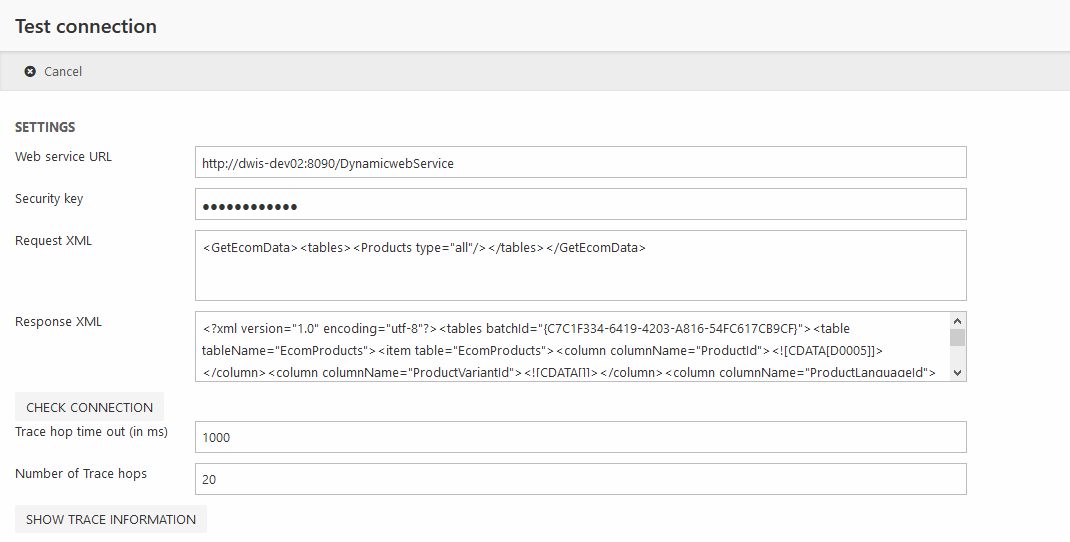
Using that, you can connect to the DynamicwebConnector web service and test requests & responses from the Dynamicweb side of the integration - provided, of course, that the connection is up and running.
You can also examine trace information.
If you wish to test your connection within the TestTool itself, you should check out the Live integration requests and responses article for an overview of the available parameters for each type of request and examples of the responses to expect:

Live Discounts
How discounts are handled by the live integration depends on the remote system:
If you’re integrating to D365 BC/NAV:
- Discounts may be handled at either side of the integration
- To have D365 BC/NAV handle the calculations, check the ERP controls discount calculation checkbox in section C of the live integration settings
- To have Dynamicweb handle the calculations leave the checkboxes unchecked
If DW handles discounts, the following discount types are supported: percentage, amount & product. A note is attached to each sales order line in NAV with details about the applied discounts.
If D365 BC/NAV handles discounts and you want to apply invoice discounts & sales line discounts to your B2C orders, they must be set on the so-called Anonymous customer specified in the live integration section D (Users).
Dynamicweb Order discounts apply to a full order – these are equivalent to Invoice discounts in D365 BC/NAV, and Dynamicweb Product discounts apply to a single order line – these are equivalent to Sale line discounts in D365 NC/NAV.
If you’re integrating with D365 FO/AX:
- Discounts fees must be handled by D365 FO/AX
- On DW versions older than 9.10 you must also configure a live discount provider in DynamicWeb to apply the discounts
The reason is fairly technical; communication with the remote system can happen at various stages of a user’s interaction with the website, including stages where the discount and shipping fee data is not normally available. Instead of requesting the data again – and negatively impacting performance - the Live Integration stores the data in session state using the cart/order ID, and the Live Shipping Provider and Live Discount Provider uses the data from session state to calculate the correct fees and discounts.
The providers are available only after the live integration dll has been installed on the solution.
In newer versions we've found a better technical solution to this, making the method obsolete. So we recommend that you upgrade to 9.10+ if possible.
Live Discount Provider (9.10 and earlier)
On DynamicWeb 9.10 and older you must set up a live discount provider which applies the discounts returned by the remote system to carts and orders in Dynamicweb. On DW 9.10+ this happens automatically, so you can ignore these instructions.
Unlike shipping fees, you can’t have Dynamicweb calculate the discounts and still use the remote system to calculate the remainder of the order such as customer specific prices. If you need to support that scenario, you’ll have modify the source code for the live integration framework.
To configure the Live Discount Provider.
- Go to Ecommerce > Discounts (not Order discounts, which is a different engine).
- If you don’t see the Discounts node, contact your partner account manager to have it added to your license
- Click New sales discount in the toolbar
- Provide a name, and an optional description, make sure the discount is active and clear the end date of the discount to make sure it remains active and does not expire after some time.
- Under Discount type, choose Live integration discount – this causes most of the settings to disappear. This is intentional.
- Under User > Used by select either All or Authenticated users, or select particular users and user groups, as appropriate
- Under Shop, select a shop or leave to All to have the discount provider kick in for all orders in all shops.
- Under Country, select one or more specific countries or leave to All to have the discount provider kick in for all countries.
- Leave minimum order price set to 0 – this business rule should be applied by the remote system instead.
- Click Save and close on the toolbar.
If you’re changing the behavior in the remote system or creating your own implementation, you should know that the values for discount are stored in the XML as follows (note that for FO/AX only OrderShippingMethodName applies):
Here is a sample XML for a product discount:
Note: If the OrderLineProductName XML field is empty, the value defined in the Orders section of the Live Integration configuration will be used.
Live shipping fees
How shipping fees are handled by the live integration depends on the remote system:
If you’re integrating to D365 BC/NAV:
- Shipping fees may be handled at either side of the integration
- To have D365 BC/NAV handle the calculations, check the ERP controls shipping calculation checkbox in section C of the live integration settings
- To have Dynamicweb handle the calculations leave the checkboxe unchecked
If shipping is handled by Dynamicweb, the fee pushed to the sales order under the ERP shipping item key defined in section C of the live integration settings – the default is DW-SHIP.
If you’re integrating with D365 FO/AX:
- Shipping fees must be handled by D365 FO/AX
- You must configure the associated provider in Dynamicweb – the Live Shipping Provider
- You must use the OrderShippingMethodName in the request. OrderShippingMethodId is not currently supported.
The reason is fairly technical; communication with the remote system can happen at various stages of a user’s interaction with the website, including stages where the discount and shipping fee data is not normally available. Instead of requesting the data again – and negatively impacting performance - the Live Integration stores the data in session state using the cart/order ID, and the Live Shipping Provider and Live Discount Provider uses the data from session state to calculate the correct fees and discounts.
The providers are available only after the live integration dll has been installed on the solution.
Live Shipping Provider
The Live Shipping Provider applies shipping fees returned by the remote system to carts and orders in Dynamicweb.
Please note, that you’re not forced to have the remote system calculate the shipping fees. You can also use Dynamicweb’s built-in shipping providers to calculate the fee directly or with the use of an external system such as UPS or FedEx. When you configure one of the built-in providers, the fee is calculated by Dynamicweb and submitted to the remote system; any fees returned by the remote system are ignored.
To configure the Live Shipping Provider.
- Go to Settings > Ecommerce > Orders > Shipping
- Click New shipping on the toolbar
- Provide a name, and an optional description and icon
- Under Countries, make sure All Countries is selected
- Since your remote system handles the fee calculation, Dynamicweb should not limit the availability of the provider to specific countries.
- Set both Default fee and No fee for purchases over to zero
- These rules should be handled by the remote system, not by Dynamicweb
- Under Shipping provider, select Live integration shipping fee provider as the type
- Under Fee settings, select Use fee rules from provider
- Click Save and close in the toolbar
If you’re changing the behavior in the remote system or creating your own implementation, you should know that the values for shipping are stored in the XML as follows (note that for FO/AX only OrderShippingMethodName applies):
Queued Orders (Ax only)
Usually, when a user completes a checkout in the frontend, the order is immediately transferred to the remote system. This allows the remote system to start processing orders as soon as they arrive.
However, there are two scenarios where this doesn’t happen:
- The system encounters an error while sending the order, e.g. because the remote system is down
- You turned off live synchronization of orders in the Live Integration settings, by setting Cart communication type to ‘None’
Either way, you now have two options for getting these orders to the remote system:
- Manually, using a button on the ribbon bar
- Automatically, using the Sync Queued Orders task.
For both options, the following criteria must be true for an order to be eligible for synchronization:
- OrderComplete – must be true
- OrderDeleted – must be false
- OrderIntegrationOrderID – must be null or empty. When it’s not, it means the order has already been sent to the remote system.
- OrderIsExported – must be null or 0. When it’s not, it means the order has already been sent to the remote system.
Manually submitting orders
You can manually send an un-synchronized order to the remote system using the Transfer to ERP button in the Live Integration section of the Ribbon bar (Figure 17.1).
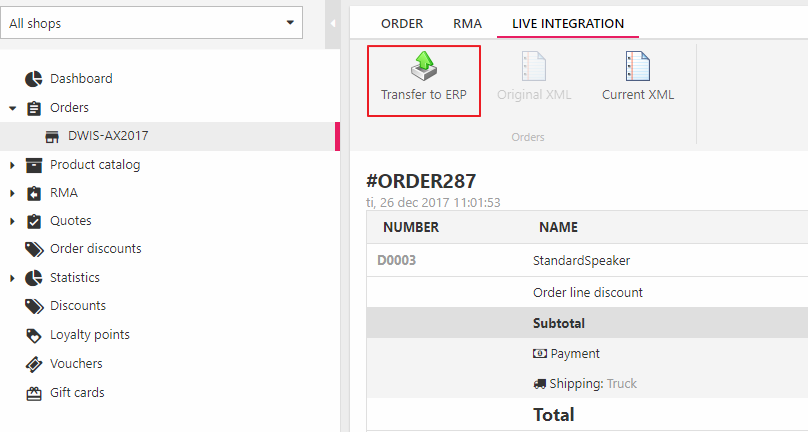
Only orders which have not been submitted before can be transferred. This is determined by looking at the IntegrationOrderId property of the order; if it’s not null or empty, the order cannot be submitted.
To send orders from the order list follow these steps:
- Click Ecommerce > Orders
- In the order list, select one or more orders you want to submit
- Switch to the Live Integration tab of the ribbon bar
- Click Transfer to ERP
After a short while you either get a notification that the orders have been transferred correctly, or you get an error message. The button is also available from both the order details page.
Automatically submitting orders
In addition to live synchronization of orders and manually submitting them, you can also send orders in batch using a scheduled task. This is useful in a few scenarios:
- You frequently encounter connection issues with live sync, and you want to submit the orders as soon as you can after the first failure.
- You want to minimize the checkout time for the user by not immediately sending the order. A scheduled task can then send the order shortly after the user has completed it.
- You don’t want to submit orders as they arrive, but send them in batch at certain intervals to lower the pressure on the remote system.
Your reasons for using scheduled order sync has some impact on how you want to configure the scheduled task. If you want to optimize the checkout time for the user and take out live integration during checkout, you can use this scheduled task to send the orders shortly after they have been completed. In that case, schedule the task to run often, such as every 5 or 10 minutes.
If, on the other hand, you disabled live integration to, say, decrease pressure on your remote system during business hours, you want your scheduled task to respect that also. In that case, you could schedule the task to run outside business hours once a day. Make sure you set “Maximum orders to process in each execution” to a high enough number so all new orders are transferred correctly.
To create the task to submit orders in batch follow these steps:
- Go to Settings > Integration > Integration Framework Batch
- Create a new batch integration activity and:
- Name it
- Set a start and end time and a repetition interval
- For Type, select the Sync queued orders using Live Integration add-in (Figure 18.1)
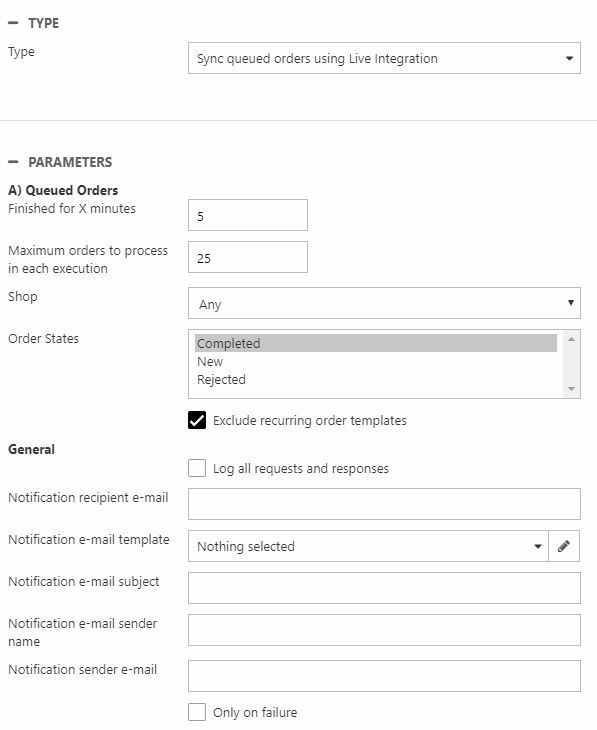
- Configure the Queued Orders section according to the table below:
|
Name |
Description |
|
Finished for X minutes |
Defines the minimum number of minutes that an order must be completed before it gets sent. This helps prevent submitting orders that are still being processed by Dynamicweb or a payment gateway. Defaults to 5 minutes. |
|
Maximum orders to process in each execution |
Defines the maximum number of orders that are sent per run of the scheduled task. A lower number means a lower pressure on your remote server at the expense of latency. Defaults to 25. |
|
Shop |
Defines the shop for which orders should be sent. Defaults to Any which means all orders for all shops are sent. |
|
Order States |
Defines the state that an order should be in in order to be sent to the remote system. Defaults to none selected which means all orders are sent. |
|
Exclude recurring order templates |
When selected, only orders that have OrderIsRecurringOrderTemplate set to 0 or null are being sent. This enables you to skip sending templates and only send real orders. |
As with all other scheduled tasks, you can also set up notifications, if you want to be notified of the task’s execution and its result.