
Dynamics 365 Finance & Operations
This article explains the process of deploying and configuring the Dynamicweb D365 FO plugin, which is a component in an integration between Microsoft Dynamics D365 Finance and Operations and a Dynamicweb solution.
The plugin is a piece of standard software which reacts to XML requests by:
- Extracting data from D365 FO
- Wrapping the data in an XML format understood by the Dynamicweb solution
- Returning it to the Dynamicweb solution via an encrypted connection
Download the Integration v2 Dynamics D365 FO plugin from the downloads area.
The Dynamicweb D365 download contains two files:
- AXDeployablePackage_[releasedate].zip
- Dynamicweb-Dynamicweb.axmodel
The deployable package can be deployed directly to your D365 solution using LCS – provided that you need to make no changes whatsoever to the standard integration. This is not usually the case.
Development environment installation
In 99% of cases, you want to tweak the plugin code to take custom data and fields into account.
In that case, you must:
- Install the model in a development environment
- Make your changes
- Create a deployable package with your custom code
- Deploy it via LCS.
Install the model
To install the model file in a development environment, use the ModelUtil.exe tool and the –import directive:
For example:
More information is available in the Microsoft documentation on model import/export.
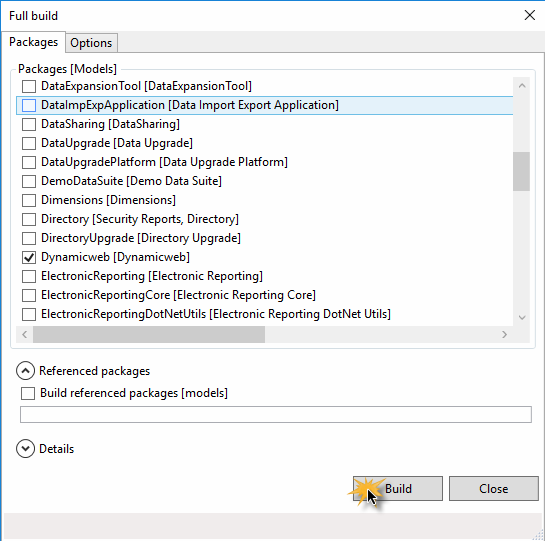
Building the model
To build the newly installed model:
- Run Visual Studio
- Click Dynamics 365 – Build models... in the main menu of Visual Studio
- Select the Dynamicweb package/model in the list of available models
- Click Build (Figure 4.1)
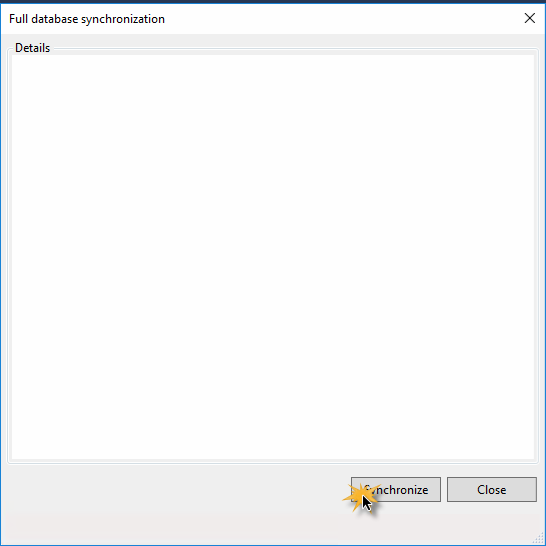
Database synchronization
In order to create all required the database objects, run database synchronization after a successful build.
- Click Dynamics 365 – Synchronize database... in the main menu of Visual Studio
- Click Synchronize (Figure 5.1)
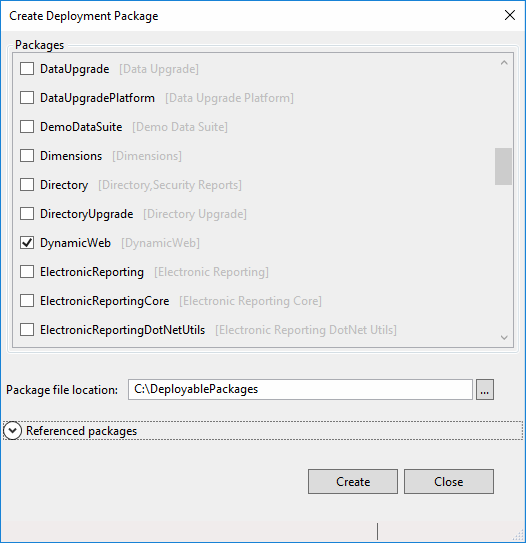
Creating a deployable package
In order to deploy your code and customizations to a runtime environment (Demo, Sandbox or Production), you must create deployable packages from the model. A deployable package does not contain source code.
Deployable packages can be created using Visual Studio dev tools. To create a deployable package from Visual Studio:
- In Microsoft Visual Studio, select Dynamics 365 > Deploy > Create Deployment Package.
- Select the packages that contain your models, and then select a location in which to create the deployable package.
Installing the package
To install a deployable package on a development environment:
- On the virtual machine (VM)
- Download the zip file for the deployable package. Make sure it is stored in a non-user folder.
- Extract the files
- Open a Command Prompt window and navigate to the folder where you extracted the deployable package
- Run the following command:
The devinstall option installs the deployable package on the VM – as of D365 Finance & Operations Enterprise Edition with Platform update 12, this does not require you to be an administrator on the VM.
Database sync
This command does NOT run database syncronization. You must run database synchronization manually from Visual Studio after installing the deployable package.
Runtime environment installation
To install a deployable package to a runtime environment (Demo, Sandbox or Production) you must first sign in to Microsoft Dynamics Lifecycle Services (LCS) and upload the package.
- Sign in to LCS
- In your LCS project click the Asset Library tile
- Upload the deployable package
Please note, that installing a package causes system downtime. All relevant services till be stopped, and you won’t be able to use your environments while the package is being applied.
Non-production environments
Applying a deployable package to a non-production (Demo, Sandbox) environment can be done by you, the developer.
- Open the Environment details view for the environment where you want to apply the package.
- Click Maintain > Apply updates to apply an update.
- Select the package to apply. Use the filter at the top to find your package.
- Click Apply. Notice that the status in the upper-right corner of the Environment details view changes to Queued, and that an Environment updates section now shows the progress of the package.
- Refresh the page to see the progress of the package application. Notice that the servicing status is In Progress, and that the environment status is Servicing.
- When the package has been applied, the environment status changes to Deployed, and the servicing status changes to Completed.
- To sign off on package application, click Sign off if there are no issues.
Production environments
In contrast to Demo and Sandbox environments, deploying a package to a production environment through LCS cannot be done by you, the developer. Instead, you must submit a request to Microsoft, who will apply a package when the customer is ready for downtime.
- On the Asset library page in LCS, on the tab that corresponds to the asset type (Software deployable package), select a package, and then click Release candidate.
- Apply the package in a sandbox environment.
- After the package is successfully applied and signed off in the sandbox environment, open the Asset Library, and mark the package as Release Candidate.
- Open the Environment details view for the production environment where you want to apply the package.
- Click Maintain > Apply updates to apply the package.
- Select the type of package to apply.
- Select the package to apply in your production environment, and then click Schedule to submit a request to the Service Engineering team to apply it. Please note, that the list of packages only includes the packages which have been successfully signed off in the sandbox environment, and have been marked as release candidates.
- Specify the date and time to schedule package application for, click Submit, and then click OK to confirm. Note that your environments will be down and unavailable to perform business while the package is being applied.
- Refresh the page. Two fields on the page indicate the status of the request.
- Request status – This field indicates the status of the request that you submitted to Microsoft.
- Actionable by – This field indicates who must take action.
- Microsoft either accepts or denies the request.
- If the request is accepted, Microsoft begins to update the environment.
- If the request is denied, Microsoft informs the customer about the reason for denial and the action that the customer must take. The customer can then reschedule the request, change the package, or cancel the request.
You can at any time use the Comments field to post comments to the request. After the environment is serviced, you can monitor the Service status field for a status of the package application process. You can also see the number of steps which have been completed, versus the total number of steps.
Succesful deployment
After a package has been successfully deployed, the Servicing status field is set to Completed. The Request field is still set to In progress because the request has not been closed yet.
- Close the request by clicking Close servicing request
- Set the Service request status field to Succeeded
- Click Submit.
Unsuccessful deployment
If the package is not successfully deployed, Microsoft will investigate the issue. The Service staus field will indicate that the deployment has failed.
Whn deployment fails, Microsoft can abort the package, revert to a good state, and return the request to the customer. The customer must then validate the environment and close the request. If the problem is an issue in the package, you must submit a new request which includes a deployable package fixing the issue.
The failed request must be closed:
- Close the request by clicking Close servicing request
- Set the Service request status field to Aborted
- Click Submit.
Dynamicweb service setup
Follow the setup procedure below to expose the Dynamicweb service to the DynamicwebConnector service, which connects D365 and the Dynamicweb solution.
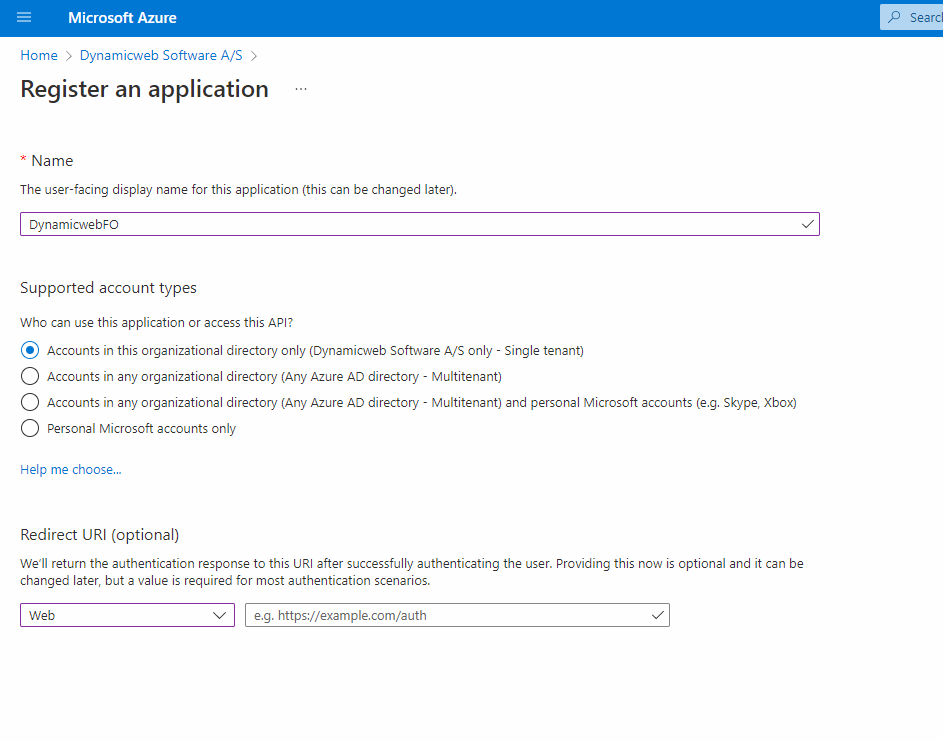
Azure application registration
First, register the service as an Azure application.
- Open MS Azure portal (https://portal.azure.com) in your browser.
- Go to Azure active directory – App registration
- Click New application registration
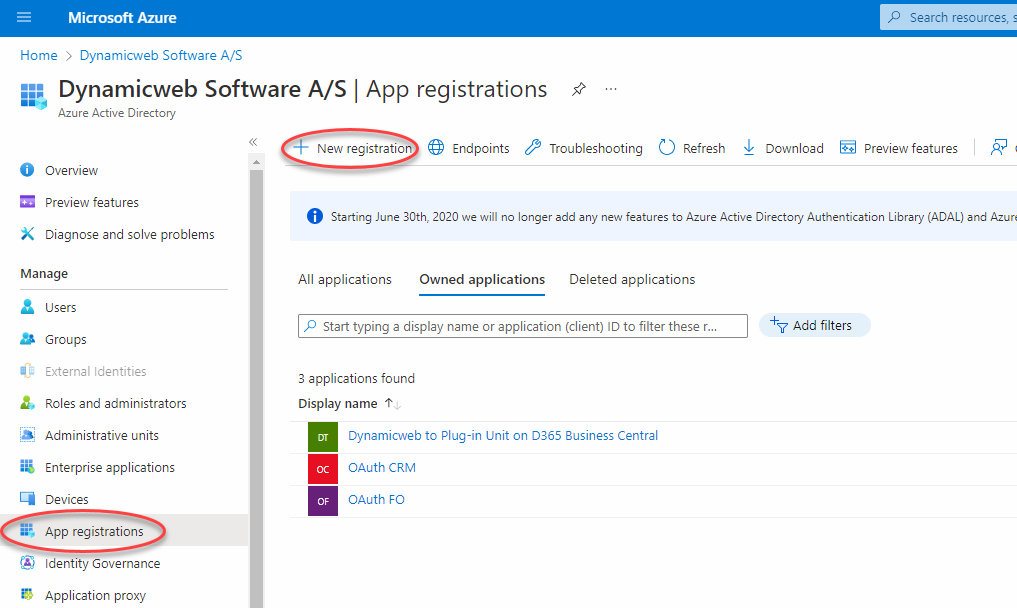
- Fill in the fields/check the following options:
- Application name – any meaningful name
- Application type – Web app/API (by default)
- Choose supported account type - Single tenant (your organization only) is recommended.
- Optionally, a redirect URI to authenticate from. This can also be added later.
- Click Create
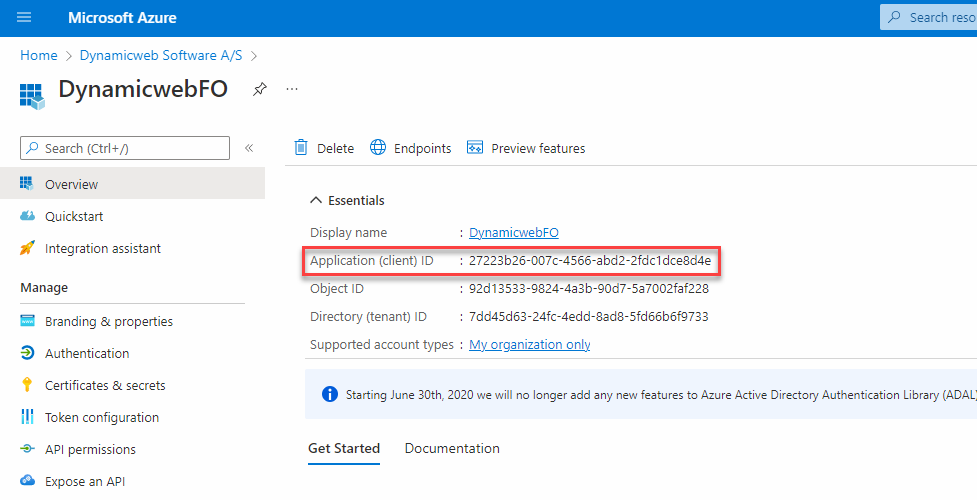
After registering, write down the Application ID value (Figure 14.3) – you will use it later in the setup process, and in requests to the Dynamicweb service.
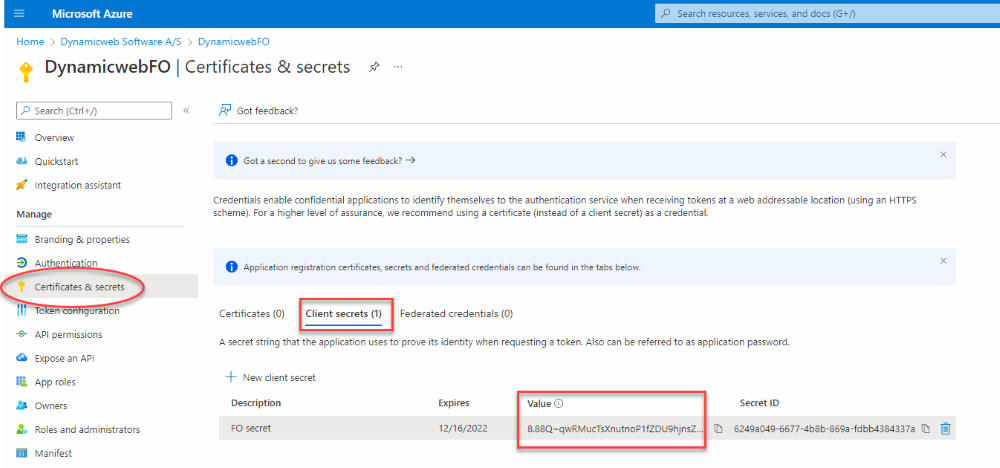
Application key creation
Next, go to Certificates & Secrets to create a client secret. This will be used later on in requests to the Dynamicweb service.
From the Certificates & Secrets screen:
- Click the Client secrets tab
- Click New client secret
- Enter a description and select an expiration time
- Click Add at the bottom of the right side bar.
- Make sure to copy the value of the client secret at this point (not to be confused with the ID), as it will be hidden henceforth and is to be used in the authentication within Dynamicweb
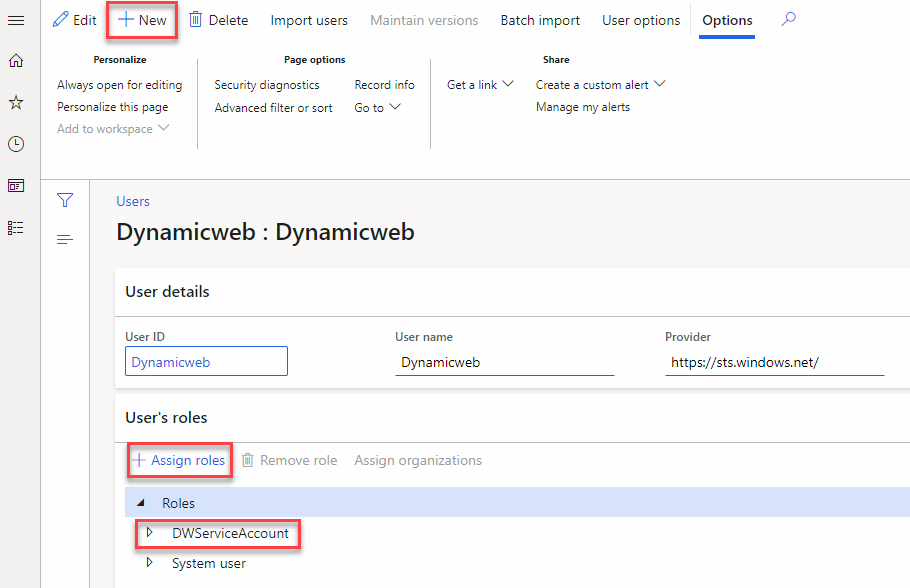
F&O User configuration
In order to expose data from the Plug-in unit, a user with the DWServiceAccount role must be configured.
To do so, go to Modules > System administration > Users in Finance & Operations.
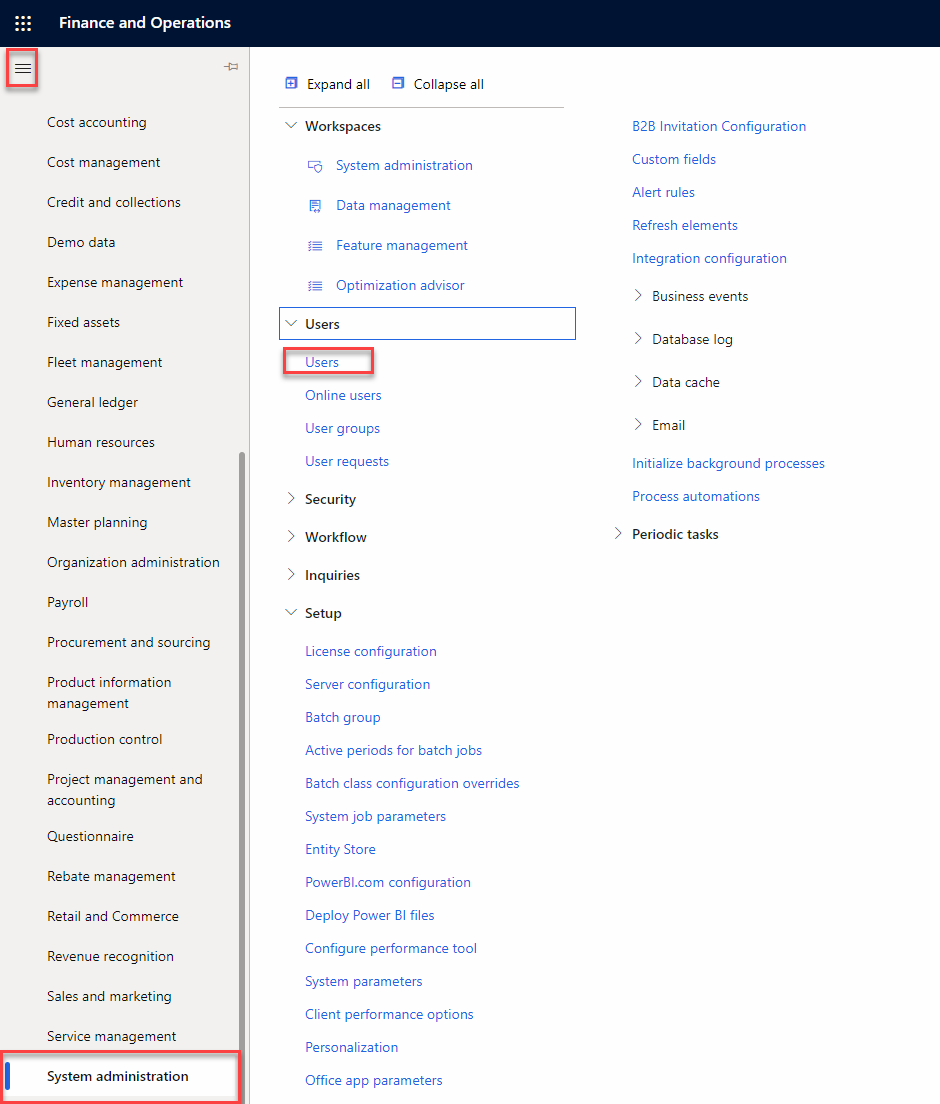
In F&O Users:
- Click new
- Insert a suitable User ID and User name (fx. "Dynamicweb)
- Insert an arbitraty email
- Click Assign roles
- Select the DWServiceAccount role and click OK
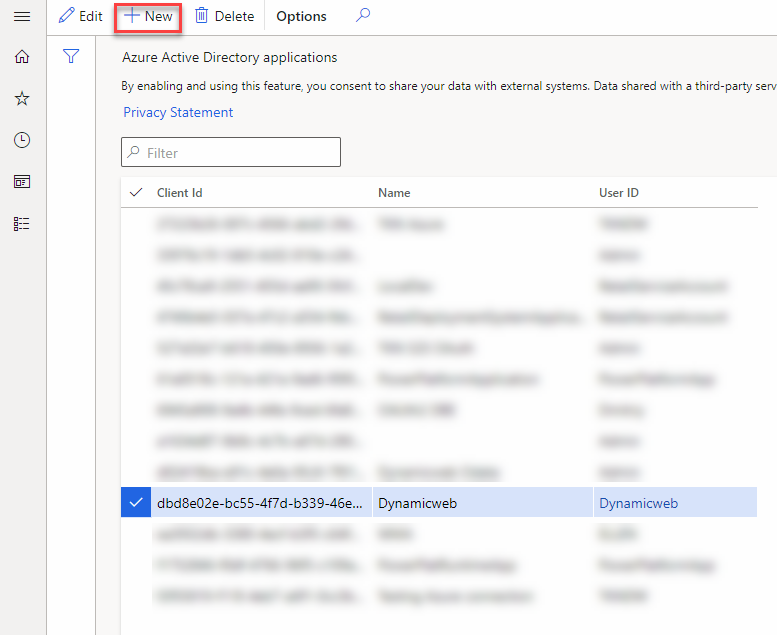
Azure application setup in D365
Finally, open the D365 FO instance in your browser and go to System administration – Setup – Azure Active Directory applications.
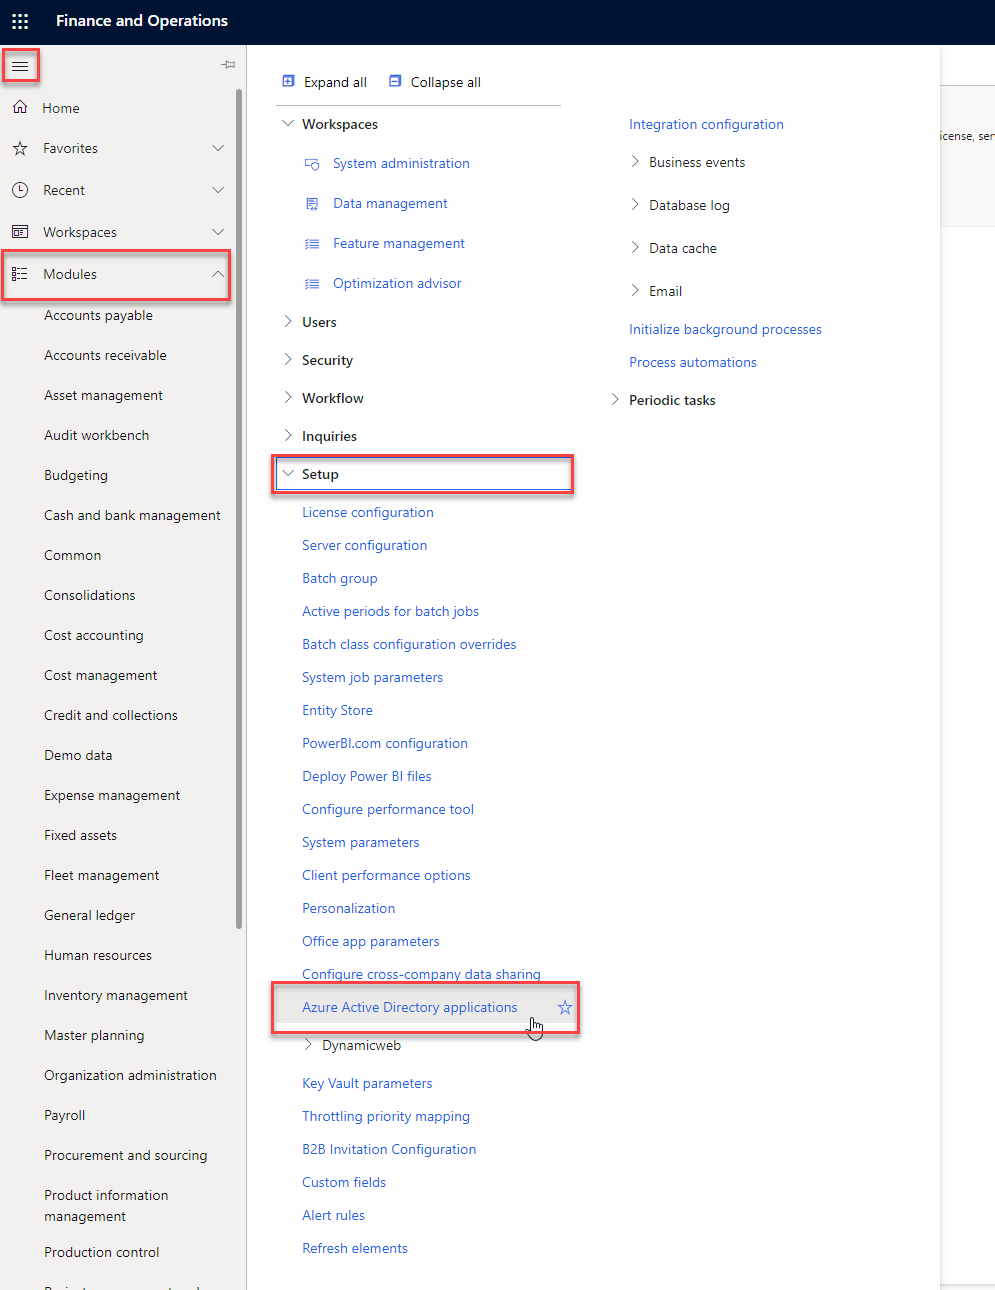
In the Azure Active Directory setup:
- Click New
- Select a User ID corresponding to the user with the appropriate access rights (the DWServiceAccount role)
- Insert the Application (client) ID copied from the Azure Portal in the beginning of the setup process
- Give the connection a name and click save
Authorization in Dynamicweb
To finalize the connection between Dynamicweb and D365 Finance & Operations, you need to add an authentication in Dynamicweb Setting > Endpoint management > Add authentication. Check out the comprehensive guide to adding an OAuth 2.0 authentication for Finance & Operations here.
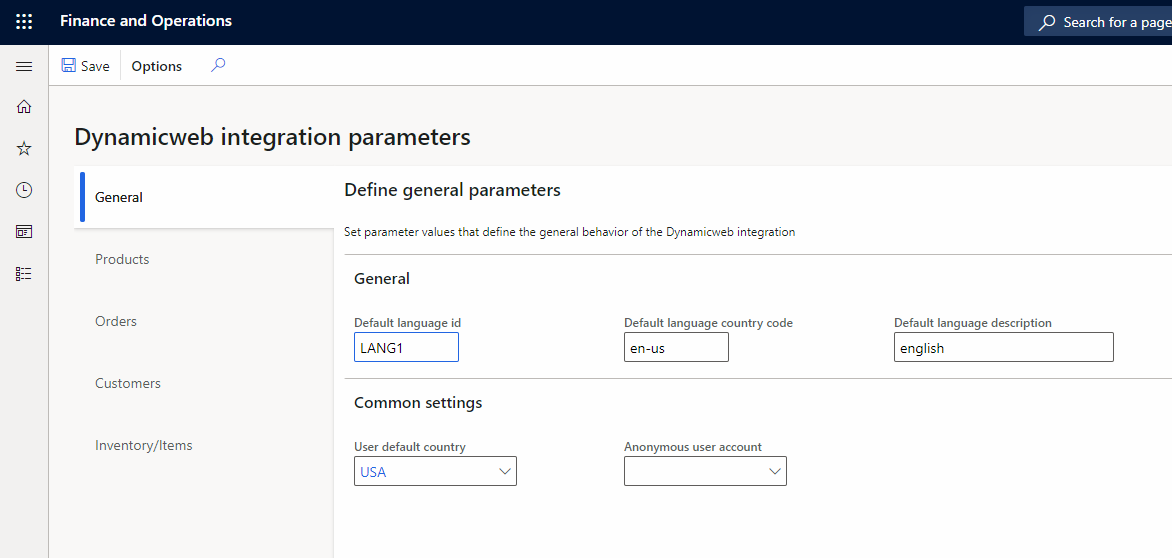
Dynamicweb parameters
The plugin/code unit comes with a set of parameters, which are used to configure the behavior of the integration in general and for particular integration features like product sync, orders, customer sync, etc.
To set Dynamicweb parameter values:
- Go to Account receivables > Setup > Dynamicweb parameters
- Locate the relevant parameter and add/select a value
Here are the various parameters.
General parameters
The General parameters define the general behavior of the Dynamicweb integration. They can be accessed from the General tab of the Dynamicweb integration parameters form (Figure 20.1).
|
Parameter |
Use |
|
Default language id |
Sets the default language for multi-language data entities translation. Value must be a language code in AX format, e.g. en-us |
|
Default language country code |
Sets the country code for the default language defined in the default language id parameter. Used by the Languages export endpoint. |
|
Default language description |
Sets the description for the default language defined in the default language id parameter. Used by the Languages export endpoint. |
|
User default country |
Used by the Sales Orders import endpoint as the default country of a customer, if it isn’t specified. Select from a list of standard Ax countries. |
|
Anonymous user account |
Used by the Sales Orders import endpoint as the default customer, if a customer is not specified in the sales order request from Dynamicweb – e.g. if the customer is anonymous. Select a customer from the standard Ax list of customers. If necessary, create a customer for anonymous purchases from Account receivable > Customers > All customers. |
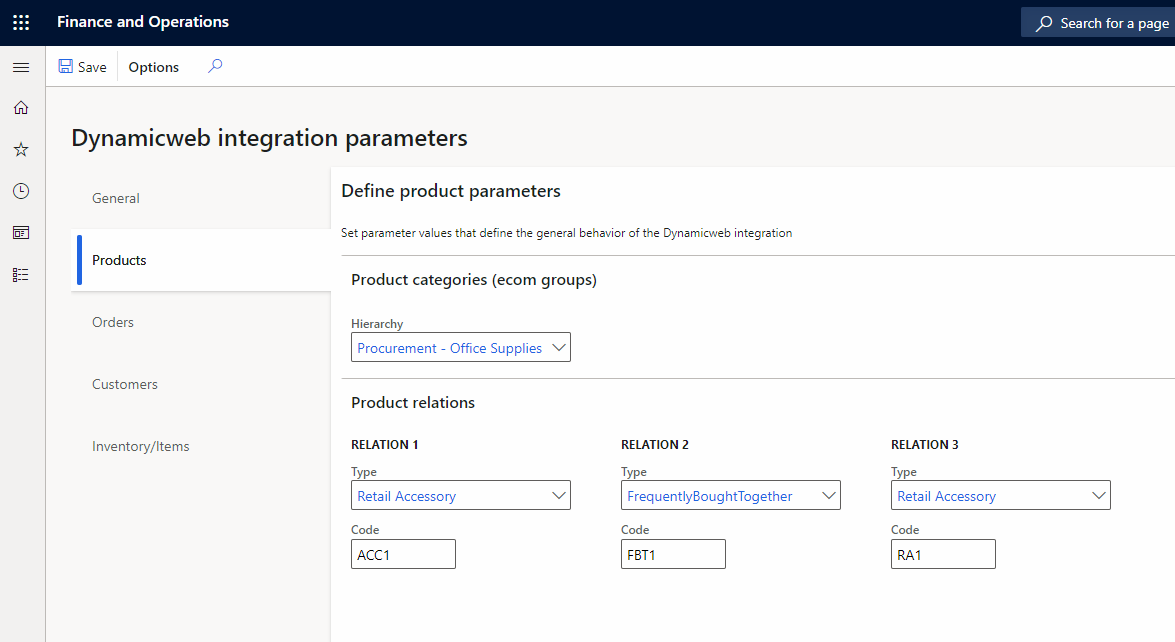
Product parameters
The Products parameters are used to configure and define the behavior of the product sync feature. They can be accessed from the Products tab of Dynamicweb integration parameters form (Figure 21.1).
|
Parameter |
Use |
|
Hierarchy |
Select a product hierarchy to use as the default product hierarchy in the Products, Product groups, and Product attributes endpoints. Select from a list of standard Ax Category hierarchies (Product information management – Setup – Categories - Category hierarchies). We strongly recommend using a procurement hierarchy in order for the Product attributes endpoint to work as intended. |
|
Product relation types |
Used to define 1-3 default relation types to use in the Related products export endpoint. Select a relation from the standard Ax product relations list (Product information management – Setup – Relationships – Product relationship types). |
|
Product relation codes |
Used to define a product relation group on the Dynamicweb-side for each default relation. Matches on RelatedGroupId, RelatedGroupName, and if both fail, a new product relation group with the code entered here as the name is created. Ask the Dynamicweb consultant for a list of appropriate codes. |
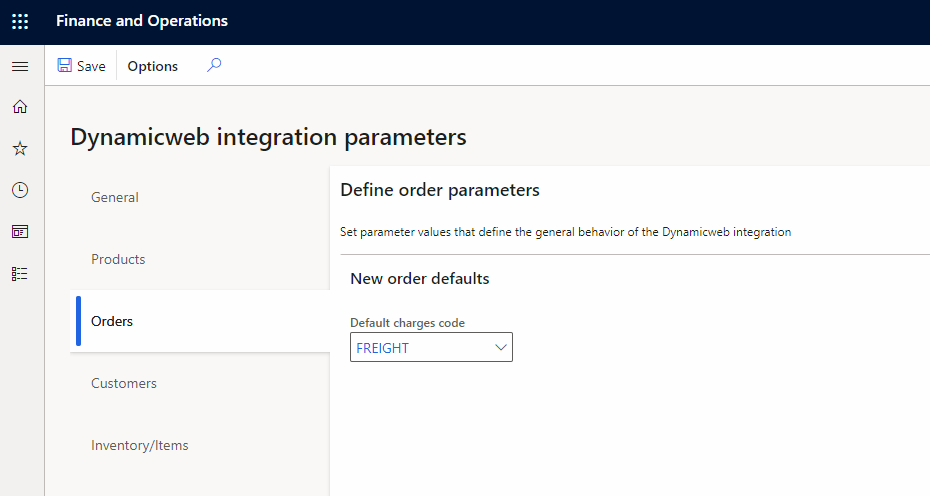
Order parameters
The Orders parameters are used to configure the behavior of the order sync feature. They can be accessed from the Orders tab of Dynamicweb integration parameters form (Figure 22.1).
|
Parameter |
Use |
|
Default charges code |
Used by the Sales orders import endpoint, if shipping charges are managed on the Ax side of the integration. If so, new shipping charge markup will be created using this code. Select a value from the standard Ax list of charge codes (Account receivable – Setup – Charges – Charges code). |
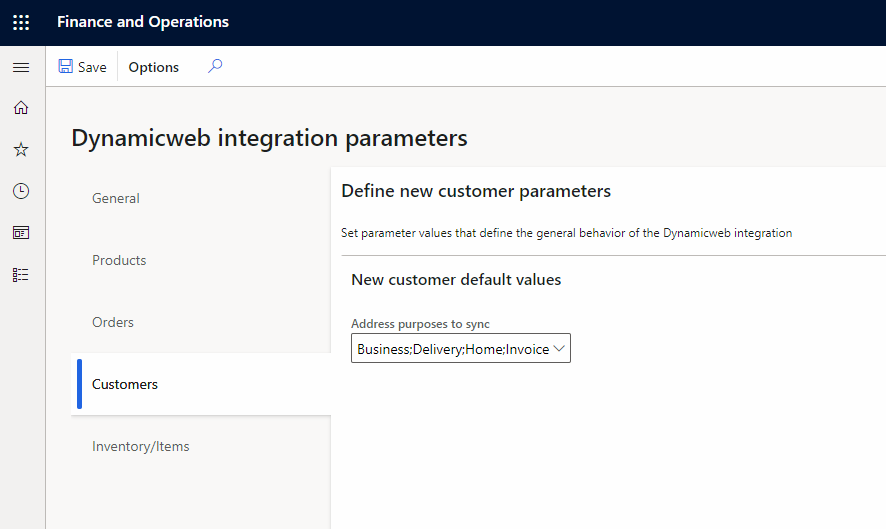
Customer parameters
The Customers parameters are used to configure the behavior of the user sync feature. They can be accessed from the Customers tab of Dynamicweb integration parameters form (Figure 23.1).
|
Parameter |
Use |
|
Address purposed to sync |
Used by the Customers export endpoint to specify which customer addresses should be export to Dynamicweb. Select one or more required purposes to exports, from the standard list of Ax address purposes (Organization administration – Setup – Global address book – Address and contact information purpose). |
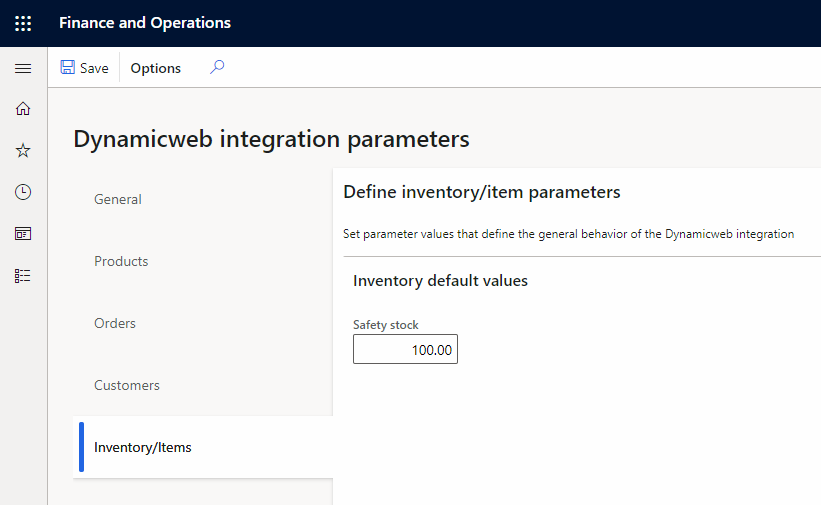
Inventory/Item parameters
The Inventory/Item parameters are used to configure the behavior of the stock sync feature. They can be accessed from the Inventory/Items tab of Dynamicweb integration parameters form (Figure 24.1).
|
Parameter |
Use |
|
Safety stock |
Used by the Product Stock export endpoint for product stock calculaton – displayed stock levels will be decreased by the Safety stock value. If the current stock is less than the safety stock, the displayed stock will be set to zero. |