Dynamics 365 Business Central cloud
This article is a best practice how-to guide for connecting to the web service of a Dynamicweb plug-in unit installed on a cloud hosted Business Central instance.
The steps described in the article include:
- Installing the DynamicWeb plug-in unit on your cloud hosted Business Central enviroment
- Configuring an OAuth S2S authentication to authorize access between DynamicWeb and Business Central
- Setting up endpoints, integration activities and scheduled tasks in DynamicWeb to query the plug-in unit
Installation
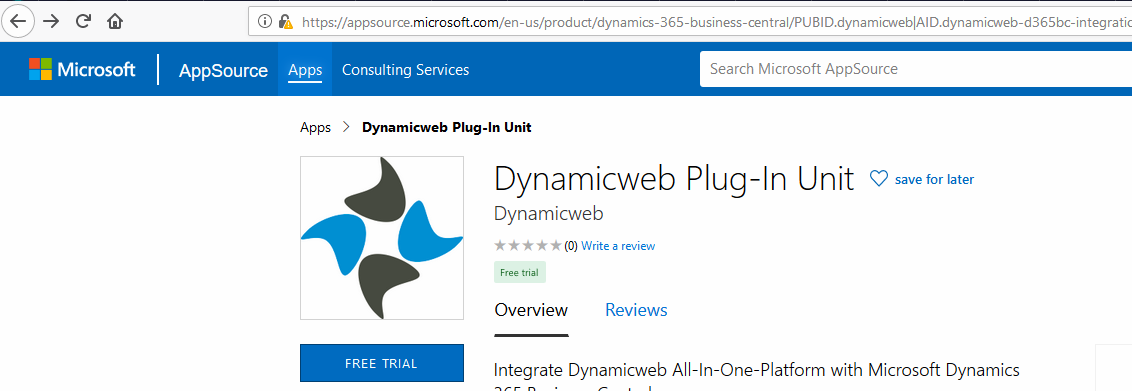
To install the app on Dynamics 365 Business Central Cloud:
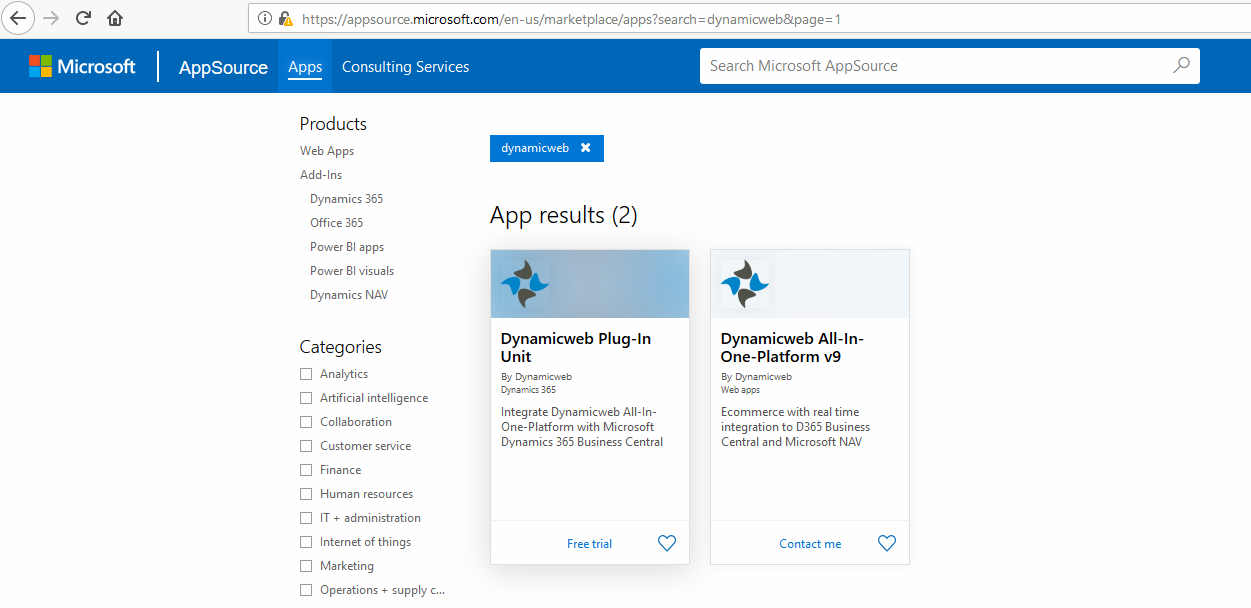
- Select the Dynamicweb Plug-In Unit and click Free trial:
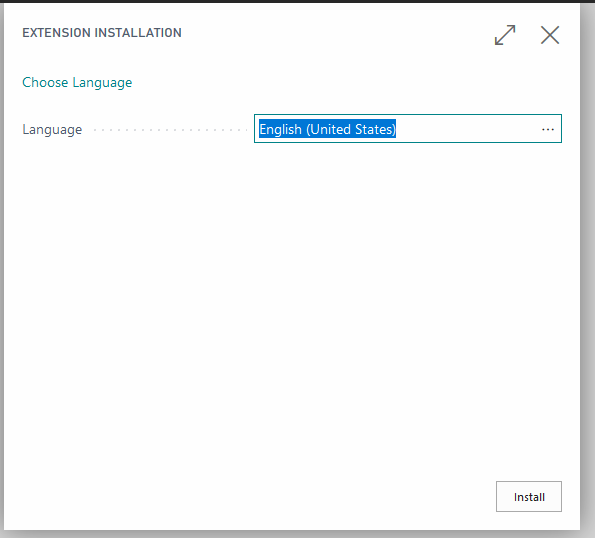
- Choose Production or Sandbox – we recommend you start with a Sandbox and test everything before installing on the Production environment (Figure 2.3)

- Choose language and click install
- After installation, go to Setup & Extensions > Manage > Deployment Status and verify that deployment has been completed

- Once the install procedure has completed, you should have access to the DWWebService. Copy the SOAP URL tied to the web service - this will be used later.

Authentication
Authentication between Dynamicweb and Business Central is best achieved through Service-to-Service authentication (sometimes referred to as S2S or Server-to-Server).
There are three fundamental steps to an S2S configuration:
- Configuring an App registration in Azure Active Directory
- Adding the application to your Business Central enviroment
- Adding a corresponding authentication in Dynamicweb
App registration in Azure AD
To add an app registration go to https://portal.azure.com/ > App registrations > New registration, choose single tenant application acces and give your application a suitable name.
Next, copy the Application (client) ID and the Directory (Tenant) ID from the App overview screen and go to Certificates & secrets to add a new Client secret. Make sure to copy the value of the client secret once it is added, since this will be hidden henceforth.
Go to Authentication and a new web platform. Add these URL's to the list of redirect URIs:
- https://businesscentral.dynamics.com/OAuthLanding.htm
- The URL of your Dynamicweb solution
For S2S authorization to a Business Central client, you should also add the URL https://businesscentral.dynamics.com/OAuthLanding.htm
Finally, go to API permissions and add a new permission for the application (Dynamics 365 Business Central/Dynamics ERP/Dynamics CRM). The type of permission should be set to Application permission. Select the appropriate permissions from the available options. The required permission is most likely API.ReadWrite.All but please refer to the official Azure Active Directory API permission documentation to learn more.
Adding the application in Business Central
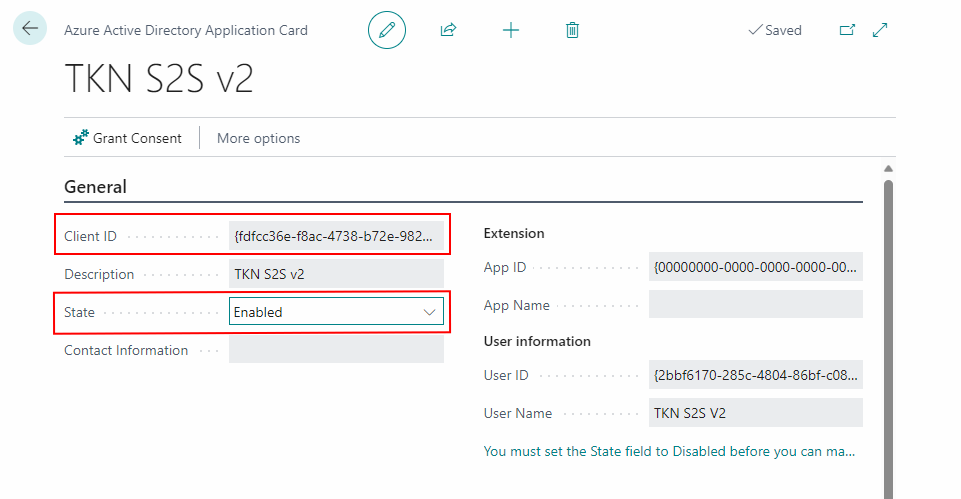
To add your new application to your cloud hosted Business Central instance, open BC and search for Azure Active Directory Applications.
In here, click new, paste the Client ID of your application and change the State to enabled. Please notice that your Business Central user needs SECURITY persmission to change states of Azure AD apps.
Adding the application to an on-prem Business Central instance is achieved through a CMD with admin rights by following steps 3 and 4 in this Microsoft Learn article.
The official details on the using S2S with Business Central can be found here.
Configuring application permissions
To configure what is exposed through the Azure Active Directory Application:
- Go to the User Permissions Sets menu at the bottom of the Application Card
- Add the D365 BUS FULL ACCESS permission to the list of User Permission Sets.
To use the S2S authentication with a DynamicWeb Plug-in unit exposing custom fields, you also need to add the dedicated DYNAMICWEBPERMISSION (Business Central plug-in unit version 1.2.0.29 or later required)

Granting consent
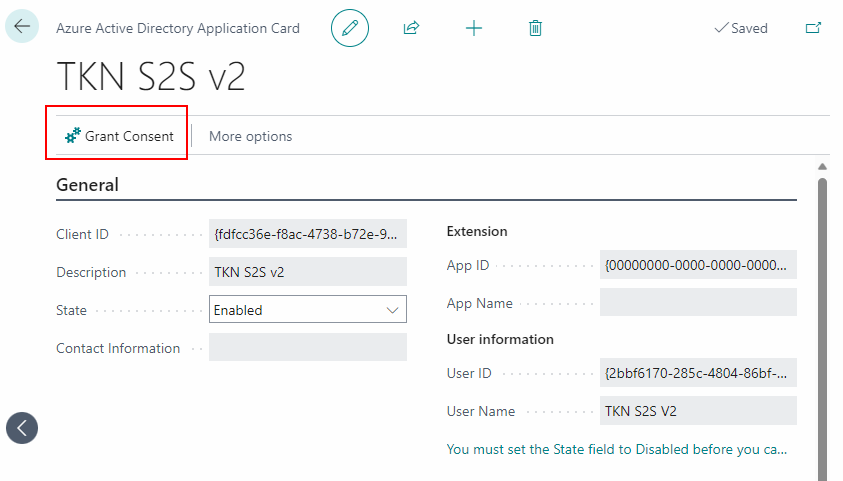
To complete the setup of your Azure Active Directory application, you (or a member of the organization with the appropriate privileges) must grant consent for the application to expose data. There are two possible ways of doing this:
The first way is to click the Grant Consent button in the Application Card from within the Business Central Web interface. This will bring up a log-in window, where you can use your Azure Active Directory credentials to grant consent.
However, granting consent requires one of the following three Azure Active Directory roles:
- Global Administrator
- Application Administrator
- Cloud Application Administrator
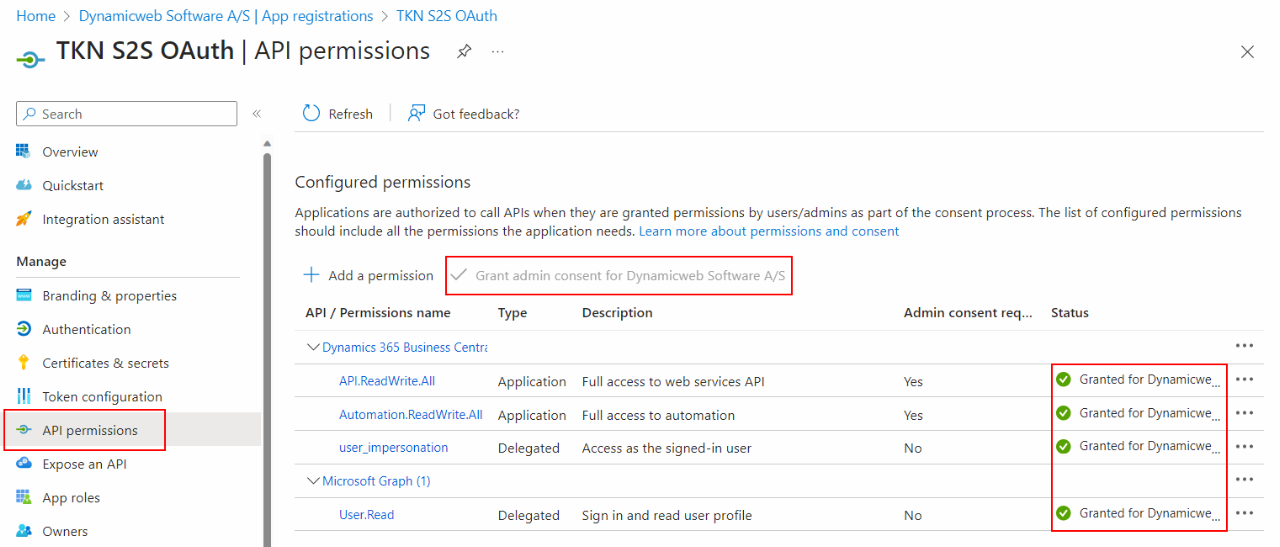
If you have not been assigned such a role in Azure Active Directory, it is possible to let an administrator of one of the aforementioned kinds grant consent through the Azure Active Directory web interface instead.
Consent is granted in the API permissions area of Active Directory as shown below.
Adding the authentication in Dynamicweb
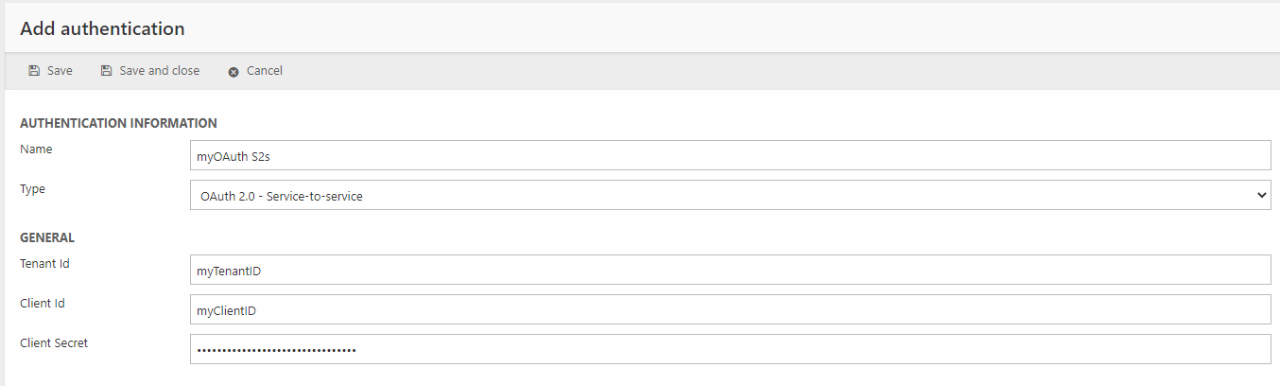
In Dynamicweb, go to Settings > Integration > Endpoint Management and click Add authentication.
Give your authentication a suitable name and select OAuth 2.0 - Service-to-Service as type.
Paste the Tenant ID, Client ID and Client Secret from your Azure AD application and save.
Unlike the OAuth 2.0 - User impersonation flow, the S2S authentication does not prompt the user for log in, in order to obain an acces token. Instead the token is exchanged between Dynamicweb and the remote system as a background service, sometimes refered to as a daemon.
Connecting through Endpoint management
When the authentication has been established, the next step is to use endpoint management to connect to the previously located web service.
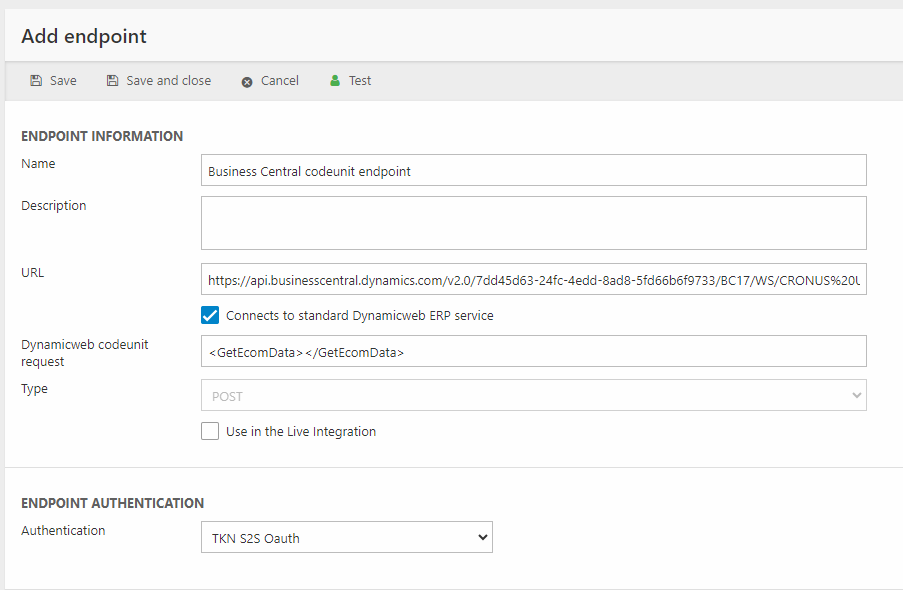
To do so, go to Settings > Integration > Endpoint management, click Add endpoint and then:
- Paste the SOAP URL of the aforementioned web service
- Give the endpoint a suitable name
- Check the Connects to standard Dynamicweb ERP service box
- Select the the previously configured Endpoint authentication from the dropdown
- Save the configured endpoint
Testing the connection
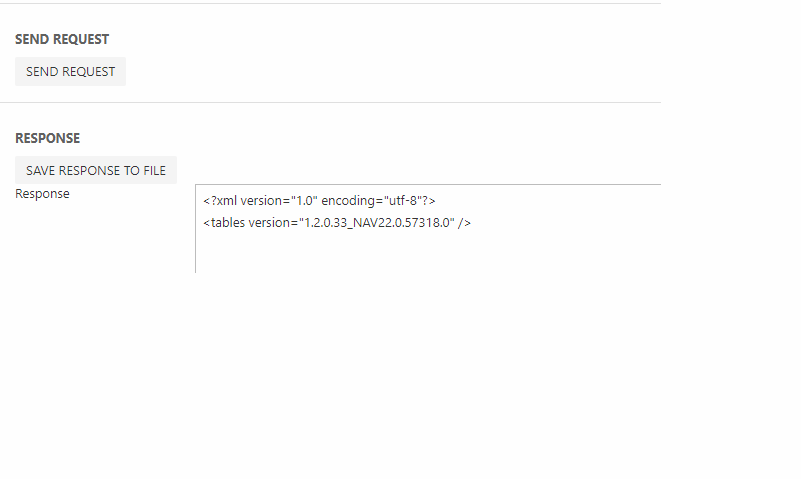
Before moving on, use this opportunity to test the connection, to check that everything was configured correctly so far.
To do so, hit test in the endpoint edit screen. When the "Connects to standard Dynamicweb codeunit service box was checked", an empty set of <GetEcomData></GetEcomData> tags should have appeared in the request field. This is a handy request for a simple connectivity test:
Click Send request at the bottom of the the test screen. If the response looks valid (like in the example below), you are good to go - if not, this is a good time to revise the previous steps.
Setting up the integration in Dynamicweb
Once you have succesfully added the plug-in unit web service in endpoint management, you are ready to setup tasks, activities and schedules for you integration project. The data flow between the Business Central plug-in unit and the Dynamicweb solution utilizes a few different components:
The Dynamicweb plug-in unit always exposes data as XML, which is both requested and saved as a file by the Batch integration. The Batch integration will then trigger a data integration activity that inserts the data from the XML file to the database.
The flow of a plug-in unit integration thus looks like this in it's essence:
- A request is sent from a batch integration to a web service authorized with S2S
- The plug-in unit handles the request and sends a response in XML
- The batch integration reads the response and saves it to an XML file
- The batch integration triggers a data integration activity, that reads the content of the XML file and stores the data in the Dynanicweb database in accordance to the mappings defined in the activity
A high offset for an integration like this, can be achieved with the Business Central Turnkey preset package, which contains a series of XML files that serves as a customizable standard configuration for a Business Central plug-in unit integration.
We do recommed however, at least if you are new to plug-in unit integrations in Dynamicweb, that you follow this guide to the end, to learn how such an integration is configured from scratch.
Local XML file
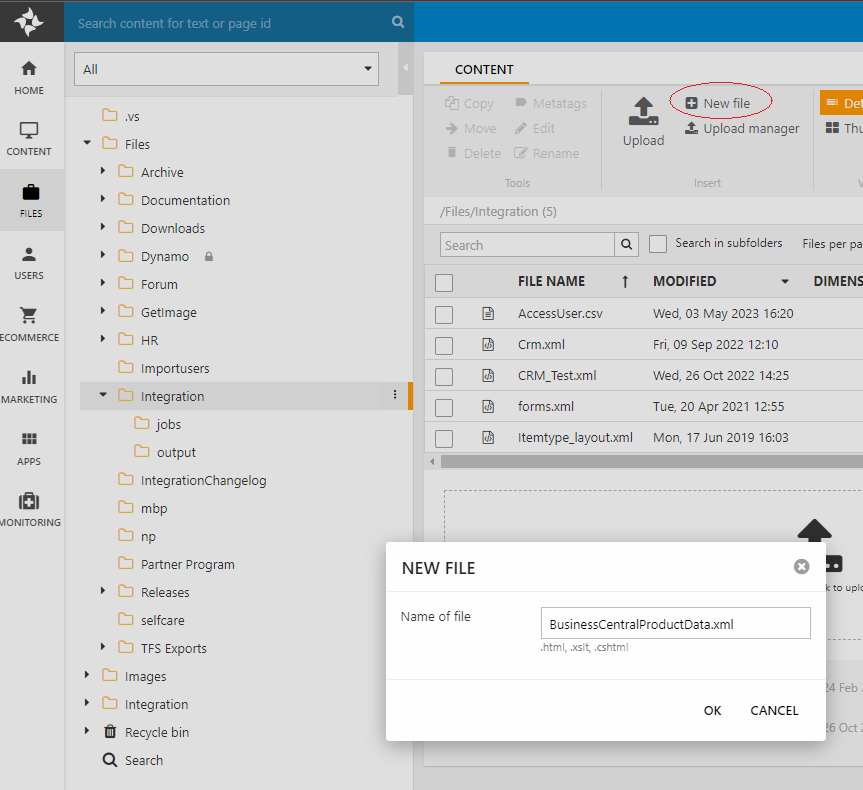
As outlined above, the response generated by the plug-in unit is in XML format. This response must first be saved somewhere, before it can be mapped to the Dynamicweb database. Having a local version of the response is also handy for debugging purposes.
To manually add an XML file for the purpose, open up the files browser and navigate to a suitable path like files/integration and click new file in the ribbon bar menu. Click OK, and when the file editor appears, just save it an as empty XML file.
Configuring a data integration activity
How the data is mapped from the local XML file to the database is handled with an integration activity.
To add an integration activity for the purpose, go to Settings > Data Integration and click new activity.
In order to match the format of the plug-in unit response, select the XML provider as source provider and select the previously added XML file (BusinessCentralProductData.xml in this example) as the source file. Click next to move on to destinatio provider selection.
The appropriate selection for destination provider depends on the nature of the data you wish to import, but generally, the Dynamicweb provider is a wise choice for a general purpose import to the Dynamicweb database. Click next to move on to the mappings screen.
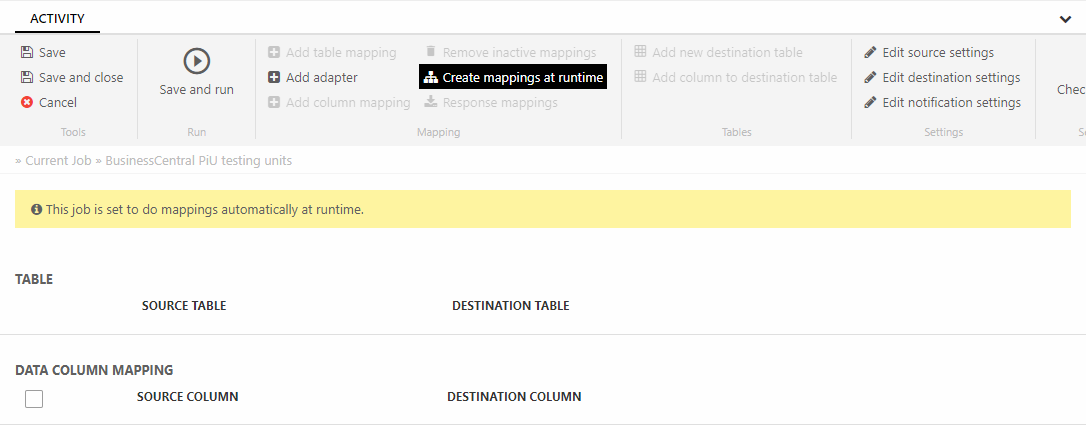
As the source XML file is still just an empty file at this point, there are no tables or columns to define mappings from. You must therefore set the activity to Create mappings at runtime in the activity ribbon bar. Since the table and column names of an XML response generated by the plug-in unit is an exact match to the tables and colums of the Dynamicweb database, these can be automatically paired, when the activity is run.
Batch integration scheduled task
All of the aforementioned components are finally tied together using a Batch integration scheduled task.
To do so, go to Settings > Integration > Integration Framework Batch and click add.
The task can be configured to your liking with a suitable name and optionally a suitable schedule, but must importantly, the Type must be set to Import data with custom request add-in - this is the piece of software responsible for calling the endpoint, storing the response in the local XML file and finally triggering the activity to insert the content into the database. To achieve this, you must:
- Select the Preconfigured endpoint
- Select the Import activity (that was defined earlier)
- Specify the Request XML to send to the Plug-in unit web service. This is where you specify the data you wish to import. If the field is left empty, the request defined on the endpoint will be used.
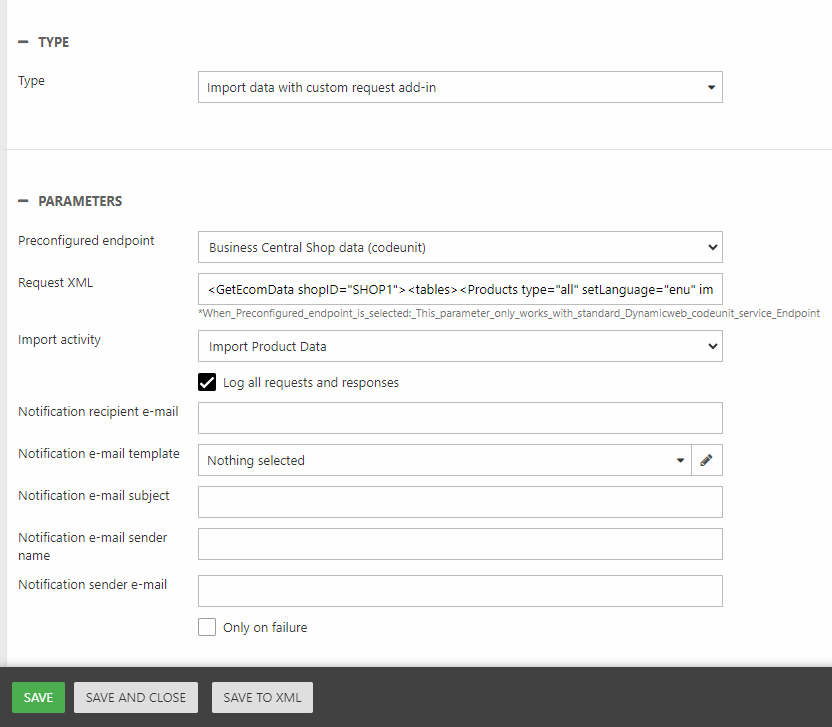
A request for product data to the Business Central plug-in unit could look like this:
Check out the Requests and Responses article to learn more about how to communicate with the Business Central plug-in unit.
Live integration
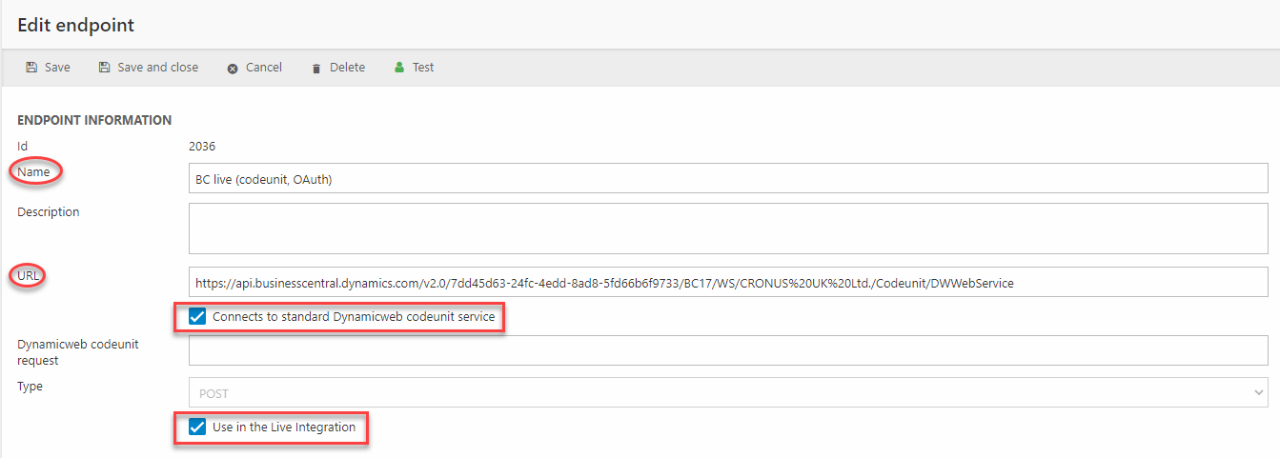
To set up a Live integration between Dynamicweb and the Business Central plug-in unit, a new endpoint must first be setup in endpoint management.
The live integration uses the same web service as the batch integration(s), so we will reuse the URL from earlier in a new endpoint. This time though, both the Connects to standard Dynamicweb ERP service and the Used in the Live integration boxes must be checked.
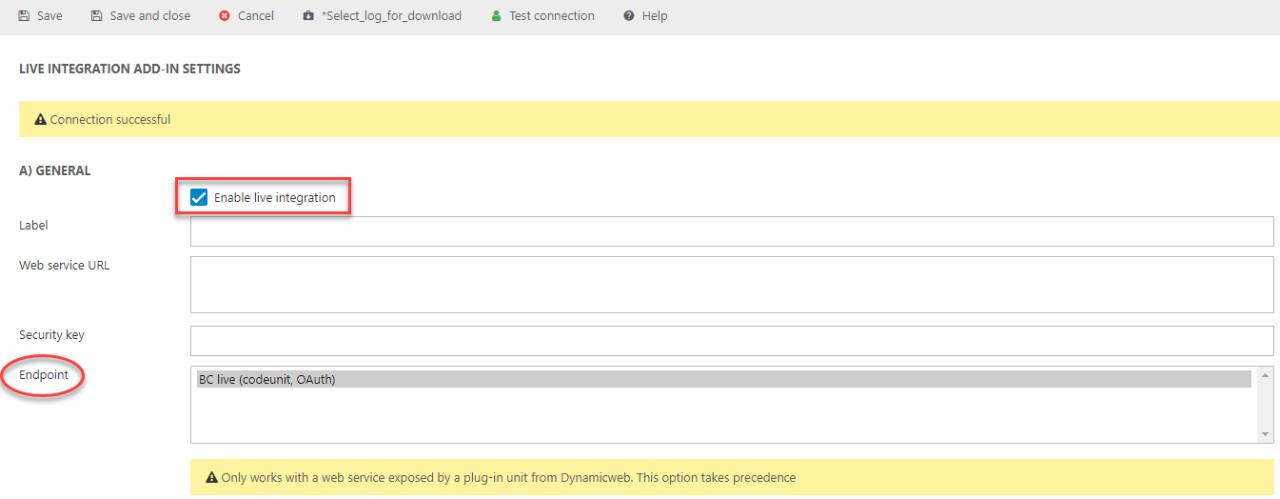
To initiate the live integration we need to create an instance of the Live Integration Add-in that makes use of the preconfigured endpoint.
- Go to Settings > Integration > Integration Framework Live and click "Create instance" in the DynamicwebLiveIntegrationAddIn row.

In the Live Integration Add-in Settings menu:
- Check the "Enable live integration" box
- Select the preconfigured endpoint from the Endpoint list
- Optionally, you can define custom settings for your live integration such as notification or order settings, but you can also leave them at default and return later to make changes
- Click "Save and close"
Your solution should now be configured to connect to a Business Central hosted in the Azure cloud.