
User groups
Depending on your type of solution, you will have different kinds of users associated with your Dynamicweb system.
For instance, you could have:
- Backend marketing personnel, who use the Dynamicweb Marketing tools to create and execute campaigns
- Backend administrators and editors
- Frontend private and business customers
- Frontend editors
- Etc.
All of these will be organized in user groups.
And with user groups, administration and maintenance of all your different kinds of users can be done in an easy and speedy manner, by administrators – or even by the users themselves – including the ability to assign or remove permissions to certain content or modules.

Basic Concepts
In this section you will learn about:
- Creating (and deleting) a user group
- User group setting and permissions
- Sorting and searching users in user groups
Creating a user group
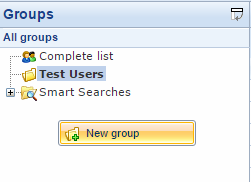
To create a user group:
- Click Users on your accordion
- Right-click the user tree structure and click New group (Figure 3.1)
This opens the basic group settings (Figure 3.2).
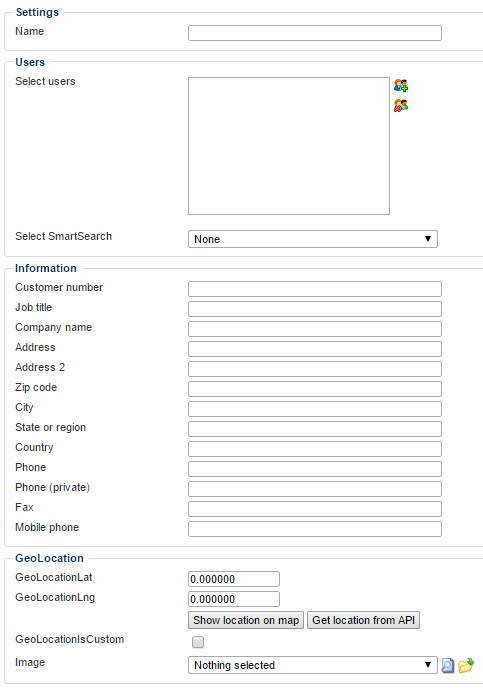
You must:
- Name the group
- Select users for the group by adding them individually – or by selecting a smart search in the dropdown.
- Click Save or Save and close the user group to create it
Under the Information and GeoLocation settings areas, you can provide group-specific information, but this is optional, and may or may not be useful for your groups.
Don’t forget that you can customize user group settings and permissions – read more below.
User group settings and permissions
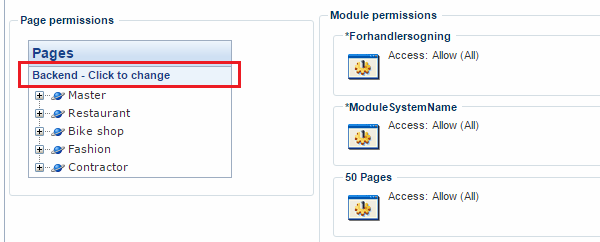
When creating or editing a user group, you have access to a number of tools from the user group ribbon (Figure 4.1).

From the user group ribbon, you can:
- See permissions for the user group, for both frontend, backend and modules (Figure 4.2). Click on the area marked in red to change between backend and frontend permissions. This is only an overview – permissions are set on the page, module, etc. itself.
- Select a custom editor configuration for the user group
- Allow (or disallow) backend login for users groups, who should have access to (parts of) the administration.
- Select a custom start page for the user group
- Set or remove email permissions for the entire group (be careful with this, in most countries it is illegal to send emails to people who have not given their explicit consent).
- Click Validate to check the format of all email addresses for users within the group. A window with incorrectly formatted emails will pop up, and allow you to correct or delete the addresses. The validation runs as follows:
- Is the email format valid?
- Does the domain exist?
- Does the domain have an MX (mail server) record?
- Select a number of group admins – users who can edit or add users in the user group. Group admins will have access to user management when logged into the backend, but will only be able to edit and add users to the group they are admin of, and will never be able to edit an administrator account.
- Select an item type to extend user group properties or user properties with.
- Customize impersonation settings for the user group. (You need to save the group, before you can configure the impersonation settings.) Read about impersonation below.
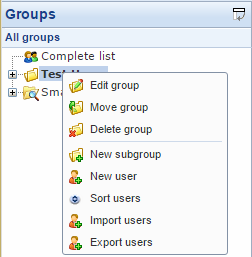
Editing, deleting or moving a user group
To edit, delete or move a user group:
- Right-click the group on your user management tree structure (Figure 5.1).
- Click Edit, move or delete group
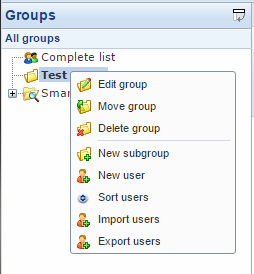
From the right-click menu, you can also sort users in a user group, import and export users, and create new users and subgroups.
Sorting users within a group
New users are created at the bottom of the user list.
You can sort your users temporarily and by column in ascending or descending order by clicking the arrows to the right of every user column, but if you want a specific sorting on a permanent basis, you can click sort users in the right-click menu.
This will take you to the sort users view (Figure 6.1).
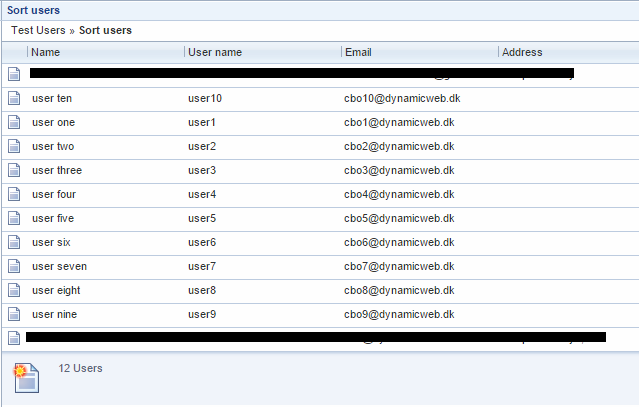
From here, simply drag and drop users to suit your needs and click save.
Searching users and user groups
If you have many users, it may be useful to search them, to find individual users or users who share certain properties.
For that purpose, you have access to the user search field and filters (Figure 7.1).

The search field searches the current selection of users – if you have selected Complete list in the user management tree, you will search all users, and if you have selected a specific group or smart search, you only search users within that group or smart search.
To search for users, simply enter your search term in the search field and press enter.
You also have the option of filtering your search via the dropdown selectors.
You can filter on:
- Active and inactive users
- User with and without backend login
Note that searching users searches all fields on the users - but that you can use operators to search specific fields - although custom fields cannot be searched.
User search operators
When searching users, the following operators are available to you.
|
< |
Less than |
|
> |
Greater than |
|
= |
Equal |
|
!= |
Not equal |
|
+ |
And |
|
- |
And not |
Remember to use double quotes to search for values containing spaces.
Note that the “=” operator does not work as a ‘contains’ operator, but as an equal-operator. This means, that if you search for e.g. Department=Marketing, you will only find users who have the value ‘Marketing’ in the department field, and not users who have e.g. the value ‘Sales & Marketing’ in the department field.
User search examples
|
Search field entry |
Search result |
|
Username = Kristian |
All users with the username “Kristian” |
|
Name = "Kristian Hansen" |
All users with the name “Kristian Hansen” |
|
ID > 100 |
All users with an ID number greater than 100 |
|
Zip = 8000 |
All users with 8000 as Zip code |
|
Address = "Solbakken 45" |
All users with the address “Solbakken 45” |
|
Department = “Marketing Department” |
All users from the specific department named “Marketing Department” |
|
Type = Default + ValidTo = "01/01/2011 00:00" |
All users of the type Default whose validity period ends on 1st of January 2011, 12:00 AM |
|
Type = Default - Zip = 690912 + City = Vladivostok |
All users of the type Default from Vladivostok whose zip-code is not 690912 |
|
ValidTo > "01/01/2013 00:00" |
All users whose validity period ends after on 1st of January 2013, 12:00 AM |
|
Active = False |
All inactive users |
|
AllowBackend = True |
All users allowed to login to backend |
|
ValidTo = "12/31/2999 23:55" |
All users with unlimited validation period (if the Valid to is set to: Dec 31 Never 23:55 in Options for the user) |
|
ValidTo > "01/01/2013 00:00" + ValidTo != "12/31/2999 23:59" |
All users whose validity period ends after on 1st of January 2013, 12:00 AM – but without the users with unlimited validation period. |
For a full list of fields you can search, see the Database section of this documentation.

Implementing
In this section you will learn about:
- The advanced management options for user management
- Allowing users to log in, and place orders, on behalf of other users (impersonation)
Advanced user management configuration options
User management has a number of advanced configuration options associated with it, options which are relevant for both users, user groups and user management in general.
To edit these settings:
- Go to Management center > Control Panel >Modules
- Click User Management
This will bring up the advanced configuration options.
Here’s a rundown of what you can do.
Password and password security settings
With the passwords and the Password security settings, you can customize you security settings.

You can:
- Encrypt all existing passwords – be advised, that the process is non-reversible
- Customize the default password security behavior for both Extranet and Administration users, where you can:
- Check the Encrypt checkbox to enable encryption by default – in combination with the extranet module, and user initiated profile creation, this means that your users will not have to worry about their password security. If checked, you can select your preferred hashing algorithm.
- Enable password expiration, from 30 days to a year.
- Customize password reuse settings
- Select the minimum required password complexity level
- Specify the minimum number of characters a password should be
Smart search settings
With the smart search settings (Figure 13.1), you can select how often your smart searched should be recalculated by the system.

Custom and System fields settings
On many solutions custom fields make sense, e.g. when importing users from other systems, where critical information is not matched by one of the regular user fields.
In those scenarios, you can create custom fields to suit your purposes.

To do so, click Edit custom fields in the list of settings, to bring up the custom fields view (Figure 14.2).
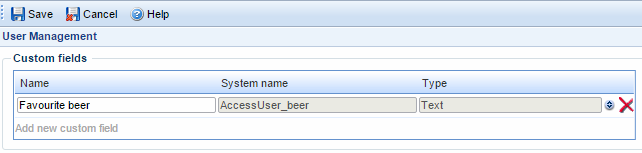
From here, you can add new custom fields by specifying a name, a system name and a type
System fields are a little more esoteric, and cannot be edited. They are created by the system when integrating with e.g. the Avalara tax provider, and other external providers. If in use, they can be viewed by clicking the View system fields button.
The upload settings
With the uploaded images settings (Figure 15.1), you can control how the system treats user-images uploaded from frontend.
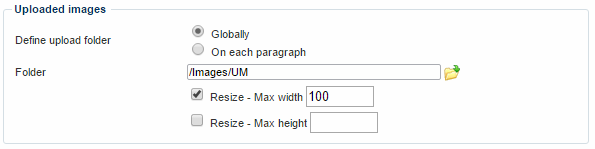
You can:
- Select between uploading to a global folder or a folder defined on the paragraph containing the extranet module instance you use for profile creation from the frontend. If you select to use a local folder, it must be defined on the extranet module settings.
- If you select a global folder, you can specify the location of it, and any resize rules you want to enforce.
Additionally, you can specify locations for both custom user files, and the Extranet secure folder.
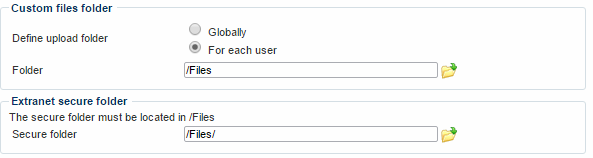
To ensure that the files in the secure folder are protected, your server must be configured to disallow direct download. Contact your hosting company for further information. If you are hosting your own solution, simply disable the read permission on the secure folder in your IIS.
Extranet login and cookie settings
With the Extranet login settings (Figure 16.1), you can set a limit on the number of failed attempts allowed – and customize how the system should treat failed login attempts.
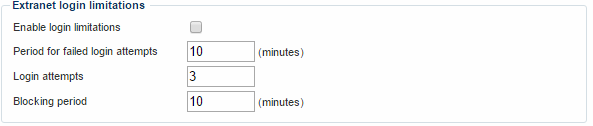
You can also customize, for how long (in days) a login cookie should be valid (Figure 16.2).

eCom ID settings
For integration purposes, it may be needed to include a shopID in the extranet login, if you have an ERP with two accountings – and the same user exists in both accounting, but needs to be directed to an accounting-specific shop.
In that case, you should check this checkbox (Figure 17.1).

Be advised, that you need the Multishop Advanced module for this integration to be possible, and that each shop needs to belong to its own website – or the system will not be able to figure out which of the users with the same name to login.
Don’t forget to to select a default SHOP in the eCommerce settings set in Website properties (Modules > Websites > Edit website > Ecommerce)
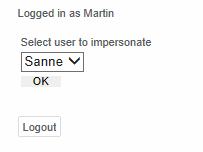
Impersonation
With impersonation, you can allow users or user groups to act on behalf of other users or user groups.
They can then log in with their regular extranet login, and select a user to impersonate ([figureref}).
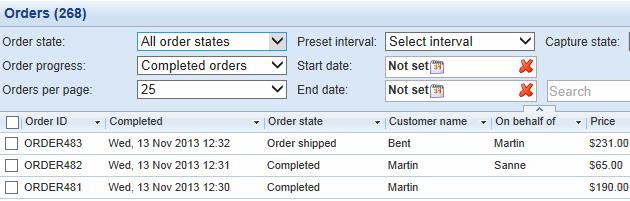
And place orders as the other user (Figure 18.2) - In the backend, add the ‘On behalf of¨’-column by right clicking the column header and selecting it in the column selector.
Permissions and impersonation
When impersonating a user, all user permissions will be set as usual for the impersonator – e.g. for pages, modules, etc.
For instance, if Martin logs in and impersonates Sanne:
- Pages that are blocked for Martin are not visible, even if they would be for Sanne.
- Ecommerce orders will appear on order lists for both Martin and Sanne – but will be marked as on behalf of, if that column has been added to the customer center order list template. The orders will be created with Thomas’ discounts, not the discounts applying to Sanne.
- Forum posts, frontend editing, and the like will list Martin as the editor, not Sanne.
In that sense, impersonation does not present a personal liability risk for the users impersonated.
Impersonation settings
Impersonation settings can be set on both individual users and at a group level, by clicking the Impersonation button in the user or user group ribbon.
This will launch a window (Figure 19.1) where you can select users and user groups to impersonate, and users and user groups who can impersonate this user or user group.
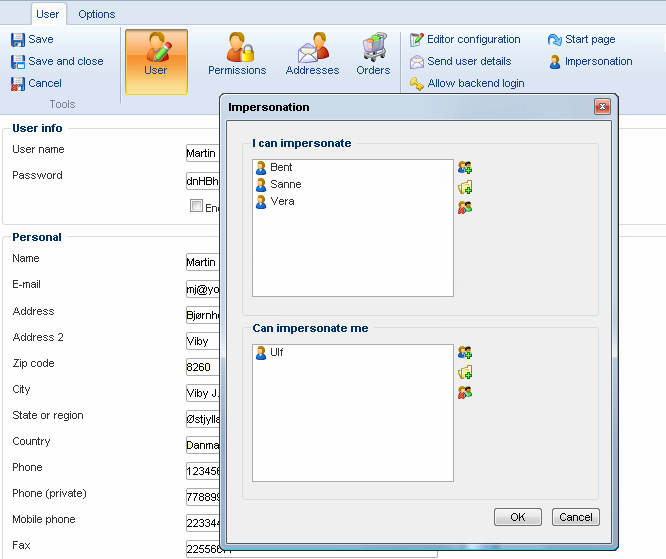
If you cannot find the Impersonation button, try saving the user first.
Creating an impersonation dropdown selector
Remember to change your templates in order to support impersonation.
For instance, you can add an impersonation profile selector using the LoopStart(DWExtranetSecondaryUsers) loop, as in the following example:
Creating impersonation columns on the frontend
And in the order list template, use the Ecom:Order.Customer.SecondaryUserName tag to create an “On-behalf of”-column showing which orders haven been added on behalf of which users, and the Ecom:Order.Customer.AccessUserUserName to create a “Order created by” column.
Corresponding sorting tags are also available.
Column headers:
Columns:


Database
A table of all available fields and their values:
|
Field |
Data type |
Allowed values |
|
ID |
Integer |
Any number |
|
UserName |
String |
Any string |
|
Name |
String |
- |
|
Department |
String |
- |
|
|
String |
- |
|
Phone |
String |
- |
|
PhonePrivate |
String |
- |
|
PhoneBusiness |
String |
- |
|
PhoneMobile |
String |
- |
|
Fax |
String |
- |
|
Address |
String |
- |
|
Address2 |
String |
- |
|
Zip |
String |
- |
|
City |
String |
- |
|
Country |
String |
- |
|
JobTitle |
String |
- |
|
Company |
String |
- |
|
CustomerNumber |
String |
- |
|
Image |
String |
- |
|
Currency |
String |
- |
|
Active |
Boolean |
True, False |
|
AllowBackend |
Boolean |
- |
|
Type |
UserType |
Default, Administrator, SystemAdministrator |
|
ValidFrom |
DateTime |
Date (format: "mm/dd/yyyy hh:mm"). |
|
ValidTo |
DateTime |
- |

Importing users
You can import users to any one of your user groups by simply right clicking the group and selecting import users (Figure 25.1).
This takes you to the import users screen (Figure 25.2).
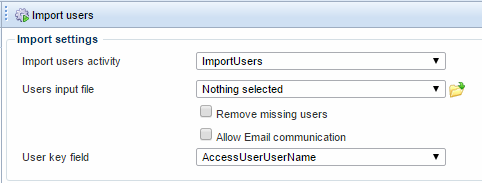
From here, you must:
- Select the import user activity you want to use – use ImportUsers to import users using the CSV provider, and ImportUsersFromExcel to import users using the Excel provider. The excel provider has these limitations:
- Worksheets must not contain whitespace
- Do not use merged cells – they will be converted as null or an empty string.
- First row must contain headers
- The worksheet you are importing must have the title “AccessUser”
- Select a user input file to import users from. The csv source file requires column names matching the database. See import.csv for an example.
- Decide if you want to remove missing users or not, meaning that users who are not in the import file will be removed from the database
- If you know for a fact that all users in your import file have consented to receive emails from you, check the allow email communication checkbox. This will override whatever value is set in the import file.
- Select the user key field from the dropdown.
To start importing users, simply click Import users in the top left corner of the window.
Exporting users
You can export users from any one of your user groups and smart searches by simply right clicking the group or smart search and selecting export users (Figure 26.1).
This will take you to the export users view, where you can:
- Select the ExportUsers activity to export all user data
- Select the ExportUsersWithSelectedColumns activity to customize which user data to export.
To export your data, simply click Export users in the top left corner of the window. This will create a CSV file with your users.