Navigation
A navigation is a list of links pointing to important areas of a website, often presented as a horizontal bar at the top of every page on a website – but you can have several different types of navigation on a website. For instance, on this website we have a top navigation in two levels, and a left side navigation showing third level pages.
Navigations can be generated dynamically from:
There are two different ways of making this happen:
- In TemplateTag-based designs you add a class called dwnavigation to an <ul>-element alongside a set of data-settings which control how the navigation is rendered
- In ViewModel-based designs you define define a set of navigationsettings and pass them to the renderer alongside a template inheriting the NavigationTreeViewModel
Don’t worry if that was a lot of mumbo-jumbo to you, both of these methods will be explained below.
TemplateTag-based designs
To create a dynamic navigation in a TemplateTag-based design:
- Create an <ul>-element
- Give it an Id
- Give it the dwnavigation class
When the page is then rendered in frontend all content inside the <ul> element is replaced by a generated navigation:
As you can see in the example above, you can use a set of data-settings to control what is returned by the renderer:
|
Property |
Description |
Default value |
Possible values |
|
startlevel |
The absolute level from which the XML should include navigation items from |
1 |
1-99 |
|
endlevel |
The absolute level to which the XML should include navigation items to |
99 |
1-99 |
|
template |
Name of XSLT template used for parsing the navigation XML |
LIClean.xslt |
Any valid existing navigation XSLT template. Must be placed in /Templates/Navigation, /Templates/Designs/Navigation or /Templates/Design/DesignName/Navigation |
|
expandmode |
How the navigation XML expands and which nodes it includes |
Path |
None, Path, All, Pathonly |
|
parentid |
Limits the navigation to items placed under the page with the ID specified |
0 |
Any valid page id |
|
parenttag |
Limits the navigation to items placed under the page with a specific navigation tag. It works like parentid setting, but where parentid is a unique key, the parent tag can be on several pages in different languages – and the value is language/website context sensitive. |
|
A name from the parent tag field on a pages properties, navigation dialog. |
|
areaid |
Limits the navigation to items placed under the website with the ID specified |
0 |
Any valid website id (these can be seen under the Websites module) |
|
sitemapmode |
Specifies which items to include in the XML. If set to true, hidden navigation items are included, but not items where show in sitemap is not set. If set to false, hidden items are not included, but do not show in sitemap are included. |
False |
True or False
|
The data-settings specify a template which controls the how the navigation is rendered in frontend. For TemplateTag-based designs these are all XSLT-based, which is useful because XSLT is a powerful tool for traversing pages/nodes and outputting HTML.
By default Dynamicweb ships with a set of example templates located under:
- /Templates/Navigation
- /Templates/Designs/Navigation
- /Templates/Designs/YourCustomDesign/Navigation
The following templates are usually present:
|
XSLT-Template |
Used for |
Render style |
|
LIClean.xslt |
Primary navigation menu |
Horizontal |
|
Breadcrumb.xslt |
Breadcrumb / path |
Horizontal |
|
LeftNavigationEcom.xslt |
Ecommerce (product) navigation |
Left, vertical |
|
TopNavigationEcom.xslt |
Ecommerce (product) navigation |
Top, horizontal |
| Navbar.xslt | Primary navigation | Horizontal |
| Pills.xslt | Primary navigation | Horizontal, pills |
Instead of using the dwnavigation class on an <ul> element you can also render a navigation directly using the @RenderNavigation() method:
ViewModel-based designs
To create a dynamic navigation in a ViewModel-based design you must:
- Define a set of navigation settings
- Specify a template
- Pass these to the renderer using the Navigation.RenderNavigation() method
Here’s an example:
This viewmodel refers to a template called Default.cshtml. A navigation template should inherit the NavigationTreeViewModel which exposes the relevant data.
Ecommerce Navigation
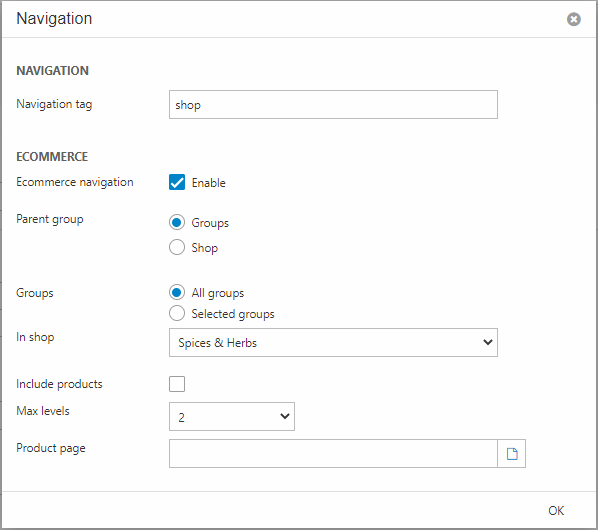
To add Ecommerce groups to the collection of nodes being rendered in either a TemplateTags-based or ViewModel-based design you must set up Ecommerce navigation under the page where you want the nodes to appear as subpages – this is typically a Shop page.
To activate Ecommerce navigation:
- Open the page properties of the page where you want to add Ecommerce groups as navigation nodes
- Switch to the Options tab
- Click on the Navigation button to open the Navigation settings (Figure 4.1)

From here you must:
- Check Enable under Ecommerce navigation
- Select a parent group – groups or shop
- If group choose between specific groups or all groups
- Select a shop
- Check Include products to add each product as a node in the navigation. This only makes sense in very specific cases with few products.
- Set the max levels to include – this is how deep you want the navigation to be
- Specify a product page – this should point to a page with a product catalog used to render the product list
You can also set a navigation tag – this can then be checked for in frontend and used to e.g. switch between two navigation templates, or whatever trickery you can think of. If you want to render only a navigation of Ecommerce groups you can check if the node has a value in the GroupId property in the template:
