
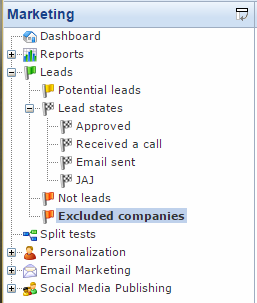
Leads
A visitor which is highly active on your website could constitute a valuable business opportunity. Perhaps you should call them and set up a meeting, or maybe send them an email with an offer?
The Leads-tool is designed to support and enhance such marketing operations by monitoring visitor engagement, and flagging the most engaged visitors as potential leads.
Engagement is measured by assigning an Engagement Index value to various actions, and collecting visitor statistics based on that.
Here's a short video introduction to the Leads tool:

Basic Concepts
In this section you will learn about:
- The Leads interface
- Managing potential leads
- Managing leads
- Excluded companies
- Engagement Index settings
Navigating to the Leads tool
To get started with leads:
- Go to Marketing on your accordion
- Click Leads on your marketing tree (Figure 3.1)

This takes you to the Lead Management Leads interface.
The Leads interface
The leads interface consists of three tabs and three management windows.
Here’s a rundown of what you can do with them:
The Leads tabs
The content tab (Figure 5.1) is the default tab, and your most basic navigation tool for working with leads.

From here you can:
- Select a day to work with – you will work with traffic from that day only
- Jump to another week – and jump back to today
The Manage tab (Figure 5.2) allows you to do bulk actions on potential leads.
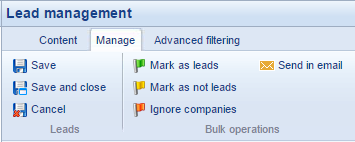
From here you can:
- Mark your selected potential leads as leads
- mark your selected potential leads as not leads
- Add the selected companies to the ignore list ("Excluded companies")
- Email the selected potential leads to someone
The Advanced filtering tab (Figure 5.3) allows you to search for potential leads in a more sophisticated manner than simply by day (as is the default)

You can filter leads on:
- Website – if your solution has more than one website
- Page – if you are only interested in visitors visiting a specific page on your website
- Date period – if you want to see potential leads from a longer period than a single day
- Country – if users of a single nationality is of particular interest to you
- Page views – if you want to exclude potential leads with only a few page views
- Extranet users – if you want to show or exclude registered users from your list
- Source – if you want to see potential leads from a particular source. You can create or modify custom sources under the Lead Settings.
- Profile – if you want to show only potential leads falling under one of your visitor profiles. Learn more about personalization.
By default, the Excluded companies checkbox is checked – this filters out the potential leads from your list of excluded companies.
For all three tabs, you can save (or discard) any changes you make with leads before exiting the tool.
The Lead management windows
Below the three leads tabs, you have the lead management windows (Figure 7.1):
- Potential Leads
- Leads
- Not Leads
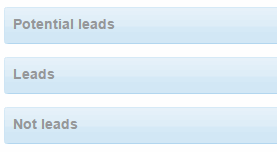
All three are expanded (and collapsed) by a click. From these windows, you manage potential leads, leads and not leads.
Potential Leads
At the most basic level, everyone who visits your website is a potential lead.
The potential leads view (Figure 8.1) presents you with an overview of the highest ranked visitors for the day, based on their Engagement Index (EI) score.
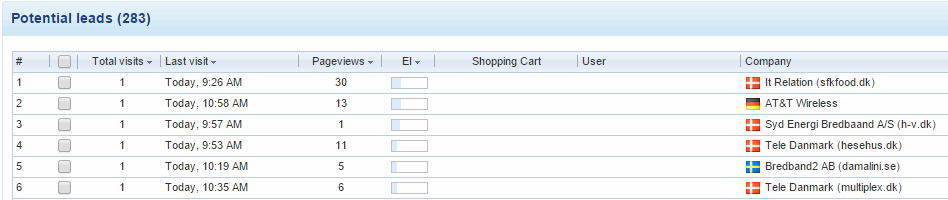
For any potential lead, you can see:
- Their rank for the day
- The total number of visits registered
- Their last visit
- The number of page views on their last visit
- Their Engagement Index (EI) score
- If they have anything in their shopping cart
- If they are a registered user (and logged in)
- Which company the visitor visits from (based on an IP lookup, so not fool proof)
If a potential lead arrived at your website through a Google search, you are notified by a binoculars icon – you can see which term they used by using mouse over:
Marking as a lead - and other actions
To the right of each potential leads, you have a row of icons (Figure 9.1) representing actions you can take for the potential lead.
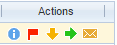
You can:
- Click the (i) icon to go to the visitor details view
- Click the red flag to exclude the visitor and put them on the ignore list
- Click the green arrow to mark the visitor as a lead
- Click the yellow arrow to mark the visitor as a not lead
- Click the envelope to send an email with the lead information to someone (e.g. your sales department).
- You can create a default sender name, email and subject, and automatically change the lead state of a lead under the lead settings
The Visitor details view
If you want to know more about a potential lead before taking any action, click the (i) icon to access the visitor details view:
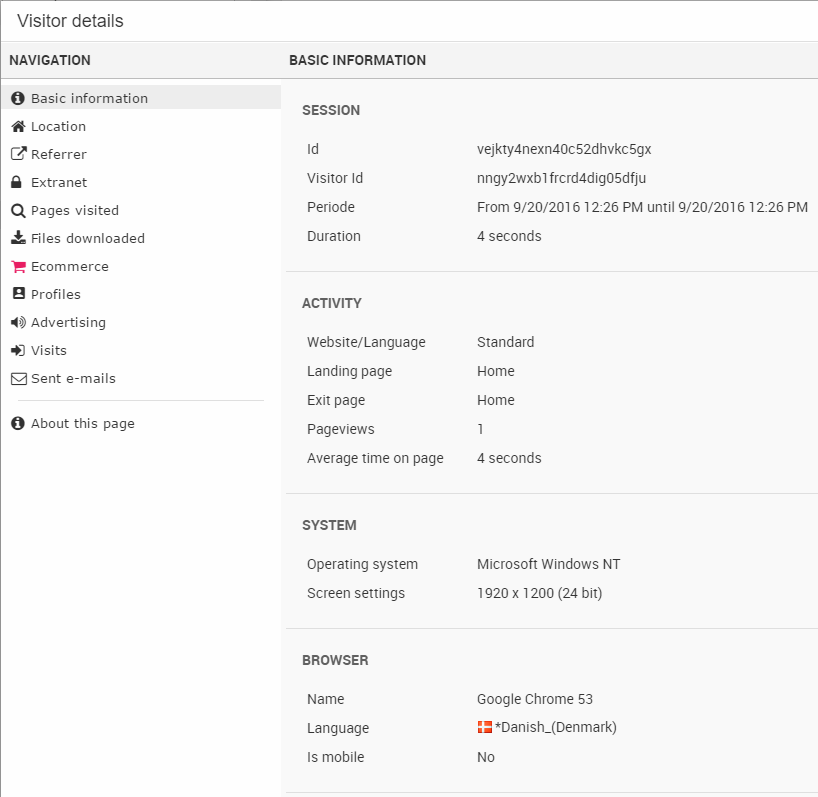
This gives you access to all the information available for that particular lead, such as:
- Basic information about the session, such as duration, average time on page, operating system and browser info, etc.
- Location info, such as IP-address, ISP, domain and company name, etc.
- You can rename a lead by clicking the page icon to the right of the looking glass. If you need an overview of all the leads you have renamed, you have access to them from your lead settings.
- Referrer information, including search keywords and your rank in the search if a search engine was used
- Extranet information, i.e. the user account registered for the visitor (provided they are a logged in, registered user)
- Pages visited info, providing you with a detailed view of the pages visited by the visitor
- Files downloaded, if your visitor downloaded any files during the visit
- Ecommerce info, providing you with info on any items added to the visitors shopping cart
- Profiles info, showing you the total visitor profile points generated by the visitor. Read more about personalization.
- Advertising – if a visitor was referred to your website through e.g. a Google AdWords campaign, you can see more here.
- Visits – providing information about any recurring visits by the visitor.
- Sent emails – a log of all the mails you have sent about this lead (e.g. to your sales department)
- About this page – provides you with a link to the visitor details, which you can send to people (e.g. your sales department)
Confirmed Leads
Visitors marked as leads are moved to the Leads overview (Figure 11.1):

From here, you have a convenient overview of the information available for the lead – it’s the same information which was available when it was a potential lead – as well as a current state tab, where the lead state of the lead is listed.
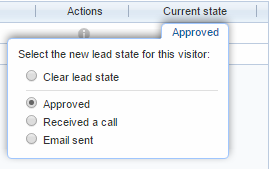
Lead states
Lead states are steps defined by you, which help you work with leads.
Dynamicweb comes with just a single state by default – approved – but it’s easy to define custom lead states.
You can change or clear the state of a lead by mousing over the current state and selecting a different state (Figure 12.2)
Email notifications
You can set up email notifications, to notify someone whenever one or more leads revisit your website.
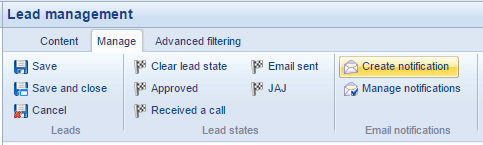
First go to your Confirmed Leads window and select the lead(s) (Figure 13.1):

Then, click Create or Manage Notification(s) from your management tab (Figure 13.2)
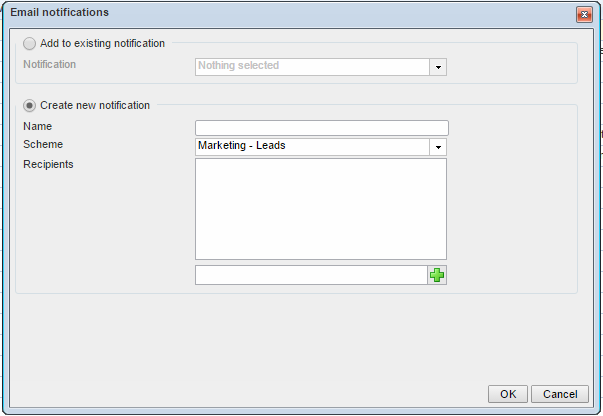
If you selected manage notification, select the appropriate email notification profile.
If you selected create notification, you will see the 'create new notification'-window (Figure 13.3)
You must:
- Create a name for the notification profile
- Select the Marketing – Leads scheme
- Fill in any number of recipients (email addresses of people to notify)
- Click OK
- Don’t forget to save your lead setting
Once set up, an email will be sent to the recipients once a day if the lead returns to your website.
You can customize the email notification frequency under your Lead settings.
Not leads
Click Not leads in the leads menu to get an overview of the visitors you have marked as not leads:

The not leads list also includes visitors from you list of excluded companies.
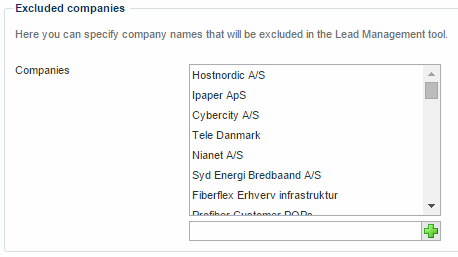
Excluded companies
To exclude certain companies from showing up as potential leads, go to the Excluded companies area (Figure 15.1):
To add them to your excluded companies list, simply add their company name to the list (Figure 15.2).
Lead Settings
The Lead settings control various aspects of the Leads tool behavior, but most importantly it controls the Engagement Index configuration for your website.
To access the lead settings:
- Go to your Management center
- Click Marketing > Leads > Lead Settings
Here’s a rundown of the Lead settings, starting with the most important one – the Engagement Index.
The Engagement Index
The heart of the Leads tool is the Engagement Index, which is used to rank your visitors by their engagement.
But how do you measure engagement?
You assign a points value to certain actions, and measuring how many points a visitor collects during their time on your website.
To make your Engagement Index more relevant, change the EI-points value of the actions below, so they reflect the value they have in your business model.
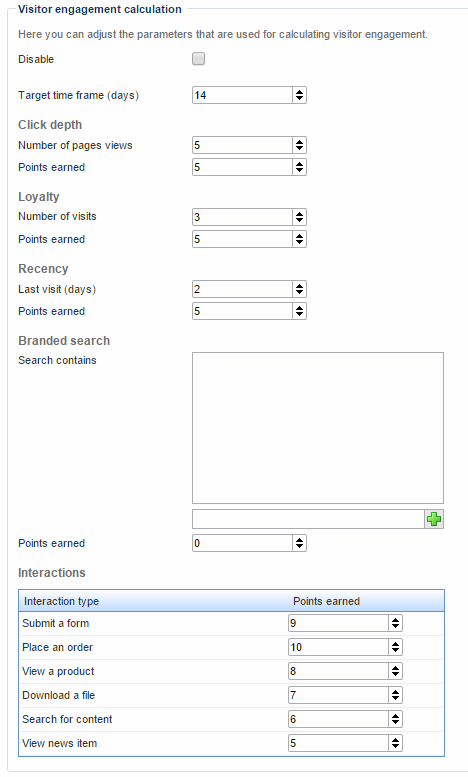
Your customization options are:
- You can disable the Engagement Index completely – if you are not using the Leads tool, this may result in a minor performance improvement on your website.
- You can set a time frame, during which EI-points are considered of interest. By default, the timeframe is 14 days, meaning that EI-points accumulated outside of that timeframe are ignored by the Engagement Index ranking.
- Assign click depth threshold and value – the number of points awarded for a customizable number of page views within the set timeframe
- Assign loyalty threshold and value – the number of visits and the points value of being a recurring visitor within the set time frame
- Assign recency threshold and value – the maximum number of days to allow between two visits to award EI-points for being a recent visitor
- Define branded search terms and assign a value for searching for them. Only works with weighted search.
- Interaction values for these actions:
- Submitting a form (only works with the Forms for Datalists and Forms for Editors modules, not item-based forms)
- Placing an order
- Viewing a product
- Downloading a file (requires the filelink to be inserted using the editor - i.e. uses DWDownload)
- Searching for content (does not currently work with index-based searches)
- Viewing a news item (from the News module, not an Item based news item)
Email Notifications for returning visitors
If you have set up email notifications for when a lead returns to your website, you can customize the frequency of email notifications (Figure 18.1).
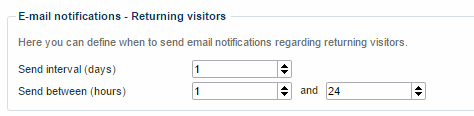
You can customize the send interval in days and the hours inbetween which you send the notifications.
Creating custom lead states
Dynamicweb comes with just a single lead state by default – approved – but you can create custom lead states here (Figure 19.1).
Simply enter a lead state name, and click the green plus sign – don’t forget to save the lead settings afterwards.
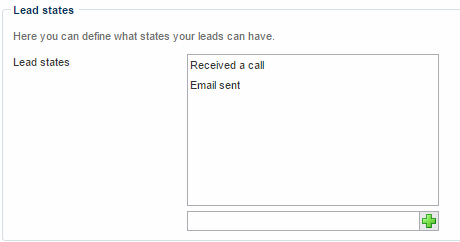
In this manner, you can define lead states to suit your needs.
Renamed leads
From the renamed leads area, you can remove any custom company names you have created for a specific IP address (Figure 20.1).

Custom names for an IP address are created (and can also be cleared) from the visitor details view, but if you need to find and clear the custom name of more than one visitor, it may be useful to see the complete list here.
Sources/domains
Advanced filtering of potential leads allows you to filter potential leads based on sources (Figure 21.1).
You create those sources here, adding any number of referrer domains to a source.
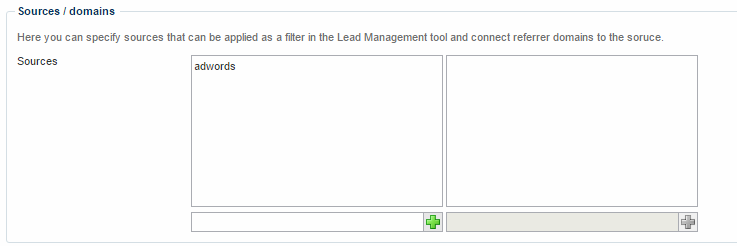
When filtering by source, only leads with referrer domains matching one of the domains defined here are shown.
Management tool
You can customize how many leads are displayed in your lead management windows here.
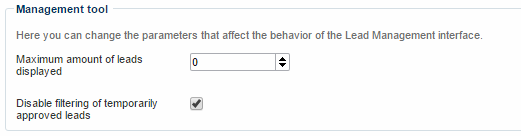
You can also disable filtering of temporarily approved leads, meaning that any filtering changes you make do not uncheck potential leads that you have already marked, until the filter settings are saved. By default, this should be checked.
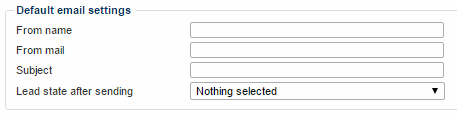
Default email settings
Create default values for lead-mails here (Figure 23.1). Your options are:
- Specify a from name, telling the recipient who is sending them an email
- Specify a from mail
- Specify a default subject
- Select a lead state to change the lead to after sending an email on it – e.g. ‘Email send to sales department’
These values can also be entered or customized manually when sending an email, but using default settings can save you time.
(Scheduling of) Lead emails
Lead emails are emails containing a lead. You can send lead emails to someone in your organization - e.g. the sales department - manually, or you can automate the process by configuring scheduling of lead emails.
Scheduling has many advantages, such as:
- The ability to work with leads without requiring a backend login, by enabling lead state changes from the lead emails
- Time saved, if you have many new potential leads every day
- The ability to automate more complex lead-state workflows
In short, if you work with many leads, you should probably work with scheduled Lead emails.
Here's how!
Getting started with lead emails
To get started with scheduled lead emails:
- Go to your Management center
- Go to Marketing > Leads > Lead Mails
- Click New lead mail
This takes you to the schedules lead mail setup window. This is where you configure your scheduled lead mails.
Read about your configuration options below.
General lead mail options
This is your general configuration options for lead mails (Figure 26.1).
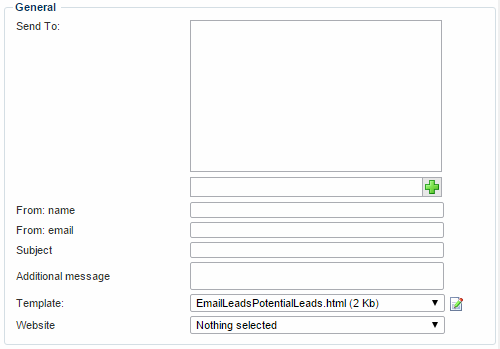
With the general options, you:
- Specify your recipients
- Specify a sender name and email, and an email subject
- Write an additional message, which will appear in the body of the email
- Select a template to use – lead mail templates are located under Templates/OMC/Notifications in the file manager.
- Select a website on your solution – only leads from the selected website will be included in the email.
Include lead states options
You can specify one or more lead states to include in the lead email. This is useful for creating complex lead state workflows, where you send e.g. approved leads to one team, and leads which are in other states to another team.

You simply add the lead states you want to add to your scheduled email to the right column.
If you combine this feature with the ability to allow lead state changes from the email, you can create very powerful workflows for your organization.
Scheduling options
This is your lead email scheduling options (Figure 28.1).

You must:
- Select a date and time for the first email to be send
- Select the frequency of future lead emails
Send settings
These are your lead email send settings (Figure 29.1).
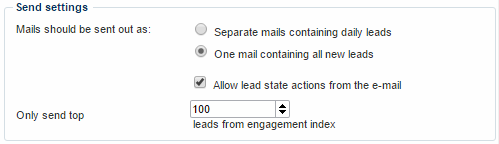
You must:
- Select between sending one email per lead, or a single email with all leads
- Allow or disallow recipients changing the lead state of a lead directly from the email
- Select the maximum number of leads to include in the email – taken from the top, based on the Engagement Index


