
Extensibility & Customization
Generally speaking, you can extend DW10 in the same places you could extend DW9:
- Notification Subscribers
- Scheduled Task Add-ins
- Configurable add-ins
- Custom providers
These four extensibility points are the same as always, and in most cases you will be able to port your custom code from DW9 to DW10 with minimal fuss.
However, when it comes to UI Extensibility Dynamicweb 10 is a little more flexible than DW9 was – you can:
- Create custom areas (like Users and Commerce)
- Create custom area trees – or change an existing one
- Implement your own screens
- Build custom commands, queries & models
- Inject screens into existing screens
- Make selectors with custom data
You can download a project doing all of this at our github – or see below for some more context.
Creating a custom area
To create a custom area you create a new class in your project and inherit from Dynamicweb.CoreUI.Application.AreaBase. You then implement the constructor and set properties such as Name, Icon, and Sort:
Add it to your solution using the Dynamicweb CLI.
Creating a custom tree
A tree in Dynamicweb consists of:
- Sections (1)
- Nodes (2)
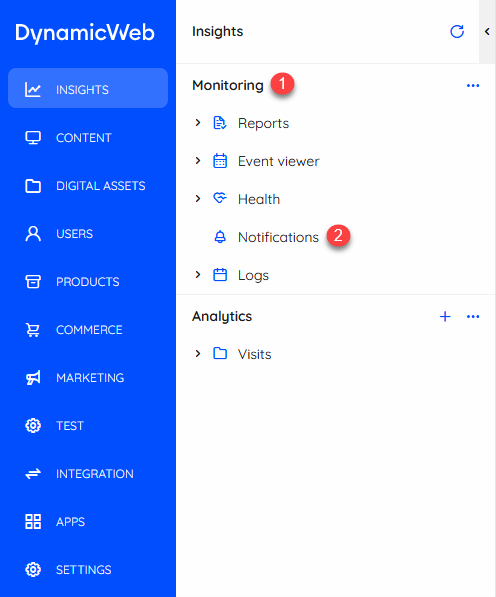
To create a section you create a class like below:
You then implement the constructor and fill out Name and Sort.
A section, then, is basically a name somewhere in the area tree – to add nodes to the section you need to implement a NavigationNodeProvider and override the default implementation of the GetRootNodes() and GetSubNodes() methods:
Add it to your solution using the Dynamicweb CLI.
Creating a customized screen
If you want to build a customized screen you can use one of our built-in ScreenTypes:
- ListScreen
- EditScreen
- OverviewScreen
When you use one of the standard ScreenTypes, you don’t have to worry about the look and feel of your screen, as we’ve taken care of that part – you just need to concentrate about your data.
All of the standard ScreenTypes are located in Dynamicweb.CoreUI.Screens, and contain some methods that you need to override to put something on the screen.
Here we inherit from ListScreenBase – in this case for the HealthProviderCheckDataModel – and use two overrides to add Name and Columns to the screen:
Creating a completely custom screen
If you want more control over how a screen looks, of if you want to show off a combination of data for which we have no data model, you can build a truly custom screen.
This is a bit more difficult than using a built-in ScreenType, but also affords you more freedom.
You must:
- Create a ProjectFile and configure it
- Make sure the Dynamicweb 10 application loads Views from your custom project
- Add content to the custom screen
Create the custom project
First you should create an empty ASP.NET Core Web App in Visual Studio:
- Create the ProjectFile and toggle RazorSupportForMVC and GenerateEmbeddedFilesManifest
- Add a reference to the Microsoft.AspNetCore.App framework
- Add a package reference to Microsoft.Extensions.FileProvider.Embedded version 6.0.6
Your project file will look something like this:
Adding a reference to IRenderBundle
Second, since this custom project will contain custom views and static files, we need to tell Dynamicweb that it should look for Views inside this dll when the application is loaded.
To do this, you need to make a class which inherits from “Dynamicweb.CoreUI.Rendering.IRenderingBundle”.
The class doesn’t need to have any functionality, it just needs to be there.
Adding content to the custom screen
The first thing you want to do is create a component – this is where you define what data is available for the screen, as well as set various properties like a header and whether to show our standard search bar, etc. A component should inherit from Dynamicweb.CoreUi.UIComponentBase, but all other content is up to you.
In this example we’re creating a component called ExpressDeliveryWidget which contains a Header and some other data related to shipping and delivery:
- ShippingLimit: Total hours given to ship a parcel
- ShippingComment: A comment field
- RemainingTime: How much time is left to fulfil this shipping request
Now the component has been defined, it’s time to define how it should look by creating a matching View.
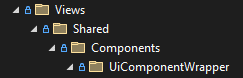
Custom views must be placed in the same hierarchy used by us to be properly loaded, so all your views must be placed in the “UiComponentWrapper” folder.
The name of the a View should be the full name of the Component, so if you have a component, which has the name “CustomComponent”, and it’s located in the namespace “MyCustomComponent.Components”, the full name would be “MyCustomComponent.Components.CustomComponent”, which should be the name of your view.
In this case out View looks like this:
Creating custom commands, queries & models
When you’re building custom Views you need to fetch and show data to your users, and often you also want your users to do stuff with the data like edit and save a user, etc. To do so you can use our built-in Queries & Commands – you can see the built-in types under Settings > Developer > Api Explorer.
Sometimes, of course, we don’t have standard queries and commands suited to your project. In this cases you can build something custom:
- Commands
Commands are actions handled serverside, e.g. Save, Delete, Move, etc. Basically, every time you want a screen to react to user input and change something you should implement a command. Custom commands should inherit from Dynamicweb.CoreUI.Data.CommandBase. - Queries
Queries are used to read data from the domain, which can then be parsed and displayed on a Screen. A query is always coupled with a specific Model – so it’s ProductByIdQuery or ProductByNameQuery and not a generic ThingsByNameQuery, unless you implement a new model with properties shared by e.g. Product, Page and Area. A query can either delivery a single model or a list of models. Custom queries should inherit from either DataQueryListBase, DataQueryIdentifiableModelBase, or DataQueryModelBase - Models
ViewModels are used to make the data fetched by queries available for screens and commands.
When you want to map a model from the Domain model to the Model, it can be done using either Global Mapping or Custom Mapping. If you use the former you can use the MappingService.Map<Model> and let it handle mapping for you.
If you want to create your own Global Mapping you need to implement a class which inherits from MappingsConfigurationBase.
And then, in the constructor of ApplicationMappingProfile, you can do something like this:
If you use custom mapping, you can basically decide on mapping on a query to query basis, if it’s needed.