
Extranet
The Extranet module is an integral part of registering and working with users, which is essential for building loyalty, creating targeted communication, and increasing both customer satisfaction and profitability.
With the extranet module, you can:
- Allow website visitors to register themselves as users from frontend
- Allow registered users to view and edit their profiles
- Allow users to login to restricted areas (personal or otherwise)
- Display lists of users, groups, or both, on the frontend
- Use advanced login functionality, with password recovery mechanics
Read about doing all of this, and more, in the sections below.

Basic Concepts
In this section you will learn about:
- The basic extranet module functions
- Configuring the module for listing, viewing, creating and editing users
- Logging people in with an account
To use the Extranet module, add it to a paragraph on a page. From the paragraph, you have access to the module settings window.
From there, you control the module behavior.
The Extranet module settings
The first thing you will see is the general module settings (Figure 3.1).
From here, you can see the name of the module, and you have the ability to remove it from the paragraph.

We strongly discourage you from creating new sites using stylesheets, Javascript, or the theme-functionality. This is old technology, and is supported for legacy reasons.
The Extranet show settings
Below the module setting, you have the extranet show settings (Figure 4.1).
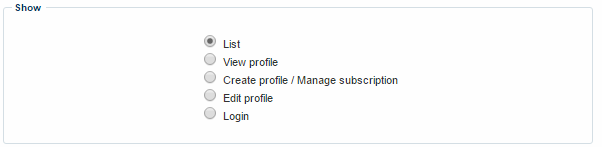
The show settings allow you to choose what this instance of the Extranet module is for.
You can choose between:
- Listing users and user groups
- Allowing someone to view a specific user account (typically their own)
- Enabling visitors to the page to create or edit a user profile
- Rendering a login area
Your choice of module function will determine how the rest of the module must be configured. In the following section, you will learn about each option separately.
Listing users and user groups
If you select List as the module function, you will be presented with a number of settings to control what and how you want to list users and user groups.
Here’s what they do.
The list settings
With the List settings (Figure 6.1), you control the general settings for displaying the list.
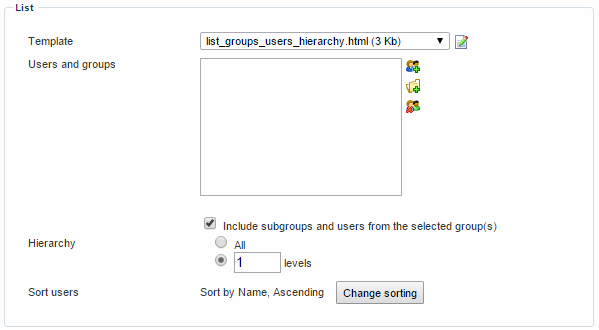
You must:
- Select a template, which controls the layout of the list. You can display users, user groups – or both – in the list.
- Select the users or user groups you want to display in the list
- Specify if you want only to show the users and user groups selected, or if you want to include subgroups and users from subgroups – if you do, you can specify the number of levels you want to display.
- Select a sorting order for the list – the default is by name, ascending
The paging settings
With the paging settings, you can activate (and customize) paging behavior for your list.
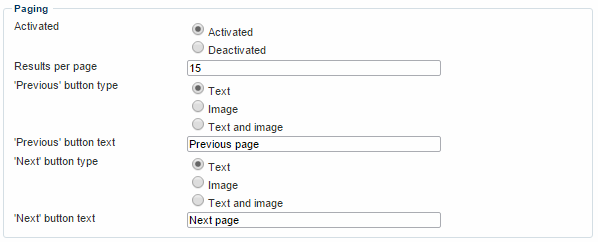
You can:
- Activate or deactivate paging
- Specify the number of list items (results)per page
- Select the type of previous and next button, and the corresponding text and/or image
The details & search settings
With the details and search settings, you can customize how the details view and search functionality for your list view should behave.
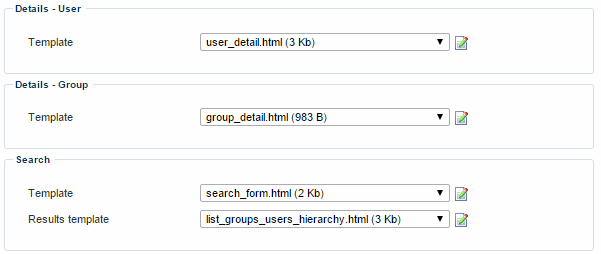
You can:
- Select a template which determines the layout of the details view of a user
- Select a template which determines the layout of the details view of a user group
- Select a template for the frontend search field which enables frontend searching of the user database
You have access to several template tags for the search template – read more here.
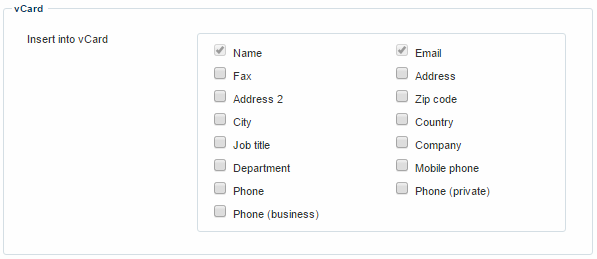
The vCard settings
With the vCard settings (Figure 9.1), you can specify which user information you want to include in the vCards on users, which can be downloaded from the frontend.
Viewing and editing user profiles
In most cases, the View profile option is used to allow logged-in users to view (and edit) their own profiles.
If you select View profile as the module function, you will be presented with a number of settings to control which profile want users to see, and how you want to display it.
Here’s what they do.
The user details settings
With the user details settings (Figure 11.1), you can control which user should be displayed by the module.
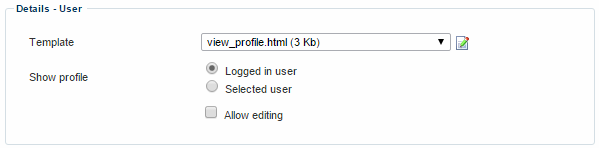
You can:
- Specify a template, which will determine the layout of the user profile shown
- Choose between showing the user currently logged in, or specify a different user
- Allow (or disallow) editing of the user from the module
The edit profile settings
If you check the Allow editing checkbox, you will be able to customize the profile editing behavior of the module (Figure 12.1).
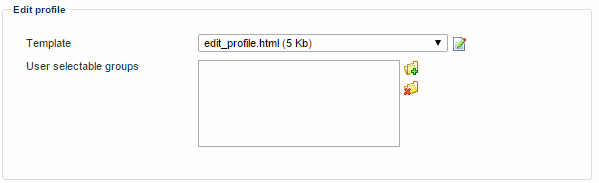
You can:
- Specify a template, which will determine the layout when editing a profile.
- Specify user groups, which the user can join on their own accord
The manage addresses settings
With the manage addresses (Figure 13.1) settings, you can control how the module deals with user addresses.

You can:
- Select a template, which will determine how the user address list is displayed
- Select a template for creating new addresses from the module (provided that you have activated allow editing)
The vCard settings
With the vCard settings (Figure 14.1), you can specify which user information you want to include in the vCards on users, which can be downloaded from the frontend.
Creating a profile
By selecting the Create profile option, you can allow users to register and create themselves from frontend via the module.
When selecting the option, you will be presented with a number of settings to control the process – here’s what they do.
The Create User settings
With the Create user settings ({figureef}), you can control the module behavior in regards to the actual profile creation process.
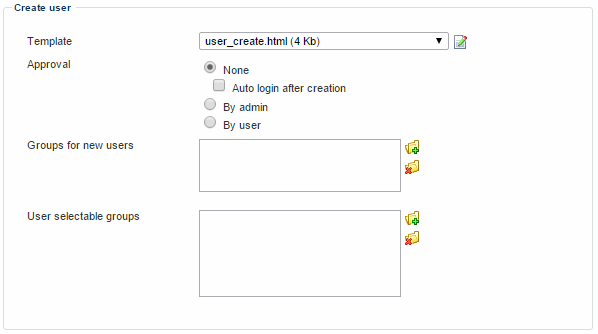
You must:
- Select a template, which will determine the layout when creating a user profile in frontend.
- Specify the approval process (if any)
- Specify any groups the user should belong to by default, and any groups he or she can actively select to belong to
Email subscribe/unsubscribe
If you want to obtain consent for sending your users emails – for instance though the Email Marketing tool – select the email_subscribe.html. This template. This template contains a form with name and email input fields, allowing the user to subscribe to Email Marketing emails. When the user is created with this form, he or she will have email permission set to yes in their user profile
In a similar vein, if you need to set up email unsubscription, select the email_unsubscribe.html template, which contains an email input field, which lets users unsubscribe from Email Marketing emails, by unchecking the Email permission checkbox on their user profile.
Notification and confirmation email settings
Depending on your choice of approval process, you will have access to a number of settings (Figure 17.1) for notifying administrators and/or your new users.
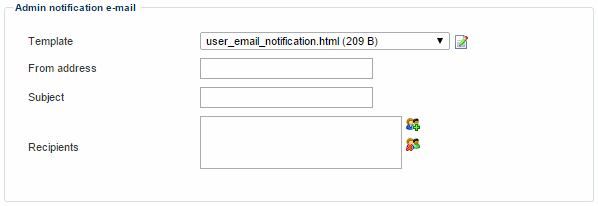
Common to these settings are, that you need to:
- Select an email template to base the email on
- Specify a from-address and a subject
- Possibly specify one or more recipients (unless it’s a confirmation email, which is sent to the newly registered user)
The redirection settings
With the redirection settings (Figure 18.1), you can control what to do after a profile has been created.
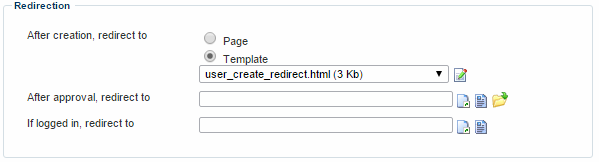
You can:
- Select a page or a template to redirect the newly created user to, depending on whether you have approval set up or not
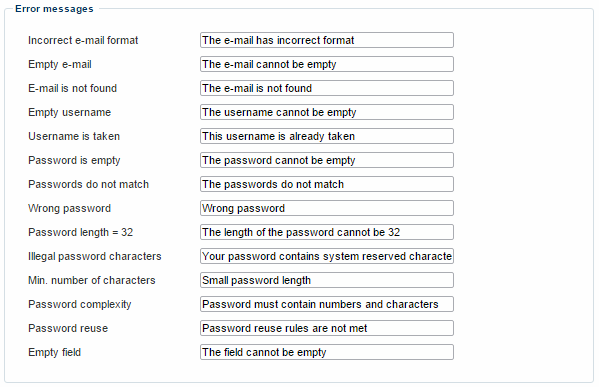
The error messages settings
With the error message settings ({figurerf}), you can customize the error messages displayed to website visitors, if they try and create a profile without filling the required fields, or enters field values in the wrong format.
Editing a profile
By selecting the Edit profile option, you can allow your users to edit their profiles from frontend via the module.
When selecting the option, you will be presented with a number of settings to control the process – here’s what they do.
Editing profile settings
The edit settings allow you to customize the profile editing behavior of the module (Figure 21.1).
You can:
- Specify a template, which will determine the layout when editing a profile.
- Specify user groups, which the user can join on their own accord
The error messages settings
With the error message settings (Figure 22.1), you can customize the error messages displayed to website visitors, if they try and edit and save a profile without filling the required fields, or enters field values in the wrong format.
Logging a user in
By selecting the Login option, you can create login procedures for your users, and customize them to your liking. The login functionality also allows you to automate password recovery methods, and much more.
The login settings
The login settings (Figure 24.1) allow you to control the login functionality of the module.
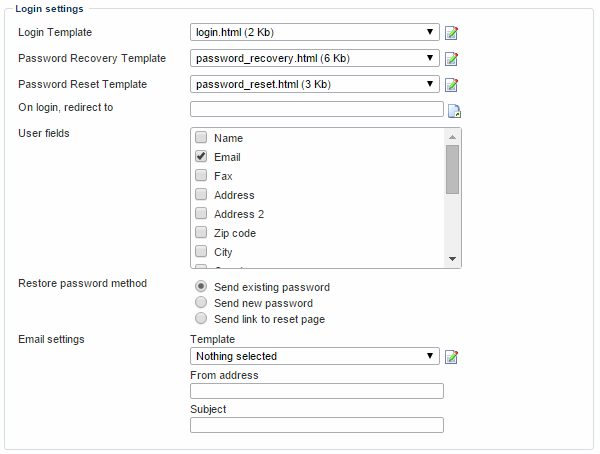
You can:
- Select a login template, which will determine the layout of the login area.
- Select a password recovery and password reset template, if you want to use reset and recovery mechanics.
- Specify a page to redirect users to, once they’ve logged in
- Select which fields are required for password retrieval – you can create custom fields for e.g. retrieval questions and answers.
- Select a method for restoring passwords – send existing password, send new password, or send a password reset link (in which case you can specify for how long the link should be valid).
- Select a template controlling how your password retrieval emails look, and supply a from-address and a subject for the email.
The error messages settings
Because the login functionality also allows people to create new passwords, you have access to the error message settings.
With the error message settings (Figure 25.1), you can customize the error messages displayed to website visitors, if they try and create a password which doesn’t follow the password security settings.

Implementing
In this section you will learn about:
- Using external authentication, such as Twitter or Facebook, to log users in
External authentication (Social media login)
Before you can set up social login, you must create an app on the social media channels you want to use.
If you want to enable your users to use external authentication, such as Login with Facebook, Login with Twitter, or Login with Google+, Dynamicweb provides you with 3 channel providers by standard, for Facebook, Twitter and Google+.
To get started with external authentication:
- Go to Management Center > Control panel > External authentication
- Click the Add button to bring up the add provider view (Figure 27.2)
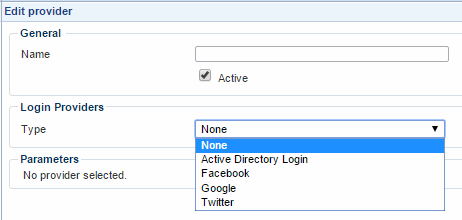
- Write the name you want your users to see on the frontend
- Select the external provider you want to use
Depending on the provider you select, you will be asked to provide a set of parameters – these parameters are needed to relate and authorize your account to the account on the social media of your choice.
Common social media provider parameters
Two parameters are common to all social media providers:
- The Create new user page allows you to select a page to direct social login users to, where they can create a new user. The user will be create in the user management group selected in the extranet module on the targeted user creation page.
- When the Create local account without showing the ‘Create new user’ page checkbox is checked, the user will not be directed to the create user page, but the he page he was trying to view before he was prompted to login. If the user does not exist, a user is automatically created, retrieving the Username, Name and Email from the social media provider.
If the Create user page field is empty then the user is created without a group and can be found in the Complete list in User Management.
You can use CreateUserPageID in the query string instead of selecting a page in the Create new user page.
When the CreateUserPageID parameter is present in the query string, e.g. yourwebsite.com/Admin/Public/Social/ExternalLogin.aspx?action=login&providerID=1&CreateUserPageID=53, the create user page defined on the provider in the field Create new user page is ignored.
Facebook parameters
External authentication with Facebook requires you to provide:
- An App ID, which is provided by Facebook when your application is created
- An App secret, which is provided by Facebook when your application is created
Given URL error
If you get an error like this: “Given URL is not allowed by the Application configuration. One or more of the given URLs is not allowed by the App's settings. It must match the Website URL or Canvas URL, or the domain must be a subdomain of one of the App's domains.” when you try to authorize the Facebook channel, then the site URL in Basic settings - Website with Facebook Login doesn´t match the website that you are trying to authorize from.
Twitter parameters
External authentication with Twitter requires you to provide:
- A consumer key, which is an API key provided by Twitter when your application is created
- A consumer secret, which is a kind of password provided by Twitter when your application is created
Google+ parameters
External authentication with Google+ requires you to provide:
- A Client ID, which is an API key provided by Google+ when your application is created
- A Client secret, which is a kind of password provided by Google+ when your application is created


