
DIBS Payment Window & DIBS Mobile
DIBS is a Scandinavian payment service provider (PSP) with more than 15.000 customers in 20 countries.
Dynamicweb integrates with the DIBS D2 platform – their most widely used platform – in several ways:
- The DIBS Payment Window checkout handler (this one)
- The DIBS FlexWin checkout handler
- The DIBS Mobile checkout handler
In this how-to, you will learn how to integrate your Dynamicweb solution with DIBS Payment window at the very basic level. To read about setting up DIBS in general, please see the DIBS documentation.
The DIBS Payment Window checkout handler loads a DIBS branded and optimized payment window, and in essence borrows some of the credibility which DIBS has in Scandinavia, at the cost of less room for customization.
For more customization options, see the DIBS FlexWin checkout handler.
DIBS Mobile is simply a mobile-friendly payment window, but is otherwise identical to DIBS Payment Window – so to use DIBS Mobile, follow this how-to, but use the DIBS Mobile checkout handler instead of the DIBS Payment Window checkout handler.
Creating a test account
To get started with DIBS, you can register a test-account at http://www.dibspayment.com/demo-signup.
The free demo is available for only a limited time, but should be sufficient to test your setup. You may have to wait for your test account to be approved.
Configuring your DIBS account
Once you have access to your account, you must configure it for integration with Dynamicweb.
This means that you must:
- Generate your two MD5 keys
- Set up an acquirer agreement
Here’s how!
Generating MD5 keys
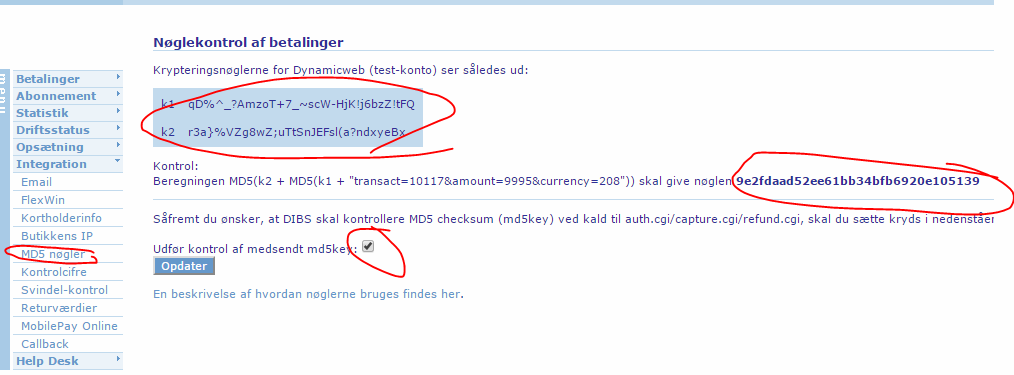
The Dynamicweb checkout handler for DIBS Payment Window requires you to provide two MD5 keys (Figure 4.1), which will be used to verify the integrity of the data sent from Dynamicweb to DIBS and DIBS to Dynamicweb.
To generate the two keys:
- Go to the DIBS backend > Integration > MD5 Nøgler
- Generate your keys – you will also be shown a checksum value based on your keys
- If relevant, check the udfør control af medsendt md5key checkbox
Registering an acquirer agreement
To actually carry out payments, you must register your acquirer agreements with DIBS.
To do so, you must contact DIBS Support.
Configuring the checkout handler
Once your account has been configured, you can create and configure the matching payment method in Dynamicweb.
To do so:
- Create or edit a payment method in the Management Center > Ecommerce > Orders > Payment following the regular procedure
- Select the DIBS Payment Window checkout handler from the dropdown
- Fill in the associated parameters (Figure 6.1)
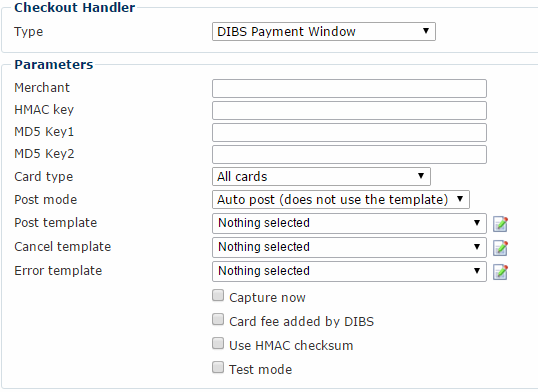
You must:
- Enter your Merchant ID, and the MD5 key 1 and MD5 key 2 provided to you by DIBS. The HMAC field is present for legacy reasons, but is not required for new accounts.
- Select a card type for your payment method. You can lock your payment method to a certain type of cards, e.g. VISA, or allow all card types.
- Select a post mode – auto post or render template. The latter allows you to customize what information you post to DIBS with the post template (see below)
In addition, you can:
- Customize any templates you want to use:
- The Post template is used when your post mode is set to Render template
- The Cancel and Error templates render cancellation and error messages
Finally, check the checkboxes appropriate to your implementation:
- Capture now allows you to auto capture authorized orders. Please note that in some countries it is illegal to capture an order before the items bought have been shipped. You may also want to review orders before capture – e.g. to check the stock level.
- Card fee added by DIBS allows you to let card fees – normally handled natively in Dynamicweb – be handled by DIBS. You need to contact the DIBS support in order to check the agreements and negotiate the cart fees for your merchant.
- Use HMAC checksum activates HMAC-key control to secure data during the transfer between your server and the DIBS server
- Test mode allows you to simulate transactions with DIBS without involving real money transfers
DIBS & Klarna Invoice
With DIBS Klarna Invoice, you can set up Klarna invoice payments through DIBS.
With Klarna Invoices, a customer “buys” a product by requesting an invoice for the order – Klarna then transfers the money to you – and on receiving the goods or at an agreed point in time, the customer pays Klarna.
In effect, the customer buys on credit, while you receive payment more or less immediately.
To set up Klarna invoice payment through DIBS Payment Window:
- Follow the standard procedure outlined in this document
- Select Klarna or All Invoices as your card type
- Fill out the rest of the field sin the standard manner, as outlined in this document
You need to contact DIBS in order to enable Klarna Invoice as a payment method for your DIBS merchant, both for testing and live payment purposes. Naturally, you also need an account (test or otherwise) with Klarna.
Please also note that Klarna Accounts/Installments are not a part of this integration.
Testing
Before going live, test your setup thoroughly.
To use the test environment,
- Your DIBS account must be enabled for test payment by DIBS. New accounts are created in test mode automatically.
- A test parameter must be sent to DIBS alongside the regular payment information.
For a list of test cards supported by DIBS, please see the DIBS test information documentation.