
T5.1 Concept & Setup
Welcome to the first of four tutorials which aim to get you up to speed with Dynamicweb PIM – for an overview of the course look here.
Dynamicweb PIM is a Product Information Management system – a set of tools which allow you to manage all aspects of your product portfolio from one central location, before publishing them to various channels, e.g. Dynamicweb Ecommerce, desktop publishing software such as Adobe InDesign, and so on. This provides you with greater control over all aspects of the product lifecycle than more traditional Ecommerce setups.
In headlines, Dynamicweb PIM enables you to:
- Organize your product portfolio in warehouses and warehouse groups
- Use workflows, queries and bulk-editing to enrich the product portfolio
- Publish parts of the portfolio to one or more channels
When a company decides to adopt a PIM system in their organization, they typically do so out of a desire to obtain a better overview of and full control over all aspects of their product catalog, especially optimizations to the product enrichment process. A PIM system is typically used in conjunction with an ERP system like Dynamics Ax or Dynamics Nav – this allows full control of the product lifecycle (create/update/delete). However, for practical reasons we will not use a complete integration setup for this course.
Since no two businesses are alike, each PIM system implementation must be tailored to match the specific scenario:
- The structure of the product data; attributes, relationships, related products, languages, variants, and so on
- The workflows and processes used by the organization using the PIM system
Of these two, the product data analysis is especially important; while workflows and processes can be adapted or changed, it’s often very resource intensive to change the underlying data because it wasn’t analyzed properly in the first place.
In the next section, we will dive headfirst into the scenario which will be used for the rest of this course.
Scenario & Data Analysis
In this scenario, you run a bike shop – you sell bikes, as well as various accessories, components and clothing associated with bikes. You already have your own product portfolio on the solution and in Dynamicweb PIM, but you have recently struck a deal with a vendor to sell their products through your webshop on a commission.
For practical purposes, you want these products to be separate from your regular product portfolio – in PIM terms, this means we will place them in their own warehouse – but will be published to the webshop alongside your own products.
First we must take a look at the data and how it’s structured:
- What information do we have for each product
- Where in Dynamicweb does the information belong
Download ClothingSimple2020.xlsx and open the file in Microsoft Excel or equivalent – it should look something like Figure 2.1).
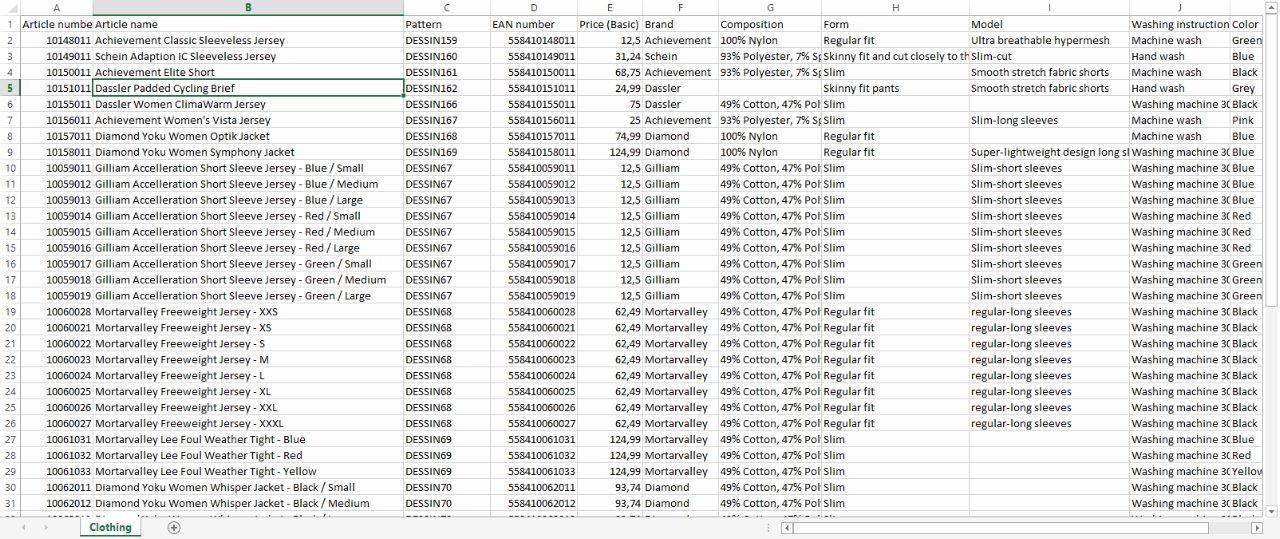
As you can see, the product data here is fairly simple and in a flat structure – and we will import it as such. In many real-world scenarios, the data model will be more complicated – but handling that is an integration task and out of scope for this course.
Now, let’s take the data apart – we must look at:
- Languages
- Product data
- Variants & Variant categories
Languages
First things first; the data uses only one language – English – which is also the default Ecommerce language for the solution. This is good, as importing data to a non-default language would complicate matters quite a bit.
Once the products have been imported, you can easily use PIM to create localized versions of the products.
Product Data
Next we take a look at the information we have available about each product in the source and determine if and where in Dynamicweb the data should be placed.
The following columns can be imported to Dynamicweb with ease:
- Article number is a unique value will be used as the product number
- Article name is a fit for the standard product name field
- Price is match for the standard product price field
The rest of the data is specific to the garment industry, and as such Dynamicweb does not have standard fields for it. Instead, we must place that data in a set of custom fields appropriate to the type of data. As the solution is already configured for selling clothes, many of the custom product fields are already present on the solution:
- The EAN number value can be placed in the custom EAN product field
- The Brand value can be placed in the custom Brand product field
Most of the other columns – Composition, Form, Model, and Washing instructions – contain data which is best modeled as product category field values in Dynamicweb, namely a small set of options associated with a particular category of products, in this case clothing. The Color column matches up with the custom product field Color, but the values would have to be parsed to hex codes to be imported correctly.
A full integration setup could of course handle these issues during the import, but in this scenario we will leave them out and use PIM to enrich the products later instead.
This leaves two data columns:
- The Pattern value tells us which products share a particular fabric pattern
- The Created value tells us when the product was created in the ERP system
While the pattern code is potentially useful, the Created value probably isn’t – so we will create a custom field for the style code but not import the Created value.
Variants
Variants are one of the most challenging topics to tackle when it comes to implementing a PIM solution, as there are so many different ways to handle them.
In our example data, variants exist as independent products, with the variant options (small, green, etc.) forming a part of the name.
The following variant categories are used:
- Colors
- Size
The good news is that these categories are both already present on the solution – the bad news is that some of the variant options used for size (XXS, XS, S, M, L, XL, XXL, XXXL) are not, as the regular product portfolio only uses S, M, and L. The missing values will have to be created.
Basic Setup
Now that we have a better understanding of the data, we can start to configure the solution to accommodate it. This involves:
- Creating a separate warehouse for the product data
- Creating a custom product field for the Style Code values
- Importing the product data
- Creating the missing variant group values
Create a warehouse & group
As mentioned in the previous section, we want these products – which are sold on commission – to be separate from your regular product portfolio. In PIM terms, this is done by placing them in their own warehouse – the PIM parallel to a shop in Dynamicweb Ecommerce.
There are several reasons for this:
- The products are probably updated separately from your regular product catalog – and you can set up import jobs to only affect a single warehouse, which is very useful
- The vendor is responsible for enriching the products - and with a separate warehouse you can restrict their access to your regular product portfolio
- Should the arrangement with the vendor end, it will be much easier to remove the products from the solution again
Warehouses can be linked to a product index – the linked index will be rebuilt automatically every time products in this warehouse are edited.
Products in a warehouse are organized in one or more warehouse groups. They are functionally identical to product groups in Dynamicweb Ecommerce. When we import products to the PIM Training warehouse, we need a group to put them in.
First, create a new warehouse:
- Go to Settings > PIM > Warehouses
- Click New Warehouse in the toolbar
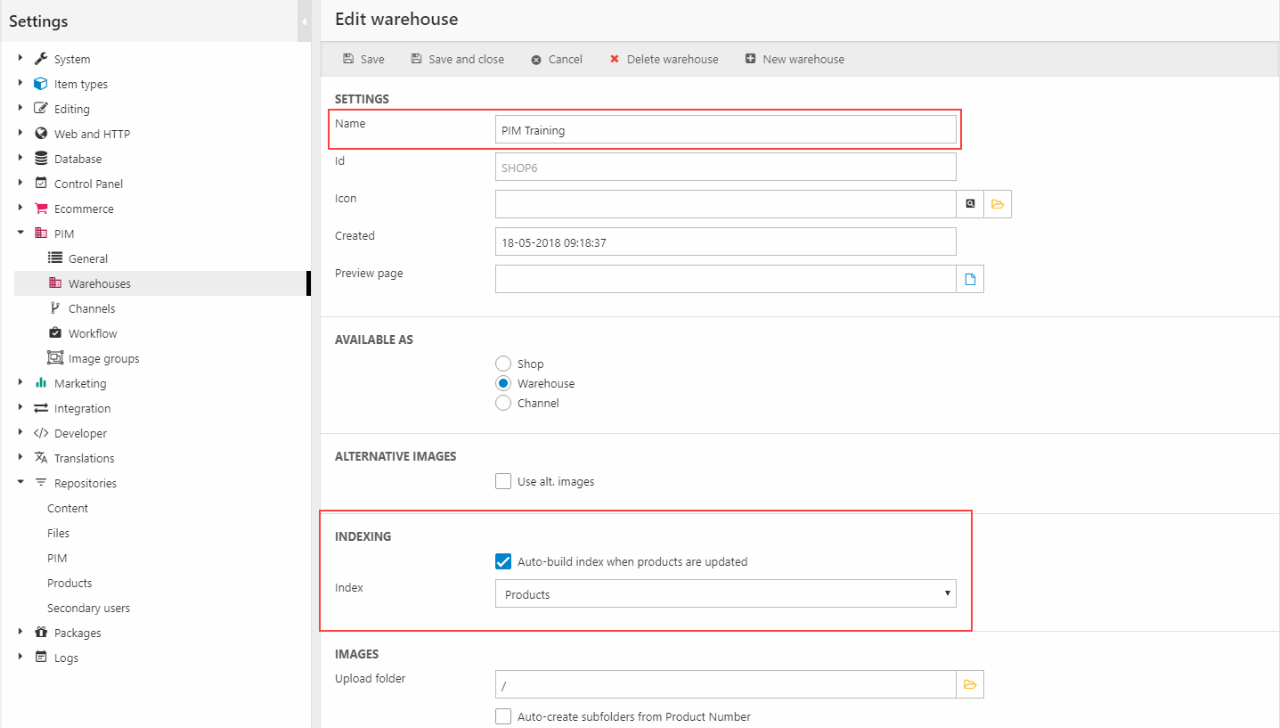
- Name the warehouse PIM Training – this is important, as the name will be used when importing products (Figure 7.1)
- Under Indexing:
- Check the Auto-build index when products are updated checkbox
- Select the Products index
- Save
Next, create a new warehouse group:
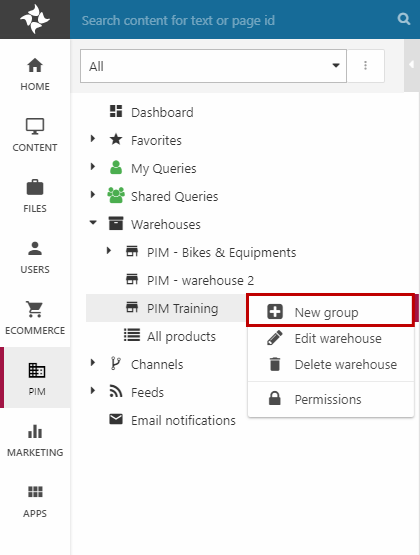
- Click on the PIM Area button to open the PIM tree
- Fold out the Warehouse node
- Right-click the PIM Training warehouse and select New group (Figure 7.2)
- Name the group All Products – this is important, as we will use a script to place the imported products in this group based on the name
- Save
Create custom fields
As we uncovered during the data analysis, most of the data fits into the existing structure – either in standard fields, or in the custom fields which are already created on the solution.
However, we do need a new custom field for the Pattern data - create a new custom field:
- Go to Settings > Ecommerce > Product Catalog > Product fields
- Click New field in the toolbar
- Enter Pattern in the Name, System name and Template Tag fields
- Select the Text (255) field type
- Save
Create variant group values
The data uses different variant group values than the ones currently present on the solution already, so the missing values must be created:
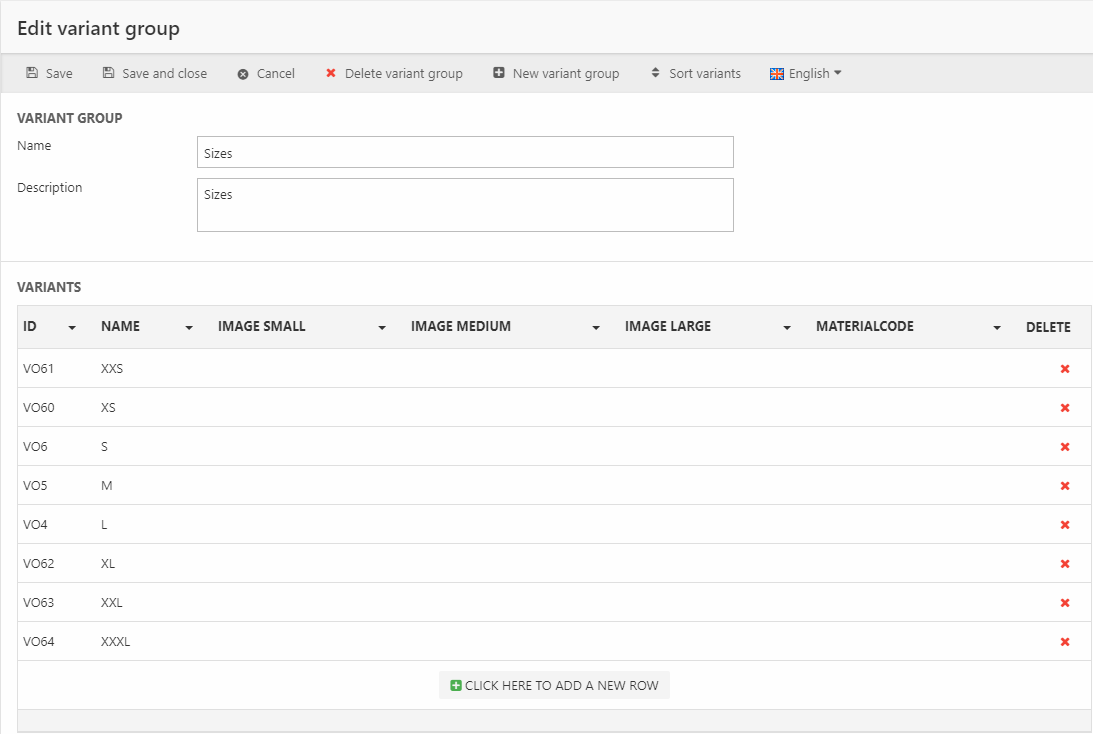
- Go to Settings > Ecommerce > Product Catalog > Variants
- Click on the Size variant group to open the edit variant group view
- Add the missing options so you end up with the full list of sizes (Figure 9.1).
You can use the Sort variants button in the toolbar to sort them, if you like – keep everything neat!
Import product data
Now that the basic infrastructure is in place we can import product data to the solution. While a production setup will likely retrieve this product data from a remote system – e.g. D365 Business Central – we’ll be using the more readily available import products tool and the ClothingSimple2020.xlsx file you downloaded earlier.
Download this file and then follow these steps:
- Go to the PIM area and click on the All Products group
- In the ribbon bar click in the Import products button
- In the file selector dialog, click the Browse icon and then the Upload button (Figure 10.1)

- Select and upload the ClothingSimple2020.xlsx file you downloaded
- Once the file is uploaded, select it and click Next
- The source file type should have auto-detected that this is an Excel file – click next
- You will now see a preview of the data you’re importing – in this case you don’t want to change anything so click Next again (Figure 10.2)

- You should now see the mapping window where you decide where to place the incoming data. Everything should be preconfigured so you can click Run
- After the import is done click Finish
Please review the imported products and verify that everything looks normal and isn't obviously problematic (Figure 10.3).

Field Settings
Before moving on to the next tutorial, we will take a quick look at one final important topic – the field settings which control whether product data is allowed to vary across languages and variants or not.
The field settings can be accessed from Settings > Ecommerce > Advanced configuration > Fields – and consist of:
- A list of all standard and custom fields on the solution
- For each field, checkboxes that control whether the value of that field is allowed to differ across languages and variants
- For each field, checkboxes that control which fields are required, read only, or hidden.
We’re not going to change anything here, but later on these settings will help determine where product fields are being shown – something we will return to in tutorial 3.

What you’ve learned – and what’s next
In this tutorial, you have been introduced to Dynamicweb PIM, the scenario we will be working with in these tutorials, and the basics of data analysis.
You have learned how to:
- Create a warehouse, a warehouse group, a custom field, variant group values
- Run a simple import job to import products from an Excel worksheet
- Access the Field settings that control whether a field can differ across languages & variants
In the next tutorial, we will explore the tools you use to manage the product portfolio:
- Warehouses & warehouse groups
- Workflows
- Queries
- The Combine tool