
T6.4 Product data
Welcome to the last of four tutorials which aim to get you up to speed with Dynamicweb Rapido – for an overview of the course look here.
In the previous three tutorials we explored how Rapido is configurable in the extreme, and how to work with content using the Rapido item types. In this final tutorial we will dive into the basics of working with product data on Rapido.
Most Rapido versions ship with example implementations of web shops – currently bikes and fashion – alongside product data for each shop. Of course, you’re probably not building a bike shop or a fashion shop, and even if you are the product portfolio will have different properties than on the example websites, and the product portfolio is organized in a different manner. Your point of departure may even be a Rapido installation devoid of product data, or without an Ecommerce setup at all.
In short, there’s much to be gained by taking a good, hard look at how Ecommerce is handled on Rapido – this includes examining:
- How the Product Catalog works on Rapido
- How product images are matched to a product
- How variants behave on Rapido
- How to add related products to a product
- How to add custom fields
- How to add new facets to the product catalog
- How to switch from one-step-checkout to multi-step checkout and vice versa
Enjoy!
Exercise 1: Shops & Products
Products – broadly speaking publishes products which:
- Are Active
- Exists in the context language and shop
- Matches the filter values set (if any)
- Matches the search term provided (if any)
Since the query reacts dynamically to the website context, it’s trivial to add a new shop to a solution and switch to using that. You can examine the actual query by going to Settings > Repositories > Products and clicking the Products query – don’t worry if it looks technical, we will return to it in greater detail in a later exercise.
Ok, it’s time to get down to business:
- Create a new shop – in the Indexing section of the shop settings check Auto-build index when products are updated and select Products
- Open the website Ecommerce settings – set the new shop as the default context shop for the website, and set the language to English
Open the frontend and navigate to a product list – you will see no products, which is of course expected now that we’ve changed the website to retrieve products from an empty shop. So, let’s add some products to the solution:
- Go to Ecommerce > Product Catalog
- Right-click the new shop and create a couple of product groups
- Open each group and create 1 or 2 products – give them a name, a number, a stock and a price but leave all other fields blank for now
Since the shop is set up to auto-build the Products index when products are saved, they are immediately published to frontend. Let’s take a closer look at the component responsible for that; Product Catalog app. Open the Content tree and click on the Products page – then open the Products paragraph and switch to the App settings view.
Note the following:
- The product catalog uses the Products query to identify which products to publish – and an associated Products facet group to publish filters
- The Display section is used to change the number of products per page
- The Templates section is used to control how products are shown in frontend – the templates used are Rapido-specific and fairly advanced, since they need to account for all the different configuration options we covered during tutorial 2
Once you’re comfortable that you understand how products are published to frontend, proceed to the next exercise.
Exercise 2: Ecommerce Navigation
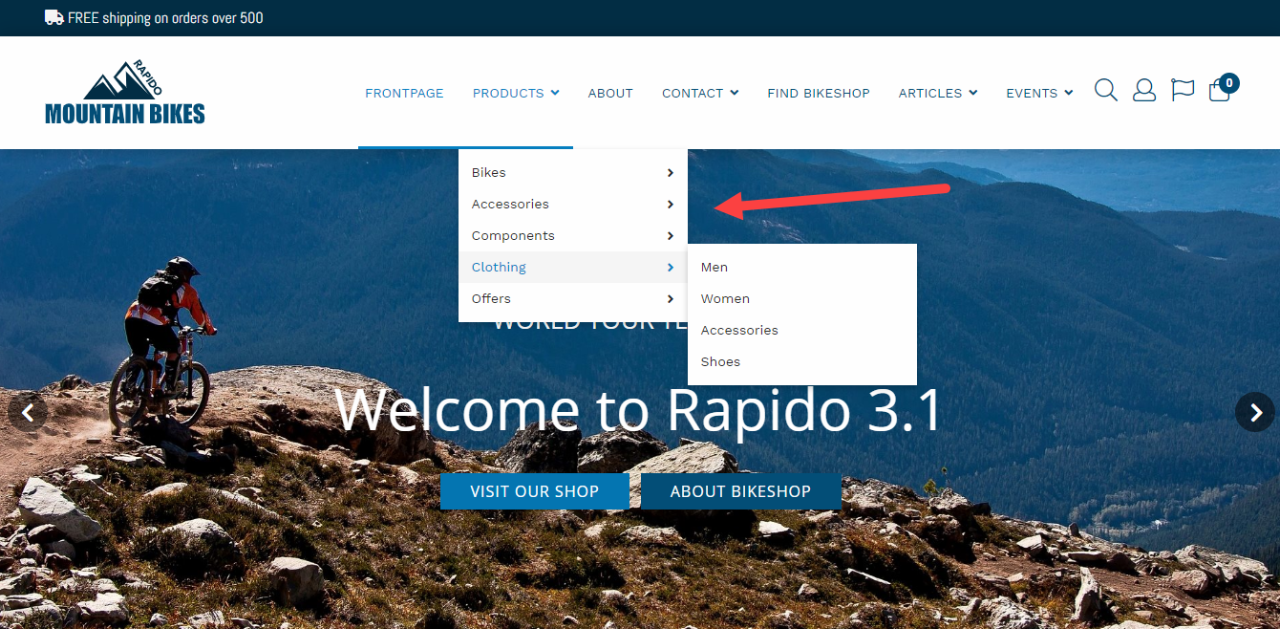
One thing you may have noticed is that while you created a new shop, new groups, and new products in the previous exercise, the navigation still shows the Bike shop product groups (Figure 3.1).
Let’s do something about that:
- Open the Content tree and navigate to the Products page
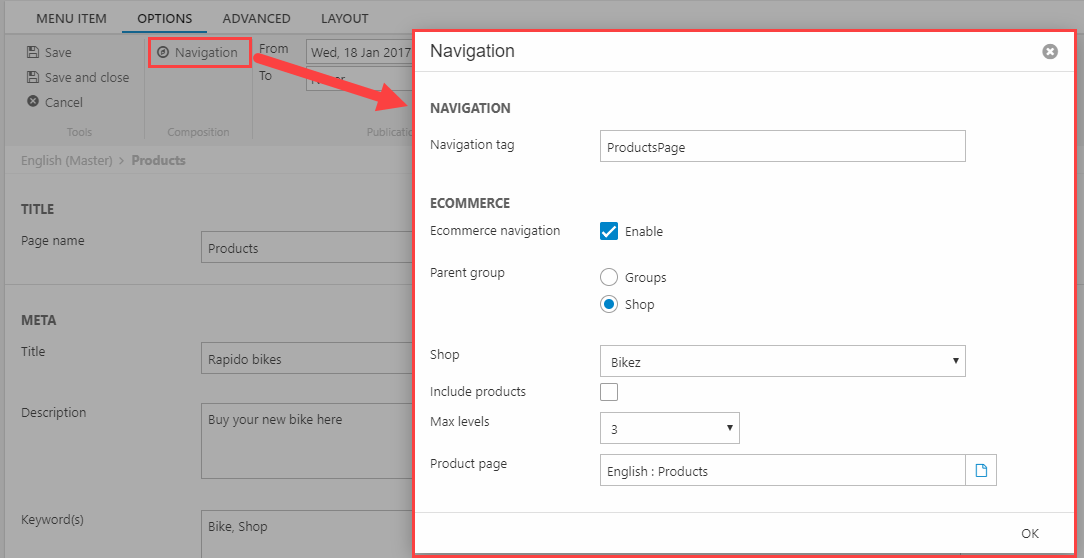
- Click Properties in the toolbar
- On the page properties toolbar, switch to the Options tab
- Click the Navigation button to open the Navigation settings (Figure 3.2)
- Under the Ecommerce section select your new shop instead of the Bikez shop
Go to frontend and verify that the correct product groups are now used in the navigation, then proceed to the next exercise.
Exercise 3: Product Images
On Rapido, product images are assigned to products via Image Patterns based on the product number. In concrete terms, this means that images which are placed in a specific folder and are correctly named are matched to a product or product variant automatically – for instance, an image called 701.jpg will be automatically matched to the product with the product number 701.
Figure 4.1 shows a typical configuration at the time of writing this course.
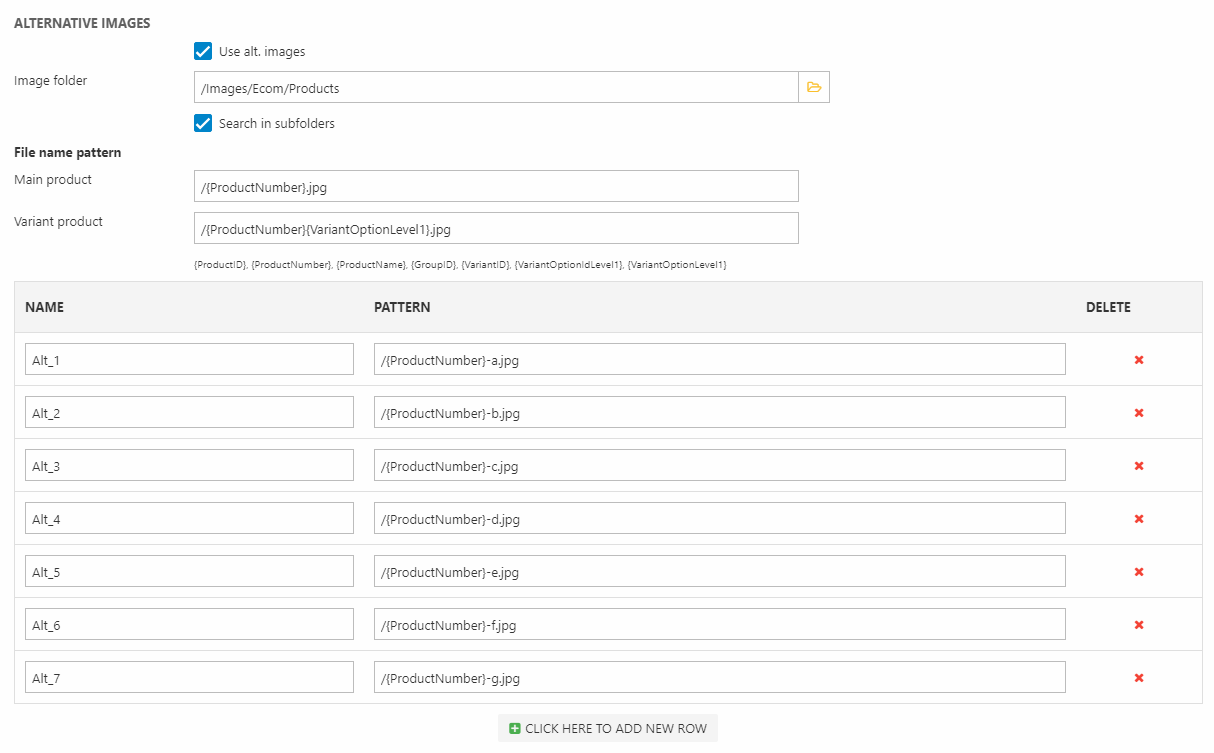
Image patterns are defined on the shop – let’s try it out:
- Read this article about Image Patterns
- Go to Files > Images > Ecom and create a new subfolder for your shop
- Go to Ecommerce > Product Catalog
- Right-click and edit the Bikez shop – take a screenshot of the Alternative images section
- Right-click and edit your new shop – activate alternative images and replicate the settings on this shop. Set your new folder as the image folder.
After defining the image patterns, go to your newly created subfolder under Files/Images/Ecom and add a number of images to this folder matching the product numbers of the products you created during the exercise 1. If the images are named correctly and use the correct extension (.jpg by default), they will immediately appear in frontend when the product list is reloaded.
Once you’ve got everything working, proceed to the next exercise.
Exercise 4: Related Products
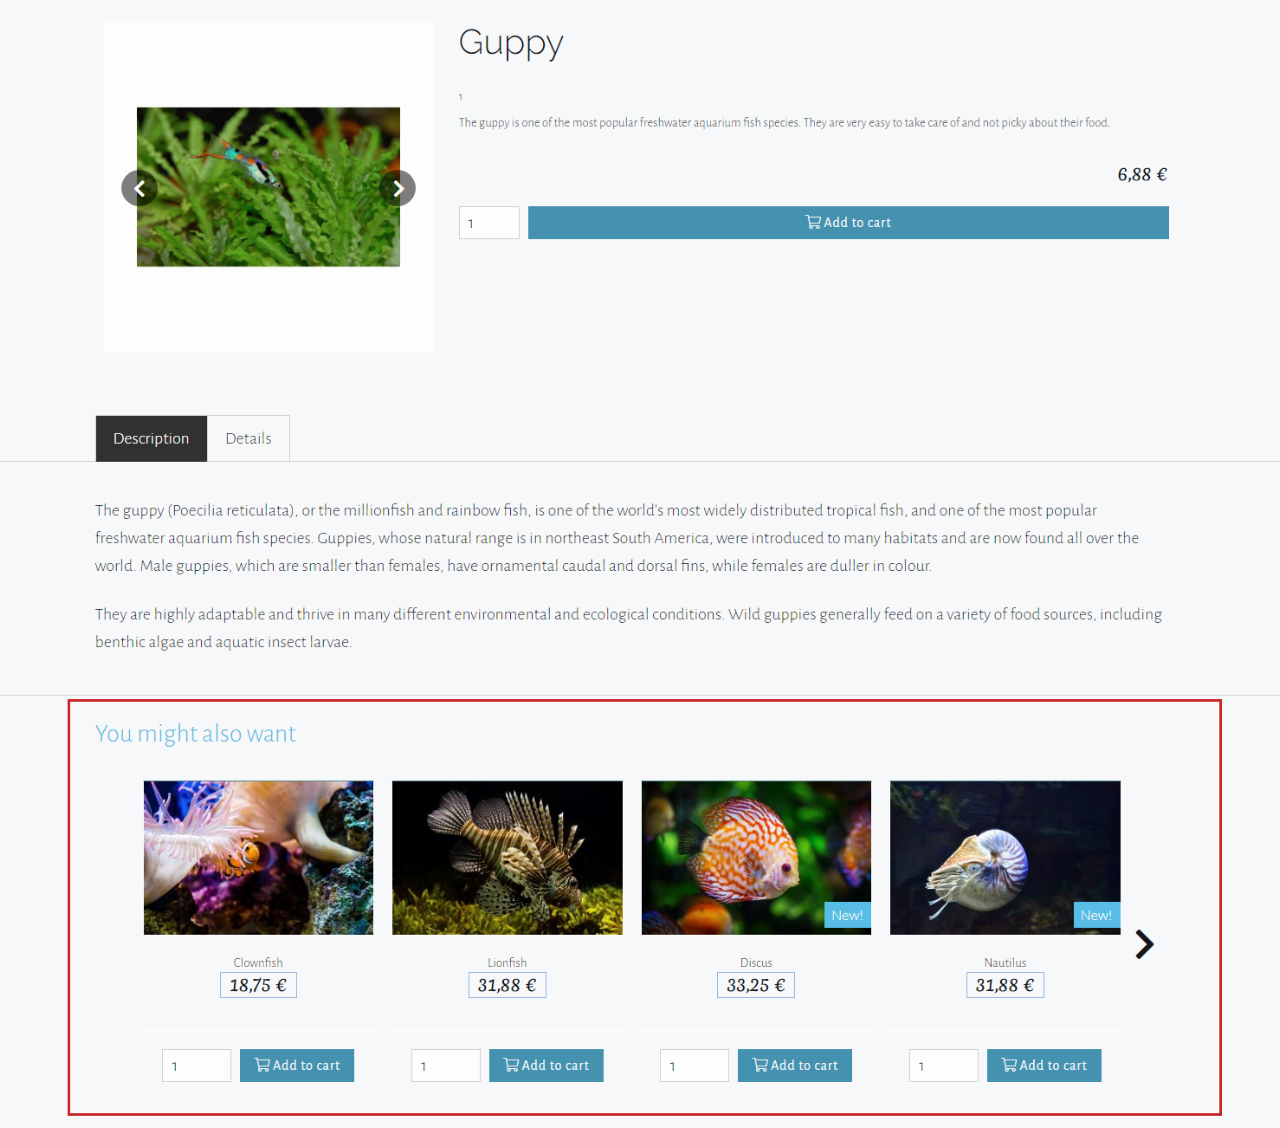
Related products is a powerful tool to upsell and cross-sell products – and Rapido comes with a built-in Related products section on all product pages (Figure 5.1).
Let’s try it out:
- Read this guide to setting up related products
- Create a relation group and add related products to one of your existing products
Once you’re comfortable with the process, proceed to the next exercise.
Exercise 5: Rapido & Variants
Both of Rapido’s example shops – Bikez and Fashion – contain products with variants; products which are linked together and share key properties such as the product number, but differ in other respects such as Size or Color (Figure 6.1). If you are already familiar with variants in Dynamicweb, please note that Rapido works best with extended variants.
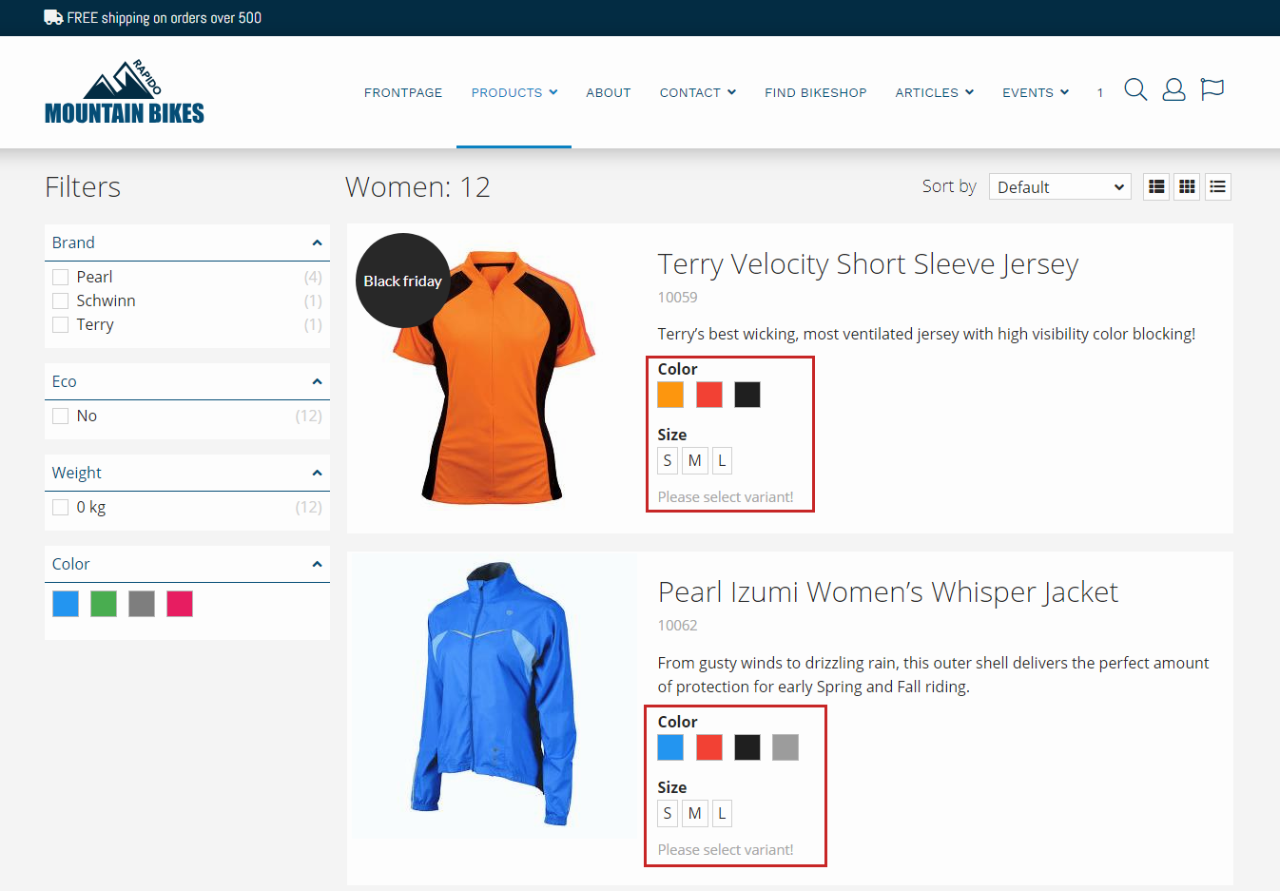
The different variant options – like S, M, and L or Blue, Red, and White – are created inside variant groups such as Size or Color. Rapido comes with a set of variant groups used in the Bikez and Fashion shops, but unless you’re going to run a bike shop or a fashion shop you will need to know how to create new variant groups:
- Read the Variants documentation
- Create a new variant group – with a set of appropriate variant options
- Open one of your products and create variants
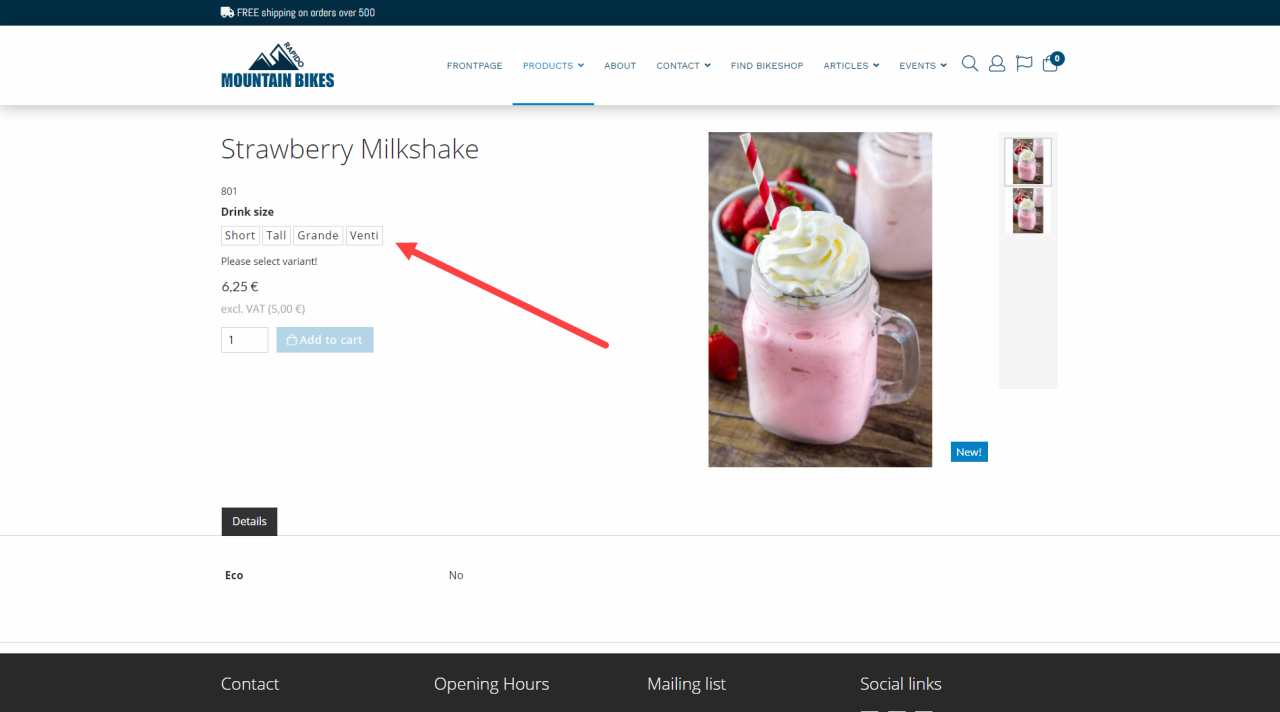
- Open the frontend and note how the new variants are immediately available:
- In the product list
- On the product page (Figure 6.2)
Exercise 6: Custom fields
A product is an object with a lot of properties; a name, a number, a description, stock, and so on. Many of these properties are used across industries and are stored in standard product fields – those that aren’t are stored in a variety of custom fields, with the type of custom field generally determined by the type of property:
- Product fields are used to extend ALL products on a solution with a new field – these should be used for properties with global relevance, for instance an external id
- Product Categories are used to extend a certain category of products – e.g. shirts or wrenches – with fields specific to the category.
Out of the box, Rapido uses both types of custom fields – but they are, of course, tailored to bikes and fashion. For each Rapido-based project you will therefore have to take a good hard look at the product portfolio of the customer, determine where each property belongs (standard vs custom field), and then create custom fields of the appropriate type:
- Read the custom field documentation
- Create two product fields and verify that they show up on all products
- Create a product category and apply to a product group – verify that the category fields show up on all products in the group
- Edit a couple of products and add values to the product fields & product category fields
Open one of the enriched products in frontend and make note of where the standard and custom data is shown. Recall from tutorial 2 exercise 2 how the Details section of the Product Page website settings can be used to control the placement of the various sections on the product page.
Once you’re comfortable with the process of adding custom fields to a solution, proceed to the next exercise.
Exercise 7: Facets
Facets – the sections listen under the Filters heading on all product lists (Figure 8.1) – are used to quickly filter a product list to only show a subset of products. On the standard Rapido example shops you should see a lot of facets out of the box – Brand, Type, Material, etc. – but since your new products don’t use those product & category fields they don’t show up on your product lists.
At the technical level, a facet takes all the values it finds in a specific field and lists them in frontend, for instance Aluminium and Carbon in the bike shop Material field. Then, when a facet value is selected, it is passed to the Products query which reacts to the values and limits the selection of products to those where the field value matches the facet selected.
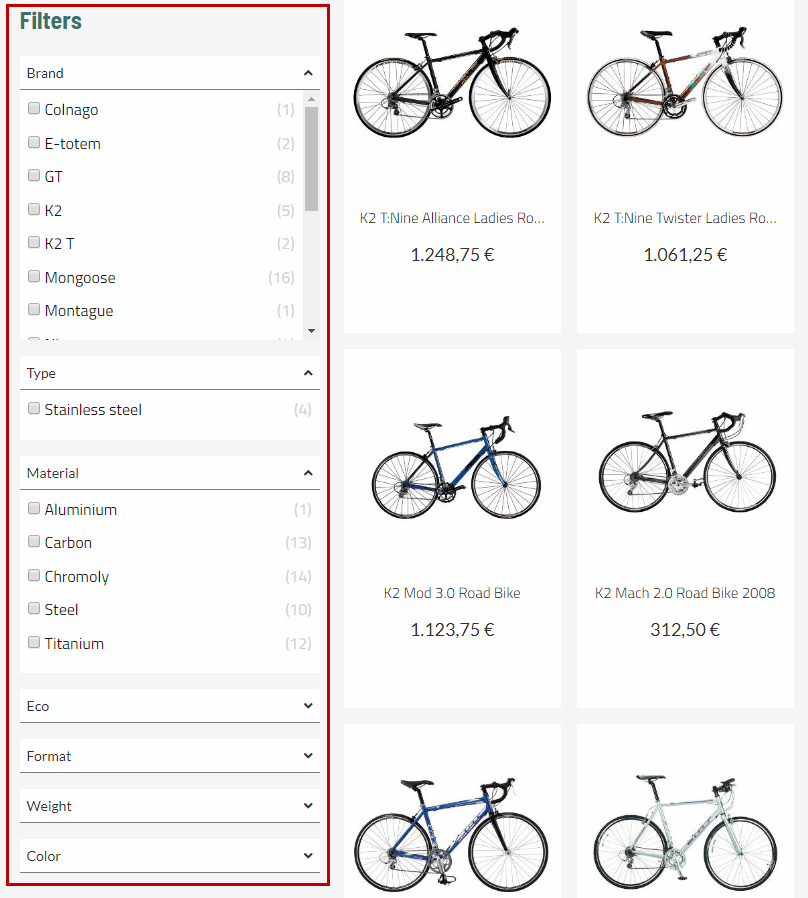
Facets may be based on values from any single field, custom or otherwise – let’s try it out:
- Open your products and add values to the Brand product field – reload the frontend and see how the existing Brand facet is now rendered
- Read this guide to adding facets from scratch
- Add a facet to the Products facet group based on the custom product fields from the last exercise
Once the facets are shown in frontend and you’re confident that you understand the process, proceed to the next and final exercise.
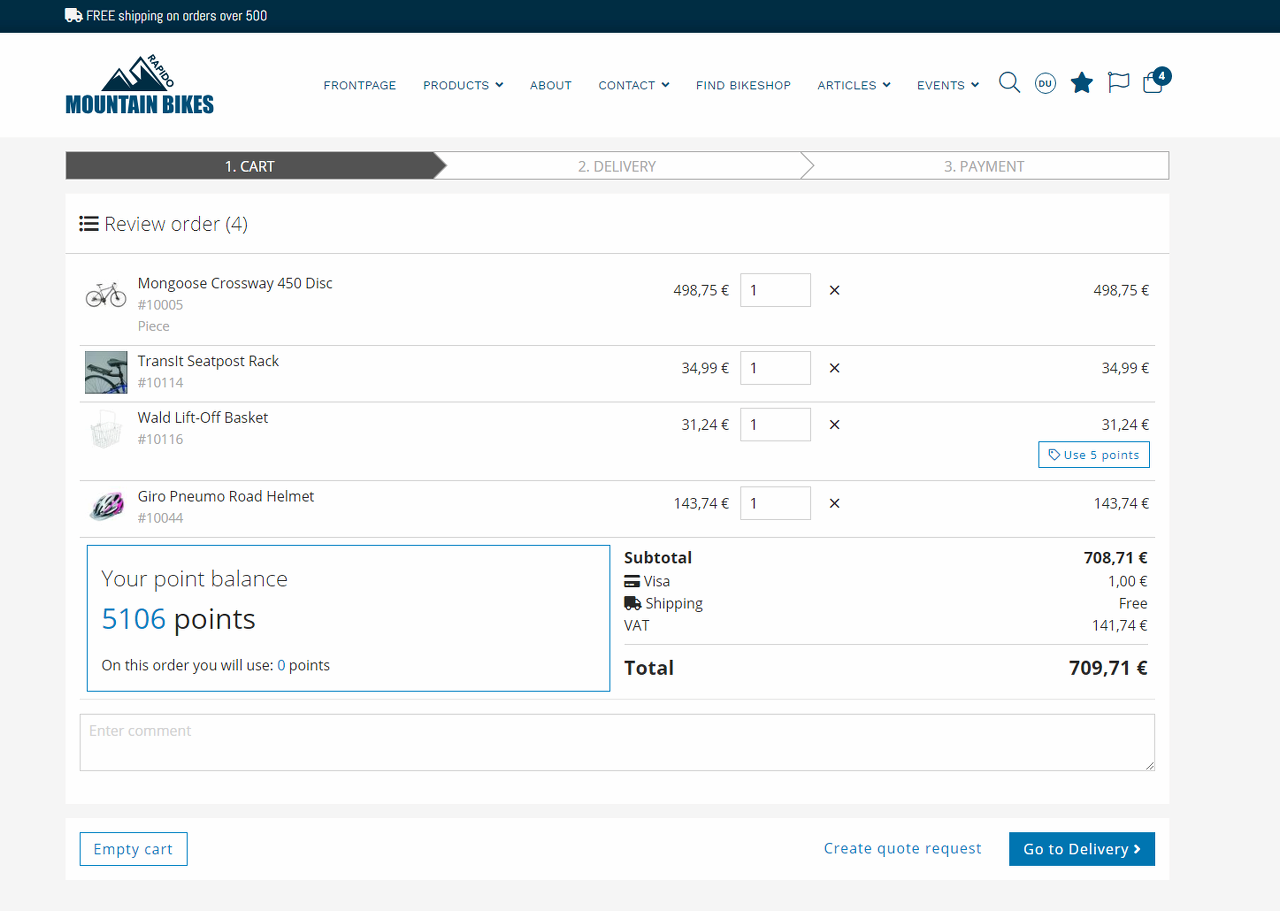
Exercise 8: Checkout configuration
There are two types of checkout flows for Rapido: the one-step-checkout flow and the multi-step-checkout flow, as illustrated in Figure 9.1.
Switching between the two checkout flows is trivial:
- Open the Content tree and click in the Cart page
- Activate the paragraph containing the checkout flow you want to use – and deactivate the other paragraph
If you’re on an empty solution, you can read about recreating the two flows from scratch in this article. Recall tutorial 2 exercise 3, where you worked with hiding/showing the various elements on the checkout page.
Summary
In this fourth and final T6 tutorial you’ve been exploring how to work with product data on Rapido, including:
- How the Product Catalog works on Rapido
- How product images are matched to a product
- How variants behave on Rapido
- How to add related products to a product
- How to add custom fields
- How to add new facets to the product catalog
- How to switch from one-step-checkout to multi-step checkout and vice versa