
T5.4 Publishing the Product Portfolio
Welcome to the fourth and final tutorial in our Dynamicweb PIM course – for an overview of the course look here.
In the previous tutorial, you got acquainted with the different processes, tools and views used when enriching the product portfolio; view modes, the visible fields selector, the bulk-edit tool, how to work with multiple languages in the same view, and finally how to work with images and image inheritance.
In this tutorial we will cover the last important step in the product information management process; publishing product data to various channels.
Dynamicweb contains two ’native channels’:
- Dynamicweb Ecommerce is a built-in distribution channel for solutions which include a web shop
- The Digital Warehouse is a frontend for PIM, and allows users to download digitals assets and product data in a variety of resolutions and formats
To complement the native channels, we also provide a framework for creating custom channels and publishing the channel data to feeds – web pages that contain data in a specific format which complies with the requirements of an external service, e.g. Google Merchant.
In this tutorial we will:
- Publish product data to Ecommerce
- Create a custom channel and publish product data to it
- Publish the channel data in two feeds – one with Danish product data and one with English product data
- Create a scheduled task for saving the feed data in a file
Publish to Ecommerce
As outlined at the beginning of the course, the products in this tutorial are meant to be published to Ecommerce alongside the products in the regular product portfolio. Fortunately, this is as easy as pie:
- Go to PIM > Warehouses > PIM Training
- Open the Diamond group
- Check all the products in the group and click Publish to channel (Figure 2.1)
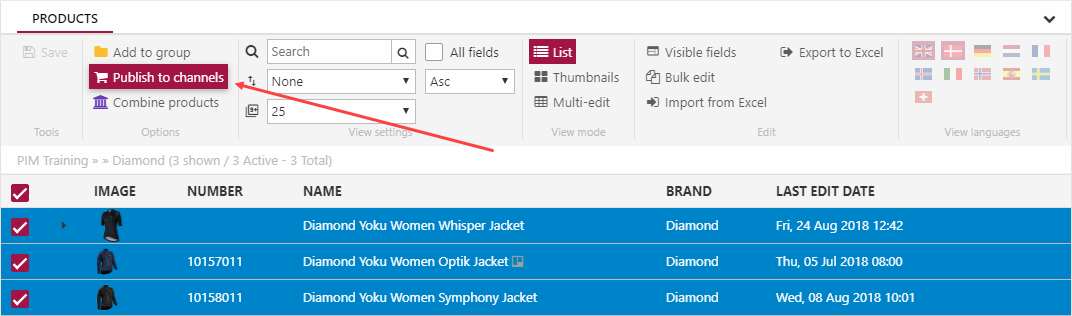
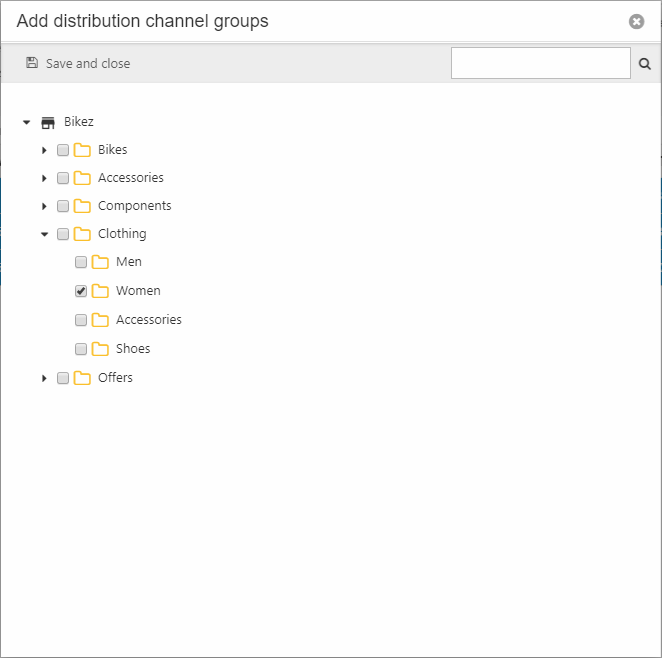
In the dialogue, fold out the Bikez tree and check the Clothing > Women group (Figure 2.2) – then click Save and close.
That’s pretty much it – open Ecommerce > Product Catalog > Bikez > Clothing > Women and verify that the products have been published to Ecommerce (Figure 2.3).
Once published to Ecommerce, they are rendered in frontend under the same conditions as the existing products, e.g. when they have a stock & price > 0 and the product index has been built. You can edit the shop settings and activate auto-building of an index whenever the shop content is changed.

Creating a Channel
One of the main strengths of a PIM system is the ability to publish the same product information across several sales channels – be it other e-commerce systems, catalog publishing software, or something else entirely. However, some of these external systems may require the product data to be organized in a particular manner; enter Channels.
A channel is simply a place to create custom group structure, just like Ecommerce typically has a different group structure than Dynamicweb PIM.
Create a channel:
- Go to Settings > PIM > Channels
- Click New Channel
- Name it ’My Custom Channel’ or equivalent
- Save
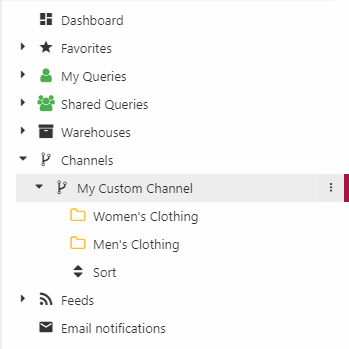
The channel is now created, and should show up in the PIM tree under the Channels node (if not, double-click the PIM button to reload the tree).
Right click the channel and create two groups – Women’s Clothing and Men’s Clothing (Figure 3.1).
Once the channel groups have been created, you can publish products to them in the same way you published products to Ecommerce:
- Go to PIM > Warehouses > PIM Training and publish products to the new channel
- The Diamond products should be placed in the Woman’s Clothing group
- Publish a couple of other (unenriched) products to the Men’s Clothing group
- Open the channel groups and verify that the products have been published correctly
Publishing products to a custom group structure isn’t really enough, though. Just like products in the Ecommerce product catalog must be published in frontend using a product catalog app, products in a channel must be published using a feed.
Creating Feeds
A feed is a web page which contains data in a specific format – e.g. JSON – that complies with the requirements of an external service. The data is typically not formatted to be human readable, but you can use a JSON formatter during development to prettify the output and verify that you have added the right data.
A feed is a simple construction consisting of:
- A query which retrieves product data from an index
- A context section which defines the languages & currencies which should be included in the feed
- A format section which defines the data which should be published and the format it should be published in
We want to create two feeds publishing the same channel data but in two different languages – Danish and English. To do so, we will first create a simple query which can do both.
Creating the query
An index query for a query does not have to be very complicated at all – it simply needs to retrieve active products in an appropriate language from within the right channel.
To create such a query:
- Go to Settings > Repositories and open the Products repository
- Click Add query – name it My Custom Channel and select Products as the Data source
- Click Add parameter and add a System.String type parameter called Language
- Click Add Group and create the following query (Figure 5.1)
- For the third expression, click the pencil icon and switch to parameter and select the newly created Language parameter
- Save
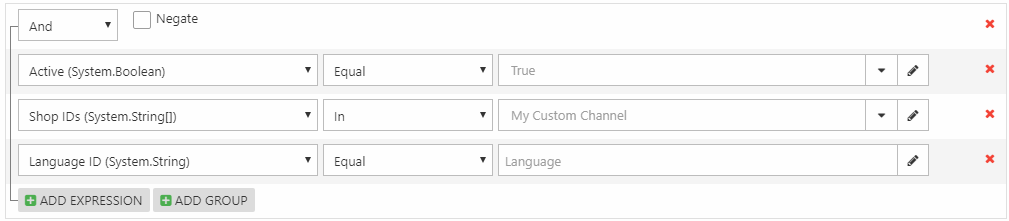
The two first expressions check that the returned products are Active and located in the correct channel (if you can’t select the channel, rebuild your product index and try again).
The third expression restricts the query result to products which exist in the language passed to the expression using the Language parameter – this means we can use the same query for both of the feeds, we just have to pass the right value to the language parameter in the feed settings.
Creating the feeds
To create a feed, go to the PIM area, right-click the Feeds node and click New feed – then fill in the details:
- Name the feed My Custom Channel DK
- In the query dropdown, select the My Custom Channel query you just created – the Override default parameters section will now show your Language parameter
- Click the Language parameter and enter LANG2 as the default value (this is the language code for Danish on a standard Rapido solution)
- In the Context section check Danish and Kroner as the language and currency.
- In the Format section:
- Select the Template feed provider
- Select the Json.cshtml template
- In the content type dropdown, select application/json
- Use the checkboxes to select the content you want to include in the feed:
- Under Product list check Products
- Under Product check Name, Number, Price and Variant ID
- Under Price check all the boxes
- Save
After saving the feed, an URL will be generated at the bottom of the page. Click it to see the feed output, or right-click and open it in a new tab. You can run the output through a JSON formatter to prettify the result and verify the contents.
Repeat the process and create My Custom Channel US – the currency code for English is LANG1.
Saving feed data
Some external services prefer to receive data in a feed, but others (like Google Merchant) requires you to transfer a file with product content to the service.
Feed data may be automatically saved to a file by creating a scheduled task using specific add-in called the Feed File Export Task:
- Go to Settings > System > Scheduled tasks and click Add in the toolbar
- Name the task
- Switch the activation selector to Add-in
- Select the Feed File Export Task add-in and configure it (Figure 7.1)

You must:
- Select a feed
- Specify a file name and a destination
- Select the language and currency you want to export
- Save
Once the task is run – either manually or on a schedule – the file is created and can be interacted with, e.g. moved to an FTP server for upload to an external system.
What you've learned – and what's next
In this tutorial, you've learned about three different methods for publishing product data:
- Publish products to Ecommerce
- Publish selected product data to a feed
- Saving feed data to a file on a schedule
This concludes the T5 course – during this course you've learned how to:
- Create a warehouse, a warehouse group, a custom field, and variant group values
- Run a simple import job to import products from an Excel worksheet
- Access the Field settings which control whether a field can differ across languages & variants
- Move/add products to a new warehouse group
- Create and apply a workflow at the group level
- Use the Combine tool to create variants from a flat product structure
- Create and use a query to extract products which share properties
- Work with the different view modes – List, Thumbnails, Multi-Edit and Details
- Enrich products and move a product to a new workflow state
- Toggle new languages and localize products
- Add product images, set one as the default image, and control inheritance using image categories
- Publish product data to Dynamicweb Ecommerce
- Create channels and publish data to them
- Publish product data in a feed
- Save feed data to a file in a schedule
We suggest you use your newfound knowledge to become a certified Dynamicweb PIM implementer.