
Tutorial 5: Prices, Discounts & Variants
In the previous tutorials, you’ve covered:
- Creating a shop, product groups and products – and a language and currency
- Creating a shopping cart and modifying the checkout flow
- Creating a product index and implementing free-text search in the product catalog
- Creating a payment method, a shipping method and configuring a VAT rate
In this the final T2 tutorial, we will be tackling three slightly more advanced Ecommerce topics:
- Creating dynamic prices with the Price Matrix
- Creating discounts and using the Discount Matrix
- Creating simple & extended Variants
The Price Matrix
You’ve already seen how simple prices work – you added a price to your products when you created them, then rendered it in frontend.
However, in many cases you want to dynamically change the price of a product according to various criteria – and for that you can use the Price Matrix (Figure 2.1).
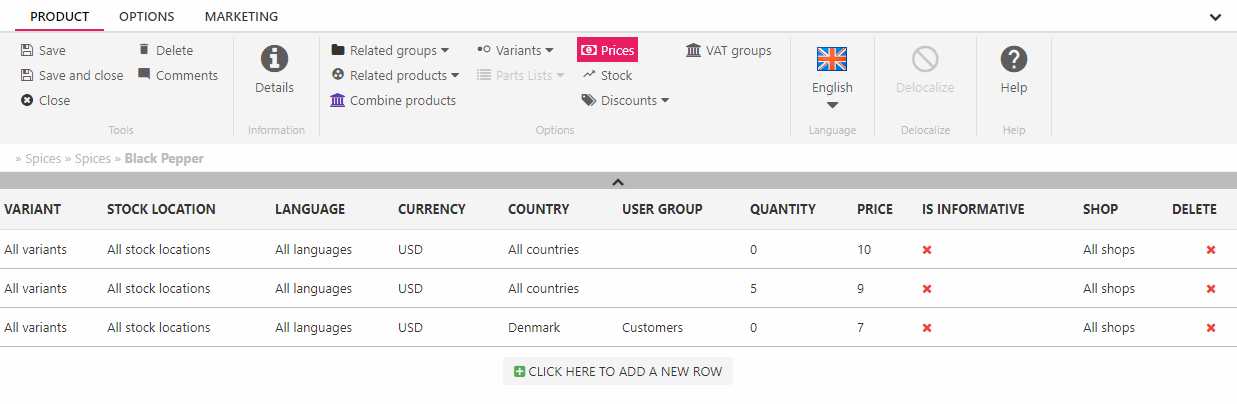
Try it out:
- Open one of your products
- Click Prices in the ribbon bar to open the price matrix
- Click Click here to add a new row to open the price row dialog (Figure 2.2)
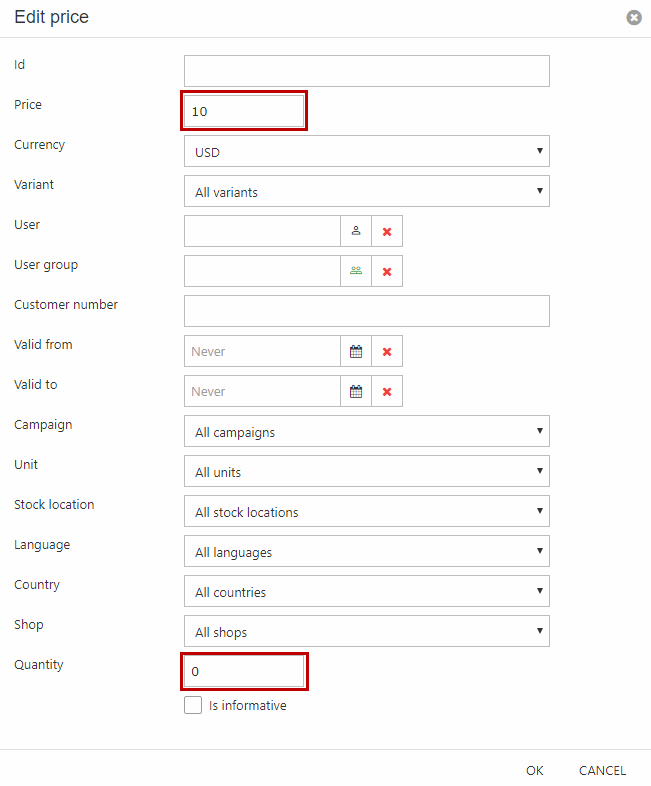
Don’t let the many options distract you:
- Set the Price to 10 USD
- Set Quantity to 0 (should be 0 by default, actually)
- Click OK
This rule establishes that the default price for this product is 10 USD – now let’s create a quantity discount.
Create a new price row and:
- Set Price to 9 USD
- Set Quantity to 5
- Click OK
- Save the product
Go to frontend and add four of the products to cart – verify that the price is 10 USD per item + VAT – and then add a fifth and verify that the items now cost 9 USD per item + VAT.
Play around with the price matrix for a while – try adding another dimension (e.g. prices based on user group membership).
The Discount Matrix
Discounts in Dynamicweb are handled in much the same way as the Price Matrix handles prices, with the key difference that the Discount Matrix (Figure 3.1) is not defined per product but on a wider scale.
We will create two different discounts – Free shipping if an order is over 100 USD & 5% OFF on orders over 500 USD – and see them applied in frontend.

Create the free shipping discount:
- Go to the Ecommerce area and click the Order discounts node
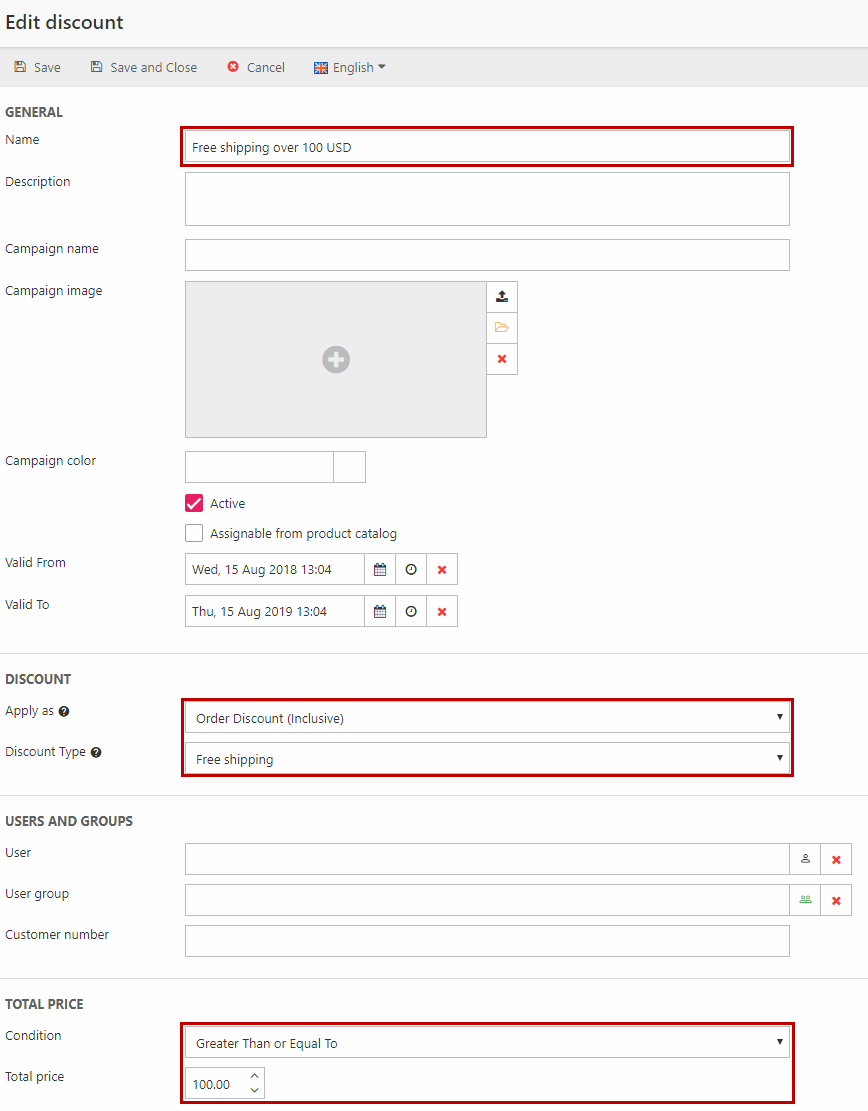
- Click New order discount in the toolbar to open the Edit discount view (Figure 3.2)
- Name the discount ‘Free shipping’ or equivalent
- Set Apply as to Order discount (inclusive) – this means that the discount will be applied AFTER other discounts have been applied
- Select Free shipping as the discount type
- Under Total Price set the condition to Greater than or equal to and the total price to 100 – this is in your default currency, in this case USD.
- Save
Go to frontend and verify that the discount is applied for orders over 100 USD.
Then create another discount – but this time make it a 5% discount for orders over 500 USD.
Variant Groups & the Variant Matrix
Variants enable you to differentiate products which are essentially the same, but vary in color, size, etc.
Working with variants is straight forward:
- Create a variant group, e.g. color or size, and create values for it, e.g. red, green & blue and small, medium & large
- Attach a variant group to a product – and manually specify the combinations you want to make available
There are two kinds of variants – simple variants and extended variants. Simple variants only differ from each other in regards to the variant group values, whereas extended variants allow for differentiated field content (e.g. price and stock, etc.) – this means that extended variants have their own database entries.
Let’s try it out!
Creating a variant group
Variant groups are a kind of category – like Size or Color – to which you add variant values, such as Green, Red and Blue.
Create a variant group:
- Go to Settings > Ecommerce > Product Catalog > Variants
- Click New variant group in the toolbar to open the Edit variant group view (Figure 5.1)
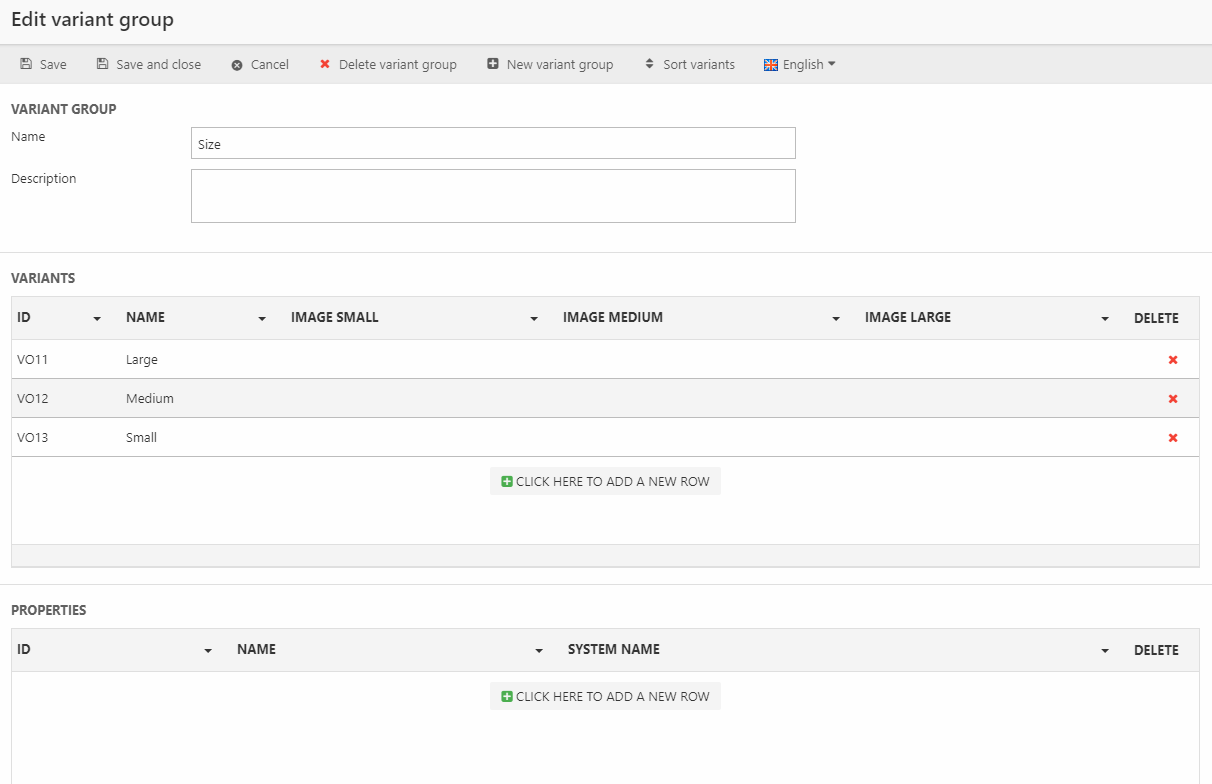
Now create a variant which makes sense in relation to your shop theme – (or pick Size if you can’t think of anything):
- Name the variant group
- Add appropriate variants to it
- Save
For a Size variant group, the variants could be Small, Medium and Large. Note how you can add images to the variant options – you will have access to this media in frontend when rendering variants. You can also create custom fields for variant options, but that’s outside the scope of this tutorial.
Creating simple variants
With a variant group and variant options created you can create simple variants:
- Open one of your products
- Click the Variants button in the ribbon bar to open the variant view
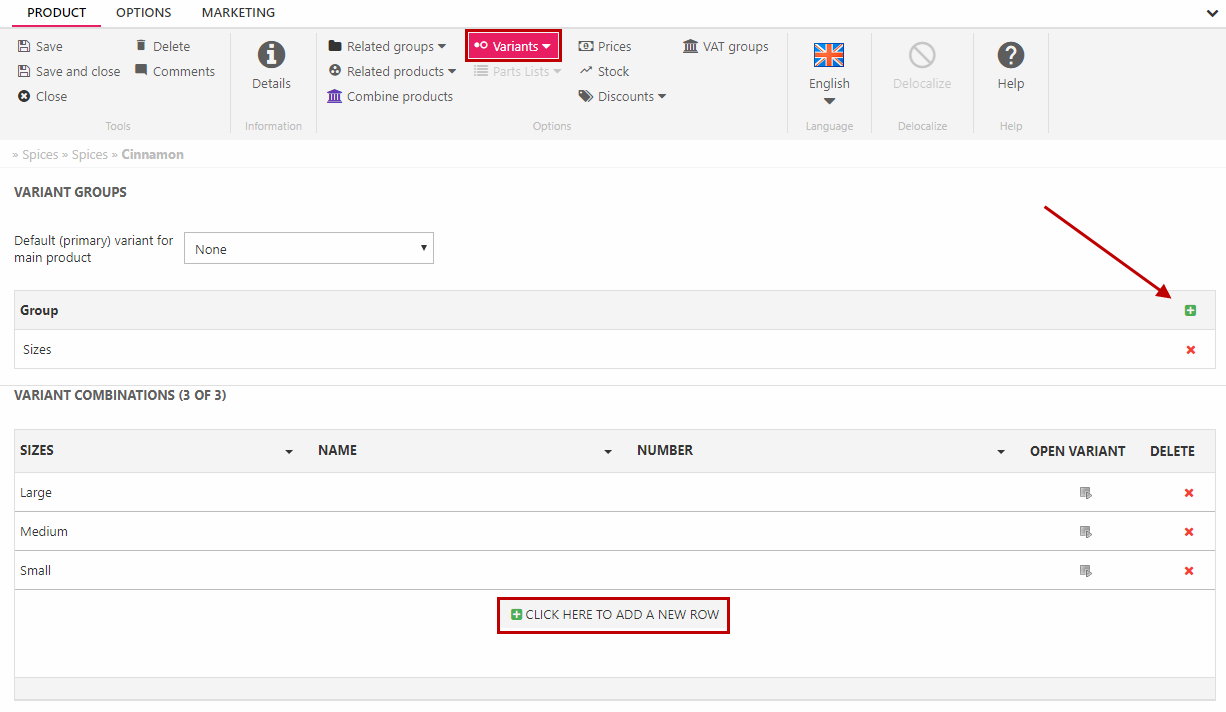
- Click the green plus icon and add the new variant group to the product (in this case Size) (Figure 6.1)
- Click the Click here to add a new row button and select All in dialog dropdown
- Save
The variant matrix for the product should now look similar to Figure 6.1 – you can add more variant groups to the matrix or add more variant options (using the Click here to add a new row button) if you want to, but leave it be for now.
Variants may be rendered in frontend using the VariantCombinations loop:
- Edit your product details and product list templates to show all variant combinations for a product
- Render the stock level and a price for each variant – they will be identical for now, but we need them later
- Create an Add to cart button for each variant – you need to supply a cartcmd, a product ID and a variant ID to the request
Creating extended variants
So simple variants are pretty cool, but what if you only have three size XL shirts in stock, but several hundred Size M shirts? What if each color variant needs its own snazzy description?
In that case, you need to use extended variants – which is variants where product field values may differ from the values on the main product.
Create an extended variant:
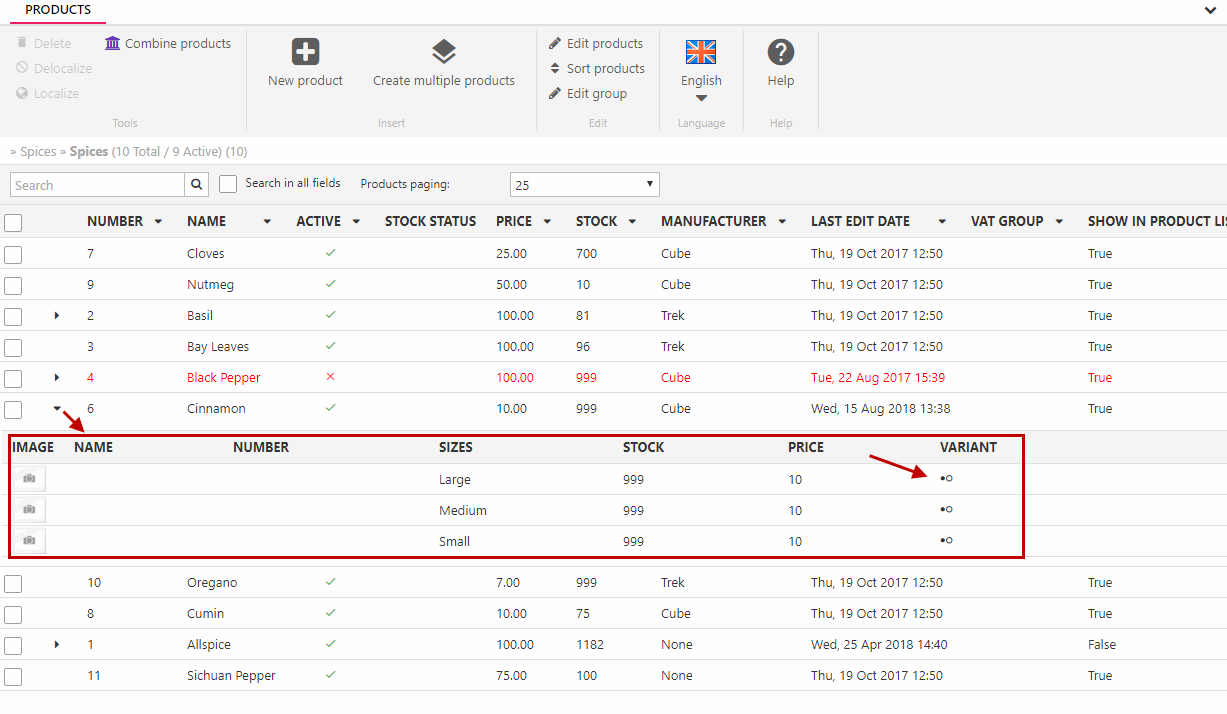
- Go to Ecommerce > Product Catalog > YourShop and select the product group where your product with simple variants exists
- Click the black arrow in the product list to fold out the list of simple variants (Figure 7.1)
- Click the icon to the far right of the list to open the variant details
- Edit the stock level for the variant
- Save
As you can see, the variant details are identical to a regular product details view – except some fields are locked. To lock or unlock fields, go to Settings > Ecommerce > Advanced configuration > Fields and tick them off in the Across all variants column.
Go to frontend and verify that you can see the stock level for each variant.
Differentiated prices for variants are best handled using the Price Matrix – try using the price matrix to create differentiated prices for each variant.
What you’ve learned
In this tutorial you’ve learned how to:
- Create dynamic prices with the price matrix
- Create discounts with the discount matrix
- Create variants groups
- Create variants – both simple and extended – and rendering them in frontend
Additionally, this tutorial concludes the course T2: Implementing Ecommerce & Marketing.
During the course you’ve learned how to:
- Create a shop, product groups and products – and a language and currency
- Create a shopping cart and modifying the checkout flow
- Create a product index and implementing free-text search in the product catalog
- Create a payment method, a shipping method and setting up VAT rate
- Create dynamic prices
- Create discounts
- Create simple and extended variants