
Checkout
Swift ships with a checkout design which guides the customers through their purchase - it consists of the following:
- A Cart page with a shopping cart app - this page is used to show the cart contents to the customer when the cart-icon is clicked
- A Checkout anonymous page which handles the actual checkout procedure for anonymous users
- A Checkout user page which handles the actual checkout procedure for registered users
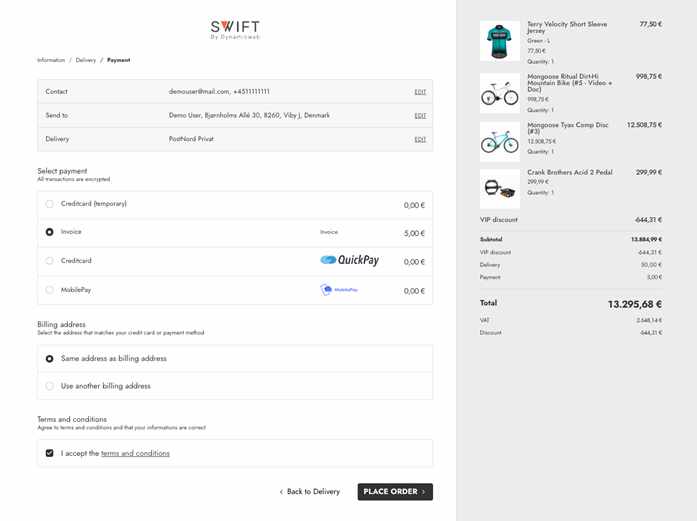
A summary of the cart is always presented, to show the customers what they are purchasing (Figure 1.1).
When you work with Swift you therefore have three options for setting up the checkout:
- You can use the existing set up – in which case you don’t have to do anything
- You can use the page presets as a starting point
- You can do a manual setup from scratch
Using checkout page presets
If you want to slightly modify the checkout design you can use our page presets as a starting point (Figure 2.1).
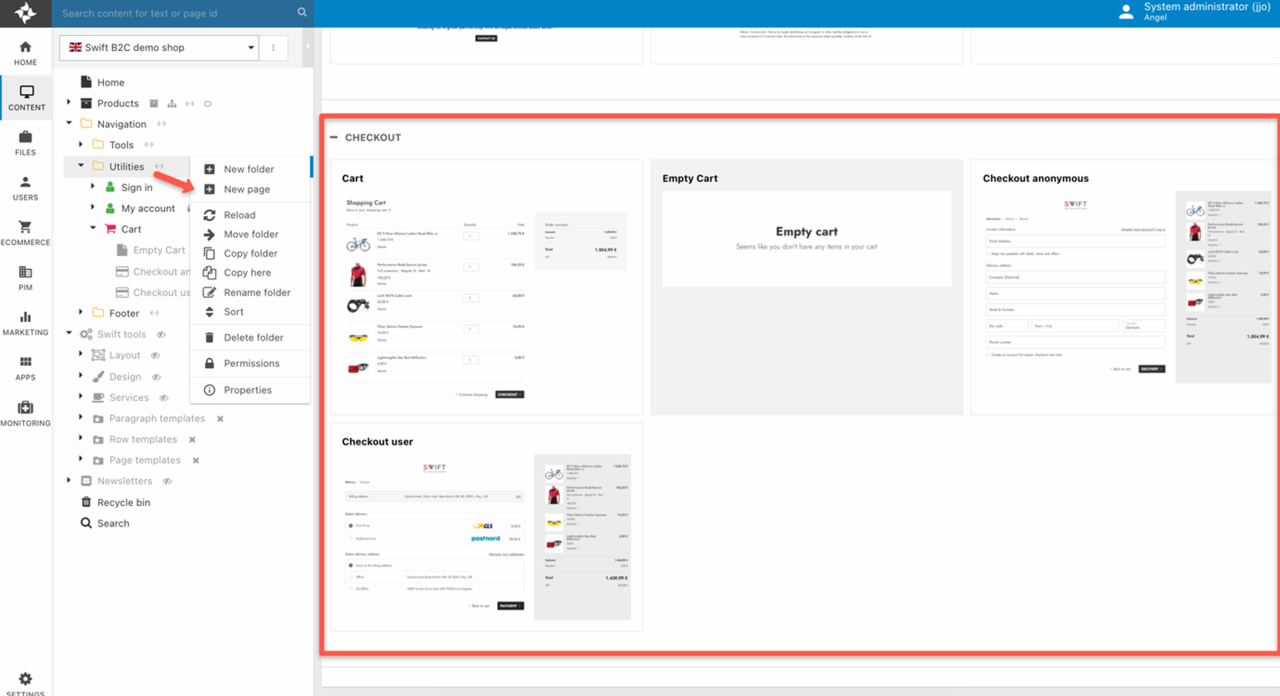
To create a checkout using the page presets:
- Go to Navigation > Utilities and create a new Cart page
- Under the Checkout section select the Cart page preset – this preset contains a preconfigured shopping cart app amongst other things
- Under the new cart page create the following subpages – there’s a preset for each of them:
- Empty cart
- Checkout anonymous
- Checkout user
You can then modify the new checkout as you please without overwriting the standard design – making it easy to roll back any changes.
Manual setup
If you want to set up the cart and checkout manually without using the page presets you can follow this guide:
- Go to Navigation/Utilities add new page and call it Cart
- The Cart page should have these subpages:
- Empty cart
- Checkout anonymous
- Checkout user
- The Cart page consist of a shopping cart app that uses the Bikes shop and has 2 steps.
- A Cart-step using the eCom7/CartV2/Cart.cshtml template
- A Checkout-step
- Under the Field Validation section you can add field validation as appropriate – typically for billing & shipping address fields
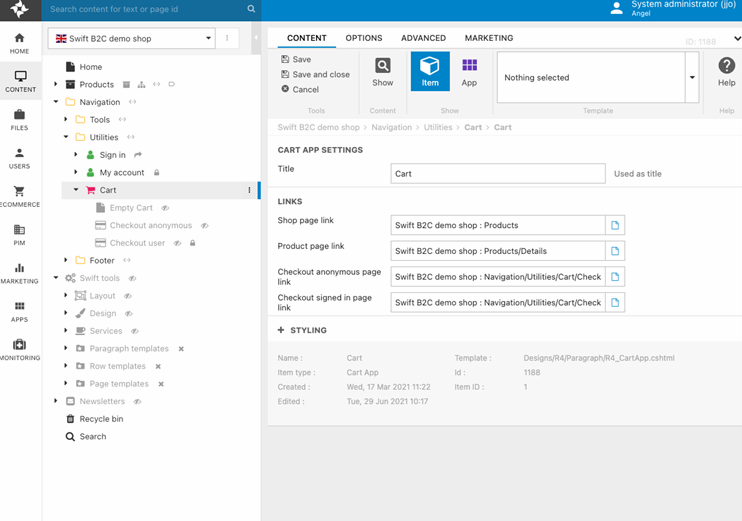
- On the Cart-app paragraph open the item-settings and add the appropriate links (Figure 3.1):
- Shop page link: Products
- Product page link : Products /details
- Checkout anonymous page: Navigation/Utilities/Checkout anonymous
- Checkout user: Navigation/Utilities/Checkout user
Next you must manually create content for the subpages – see below.
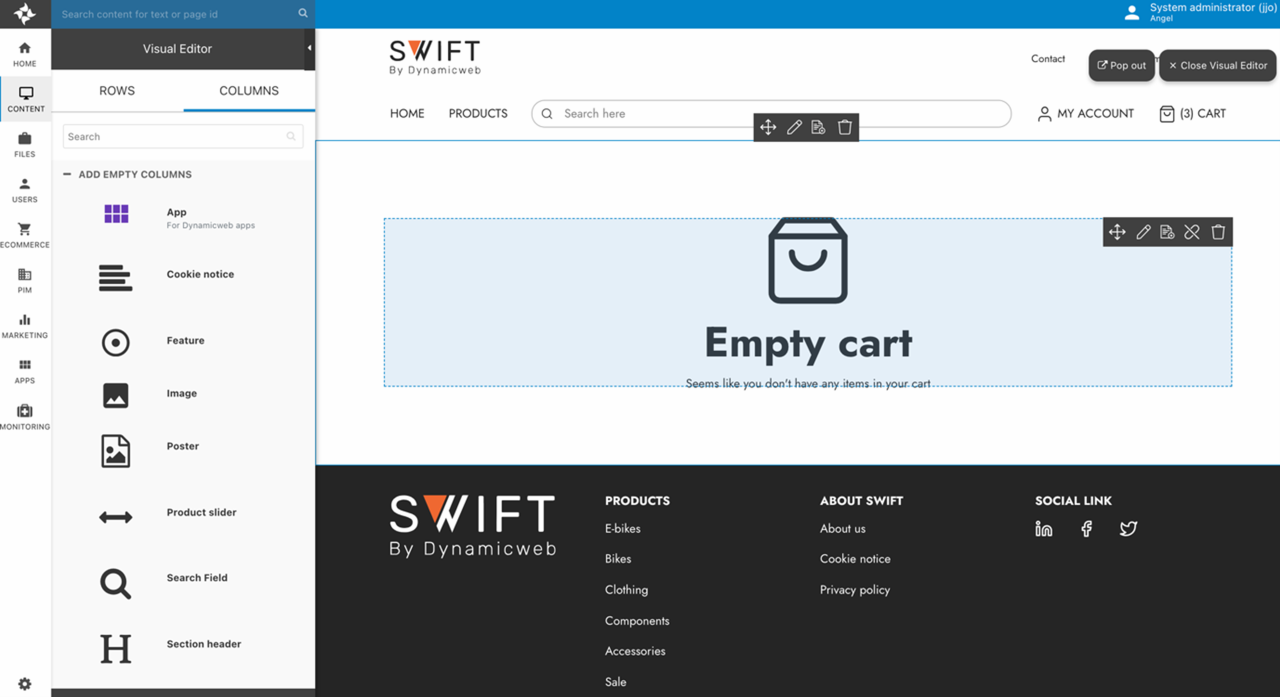
Empty Cart page
The subpage Empty cart is a regular content page – you can use the visual editor to create whichever content you want, here a Feature-column with an icon and a text (Figure 4.1).
Checkout anonymous page
The checkout anonymous-page uses a shopping cart to check out anonymous users – here’s how to do a full manual setup:
- Open the page and set it to Hide in menu
- Add a Shopping Cart app to the page and create the following steps:
- Information – for reference, the standard setup uses the eCom7/CartV2/InformationAnonymous_v2.cshtml template.
- Delivery – for reference, the standard setup uses the eCom7/CartV2/DeliveryAnonymous_v2.cshtml template.
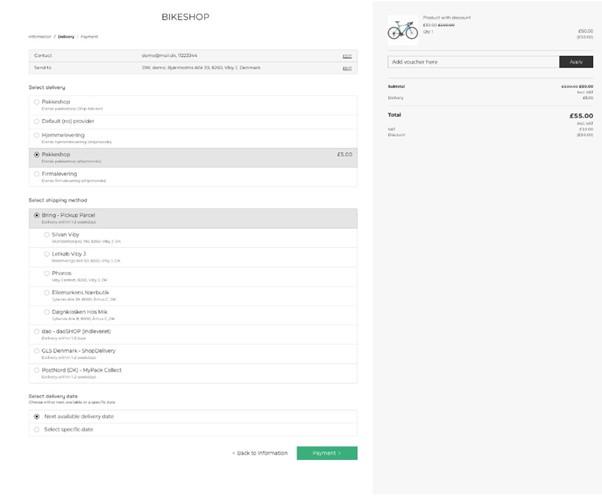
- Using the _v2 opens for e.g. Shipmondo parcelshop delivery (See image below). We've already documentet shipping methods and more specifically the setup of Shipmondo.
- Payment – for reference, the standard setup uses the eCom7/CartV2/PaymentAnonymous_v2.cshtml template.
- Checkout – remember to call it Checkout
- Receipt – for reference, the standard setup uses the eCom7/CartV2/Receipt.cshtml template.
- Under the Field Validation section you can add field validation as appropriate – typically for billing & shipping address fields
- Open the paragraph item settings of the paragraph with the shopping cart app and fill in the following:
- Logo and logo link
- Product page link
- Cart page link
- Sign-in page
- Checkout user page link
- Terms and Conditions page link
Checkout user page
Like the checkout anonymous-page, the checkout users-page uses a shopping cart to check out logged-in users – the setup is almost identical, but there are key differences:
- Open the page and set it ti Hide in menu and setup permissions so it can only be accessed by logged-in users
- Add a Shopping Cart app to the page and create the following steps:
- Information – for reference, the standard setup uses the eCom7/CartV2/InformationUser_v2.cshtml template.
- Delivery – for reference, the standard setup uses the eCom7/CartV2/DeliveryUser_v2.cshtml template.
- Using the _v2 opens for e.g. Shipmondo parcelshop delivery (See image below). We've already documentet shipping methods and more specifically the setup of Shipmondo.
- Payment – for reference, the standard setup uses the eCom7/CartV2/PaymentUsers.cshtml template.
- Checkout – remember to call it Checkout
- Receipt – for reference, the standard setup uses the eCom7/CartV2/Receipt.cshtml template.
- Under the Field Validation section you can add field validation as appropriate – typically for billing & shipping address fields
- Open the paragraph item settings of the paragraph with the shopping cart app and fill in the following:
- Logo and logo link
- Product page link
- Cart page link
- User address page link
- User account page link
- Terms and Conditions page link
Customizing checkout
The checkout app consists of several features that can be enabled or disabled. Some of the are configured simply by checking or unchecking a checkbox, while others might need some explanation. Also please remember that changes should be done on both checkout apps (mobile and desktop).
We have documented the most important features below:
Enable Delivery Date in field checkout
Delivery dates allows the customer to choose specific dates for delivery instead of the next available date, this is often relevant in a B2B scenario. In Swift, this feature is available in the checkout process. You can create different settings for anonymous users and signed in users.
The settings are available either by clicking the app column on the checkout page or through the column editor in the Visual Editor. Swift has two different pages depending on if the customer is signed in or not this means that you will have to be specific about the situation you want to design for when configuring the delivery date.
- In the Item settings/Column editor of the checkout app tick the Enable Delivery Date field in checkout checkbox
This will open a new section called Disabled Delivery Dates. Here, you can choose specific days of the week that are not available for delivery (e.g., weekends). You can also create longer periods of disabled dates (e.g., holidays).
If the customer has chosen a specific delivery date, it will be shown on their receipt.
Terms and Conditions
Accepting terms and conditions are often a fundamental part of purchasing online. However, in some scenarios you might want to disable the need for confirmation. Swift is constructed with two checkout pages, one for anonymous users and one for signed in users. This means that you will have to change the settings on both pages if you want all your customers to be affected by the changes.
This documentation will explain how to disable the terms and conditions feature, should you want to enable it, you will of course have to do the steps opposite.
If you want to disable the field of terms and conditions in the checkout process, you will need to:
- In Content, locate and click on your checkout page (either for anonymous users or signed in users).
- Click the checkout app
- In the Links section, clear the Terms and Conditions Page Link field
- Enter the App part of the column
- In the Field Validation section untick the Customer acceptance checkbox
- Hit Save and Close
Hide edit billing addresses and/or manage your addresses link
During checkout a signed in customer is presented with links for both editing the billing address and manage their addresses. Should you want to hide one or both links the configuration of the two settings happens on the checkout app on the user checkout page.
- In Content, locate and click on the checkout page for signed in users
- Click on the Checkout app
- Check one or both boxes for hiding edit billing addresses and/or manage your addresses link
- Hit Save and Close
Removing account creation/login during checkout
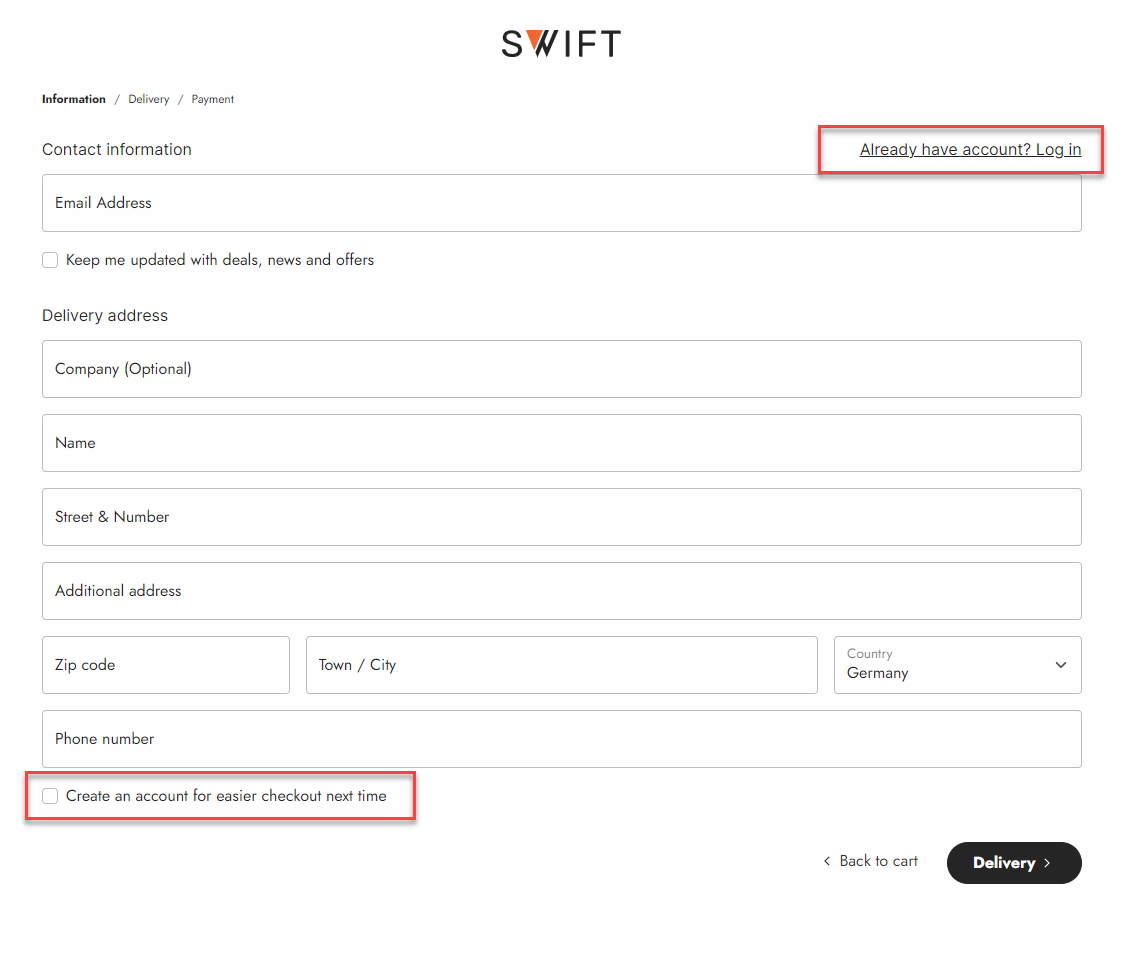
When users are anonymous, the checkout fase will have different options for creating a user or logging in based on the data provided by the user (Figure 11.1). Should you not want this, if for example your Swift solution doesn't have a user setup, this can be removed.
As the user has both an option for creation and an option for logging in, we will split this guide in two.
- Already have an account? Log in
- Locate the checkout page you want to change, this is properly the anonymous checkout page. In the default Swift solution, this is located at:
Navigation/Utilities/Cart/Checkout anonymous - Enter the settings of the checkout app
- At the bottom in the Links section locate the "Sign in page link" field
- Clearing this field will remove the "Already have an account? Log in" link at the top of the checkout
- Locate the checkout page you want to change, this is properly the anonymous checkout page. In the default Swift solution, this is located at:
- Create an account for easier checkout next time
- Locate the checkout page you want to change, this is properly the anonymous checkout page. In the default Swift solution, this is located at:
Navigation/Utilities/Cart/Checkout anonymous - Enter the settings of the Cart app item type.
- Enter the app part of the settings by clicking "App" in the top menu
- In the User management section, if the "Create user in checkout" checkbox is unchecked the "Create an account for easier checkout next time" checkbox will remove the checkbox from front end
- Locate the checkout page you want to change, this is properly the anonymous checkout page. In the default Swift solution, this is located at: