
Upgrading Rapido
There are two types of Rapido releases – majors and minors:
- A major release is from Rapido i.e 2.* to 3.*. May contain breaking changes.
- A minor release is from i.e. 2.0.1 to 2.1.
Upgrading from one major to another is a handheld process, and we cannot guarantee a simple and problem-free experience. Upgrading from one minor to another is a straight-forward and low-risk procedure, as described below.
Upgrades must always be applied to a test environment before a live solution is upgraded.
Since Rapido is FREE to use, please find below some limitations:
If an upgrade fails, Dynamicweb cannot be held responsible - and is not responsible for investigating why the upgrade fails, as this can be a result of custom implementation. We will however, accept bug reports and change Rapido implementation in such a way that minor updates can be conducted if the error is in Rapido solution and is not coming from any kind of customisation.
New versions of Rapido can contain new content (Pages, feeds, products, settings etc.) that will not be part of an update, minor or major, and these have to be added manually upon upgrades. This is done by looking at a new standard Rapido and make the same configuration on the solution being upgraded. If you want to include select features from a major release in an older project, it is often possible to manually merge the feature to an older project.
Updates are a manual process conducted by the partner. Dynamicweb does not cover the costs of upgrading.
Upgrading From 3.3/3.4 to 3.4.3
Follow this upgrade guide
- Backup your solution
- Export the website settings on the existing solution
- Download the Rapido upgrade zip package
- Unzip upgrade file
- Copy the Files folder from the upgrade zip and overwrite the existing Files folder on your solution
- IIS recycle
- Import your old website settings - the ones you exported during step 2
- Save and close
- In Settings/Itemtypes click Update in the ribbon bar
Upgrading From 3.2.X to 3.3
Info
When upgrading your Rapido 3.2 solution to a Rapido 3.3 your old content pages and paragraphs will not magically be using on the new column/row grid system for Visual editor. Your content will still be presented and up and running. But you will get a mix of new/old pages and paragraphs types. Also, read the release notes here
However, it is possible to change all your old pages to the new content model if needed, but this is a manual process. You can also leave the old pages as they are and only create the new content pages with the new visual editor.
Follow this upgrade guide
- Backup your solution
- Export the website settings on the existing solution
- Download the Rapido upgrade zip package
- Unzip upgrade file
- Copy the Files folder from the upgrade zip and overwrite the existing Files folder on your solution
- IIS recycle
- Import your old website settings - the ones you exported during step 2
- Save and close
- In Settings/Itemtypes click Update in the ribbon bar
- In Settings/Web and HTTP/Security. Enable checkbox “Activate antispam functionality”
- In Settings/Ecommerce/Advanced configuration/Shopping cart. Enable checkbox “Do not delete carts with 0 orderlines “. (If you want to use Order draft functionality)
Convert Old pages in Rapido 3.2 to Rapido 3.3 manually to support Visual editor
(The Rapido 3.3 full packages consist only of the new pages and paragraphs types, which is supported by the visual editor, set up from scratch. On this packages you can see how we have set the pages up with the new content page)
Optional: If you decide to convert all your old pages to the new content pages manually to support visual editor please follow this To-do-list. Be aware that this will be a time consuming process.
Convert these pages
- Content pages e.g. landing page, about page, contact
- Log in/log out/Create account pages
- Customer center pages e.g.
- Dashboard, My profile, My addresses, My orders, My favorites, My Quotes etc.
- Cart/empty cart page
- These pages do not support the new content pages:
- Dynamic articles, Newsletter emails, Printable papers, Content in the Feeds folder
Example: Setting up e.g. the Sign in page
- Create page select Content page (supported by visual editor)
- Click visual editor on the ribbon bar, this will redirect you to the visual editor mode
- On the Panel on the left. Click on the Row tab, find section Empty rows.
- Select either a Full row or 1-2-1 split row and drag it to the area.
- Set height to auto.
- On the panel select Column tab, go to section empty columns
- Select the App column item type and drag it to the empty row you just applied earlier
- A modal will appear
- click on App in the ribbon bar select Extranet App and fill in the usual information and selected template needed for the Sign in page
Now repeat the same process for the rest of the pages that needs to be converted. If you need more general introduction to the Visual editor please read it here.
Are you still using the old News -, Blog-, Events- list?
Go to Website settings on ribbon bar select Layout tab, select Item page layouts. Insert Page.cshtml for the list that is needed e.g. on Event list
Hide old Page and paragraph options & check restrictions
After converting all the pages to the new content page. There are some settings and permission to setup that can be a benefit, in order not to confuse the end user by displaying both old and new page and paragraphs.
- In Settings/Editing/Interface settings enable checkboxes
- “Disable Remove standard paragraphs”.
- “Disable standard page”.
- Go to website setting on ribbon bar select tab Layout select Rapido: ContentPage.cshtml
- Go to website settings on ribbon bar select tab Website and Item type: Now select Content page properties on Page settings
- Important!: You need to go through all your new pages and “save & close” you Page properties to get rid of the template error
- In Settings/Itemtype/Content folder/Content page select restrictions on the ribbon bar ensure that these checkboxes are enabled.
- Allow in websites – “All”
- Allowed parents – “Allow in root of website” & “Allow under a regular page”
- Allowed children – “App”, “Breadcrumb”, “Buttons” “Card paragraphs”, “Carousel”, “Content page”, “Cover row”, “Image” , “Navigation”, “Quote”, “Search paragraphs”, “Seperation line”, “Simple map”, “Standard paragraph one”, “Standard paragraph three” , “Standard paragraph two”, “Video”.
Upgrading to a new minor
To upgrade from one minor to another minor within the same major:
- Keep in mind that if you have made custom changes to the standard Rapido files then be they may be overwritten, so make sure to follow these bullets
- If you have changed the standard website settings, be sure to export the website settings on your existing solution, so that you can import them again later
- Backup your /Files folder and the solution database
- These include your GlobalSettings.aspx file in which you've entered your database information when you first installed Rapido - this will be used later
- In /System/Items/WebsiteSettings/ you can find your exported website settings
- Download the new Rapido release (Use the 'Upgrade file' Rapido version)
- Extract the /Files folder from the new release on top of the old /Files folder (this should merge the two folders, but if not, you have a backup of e.g. the /Images folder)
- These files are removed from the 'Upgrade file' Rapido version, so it should not overwrite your custom changes. However if it does, then copy them over from your backup:
- Copy the CSS/Ignite files and custom.js from the backup to the updated /Files folder
- Copy the repositories from the backup to the updated /Files/System/Repositiories folder
- Do not update the database! Open the new /Files folder and locate the new GlobalSettings.aspx. Using the old file, re-enter the the Database information and recycle the application pool
- Now go to your solution frontend and go through the Rapido website settings and ensure that any new setting are properly configured and selected - Very important!
- In backend go to Settings/Itemtypes and click 'Refresh' in the ribbonbar
- Delete browser cache
- Go through the solution and verify that everything is fine:
- Content pages
- Product lists
- Product page
- Customer Center
- Etc.
- Only on Rapido 2.0 to Rapido 2.1 version
- If you are using PageNoEcom Template on your existing solution then change it to Rapido Page.cshtml template.
- Go to website settings/Layout and select Page.cshtml template (imp. when upgrading to Rapido 2.1)
- Check that the file Placerholder.gif is in the folder Files/Images (imp. when upgrading to Rapido 2.1)
- Copy the folders Payment and SocialIcons and place it as a subfolder under Files/Images (imp. when upgrading to Rapido Beta to Rapido 2.1)
Please be aware, that any changes to Rapido code outside of the Ignite.css and custom.js files means you cannot upgrade in the manner described above. Instead, you can often manually merge features from the new release to the solution.
Be sure that you select all the options in website settings or import our default JSON website settings.
Merging features manually
If you want to include features from a new major release, or if you have made customizations to the Rapido code outside of the ignite.css and custom.js files, you cannot upgrade in the manner outlined above.
However, it will often be possible to manually merge the feature. This is a frontend-developer task, and requires code knowledge:
- Backup your /Files folder
- Locate the code related to feature you want to merge in the Rapido template set
- Copy it
- Check if the feature is dependent on JavaScript – this is the case if an element has a class with the ’js-’ prefix. Copy the corresponding JavaScript.
- Check if the feature uses any new CSS – this can easily be checked by simply having a look, or searching for class names. Copy the corresponding .less code
This is the recommended approach – if it fails, don’t hesitate to contact us on the forum.
Upgrading From 3.1.X to 3.2
Upgrading from Rapido 3.1.X to 3.2 has some extra
- Backup your solution
- Export the website settings on the existing solution
- Download the Rapido upgrade zip package
- Unzip upgrade file
- Copy the Files folder from the upgrade zip and overwrite the existing Files folder on your solution
- IIS recycle
- Import your old website settings - the ones you exported during step 2
- Save and close
Required on Rapido 3.2
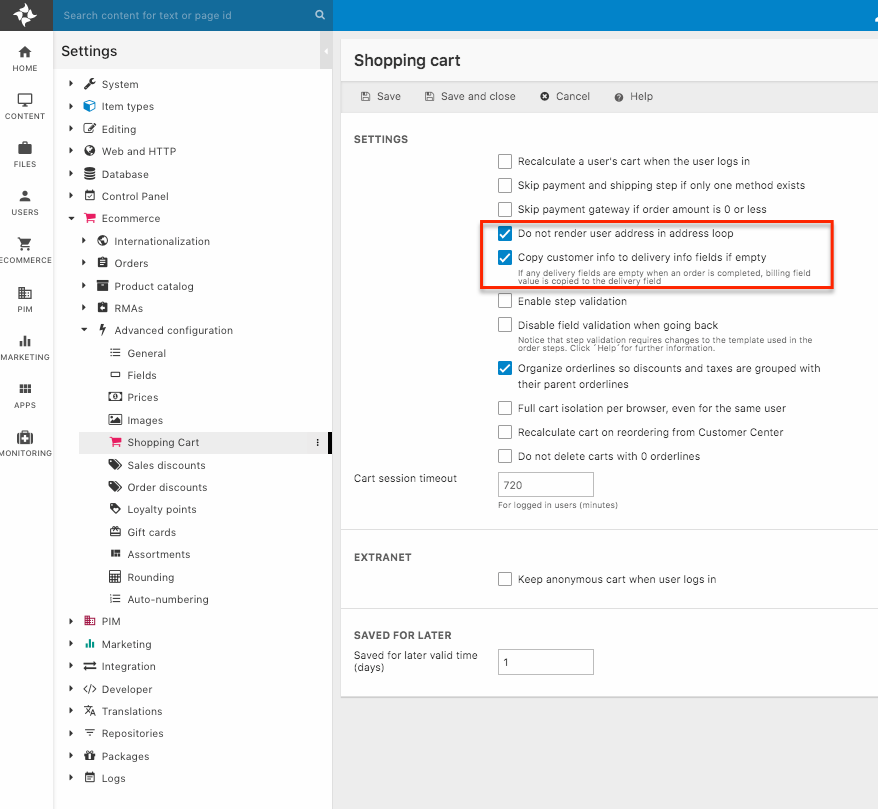
- Set the settings in Settings/Ecommerce/advanced configuration/shopping cart enable Do not render user address loop & enable Copy customer info to delivery fields if empty
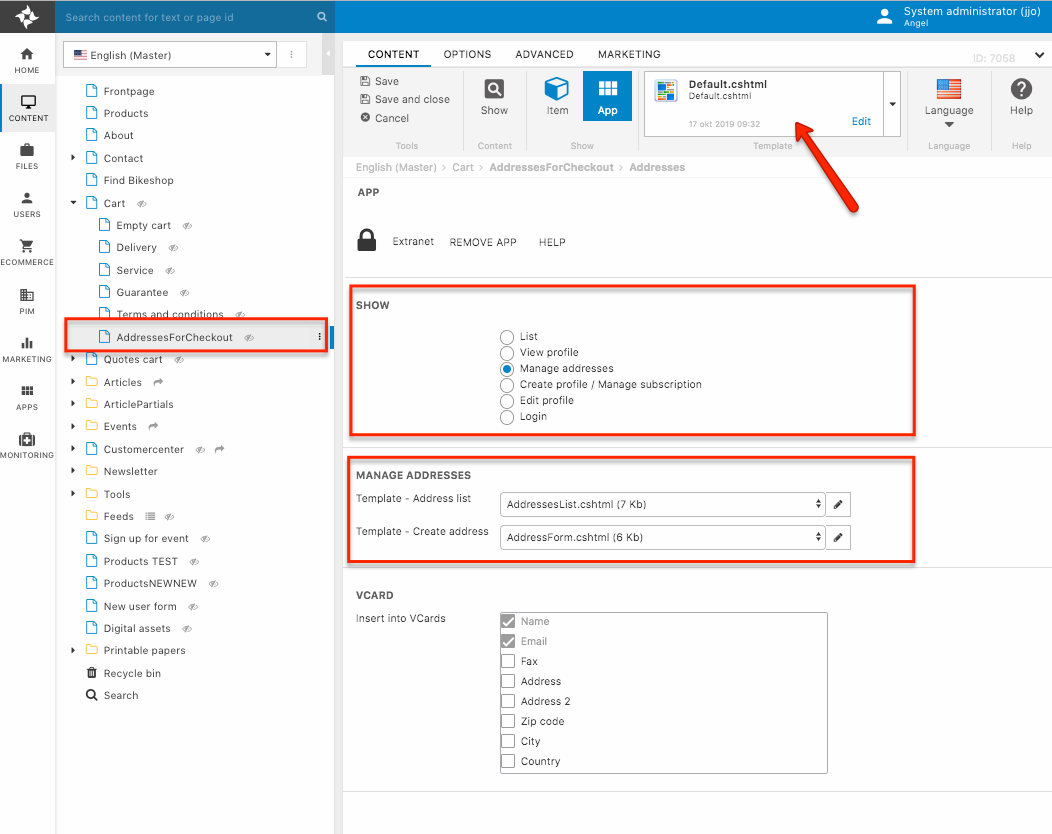
- Create a subpage under cart called AddressForCheckout
- Create a paragraph and select the extranet
- In Section SHOW Select toggle Manage addresses
- Select template AddressesList.cshtml
- Select template AddressForm.cshtml
- On the ribbon bar use the template Default.cshtml
- On the page AddressesForCheckout go to Properties in the ribbonbar
- Select the Option tab and click on Navigation in the ribbon bar , insert Navigation tag AddressesForCheckout
- Select the Layout tab And select the Rapido:clean template
- Create a paragraph and select the extranet
- Go to website settings /Ecommerce tab/Checkout and enable toggle e.g. Static addresses
- Empty cache
Page Setup for AddressesForCheckout
Upgrading From 3.0.X to 3.1
Upgrading from Rapido 3.0.X to 3.X is a handheld process because 3.X uses the color swatch item type instead of the color field item type.
- Backup your solution
- Export the website settings on the existing solution
- Download the Rapido upgrade zip package
- Unzip upgrade file
- Copy the Files folder from the upgrade zip and overwrite the existing Files folder on your solution (Needs to be a 3.0/3.0.X)
- IIS recycle
- Import your old website settings - the ones you exported during step 2
- Save and close
- Go to website settings and find the pencil icon besides the color swatches
- Set brand colors in new brand color swatch by editing Brand color 1,2,3,4,5 and set your brand colors. You can take the hex codes from the rounded custom color swatch button and insert when you edit each brand color (Figure 7.1)
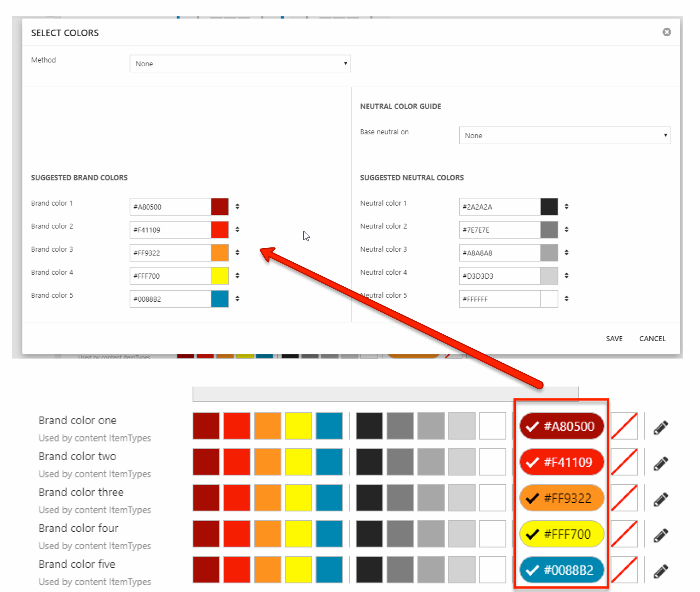
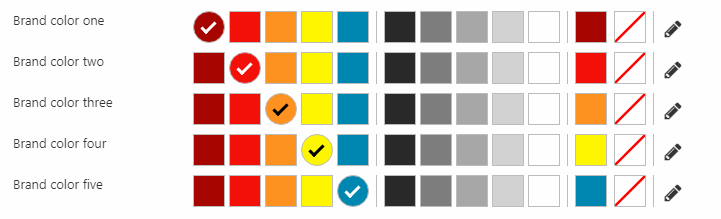
- Select the new color swatches for brand color one-five (Figure 7.2)
- (Go through your entire website settings)
- Save and close website settings
- Empty your cache and IIS recyle
And that’s all folks :)
Upgrading From 2.X to 3.0
Upgrading from Rapido 2.X to 3.0 is a handheld process since we move from one long page of website settings to website settings in tabs, and we cannot guarantee a simple and problem-free experience.
That said, if you have made no changes to the standard Rapido templates the process is as follows:
- First, backup or screenshot the existing website settings
- Download the new Rapido 3 Files folder and extract it
- Backup the existing Files folder
- Overwrite the old Files folder with the new Files folder
- Copy the <Database> section from the old GlobalSettings.aspx file to the new one – you may have to recycle the application pool afterwards
You now have the new templates & item types installed – next they must be applied:
- Login to the backend
- Open the Website settings for the English (Master) website
- In the toolbar click Item types
- Select the new Website settings tabs as the website properties item
- Save the website settings
This applies the updated, tabbed website settings to the solution.You can now manually transfer settings from the old setup to the new setup - or use the converter tool as decribed below.
If you simply want to load the new default layout:
- Click Import settings
- Select the ENG-BIKES-Websitesettings.json file and click LOAD
- Save the website settings
If your settings still does not appear on frontend check your less.config files
- Go to Files/Template
- Open e.g. Less_1.config
- Ensure that this line is place below OutputPath
<UseCleanVariableNaming>true</UseCleanVariableNaming> - Go to your website settings and save your settings again
And that’s all folks :)
Convert Rapido 2.x settings to Rapido 3.x settings
Since the format for website settings changed between Rapido 2.x and 3.x, with Rapido 3.x employing the item tab item type, a simple export and import between versions is not possible.
To solve this issue, we have developed a small tool for converting Rapido 2.x settings to the Rapido 3.x format.
Here's how to use it:
- Download the Rapido Settings Converter
- Create a folder on your Desktop call it Mapping
- Insert the RapidoSettingsConverter.exe that you have downloaded in the Mapping folder
- Go to your Rapido 21 solution and export the website settings call it e.g. Mysite2-1
- Find your json file under File/System/Items/Websitesettings, copy Mysite2-1.json
- Insert the Mysite2-1.json file in the Mapping folder
- Open your command line
- Write cd Desktop in the command line
- Write cd Mapping in the command line
- Write RapidoSettingsConverter.exe to run it
- Write Mysite2-1.json to select the file you need to convert to fit a Rapido 3.0 website settings
- Now in the Mapping folder you get a file called Mysite2-1.json(Rapido30).json
- Insert the new json fil in your solution under File/System/Items/Websitesettings
- Go to website settings and import Mysite2-1.json(Rapido30).json and click save